Growing your own buckwheat can be a game-changer for any gardener looking to attract bees and other pollinators to their garden. As concerns about bee populations continue to rise, it’s more important than ever to create a welcoming environment that encourages these vital visitors to stay and thrive. Buckwheat is an excellent choice for bee-friendly gardens, as its flowers provide a rich source of nectar and pollen for bees to feed on. But growing buckwheat successfully requires some know-how – that’s where this article comes in! In the following pages, we’ll take you through the ins and outs of choosing the right variety, preparing your soil, and creating an environment that will draw bees in by the dozen. Whether you’re a seasoned gardener or just starting out, our expert tips will show you how to grow buckwheat like a pro and attract a buzzing crowd of bees to your garden.
Benefits of Incorporating Buckwheat into Your Garden
Adding buckwheat to your garden comes with a host of benefits, from its ability to attract beneficial pollinators to its drought-resistant qualities. Let’s explore these advantages in more detail.
Attracting Pollinators: The Importance of Buckwheat for Bees
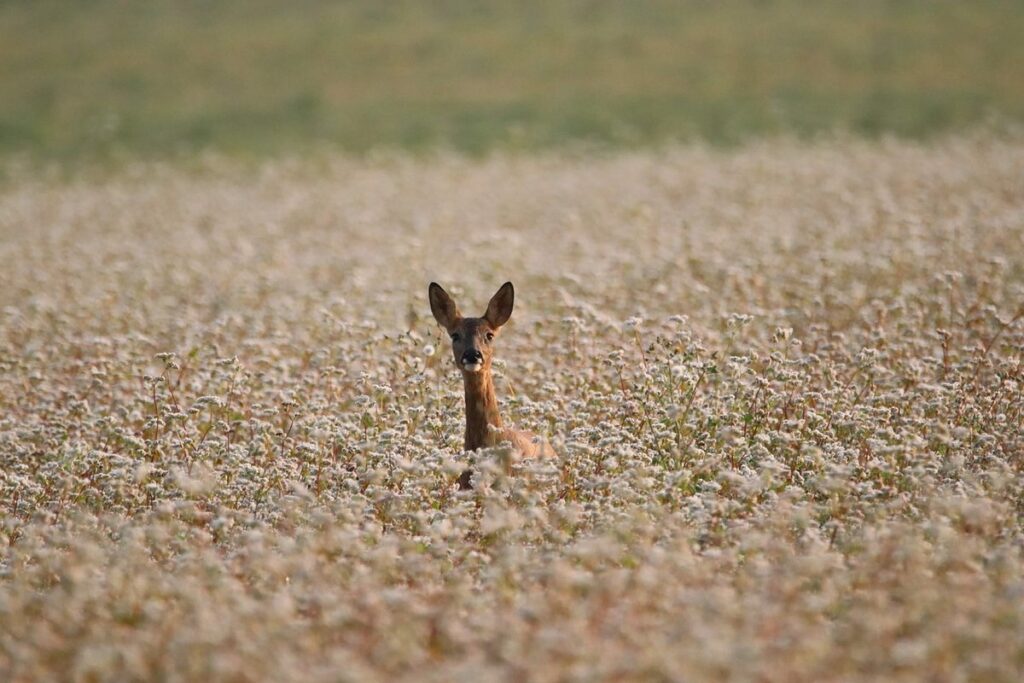
Buckwheat is a game-changer for bee-friendly gardens. Not only is it an attractive crop to grow, but its high nectar and pollen content makes it an absolute haven for pollinators like bees. In fact, buckwheat is one of the top three crops in terms of nectar production, surpassing even sunflowers.
Bees are drawn to the fragrant flowers of buckwheat, which provide a rich source of energy and nutrients. The pollen content of buckwheat is particularly high, making it an excellent choice for bees looking to stock up on protein-rich food. By incorporating buckwheat into your garden, you’ll be providing a vital source of nutrition for local bee populations.
To get the most out of your buckwheat crop from a pollinator perspective, plant it in late spring or early summer when nectar flows are typically low. This will give bees an extra boost during a critical time. Additionally, consider planting buckwheat in blocks rather than individual rows to maximize nectar and pollen availability. By doing so, you’ll create a bee-friendly paradise that’s sure to attract these vital pollinators.
Supporting Local Ecosystems with Buckwheat
When you incorporate buckwheat into your garden, you’re not just growing a versatile crop – you’re also supporting local ecosystems and promoting biodiversity. Buckwheat is a natural haven for bees, butterflies, and other pollinators, providing them with the nectar and pollen they need to thrive.
By planting buckwheat in your garden, you’ll be creating a vital source of food for these beneficial insects, which are essential for maintaining healthy ecosystems. In fact, studies have shown that buckwheat is one of the top three bee-friendly plants, alongside sunflowers and lavender. As an added bonus, buckwheat’s short growing season means it won’t compete with other crops for resources.
To maximize the benefits of buckwheat in your garden, try planting it as a cover crop to provide shelter and food for beneficial insects during the off-season. You can also use buckwheat as a companion plant to support nearby vegetables and herbs, improving their growth and health.
By supporting local ecosystems with buckwheat, you’ll be contributing to a more resilient and biodiverse environment – one that’s teeming with life and full of beauty.
Choosing the Right Variety for Your Garden
When it comes to growing buckwheat, selecting the right variety is crucial for a thriving bee-friendly garden. With so many options available, let’s explore some key factors to consider in this choice.
Selecting Buckwheat Varieties Suitable for Your Climate
When selecting buckwheat varieties for your bee-friendly garden, it’s essential to consider several factors that will impact their growth and yield. Climate is a crucial factor to consider, as different regions have unique temperature and precipitation patterns that can affect the plant’s performance. For example, some buckwheat varieties are more tolerant of heat and drought than others, making them suitable for warmer climates.
Soil type is also a critical consideration. Buckwheat prefers well-draining soil with a pH between 5.8 and 7.0. If your soil is heavy clay or sandy, you may need to amend it before planting buckwheat. Moisture levels are another factor to consider, as buckwheat requires consistent moisture throughout its growth cycle.
To choose the right variety for your climate, research local options that have been bred for specific regions. Check with local nurseries, gardening clubs, or extension services for recommendations on varieties that perform well in your area. Some popular buckwheat varieties include ‘Kamut’, ‘Columbia Giant’, and ‘Rose de Nancy’. Consider the mature height of each variety to ensure it fits within your garden’s space constraints. By choosing a suitable variety, you’ll be able to create an optimal environment for both your plants and pollinators.
Growing Conditions for Maximum Success
When growing buckwheat for bee-friendly gardens, it’s essential to provide your plants with the right conditions for maximum success. Buckwheat requires full sun to thrive, so choose a spot that receives at least six hours of direct sunlight per day.
Temperature-wise, buckwheat is a cool-season crop and grows best in temperatures between 65°F and 75°F (18°C and 24°C). It’s sensitive to heat, so avoid planting it in areas where the temperature often exceeds 85°F (29°C).
Water requirements are also crucial. Buckwheat needs about one inch of water per week, either from rainfall or irrigation. Be sure to keep the soil consistently moist during the first few weeks after sowing, but avoid overwatering, which can lead to root rot.
To ensure optimal growing conditions, test your soil before planting buckwheat. Aim for a pH between 6.0 and 7.0, as this will allow your plants to absorb essential nutrients more efficiently.
Keep in mind that buckwheat is a warm-season crop and requires about 100 days to mature from sowing to harvest. With proper care and attention, you can expect a bountiful harvest of delicious buckwheat seeds for pollinators to enjoy.
Preparing the Soil for Optimal Growth
Before planting buckwheat, it’s essential to prepare the soil by loosening and aerating the top layer, removing any debris or weeds that can compete with your crop. This simple step sets the stage for optimal growth.
Soil Preparation: Testing and Amendments
Before planting buckwheat for your bee-friendly garden, it’s essential to test and prepare your soil. This may seem like a straightforward step, but it can make all the difference in achieving optimal growth and ensuring your bees have a healthy source of nectar.
Testing your soil will help identify nutrient deficiencies, pH levels, and other factors that might impact buckwheat’s performance. You can purchase a DIY soil testing kit or send a sample to a lab for analysis. Consider getting a comprehensive test that includes pH, nitrogen (N), phosphorus (P), potassium (K), calcium, magnesium, and micronutrients like zinc and boron.
Based on the results, you may need to make amendments to create an ideal environment for buckwheat growth. For example, if your soil is acidic, adding lime can help raise the pH. If it’s low in nitrogen, consider incorporating compost or well-rotted manure. Remember that every region has unique soil characteristics, so be sure to consult with local experts or gardening communities for advice tailored to your area.
Typically, a balanced fertilizer with an N-P-K ratio of 10-10-10 is suitable for buckwheat. However, if you’ve identified specific nutrient deficiencies in your test results, adjust the formulation accordingly.
Creating a Buckwheat-Friendly Environment
When preparing to grow buckwheat for a bee-friendly garden, it’s essential to create an environment that allows the crop to thrive. One of the most critical steps is to remove weeds and debris from the area where you’ll be planting. Weeds can compete with buckwheat for water, nutrients, and light, reducing its yield and quality.
To start, inspect your garden or designated growing space carefully. Look for any visible weeds, including annuals and perennials, and consider using a tool like a hoe or weeding fork to gently remove them without disturbing the soil. Be sure to dispose of the removed weeds properly, as some can spread seeds if not handled correctly.
Additionally, clear away any debris, such as dead plants, branches, or rocks, that could obstruct buckwheat growth or interfere with proper drainage. You may also want to loosen the top 6-8 inches of soil to promote healthy root development and prevent compacted soil from hindering nutrient uptake. By removing weeds and debris, you’ll be creating a clean slate for your buckwheat plants to grow strong and healthy, setting them up for optimal pollination by bees and other beneficial insects.
Planting and Caring for Your Buckwheat Crop
To grow a thriving buckwheat crop that will bring in the bees, you’ll want to learn how to plant it correctly and provide it with the right care throughout its growing season.
Planting Buckwheat: Tips and Tricks
Planting buckwheat is relatively easy and requires minimal equipment. Start by selecting a spot with full sun and well-draining soil. Buckwheat prefers a pH between 6.0 and 7.5, so test your soil if necessary. Begin by loosening the soil to a depth of about 8-10 inches using a garden fork or spade.
Sow buckwheat seeds directly into the ground in late spring or early summer, when the soil has warmed up to at least 60°F (15°C). Plant the seeds 1-2 inches deep and 6-12 inches apart, depending on the specific variety you’re growing. If sowing a large area, use a planter or drill with the correct spacing for efficient planting.
Keep in mind that buckwheat is a fast-growing crop and will spread quickly. It’s essential to provide adequate space between plants to prevent overcrowding and promote healthy growth. Regularly water the soil during its establishment phase, but avoid overwatering, which can lead to disease susceptibility.
Maintaining a Healthy Crop: Watering and Fertilization
When it comes to maintaining a healthy buckwheat crop for your bee-friendly garden, proper watering and fertilization are crucial. Buckwheat is a drought-tolerant crop, but consistent moisture encourages optimal growth and development. Aim to provide about 1-2 inches of water per week, either through rainfall or irrigation.
As for fertilization, buckwheat has low fertility requirements, making it an excellent choice for organic gardens. You can use a balanced fertilizer like 10-10-10 NPK (nitrogen-phosphorus-potassium) once a month during the growth stage. However, be cautious not to over-fertilize, as this can lead to excessive leaf growth and reduced seed production.
Some additional tips to keep in mind: mulch around your buckwheat plants to retain moisture and suppress weeds, and rotate your crops every few years to maintain soil health and prevent nutrient depletion. With these simple yet effective strategies, you’ll be well on your way to growing a thriving and bee-friendly buckwheat crop that will attract pollinators all season long.
Encouraging Bee Activity in Your Buckwheat Garden
To create a haven for busy bees, you’ll want to make sure your buckwheat garden is buzzing with activity by incorporating features that attract and support these important pollinators. Let’s explore some key strategies together!
Creating a Pollinator-Friendly Environment
Creating a pollinator-friendly environment is crucial to attracting bees and other beneficial insects to your buckwheat garden. This means not only providing a source of nectar-rich flowers but also creating a habitat that supports the overall health and well-being of these essential visitors.
To start, incorporate companion flowers into your garden design. These plants are specifically chosen for their ability to attract pollinators while also growing harmoniously alongside buckwheat. Some excellent options include wildflowers like cosmos, marigold, and sunflower, which all thrive in well-drained soil and full sunlight. You can also plant lavender, coneflower, or black-eyed Susan, which provide a rich source of nectar for bees.
When selecting companion flowers, consider the bloom times of each plant to ensure a constant supply of nectar throughout the growing season. Plant multiple varieties with staggered blooming periods to create a pollinator paradise in your garden.
Monitoring and Supporting Local Bees
Monitoring and supporting local bee populations is crucial for the long-term health of your buckwheat garden. As you work to create a haven for these vital pollinators, it’s essential to understand their needs and habits.
To monitor local bee activity, consider keeping a journal or spreadsheet to track sightings, noting the types of bees present, their numbers, and any patterns or trends you observe. You can also install a bee hotel or provide nesting boxes specifically designed for solitary bees. By doing so, you’ll be creating habitats that cater to these important pollinators.
Reducing pesticide use is another vital aspect of supporting local bees. Consider adopting integrated pest management (IPM) techniques, which focus on using natural methods to control pests. This might involve hand-picking weeds or using neem oil as a non-toxic alternative to chemical pesticides. By reducing the chemicals in your garden, you’ll be creating a safer environment for bees and other beneficial insects.
Remember, every effort counts – even small changes can have a significant impact on local bee populations.
Harvesting and Utilizing Your Buckwheat Crop
Now that your buckwheat crop is thriving, it’s time to reap the rewards and learn how to harvest its nutritious seeds and leaves for a variety of uses. We’ll walk you through the process step by step.
Timing the Harvest for Maximum Benefit
Timing the harvest for optimal pollinator activity is crucial to maximize the benefits of your buckwheat crop. Buckwheat flowers typically bloom within 60-70 days after sowing, but the optimal time for harvesting depends on the specific variety and desired outcome.
In general, it’s best to harvest buckwheat when about 20% of the seed heads have turned a light brown color. This is usually around 100-110 days after sowing. However, if you’re looking to promote pollinator activity, consider harvesting the crop when the flowers are still in full bloom.
This approach allows bees and other pollinators to continue accessing nectar and pollen from the buckwheat flowers for a longer period. It’s also essential to avoid over-harvesting, as this can reduce the number of seeds produced, affecting future crops.
To time your harvest correctly, monitor the seed heads daily, checking for the desired level of maturity. Cut the plants near the base with scissors or a sharp knife, leaving the stems intact to minimize damage and promote regrowth. By harvesting at the right time, you’ll not only ensure a healthy crop but also provide a vital source of nutrition for pollinators in your garden.
Using Your Harvest: Food, Fodder, and More
Now that you’ve harvested your buckwheat crop, it’s time to think creatively about using all its parts. Buckwheat is a versatile crop that can be used for food, animal feed, and even crafting.
When it comes to cooking with buckwheat, try making a delicious porridge by soaking the grains overnight and then simmering them in water or milk. You can also use buckwheat flour to make pancakes, soba noodles, or even as a thickening agent in soups and stews. For a tasty snack, roast buckwheat seeds in a pan with some oil and herbs for a crunchy, nutty treat.
Buckwheat can also be used as fodder for animals, such as chickens and rabbits. Simply dry the crop thoroughly to preserve it, then store it in an airtight container or feed it fresh to your pets. The leaves and stems of buckwheat plants are rich in nutrients and can be added to compost piles or used as mulch.
Get creative with your harvest by making buckwheat crafts! Use the seeds as beads for jewelry-making or press them into a decorative pattern on paper. You can even use the dried flowers and foliage to make potpourri or wreaths.
Common Challenges and Solutions for a Successful Buckwheat Crop
Growing buckwheat can be tricky, but don’t worry, we’ve got you covered. In this next part, we’ll dive into common challenges you might face and share practical solutions to help your crop thrive.
Managing Pests and Diseases
When growing buckwheat for bee-friendly gardens, managing pests and diseases is crucial to ensure a healthy crop. Common pests that can affect buckwheat crops include aphids, spider mites, and thrips. These insects feed on the plant’s sap, causing curled or distorted leaves, stunted growth, and reduced yields.
Diseases such as powdery mildew, leaf spot, and rust can also impact your buckwheat crop. Fungal diseases thrive in humid environments and can spread quickly through irrigation water or nearby infected plants. Regularly inspect your crops for signs of disease, such as white patches on leaves or black spots on stems.
To manage pests and diseases effectively, adopt an integrated pest management (IPM) approach. This involves using a combination of cultural, mechanical, biological, and chemical controls to minimize harm to beneficial insects and the environment. For example, use physical barriers to prevent aphid infestations or introduce natural predators like ladybugs or lacewings to control pests. Consider crop rotation and sanitation practices to reduce disease pressure.
Keep in mind that IPM is an ongoing process that requires regular monitoring and adjustments. By staying vigilant and taking proactive steps, you can minimize the risk of pest and disease issues and enjoy a thriving buckwheat crop that attracts pollinators and supports biodiversity.
Overcoming Obstacles: Tips for Success
Growing buckwheat for bee-friendly gardens can be a rewarding experience, but it’s not without its challenges. Weather-related issues are one of the most common obstacles gardeners face when growing this versatile crop. One of the biggest weather-related challenges is drought. Buckwheat requires consistent moisture, especially during its first few weeks of growth. If the soil dries out, it can lead to stunted plants and reduced yields.
To overcome drought stress, make sure to mulch around your buckwheat plants to retain moisture in the soil. You can also use drip irrigation or soaker hoses to deliver water directly to the roots. Another challenge is extreme heat, which can cause buckwheat flowers to drop their pollen and reduce nectar production. To mitigate this, plant buckwheat during a cooler part of the season, such as spring or fall.
Additionally, be prepared for unexpected weather events like heavy rain or hail, which can damage your crop. Have a plan in place for protecting your buckwheat plants, such as using row covers to shield them from wind-borne debris. By anticipating and preparing for these challenges, you can help ensure a successful harvest and create a haven for pollinators in your garden.
Frequently Asked Questions
How can I ensure my buckwheat crop is pest-free?
Buckwheat is relatively resistant to pests, but a few common issues include aphids and spider mites. To prevent infestations, maintain good soil health by incorporating organic matter and avoiding over-watering. Regularly inspect your plants for signs of pests and use neem oil or insecticidal soap as needed.
Can I grow buckwheat in containers?
While buckwheat typically thrives in full sun and well-drained soil, it’s possible to grow it in containers provided they’re at least 12 inches deep. Use a high-quality potting mix and ensure the container has adequate drainage holes to prevent waterlogged soil.
How long does it take for buckwheat to flower?
Buckwheat typically takes around 60-70 days to mature from sowing, with flowers appearing in mid-to-late summer. Keep in mind that this timeframe can vary depending on weather conditions and the specific variety you’re growing.
What’s the best way to support local bee populations through my buckwheat crop?
To create a pollinator-friendly environment, plant a mix of nectar-rich flowers like sunflowers, cosmos, and zinnias alongside your buckwheat. Avoid using pesticides or herbicides, which can harm beneficial insects. Consider creating a bee hotel or insect house to provide habitat for solitary bees.
Can I harvest buckwheat at any time during the growing season?
While you can start harvesting buckwheat’s edible flowers and leaves as soon as they appear, the main crop is ready when the seeds are mature and dry. Typically, this occurs around 90-100 days after sowing. Avoid harvesting too early, as this can lead to lower yields and reduced seed quality.