Growing your own delicious and nutritious bean sprouts at home is easier than you think. Not only do they add a burst of flavor to salads, stir-fries, and sandwiches, but they’re also packed with protein, fiber, and essential vitamins. However, knowing where to start can be overwhelming – selecting the right variety, understanding their nutritional benefits, and learning how to care for them are just a few of the challenges you may face.
In this article, we’ll take you by the hand through each step of growing your own bean sprouts, from choosing the perfect beans to harvesting and storing your fresh produce. We’ll cover topics such as soil selection, ideal temperature ranges, and common mistakes to avoid. Whether you’re a seasoned gardener or just starting out, our simple guide will show you how to grow mouthwatering bean sprouts in just a few simple steps.
Benefits of Growing Your Own Bean Sprouts
Growing your own bean sprouts is a game-changer for any health enthusiast, and we’re excited to share the numerous benefits you’ll experience when you start growing your own at home. Let’s dive into the advantages of self-sustained sprouting!
Why Choose Bean Sprouts Over Other Greens?
When it comes to choosing between bean sprouts and other leafy greens, there are several compelling reasons why you might want to opt for the former. Not only do they offer a higher nutritional punch, but their unique taste and texture also make them stand out from the crowd.
One of the most significant advantages of bean sprouts is their high vitamin C content. In fact, just 100 grams of mung bean sprouts contain over 50% of your daily recommended intake. This makes them an excellent choice for those looking to boost their immune system and fight off colds and flu.
In terms of taste, bean sprouts have a delicate, slightly sweet flavor that pairs well with a wide range of dishes – from stir-fries to salads. They’re also incredibly versatile, and can be used in everything from soups to sandwiches. Plus, their crunchy texture adds a satisfying depth to any meal.
Compared to other leafy greens like kale or spinach, bean sprouts have a much lower oxalate content, making them easier to digest for those with sensitive stomachs.
Easy-to-Grow Characteristics for Beginners
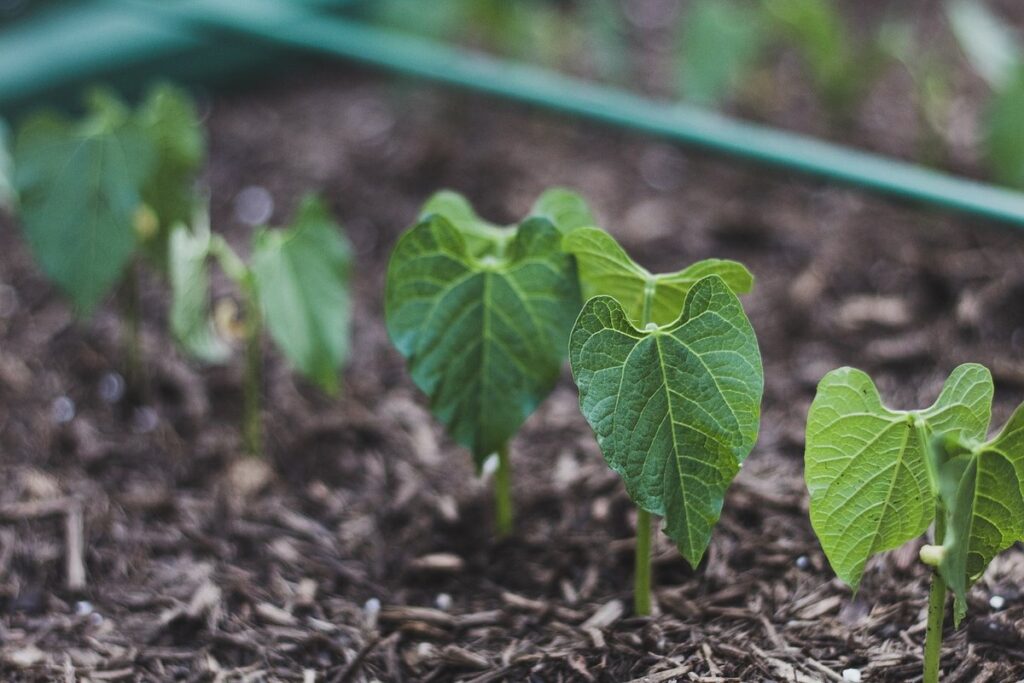
Bean sprouts are an excellent choice for beginners due to their low-maintenance requirements and easy-growing nature. One of the main advantages is that they can thrive in a variety of environments, making them perfect for indoor growing. You don’t need a lot of space or specialized equipment to get started.
To begin with bean sprouts, you’ll want to select a clean glass jar or container with a wide mouth. Rinse the beans thoroughly and soak them in water for several hours. Once soaked, drain the water and transfer the beans to your growing vessel. Cover the top with a mesh screen or cheesecloth to keep dust out while allowing air circulation.
Keep the beans in a warm, dark place, such as a pantry or cupboard, until you start to notice sprouting. This usually takes 1-3 days. Once sprouted, move the jar to a bright, indirectly lit area and continue to rinse with water daily. Monitor your progress, and within 7-10 days, you’ll be harvesting fresh bean sprouts ready for use in salads or as a nutritious snack.
Choosing the Right Bean Variety
When it comes to growing delicious bean sprouts, selecting the right variety of beans is crucial. Let’s explore the different types and characteristics you should consider for optimal growth.
Popular Types of Beans for Sprouting
When it comes to choosing the right bean variety for sprouting, there are several popular options to consider. Mung beans are a popular choice among sprouting enthusiasts due to their high nutritional value and ease of germination. They have a mild flavor and soft texture, making them an ideal choice for salads and other dishes.
Another type of bean that’s well-suited for sprouting is the adzuki bean. These small, red beans are packed with protein and fiber, and have a slightly sweet taste. They’re also relatively easy to find in most health food stores or online. When sprouted, adzuki beans can be used as a topping for sushi rolls or added to soups and stews.
Kidney beans are another option that’s worth considering, although they do require a bit more effort to sprout due to their harder outer shell. However, the end result is well worth it – kidney bean sprouts have a rich, earthy flavor and a firmer texture than mung or adzuki beans.
Some key things to keep in mind when selecting a bean variety for sprouting include germination rates, nutritional content, and ease of preparation. For example, some beans may require soaking before sprouting, while others can be simply rinsed and left to germinate. Experimenting with different types of beans can help you find the ones that work best for your needs and preferences.
Factors to Consider When Selecting a Bean Variety
When selecting the ideal bean variety for growing bean sprouts, there are several key factors to consider. Climate adaptability is one of the most important considerations. Different regions have unique temperature and humidity levels that can affect the growth and development of your bean sprouts. For example, if you live in a hot and dry climate, look for bean varieties that are resistant to heat stress such as the ‘Alubia’ or ‘Black Bean’ variety.
Disease resistance is also crucial when choosing a bean variety. As bean sprouts are often grown indoors, they can be susceptible to fungal diseases like powdery mildew. Opt for bean varieties with built-in disease resistance, such as the ‘Red Kidney Bean’ or ‘Pinto Bean’, to minimize the risk of infection.
Taste preferences should also play a role in your decision-making process. Consider what type of flavor profile you want to achieve and choose a bean variety that suits your needs. Some popular choices include mung beans for their mild taste, adzuki beans for their nutty flavor, or black beans for their robust earthy taste.
Consider the time it takes for each bean variety to mature as well – some take longer than others. This will help you plan and ensure that you have a continuous supply of fresh sprouts throughout the year.
Preparing the Seeds and Equipment
Before you begin growing bean sprouts, it’s essential to prepare your seeds and equipment properly. This involves selecting high-quality seeds and choosing the right container for optimal growth.
Seed Selection, Storage, and Germination Rates
When it comes to growing high-quality bean sprouts, selecting the right seeds is paramount. Look for seeds that are specifically labeled as “bean sprout” or “microgreen” seeds, as these have been bred for optimal germination and growth. Avoid using regular bean seeds, as they may not produce the desired results.
Proper storage of your seeds is also crucial to maintaining their viability. Store them in an airtight container in a cool, dark place. A refrigerator is ideal, but if you don’t have one, keep them away from direct sunlight and heat sources. For every 100 seeds, aim for a germination rate of at least 90%. Some popular bean sprout varieties include Adzuki, Mung, and Black beans.
When purchasing seeds, check the packaging for information on seed viability and shelf life. Keep in mind that old seeds may not germinate well, so it’s essential to replace them regularly. A general rule of thumb is to use seeds within 12-18 months of purchase for optimal results.
Essential Tools for Growing Bean Sprouts at Home
To grow bean sprouts at home, you’ll need some essential tools to get started. A good quality sprouting jar is a must-have for beginners. These jars are specifically designed to allow for airflow and easy rinsing of the seeds. Look for one with a wide mouth and a lid that fits snugly.
If you prefer to use a tray or planter, make sure it has drainage holes to prevent waterlogged soil. You can also use a mesh screen or cheesecloth to cover the top for added support. When using a tray, place it on a flat surface and ensure the seeds are spread evenly.
Some popular alternatives to traditional jars include mini greenhouse kits and hydroponic systems. These can be more expensive but offer greater control over temperature and humidity levels. Before investing in any equipment, consider the space you have available and the level of maintenance you’re willing to commit to.
Remember to always follow proper sanitation procedures when handling your sprouting equipment to prevent contamination and ensure healthy growth.
Step-by-Step Instructions for Growing Bean Sprouts
Now that you have a solid understanding of how to prepare your bean seeds, it’s time to dive into the step-by-step process of growing delicious and nutritious bean sprouts. Follow along carefully!
Rinsing, Soaking, and Draining: The Initial Steps
To begin growing bean sprouts, you’ll need to start with clean seeds. Begin by rinsing them under cold running water to remove any debris or impurities that may be present on the surface. This step is crucial in preventing contamination and ensuring healthy germination.
Next, soak the seeds in a bowl of lukewarm water for 8-12 hours. The soaking process will help rehydrate the seeds and encourage them to begin germinating. You can speed up this process by using a glass jar with a wide mouth or a specialized sprouting container with a built-in strainer.
After the soaking period, drain the seeds thoroughly and transfer them to your chosen growing medium, such as a mesh bag or a jar with fine holes for drainage. Rinse the seeds again under cold running water to remove any remaining impurities. This final rinse will help prevent fungal growth and ensure that your sprouts develop healthily.
It’s essential to handle the seeds gently during this initial process to avoid damaging them, which can lead to reduced germination rates or weak sprout development.
Monitoring and Maintaining Optimal Conditions
Providing optimal conditions for bean sprout growth is crucial to ensure healthy and consistent yields. Adequate light is essential for photosynthesis, which fuels the sprouting process. Aim for 12-14 hours of indirect light per day, with a temperature range between 65°F to 75°F (18°C to 24°C). Direct sunlight can be too intense, causing damage to the delicate shoots.
Maintaining optimal humidity levels is also vital. Cover your growing container or tray with a damp cloth to maintain an environment around 70-80% relative humidity. This will prevent moisture loss and keep the seeds hydrated.
Temperature fluctuations should be minimized, as sudden changes can shock the seedlings. Keep your sprout-growing area away from drafts, radiators, and other heat sources. A stable temperature will promote even growth and reduce the risk of fungal diseases.
Monitor your growing conditions daily to ensure optimal conditions are maintained. By paying attention to light, temperature, and humidity, you’ll be able to fine-tune your setup for a bountiful harvest of delicious and nutritious bean sprouts.
Troubleshooting Common Issues
Sometimes things don’t go as planned when growing bean sprouts, so let’s tackle common issues that can occur and how to resolve them successfully. We’ll break down solutions for common problems you may encounter.
Identifying and Addressing Pests, Diseases, or Nutrient Deficiencies
When it comes to growing bean sprouts, common issues like pests, diseases, and nutrient deficiencies can be a significant concern. To ensure you don’t lose your crop, it’s essential to recognize these problems early on.
Pests are one of the most prevalent issues in sprout cultivation. Check for tiny insects like aphids, whiteflies, or spider mites by inspecting the leaves and stems closely. A telltale sign is usually a sticky residue or distorted growth patterns. For example, if you notice tiny eggs or larvae on your bean seeds, it’s likely an infestation.
Diseases can be harder to diagnose but common signs include yellowing leaves, black spots, or fuzzy growths. Fungal diseases like powdery mildew or root rot are often caused by excess moisture or poor air circulation. Regularly inspect your sprouts for these warning signs and adjust your growing conditions accordingly.
Nutrient deficiencies can also lead to problems in your bean sprout crop. Look out for symptoms like stunted growth, yellowing leaves, or curled stems. This could be due to a lack of essential nutrients like nitrogen, iron, or magnesium. Consider using organic fertilizers or adjusting your watering schedule to ensure you’re providing the right balance of nutrients.
If you do encounter any issues, don’t panic – it’s not the end of the world! Regularly monitoring your crop and taking prompt action can help prevent problems from escalating.
Resolving Low Growth Rates or Unusual Outcomes
If you’re experiencing low growth rates or unusual outcomes with your bean sprouts, don’t worry – it’s not uncommon! There are several factors that could be contributing to the issue. First, check your seed quality: old or low-quality seeds can lead to slow germination and stunted growth.
Another possible culprit is inadequate light or temperature control. Bean sprouts typically thrive in temperatures between 65-75°F (18-24°C) and require at least 12 hours of indirect sunlight per day. Ensure that your growing area meets these conditions, and consider investing in a grow light if necessary.
Humidity levels are also crucial for healthy growth. Aim for a humid environment with 70-80% relative humidity to prevent the seeds from drying out. Avoid placing your sprout jar near drafty areas or heating vents.
If you’ve checked all of these factors and still experience issues, try varying your water temperature and pH level. Water that’s too hot can kill the delicate sprouts, while water that’s too alkaline (above 7 pH) can impede growth. Monitor your water quality regularly to ensure it remains within optimal ranges.
Harvesting and Storing Your Bean Sprouts
Now that you’ve successfully grown your bean sprouts, it’s time to harvest them at the perfect moment and store them properly to maintain their freshness and nutritional value. Learn how to do this in a way that preserves their delicate flavor and texture.
Timing and Methods for Harvesting Mature Sprouts
When your bean sprouts have reached their optimal maturity, it’s time to harvest them. But when is that exactly? Look for these signs of readiness: the sprouts should be around 1-2 inches long and have at least two sets of leaves. They should also be tender to the touch and have a slightly sweet aroma.
Now that you know what to look for, let’s talk about the best methods for harvesting your mature bean sprouts. You can either harvest individual sprouts as needed or cut off the entire batch at once. To do this, use scissors or a sharp knife to snip the stem just above the growing medium. This will prevent damaging the roots and ensure that you get the most out of your crop.
Another technique is to use a process called “lifting and harvesting.” This involves gently lifting the sprouts out of their container and cutting off the excess leaves. This method helps preserve the delicate roots and can be especially useful for large batches or when transporting the sprouts to different locations.
Tips for Storing and Preserving Freshly Harvested Sprouts
Proper storage is crucial to maintain the freshness of your bean sprouts and prolong their shelf life. Once you’ve harvested your sprouts, it’s essential to store them correctly to prevent spoilage and retain their nutrients. You have two primary options: refrigeration or freezing.
Refrigeration is the best method for short-term storage. Place your bean sprouts in a breathable container, such as a mesh bag or a ventilated plastic bag, and store them in the crisper drawer of your refrigerator. This will maintain humidity levels and keep your sprouts fresh for up to 5 days. You can also wrap the sprouts in a damp paper towel and place them in an airtight container for similar results.
If you want to extend the shelf life of your bean sprouts, consider freezing them. Rinse the sprouts with cold water, pat them dry with a clean towel, and spread them out on a baking sheet lined with parchment paper. Place the sheet in the freezer until the sprouts are frozen solid, then transfer them to an airtight container or freezer bag for storage. Frozen bean sprouts can be stored for up to 6 months and will retain their flavor and nutritional value.
Frequently Asked Questions
How Do I Know If My Bean Sprouts Are Ready for Harvesting?
Check for a visible white or light-colored sprout emerging from the seed, usually after 3-7 days of soaking and draining. Gently lift one end of the container to inspect the roots; if they’re about an inch long, it’s time to harvest.
Can I Grow Bean Sprouts in a Small Space, Such as a Window Box or Apartment?
Yes! Bean sprouts are perfect for small spaces due to their minimal growing requirements. Use a shallow container (about 1-2 inches deep) and ensure proper drainage to prevent waterlogged soil.
What Happens If My Bean Sprouts Start Showing Signs of Pests or Diseases?
Identify the issue quickly by inspecting your sprouts regularly. Common pests include aphids, spider mites, and whiteflies; diseases like root rot can be prevented with good hygiene practices. Address the problem promptly using organic pest control methods or fungicides.
Can I Use a Different Type of Container for Growing Bean Sprouts?
Yes! While plastic or glass containers work well, you can also use cloth bags or mesh baskets as long as they provide adequate drainage and air circulation. Be sure to sterilize any new container before use to prevent contamination.
How Do I Store My Harvested Bean Sprouts to Keep Them Fresh for Longer?
To extend shelf life, store freshly harvested bean sprouts in the refrigerator at 40°F (4°C) or below. Use a sealed container or plastic bag and keep them away from direct sunlight to maintain crispness and freshness.