Growing your own bean sprouts at home is easier than you think, and it’s an incredibly rewarding process that yields delicious and nutritious results. Bean sprouts are a staple in many cuisines worldwide, packed with vitamins, minerals, and antioxidants that boost energy and support overall health. However, buying them from the store can be expensive and often lacks freshness. By learning how to grow bean sprouts at home, you’ll not only save money but also enjoy the satisfaction of harvesting your own crop.
In this comprehensive guide, we’ll walk you through the essential equipment and tips needed to grow delicious and nutritious bean sprouts in just a few days. From setting up your equipment to optimal growth conditions and creative recipe ideas, we’ve got you covered. Whether you’re a seasoned gardener or a beginner, our step-by-step instructions will help you master the art of growing perfect bean sprouts at home.
Benefits and Reasons to Grow Bean Sprouts
Growing bean sprouts at home offers a wealth of benefits, from improved nutrition to reduced costs. Let’s explore why you’ll love cultivating these nutritious greens in your own kitchen!
Introduction to Bean Sprouts
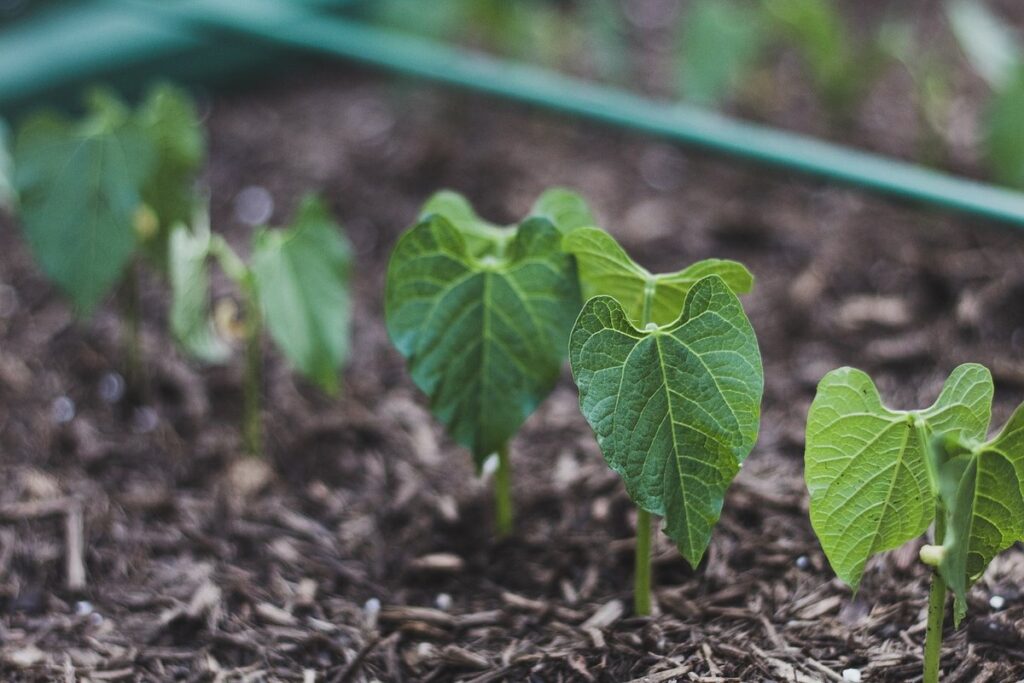
Bean sprouts are one of the most versatile and nutritious ingredients you can grow at home. They’re essentially the early growth stage of legumes, such as mung beans, kidney beans, or black beans, which have been allowed to germinate under controlled conditions. This process converts starches into easily digestible sugars, making them a powerhouse of nutrition.
Packed with vitamins C and K, fiber, and minerals like iron and zinc, bean sprouts are an excellent addition to salads, stir-fries, and sandwiches. They’re also low in calories, making them an ideal choice for health-conscious individuals. Growing your own bean sprouts at home is a great idea because it allows you to have complete control over the quality and freshness of the produce. By doing so, you can avoid exposure to pesticides, preservatives, or other chemicals often found in store-bought products.
Moreover, growing bean sprouts requires minimal space and equipment, making them an ideal choice for urban gardeners or those with limited kitchen space.
Space-Saving and Cost-Effective
One of the most significant advantages of growing bean sprouts at home is that it’s an incredibly space-saving and cost-effective way to have fresh vegetables on hand. Unlike traditional gardens or even indoor herb planters, a bean sprout tray can be tucked away on a windowsill, in a pantry, or even on top of your refrigerator, making it perfect for small kitchens, apartments, or offices.
To give you an idea, a standard 10-inch by 20-inch tray can yield up to 4-6 cups of fresh bean sprouts within just 3-5 days. This is equivalent to buying several bunches of store-bought sprouts at a fraction of the cost. Plus, with no soil required and minimal equipment needed, you’ll be saving on water, fertilizers, and other gardening expenses.
Another benefit is that you can harvest your bean sprouts as soon as they’re ready, which means you won’t have to worry about them going bad or taking up valuable storage space. With a bit of planning and care, growing bean sprouts at home can provide you with a steady supply of fresh greens all year round, without breaking the bank or sacrificing precious kitchen space.
Preparing for Bean Sprout Growth
To successfully grow bean sprouts at home, it’s essential to prepare your space and materials before sowing. This includes selecting a suitable container and soaking your beans properly.
Choosing the Right Equipment
When it comes to growing bean sprouts at home, having the right equipment is essential for optimal growth and success. To get started, you’ll need a few basic items that will help you create an ideal environment for your sprouts.
First and foremost, you’ll need a clean and sterile container or jar to grow your bean sprouts in. A glass jar with a wide mouth is ideal, as it allows for easy access and visibility of the sprouts. Make sure the jar is thoroughly cleaned and rinsed before use. You can also opt for a specialized sprouting jar with a built-in mesh screen, which helps keep debris out and promotes even growth.
A mesh screen or cheesecloth is also necessary to cover the top of the container. This will allow water to reach the seeds while preventing any contaminants from entering the jar. Additionally, consider using a spray bottle to mist your sprouts regularly, keeping them hydrated and healthy throughout the growth process.
When selecting equipment, it’s essential to choose items that are easy to clean and maintain. Avoid materials that may harbor bacteria or other microorganisms that could harm your sprouts. With these basic tools in hand, you’ll be well on your way to successfully growing bean sprouts at home.
Selecting the Best Beans for Sprouting
When it comes to growing bean sprouts at home, selecting the right type of beans is crucial for their success. Not all beans are created equal when it comes to sprouting, and some factors will give you better results than others.
The size of the bean can affect its ability to sprout. Larger beans tend to have more nutrients stored in them, making them a great choice for sprouting. However, they can be harder to find and may require longer soaking times. On the other hand, smaller beans are often easier to come by and will sprout faster, but may not pack as much nutritional punch.
When it comes to color, mung beans are one of the most popular choices for sprouting due to their high nutritional value and ease of growth. They’re also relatively inexpensive and can be found at most health food stores or online.
In terms of seed quality, look for beans that are plump and have a hard outer shell. Avoid beans with visible signs of damage, mold, or mildew. A good quality bean will produce more sprouts and result in a healthier crop. Always purchase beans from a reputable source to ensure you get the best possible product.
Planting and Caring for Bean Sprouts
To successfully grow bean sprouts at home, you’ll need to know how to properly plant and care for them, which involves providing just the right amount of moisture and light. We’ll walk you through it step by step.
Preparing the Seeds
To prepare the seeds for sprouting, start by rinsing them thoroughly under cold running water. This helps to remove any impurities, dust, or debris that may be clinging to the surface of the beans. For most bean varieties, a simple rinse is sufficient. However, some types like mung beans and adzuki beans benefit from an initial soaking period.
Soak the seeds in water for 8-12 hours, then drain and rinse them again under cold running water. This helps to rehydrate the seeds and kickstart the germination process. Avoid using hot water during this step, as it can damage the delicate seed coat and reduce the chances of successful sprouting. After soaking, store the rinsed seeds in a clean container filled with water at room temperature for 24-48 hours before transferring them to your sprouting jar or tray. This step is crucial for optimal germination and growth. By following these simple steps, you’ll be well on your way to growing healthy bean sprouts at home.
Maintaining Optimal Conditions
To ensure your bean sprouts grow into nutritious and delicious microgreens, maintaining optimal conditions is crucial. Temperature plays a significant role in this process – most bean varieties prefer daytime temperatures between 70°F to 80°F (21°C to 27°C) and nighttime temperatures around 60°F to 65°F (15°C to 18°C). A temperature swing of this magnitude can stimulate growth, but it’s essential to avoid extreme fluctuations.
Maintaining humidity levels is also vital for optimal growth. Aim for a humid environment with relative humidity ranging from 50% to 70%. You can achieve this by placing the growing tray on a tray filled with water and pebbles or using a humidifier nearby.
Lighting requirements are another critical aspect of bean sprout cultivation. While most bean varieties can tolerate partial shade, direct sunlight for short periods can be beneficial. Aim for indirect light for 12 to 14 hours per day, especially during the initial stages of growth.
Regular monitoring and adjustments will help you maintain optimal conditions for your bean sprouts to thrive.
Common Issues and Troubleshooting
If you encounter any problems while growing bean sprouts at home, don’t worry – we’ve got solutions. This section will help troubleshoot common issues to keep your sprout-growing journey on track.
Preventing Mold and Pests
As you nurture your bean sprout growth, it’s essential to address potential issues that can arise. One of the most common problems is mold and pests, which can quickly spread and ruin an entire batch. To prevent this, maintain a clean environment by washing your hands before handling the sprouts, and ensure all equipment is sanitized regularly.
Monitor the temperature and humidity levels in your growing area. Bean sprouts thrive in temperatures between 60-75°F (15-24°C) and high humidity levels around 80-90%. Be cautious not to let the air dry out completely, as this can lead to mold growth.
Regularly inspect your sprouts for signs of pests such as aphids, spider mites, or mealybugs. Remove any affected areas immediately, and treat the surrounding area with a mild detergent solution. Check for mold by looking for visible white or green patches on the leaves or stems. Regular cleaning and monitoring will help prevent these issues from arising in the first place.
For example, if you’re growing bean sprouts in a jar, change the water daily to prevent bacterial growth.
Overcoming Common Challenges
Uneven sprouting is a common issue many home growers face when growing bean sprouts. This can be due to inconsistent moisture levels or temperature fluctuations. To overcome this challenge, ensure you maintain a consistent temperature between 65°F and 75°F (18°C and 24°C). Also, keep the soil consistently moist but not waterlogged.
Another potential problem is inadequate growth. This may result from insufficient light exposure. Bean sprouts require indirect sunlight to grow properly. If your growing area receives direct sunlight, consider using a sheer curtain or shade cloth to filter the light.
To promote even growth and prevent legginess, rotate your jar every day or two to ensure uniform exposure to light and temperature. Regularly inspect your bean sprouts for signs of disease or pests, such as mold, fungi, or aphids. Remove any affected areas promptly to prevent further damage.
By being mindful of these common challenges and taking proactive steps to address them, you can successfully grow healthy and nutritious bean sprouts at home.
Harvesting and Storing Bean Sprouts
Now that you’ve successfully grown your bean sprouts, it’s time to learn how to harvest them at the perfect stage of growth for maximum flavor and nutrition. This section covers the essential steps to harvesting and storing your fresh bean sprouts.
Knowing When to Harvest
When it comes to harvesting bean sprouts, timing is crucial to ensure they are picked at their optimal stage of freshness and flavor. As a general rule, most bean sprouts are ready to harvest within 3-5 days after sowing, depending on the type of beans you’re using.
One way to determine if your sprouts are ready is to look for signs of readiness. Check for a small white or yellow root at the base of the stem, which indicates that the sprout has started to develop its taproot. You should also see a small green leaf emerging from the top of the stem. These signs indicate that the sprout has reached its optimal stage of growth and is ready to be harvested.
It’s essential to check your sprouts daily during this period, as they can quickly go from perfect to overgrown if left unattended. Harvesting in the morning when the sprouts are at their highest water content will also help maintain their crunchiness and flavor.
In terms of timing considerations, make sure to harvest your bean sprouts before the first set of leaves emerges, as this is usually a sign that they’re getting too old.
Storage and Handling
Proper storage and handling of harvested bean sprouts are crucial to maintaining their freshness and quality. When you’ve finished harvesting, transfer the bean sprouts to a breathable container such as a paper bag or a mesh produce bag. This will allow for airflow and prevent moisture buildup.
For longer-term storage, consider placing the bean sprouts in an airtight container filled with damp paper towels. Store them in the refrigerator at a consistent temperature below 40°F (4°C). Check on the bean sprouts daily to ensure they remain fresh. If you notice any signs of spoilage or sliminess, it’s best to use them immediately.
To extend shelf life, consider blanching the bean sprouts before storing. Briefly submerge them in boiling water for 30 seconds to 1 minute, then immediately plunge them into an ice bath. This will halt enzymatic activity and preserve their texture.
Some key factors to keep in mind when handling harvested bean sprouts include maintaining humidity levels, preventing temperature fluctuations, and minimizing physical damage. By following these guidelines, you can enjoy your freshly grown bean sprouts for several days after harvesting.
Tips and Variations for Advanced Growers
If you’ve mastered the basics of growing bean sprouts, it’s time to explore new techniques and ideas to take your sprouting game to the next level. This is where advanced growers can get creative!
Experimenting with Different Beans
As an advanced grower, you’re likely eager to push the boundaries of what’s possible with bean sprouts. One exciting way to do this is by experimenting with different types of beans. Not only will you discover unique flavor profiles and textures, but you’ll also add a personal touch to your dishes.
Mung beans, for instance, have a delicate sweetness that pairs perfectly with salads or stir-fries. Adzuki beans, on the other hand, offer a nuttier taste that’s simply divine in soups or stews. Experimenting with these and other varieties will allow you to craft truly distinctive flavor profiles.
Consider growing garbanzo or black beans for their earthy undertones, which complement rich sauces or dips beautifully. If you’re feeling adventurous, try sprouting lentils or kidney beans for an added boost of protein in your meals.
To get started, research different types of beans and their characteristics. Choose a few to experiment with and keep notes on the results. This will help you refine your techniques and make informed decisions about which varieties to grow next. Remember, the beauty of growing bean sprouts lies in its endless possibilities – so don’t be afraid to try new things!
Incorporating Bean Sprouts into Recipes
As an advanced grower of bean sprouts, you’re likely eager to incorporate these nutritious greens into your favorite recipes. One of the best things about growing your own bean sprouts is being able to use them fresh and add a burst of flavor to various dishes.
When it comes to salads, try adding bean sprouts to a classic Caesar or spinach salad for a delightful crunch. You can also toss them with mixed greens, cherry tomatoes, and a homemade vinaigrette for a simple yet satisfying side dish. For stir-fries, sauté the sprouts with your favorite vegetables, such as bell peppers and carrots, and serve over rice or noodles.
Incorporating bean sprouts into sandwiches is also a great idea. Add them to a veggie burger or use them as a topping for a grilled cheese sandwich. You can also mix them into pasta dishes or use them as a crunchy base for sushi rolls.
Some of our favorite ways to incorporate bean sprouts include:
• Adding them to omelets or frittatas for a protein-packed breakfast
• Using them in place of lettuce wraps for tacos or burgers
• Mixing them into hummus or guacamole for added crunch and nutrition
Frequently Asked Questions
What if I’m away from home for a few days; can my bean sprouts still thrive?
You can easily maintain optimal conditions while you’re away by using a self-watering container or installing an automatic watering system. You can also ask a trusted neighbor or friend to check on your sprouts and water them as needed.
How often should I rinse the seeds during the germination process?
Rinse the seeds at least once a day, but ideally 2-3 times daily, until they begin to sprout. This ensures the seeds stay moist and helps prevent mold from developing.
Can I grow bean sprouts in direct sunlight or do I need artificial lighting?
While some natural light is beneficial, it’s not always ideal for growing bean sprouts. Direct sunlight can cause temperature fluctuations that might lead to mold or pests. Consider using LED grow lights instead, which provide consistent and controlled conditions for optimal growth.
How long does it take for bean sprouts to become ready for harvest?
Most bean sprouts are ready to harvest within 3-5 days of germination, depending on the type of bean used and environmental factors like temperature and humidity. Keep a close eye on their development and harvest when they reach your desired length.
Can I grow multiple types of beans at once or should I focus on one variety?
It’s perfectly fine to grow multiple varieties simultaneously, but make sure you’re using separate containers for each type to prevent cross-contamination. This will also allow you to experiment with different flavors and textures without affecting the overall growth process.