Are you looking for a natural way to soothe your mind and body? Look no further than the humble chamomile plant! Not only is it a calming tea, but its flowers also have a multitude of uses in skincare, aromatherapy, and even as a medicinal herb. To unlock all these benefits, you need to know how to grow and harvest chamomile successfully.
In this comprehensive guide, we’ll take you through the entire process of cultivating chamomile plants, from preparing the right soil conditions to pruning and pest control strategies. We’ll also share expert tips on when and how to harvest those delicate flowers for maximum potency. By the end of this article, you’ll be well-equipped to grow your own chamomile and reap its many rewards. Whether you’re a seasoned gardener or just starting out, our step-by-step advice will have you sipping on homemade chamomile tea in no time!
Choosing the Right Variety
When it comes to growing chamomile, selecting the right variety is crucial for optimal results and a successful harvest. Let’s dive into the factors that influence your choice of chamomile type.
Understanding the Different Types of Chamomile
Chamomile is a versatile herb that comes in several varieties, each with its unique characteristics and uses. As you begin to grow and harvest chamomile for tea, skincare, or medicinal purposes, it’s essential to understand the differences between the most common types.
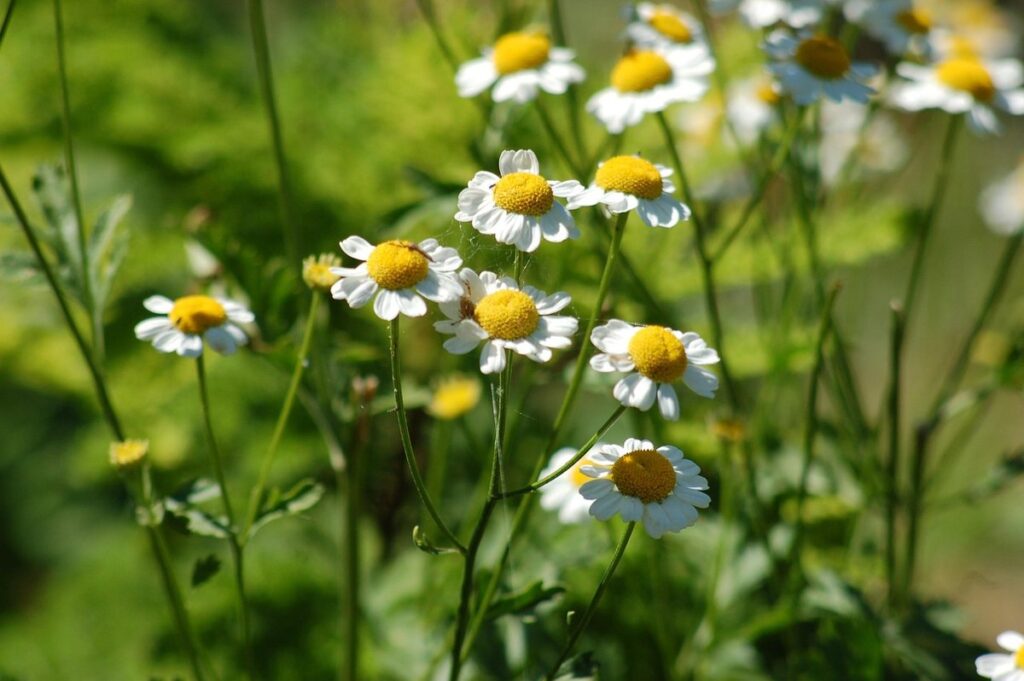
German chamomile (Matricaria chamomilla) is one of the most widely cultivated species. It has apple-like white flowers with a strong apple fragrance and is often used as an herbal tea due to its calming effects. German chamomile grows relatively fast, reaching maturity in about 60-70 days, making it a popular choice for commercial growers.
Roman chamomile (Anthemis nobilis), on the other hand, has daisy-like flowers with a sweeter fragrance than German chamomile. It prefers cooler climates and can grow up to two feet tall. Roman chamomile is often used in skincare products due to its antiseptic properties.
When choosing between these types of chamomile, consider your specific needs: if you want a fast-growing option for tea production, German chamomile might be the better choice. If you’re looking for a variety with antiseptic properties for skincare products, Roman chamomile is a better fit.
Factors to Consider When Selecting a Variety
When selecting a chamomile variety, there are several key factors to consider. Climate plays a significant role in choosing the right type of chamomile for your garden. If you live in an area with hot summers and mild winters, German chamomile (Matricaria chamomilla) is a good choice due to its heat tolerance and ability to thrive in dry conditions. On the other hand, if you’re growing in cooler climates, Roman chamomile (Anthemis nobilis) may be more suitable.
Soil type is also an essential consideration when selecting a chamomile variety. Chamomile prefers well-draining soil that’s rich in organic matter. If your soil is heavy clay or prone to waterlogging, you’ll want to choose a variety that’s tolerant of wet conditions. For example, English chamomile (Anthemis cotula) is known for its ability to thrive in damp environments.
Another important factor to consider is the intended use of your chamomile crop. If you’re growing for medicinal purposes, German chamomile is often preferred due to its higher apigenin content. For tea or potpourri production, Roman chamomile may be a better choice due to its stronger apple-like fragrance and slightly sweet flavor.
Soil Preparation and Planting
Before you can start harvesting those lovely chamomile flowers, you need to prepare a bed that’s perfect for your plants. This section will walk you through the process of creating an ideal environment for your chamomile to thrive.
Preparing the Soil for Chamomile Growth
Chamomile is a low-maintenance herb that can thrive in a variety of soil conditions. However, to ensure optimal growth and bountiful harvests, it’s essential to prepare the soil correctly.
First, let’s talk about pH levels: chamomile prefers slightly acidic to neutral soil with a pH between 6.0 and 7.0. If your soil is too alkaline or acidic, it may hinder the plant’s growth and affect its flavor and aroma. To check your soil’s pH level, you can purchase a DIY testing kit or send a sample to a lab for analysis.
In terms of nutrient requirements, chamomile needs well-draining soil with adequate nutrients. Mix in 2-3 inches of compost or well-rotted manure to improve soil structure and fertility. You can also add a balanced fertilizer (10-10-10 NPK) according to the manufacturer’s instructions. Avoid over-fertilizing, as this can lead to weak and leggy stems.
Before planting chamomile seeds or seedlings, ensure your soil is workable by loosening it to a depth of 8-10 inches. This will give the roots room to grow and establish themselves in the new environment.
Planting Techniques for Maximum Success
When planting chamomile seeds or seedlings, it’s essential to get the spacing and depth just right for maximum success. Chamomile plants prefer well-draining soil and full sun to partial shade, so choose a location that receives at least 4-6 hours of direct sunlight per day.
For sowing seeds directly into the ground, space them about 12-18 inches apart in rows that are 2-3 feet apart. Sow the seeds about 1/8 inch deep and 1/4 inch deeper than their original depth if you’re using seedlings. Water gently but thoroughly after planting.
If you’re transplanting seedlings, wait until they have at least two sets of leaves before transferring them to their final location. Space them the same distance apart as mentioned above, and water well to settle the soil.
Keep in mind that chamomile is a low-growing plant that can form dense mats over time. To encourage air circulation and prevent fungal diseases, make sure to leave enough space between plants for good air flow. By following these guidelines, you’ll be well on your way to growing healthy and thriving chamomile plants.
Care and Maintenance of Chamomile Plants
To keep your chamomile plants thriving, regular care and maintenance is essential, including pruning, watering, and protecting them from pests and diseases. By following these tips, you’ll be rewarded with a bountiful harvest.
Watering and Irrigation Requirements
Chamomile plants are sensitive to overwatering, which can lead to root rot and other problems. To ensure healthy growth, it’s essential to establish a proper watering schedule.
A general rule of thumb is to water chamomile plants when the top inch of soil feels dry to the touch. This may need to be done daily during hot summer months, but less frequently during cooler periods. The exact frequency will depend on factors such as climate, soil type, and plant age.
It’s also crucial to avoid getting water on the leaves or flowers, as this can lead to fungal diseases. Instead, water at the base of the plants, allowing the moisture to soak into the roots.
In areas with low rainfall, a drip irrigation system can be an effective way to deliver water directly to the roots while minimizing evaporation and runoff. Mulching around the plants can also help retain moisture in the soil and reduce watering frequency.
Fertilization and Pest Control Strategies
When it comes to growing healthy chamomile plants, fertilization and pest control strategies play a crucial role. To promote optimal growth, you’ll want to choose the right fertilizer for your plant’s needs.
Organic fertilizers like compost tea or well-rotted manure can provide essential nutrients without harming the environment. For example, adding a teaspoon of Epsom salt to the soil can help improve magnesium levels and promote healthy root development. On the other hand, synthetic fertilizers can be effective but may require more frequent applications.
In terms of pest control, keep an eye out for common pests like aphids, whiteflies, and spider mites. To manage these issues, you can use neem oil or insecticidal soap as a natural deterrent. Regularly inspecting your plants and taking action early on will help prevent infestations from getting out of hand.
Some additional tips to keep in mind include maintaining good air circulation around the plants and using row covers to prevent pests from reaching them. By implementing these fertilization and pest control strategies, you’ll be well on your way to growing healthy, thriving chamomile plants that produce an abundance of flowers for harvesting.
Pruning and Training Techniques
Pruning and training techniques are essential for promoting healthy growth, encouraging bushy stems, and maximizing your chamomile harvest. Learn how to prune and train your chamomile plants effectively here.
Why Prune Chamomile Plants?
Pruning your chamomile plants is an essential step in maintaining their health and promoting blooming. When left unpruned, chamomile plants can become leggy and sparse, leading to reduced flowering and a weakened root system. Regular pruning helps maintain the plant’s shape, encourages new growth, and directs the plant’s energy towards producing more flowers.
By pruning your chamomile plants, you’re also removing any dead or diseased stems, which prevents the spread of disease and promotes healthy growth. Additionally, pruning encourages the plant to produce new shoots, resulting in a fuller and more robust appearance.
To prune your chamomile plants effectively, remove any weak or spindly growth after flowering has finished for the season. Cut back stems to about one-third of their height to encourage bushy growth and prevent legginess. Regular pruning also helps control the plant’s size and shape, making it easier to manage in smaller spaces. With regular pruning, your chamomile plants will remain healthy, robust, and continue to produce an abundance of beautiful flowers throughout the growing season.
Tips on Pruning and Training for Optimal Growth
Pruning and training are essential for promoting optimal growth, preventing disease, and encouraging a bushy habit in chamomile plants. To prune your chamomile correctly, start by removing any dead or damaged flowers to prevent the spread of disease and encourage new growth.
Next, cut back the plant’s stems to about half their height after it has finished flowering. This will help control its size and promote more blooms throughout the season. You can also trim off any weak or leggy growth to maintain a compact shape and prevent the plant from becoming too sprawling.
To train your chamomile, try staking it up to a trellis or other support. This will allow you to make the most of vertical space and keep the plant upright, even in windy conditions. You can also pinch off the top sets of leaves on the stems to encourage branching and create a fuller, more compact plant.
Regular pruning and training will not only improve your chamomile’s appearance but also promote healthy growth and encourage more blooms throughout the season.
Harvesting and Drying Chamomile
Now that you’ve learned how to grow and care for your chamomile plants, it’s time to reap the rewards by harvesting and drying this lovely herb. This process is crucial for preserving its medicinal properties.
When to Harvest Chamomile Flowers
When it comes to harvesting chamomile flowers, timing is everything. You’ll want to pluck them at the peak of their potency and flavor, which means understanding when they’re most likely to bloom.
Chamomile typically blooms from mid-summer to early fall, with the exact timing depending on your location, climate, and specific variety. In general, you can expect chamomile flowers to bloom in full sun for about 6 weeks, usually around July or August in the Northern Hemisphere. However, this can vary significantly depending on factors like temperature, rainfall, and soil quality.
To determine when your chamomile is ready for harvesting, look for signs of peak blooming such as the number of white flowers per stem increasing, the flower heads becoming larger, and a sweet, apple-like fragrance wafting from the plants. It’s essential to harvest chamomile during this brief window of peak potency, usually around the mid-morning when the dew has evaporated but before the heat of the day sets in.
Timing your harvest just right will ensure that you collect the highest quality and most flavorful flowers for tea, infusions, or other uses.
Methods for Drying and Preserving Chamomile
Drying chamomile effectively is crucial for preserving its medicinal properties and extending its shelf life. There are several methods to dry chamomile, each with its own advantages and considerations.
Air-drying is a simple method where you hang the dried flowers upside down in a warm, dry, dark place. This method can take up to two weeks, depending on the humidity levels in your area. To ensure even drying, it’s essential to keep the flowers away from direct sunlight and heat sources.
Oven-drying is another popular method, which involves spreading the chamomile flowers on a baking sheet and placing them in a low-temperature oven (150°F – 200°F). This method is faster than air-drying, taking around 1-2 hours. However, be cautious not to overdry the flowers, as this can lead to loss of essential oils.
Microwave-drying is a quicker option, but it requires more attention to prevent overheating and scorching. Place a single layer of chamomile flowers in a microwave-safe container and heat for 30-second intervals, checking and rotating the flowers after each interval until dry.
Regardless of the method chosen, it’s essential to store dried chamomile in airtight containers to maintain its potency and freshness.
Common Issues and Pests in Chamomile Gardens
As you tend to your chamomile garden, it’s not uncommon for pests and diseases to arise. In this crucial section, we’ll tackle common issues to look out for.
Identifying Common Pests and Diseases
Chamomile gardens are susceptible to various pests and diseases that can cause damage to the plants if left unchecked. One of the most common pests is the aphid, which sucks the sap from the leaves, causing curled or distorted growth. Check for yellowing or stunted leaves, as well as a sticky substance on the stems and leaves.
Another pest that affects chamomile is the spider mite, which feeds on the plant’s sap, causing fine webbing between the stems and leaves. White powdery patches on the leaves are often indicative of an infestation.
Chamomile is also prone to root rot caused by overwatering, as well as leaf spot diseases such as Septoria leaf spot. Look for black or brown spots on the leaves, which may cause the leaves to drop prematurely.
Regular monitoring and inspections can help identify potential issues early on. Remove any infested or damaged plants to prevent the spread of disease. Use organic pest control methods whenever possible, such as neem oil or insecticidal soap. Prune infected areas to promote healthy growth and prevent further damage.
Prevention and Control Strategies
Preventing pest infestations and diseases is crucial to maintaining a healthy chamomile garden. Regularly inspect your plants for signs of pests like aphids, whiteflies, and spider mites, which can be controlled using neem oil or insecticidal soap. Organic methods also include introducing beneficial insects such as ladybugs and lacewings that prey on these pests.
To prevent fungal diseases like powdery mildew and leaf spot, ensure good air circulation by spacing plants 12-18 inches apart. Remove any infected leaves or flowers to prevent the disease from spreading. Water your chamomile plants in the morning to allow excess moisture to evaporate before nightfall, reducing the risk of fungal growth.
Chemical controls can be effective for severe infestations or diseases, but use them as a last resort and follow the product instructions carefully. Integrated pest management (IPM) strategies that combine multiple methods can also help minimize chemical use and promote long-term sustainability in your chamomile garden.
Conclusion: Maximizing Your Chamomile Yield
By following the guidance outlined in this ultimate guide, you’ll be well on your way to successfully growing and harvesting chamomile. To maximize your yield, remember that regular pruning is essential to encourage bushy growth and prevent flowering too quickly. Cut back the stems after each harvest, leaving about an inch of new growth intact. This will help direct energy towards producing more blooms, rather than seed production.
In addition to maintaining a healthy plant, consider planting multiple varieties to stagger their blooming periods. This will ensure a continuous supply of chamomile throughout the growing season. With proper care and attention, you can expect to harvest your chamomile flowers in as little as 6-8 weeks after planting.
Frequently Asked Questions
What are the ideal climate conditions for growing chamomile?
Chamomile thrives in temperate climates with moderate temperatures between 65°F (18°C) and 75°F (24°C). It requires full sun to partial shade, making it suitable for gardens in USDA zones 4-9. Be sure to check your local hardiness zone before planting.
Can I grow chamomile indoors if I don’t have an outdoor garden?
Yes, you can grow chamomile indoors in containers or pots. Choose a pot that is at least 6 inches deep and has good drainage holes. Use a well-draining potting mix and maintain temperatures between 65°F (18°C) and 75°F (24°C). Chamomile plants will require more frequent watering when grown indoors.
How do I prevent common pests like aphids and whiteflies from infesting my chamomile plants?
To prevent infestations, inspect your plants regularly for signs of pests. Use neem oil or insecticidal soap to control aphid populations, and introduce natural predators like ladybugs to combat whiteflies. Additionally, ensure good air circulation around your plants and maintain a clean growing environment.
Can I harvest chamomile flowers at any time during the day?
Harvesting chamomile flowers in the morning is ideal when the essential oils are most concentrated. Avoid harvesting during peak sun hours (usually between 11 am and 3 pm) to prevent damage from intense sunlight. Use scissors or pinch off individual flowers to encourage new growth.
How do I store dried chamomile flowers for maximum preservation?
Store dried chamomile flowers in airtight containers, such as glass jars or paper bags, away from direct sunlight and moisture. Keep them in a cool, dark place like a cupboard or pantry. You can also freeze the flowers to preserve their potency and aroma for longer periods.