If you’re looking for a low-maintenance addition to your garden that still packs a punch, look no further than Helleborus foetidus. This unique plant has gained popularity among gardeners in recent years due to its ornamental value and ease of care. But what exactly makes it so special? In this article, we’ll delve into the optimal growing conditions for Helleborus foetidus, including soil, sunlight, and watering requirements. We’ll also cover propagation methods, from seed to division, as well as common problems and their solutions. By the end of this guide, you’ll be equipped with all the knowledge needed to successfully grow and care for your own Helleborus foetidus plant, making it a beautiful and thriving addition to your garden. With its striking foliage and delicate blooms, it’s no wonder why Helleborus foetidus is a top choice among gardeners.
Introduction to Helleborus Foetidus
Let’s start by getting familiar with one of the lesser-known yet fascinating members of the Helleborus family: Helleborus foetidus. This section will give you a brief introduction to its unique characteristics and needs.
What is Helleborus Foetidus?
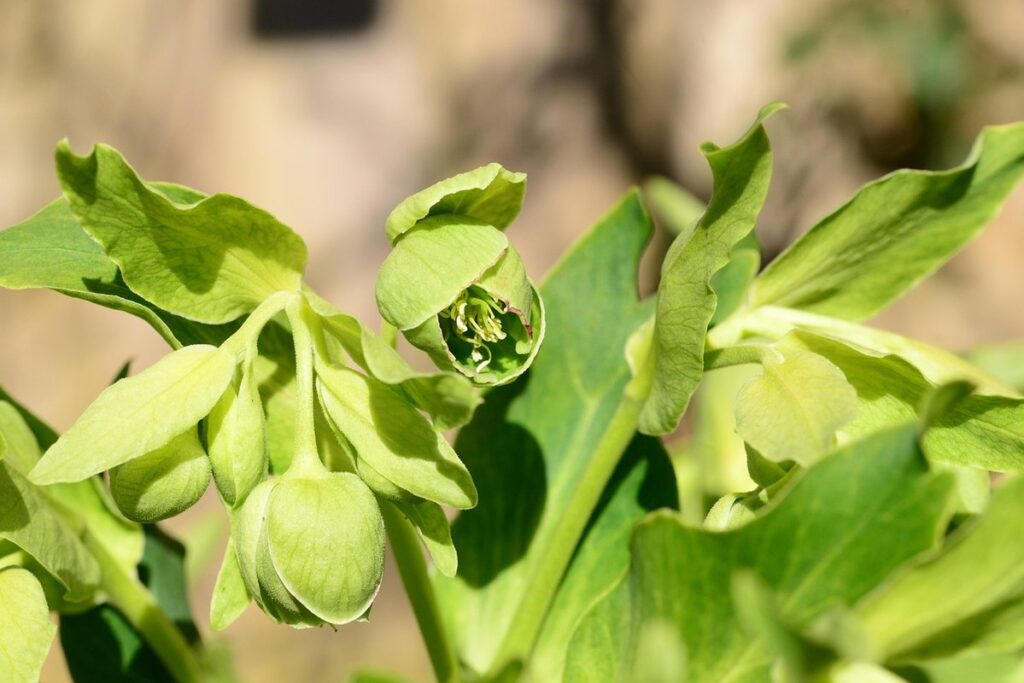
Helleborus foetidus is a species of flowering plant that belongs to the Ranunculaceae family. Native to Europe and Western Asia, it’s often referred to as the stinking hellebore due to its unpleasantly scented flowers. Despite this characteristic, the plant has gained popularity among gardeners for its unique appearance and low-maintenance requirements.
One of the distinctive features of Helleborus foetidus is its evergreen foliage, which remains intact throughout the year. The dark green leaves are lance-shaped and serrated, creating a striking contrast with the nodding, bell-shaped flowers that appear in late winter to early spring. These flowers are typically pale yellow or creamy white, but occasionally display a hint of red or pink.
When choosing Helleborus foetidus for your garden, consider its growth habit. It tends to form clumps over time, making it an excellent option for woodland gardens or areas with dappled shade. With proper care, this plant can thrive in zones 5-9 and even tolerate some frost, making it a versatile choice for various climates.
In the next section, we’ll delve into the specific care requirements of Helleborus foetidus, including lighting, watering, and fertilization tips to ensure your plant thrives.
Importance of Helleborus Foetidus in Gardening
Helleborus foetidus is a sought-after plant among gardeners due to its unique ornamental value and versatility. One reason for its popularity is its ability to thrive in shady conditions, making it an ideal choice for areas with limited sunlight. This adaptability allows gardeners to incorporate Helleborus foetidus into various garden designs, from woodland gardens to cottage-style plantings.
Its foliage, which features glossy, lobed leaves, adds depth and texture to garden beds. The plant’s nodding, bell-shaped flowers also provide a striking contrast in color and form during the late winter and early spring seasons. Gardeners can use Helleborus foetidus as a groundcover or interspers it with other plants to create a layered effect.
In addition to its aesthetic appeal, Helleborus foetidus is low-maintenance and relatively pest- and disease-free. This makes it an excellent choice for gardeners who want to minimize their upkeep while still enjoying the benefits of a lush, thriving garden. By incorporating this plant into their designs, gardeners can add year-round interest and texture to their gardens with minimal effort.
Growing Conditions for Helleborus Foetidus
To thrive, helleborus foetidus requires specific growing conditions, including partial shade and consistent moisture in well-draining soil. These conditions will be explored further below.
Optimal Climate and Soil Requirements
Helleborus foetidus thrives in a specific set of climate and soil conditions. To promote healthy growth, aim for an ideal temperature range between 35°F to 65°F (2°C to 18°C). This temperate zone allows the plant to maintain its vigor throughout the seasons. Avoid exposing helleborus foetidus to extreme temperatures above 75°F (24°C) or below 25°F (-4°C), as this can cause damage to the leaves and flowers.
Humidity levels also play a crucial role in maintaining healthy growth. Aim for moderate humidity levels between 50-70%. This range allows for optimal water retention, reducing the need for frequent watering. Avoid humid environments above 80%, as this can lead to root rot and other fungal diseases.
In terms of soil pH, helleborus foetidus prefers a slightly acidic to neutral environment with a pH range between 6.0-7.0. A well-draining loamy or sandy soil is ideal for optimal growth. To achieve the right balance, consider adding a mix of compost and organic matter to your existing soil structure. This blend will help maintain the required moisture levels while preventing root rot and promoting healthy root development.
Lighting Needs for Helleborus Foetidus
Helleborus foetidus requires partial shade to complete shade conditions to thrive. While it can tolerate some direct sunlight, prolonged exposure can cause scorching and discoloration of the leaves. Aim for a location that receives filtered or dappled light, such as under a tree canopy or near an east- or west-facing window.
In ideal conditions, Helleborus foetidus prefers bright, indirect light to promote healthy growth and flowering. If you’re growing this plant in full sun, be sure to provide protection from intense midday sunlight by using sheer curtains or a shade cloth. Conversely, if your plant is not receiving enough light, it may become leggy and produce fewer flowers.
A good rule of thumb is to observe the plant’s natural growing conditions in its native habitat. Helleborus foetidus originates from woodlands and shaded areas in Europe and Asia, so replicate these environments by placing your plant in a spot with low to moderate light levels. By providing the right amount of light, you’ll be rewarded with vibrant green foliage and an abundance of bell-shaped flowers in shades of green and white.
Care Instructions for Helleborus Foetidus
To keep your helleborus foetidus healthy and thriving, it’s essential to follow proper care instructions that include watering, fertilizing, and pruning techniques tailored specifically for this plant.
Watering Schedule and Techniques
When it comes to watering your Helleborus foetidus plant, getting it just right can be a challenge. These plants prefer well-draining soil and should never be waterlogged. A good rule of thumb is to check the soil moisture by sticking your finger into the soil up to the first knuckle. If the soil feels dry, it’s time to water.
As for frequency, Helleborus foetidus prefers to have its soil consistently moist but not soggy. Water your plant once a week during the spring and summer months when they’re actively growing. During the fall and winter months, you can reduce watering to once every 10-14 days as the plant goes dormant.
To avoid overwatering, make sure the pot has good drainage holes in the bottom and use a potting mix that’s designed for plants with high water requirements. You should also avoid getting water on the leaves or crown of the plant, as this can lead to rot. Instead, water at the base of the plant, allowing the soil to absorb the moisture.
Fertilization and Pruning Practices
Fertilization is typically not required for Helleborus foetidus as it’s adapted to poor soil conditions. However, if you want to promote healthy growth and flowering, a balanced fertilizer can be applied during the growing season (spring-fall). Use a slow-release fertilizer or a low-nitrogen formula to avoid promoting excessive foliage at the expense of flowers.
When fertilizing, apply the recommended dosage directly around the base of the plant, taking care not to burn the roots. It’s essential to follow the manufacturer’s instructions and take into account any specific requirements for your region’s climate and soil type.
Pruning is necessary to maintain Helleborus foetidus’ shape and promote healthy growth. Remove dead or damaged flowers after blooming to encourage new blooms and prevent seed production, which can weaken the plant. Cut back any leggy stems in late winter or early spring to about 2-3 inches from the base of the plant.
Also, consider removing any foliage that’s past its prime, as this will help maintain a neat appearance and prevent overcrowding. Be cautious not to over-prune, as this can stress the plant and reduce flowering.
Propagation Methods for Helleborus Foetidus
To successfully propagate your helleborus foetidus, you’ll want to focus on division and seed collection, both of which require a bit of patience and care. We’ll walk through each method step by step.
Division and Planting Tips
Dividing established Helleborus foetidus plants is a great way to propagate new ones and maintain their health. To divide, start by carefully digging up the entire plant, taking care not to damage its roots. Gently separate the offsets or divisions from the mother plant using a sharp tool or pruning shears.
You can also repot the offsets individually, making sure each one has at least one growing point above the soil level. This will encourage new growth and prevent the offsets from becoming pot-bound. Make sure to provide enough space for the roots of each offset to establish themselves when replanting.
When replanting divisions or offsets, choose a location with well-draining soil and partial shade to full sun, depending on your climate. Water thoroughly after planting and keep the soil consistently moist during the first growing season. Avoid overwatering, as this can lead to root rot. With proper care, your new Helleborus foetidus plants should thrive and bloom beautifully in a few years.
To ensure success, plant offsets or divisions at the same depth they were previously growing, making sure not to bury them too deeply. Keep an eye on their progress and adjust watering as needed based on weather conditions.
Seed Germination Techniques
Obtaining seeds from mature Helleborus foetidus flowers can be a rewarding experience for gardeners. To collect seeds, allow the plants to bloom and develop seed pods. These pods will eventually turn brown and split open, releasing their seeds. It’s essential to harvest the seeds as soon as possible after they’re released to ensure optimal germination rates.
Sowing Helleborus foetidus seeds requires a specific environment. They need to be stratified in a cold frame or a sealed plastic bag placed in the refrigerator at around 4°C (39°F) for about 30-60 days. This process simulates winter conditions, helping the seeds break dormancy. Once stratified, sow them about 1/8 inch deep and 1-2 inches apart in a well-draining seed starting mix. Keep the soil consistently moist but not waterlogged during this period.
After sowing, maintain temperatures between 15°C to 20°C (59°F to 68°F). Helleborus foetidus seeds typically germinate within 30-60 days after sowing. Avoid overwatering, as this can lead to rot and poor seedling establishment. By following these steps, you’ll increase the chances of successful seed germination and grow healthy Helleborus foetidus plants.
Common Problems and Solutions for Helleborus Foetidus
As you care for your Helleborus foetidus plant, you may encounter some common issues that can be frustrating to solve. We’ll cover these problems and provide practical solutions in this section.
Pests and Diseases Affecting This Plant
Helleborus foetidus is not immune to pests and diseases that can cause significant damage if left unchecked. One of the most common pests affecting this plant are slugs and snails, which can be identified by their slimy trails on the leaves. To control these pests, use copper tape around the plant’s pot or nearby areas, as slugs and snails don’t like to cross over it.
Another pest that may affect Helleborus foetidus is aphids, which can be treated with insecticidal soap or neem oil. Regularly inspecting your plant for signs of pests will help you catch issues early on and prevent further damage.
As for diseases, root rot is a common issue caused by overwatering, which can lead to soft, mushy stems and roots that are easily damaged. To avoid this, ensure good drainage in the potting mix and avoid getting water on the plant’s leaves. Regularly repot your Helleborus foetidus every 2-3 years to refresh the soil and prevent root bound issues.
It’s essential to note that prevention is key when it comes to pests and diseases. By maintaining good hygiene, monitoring your plant regularly, and taking prompt action when you notice any signs of trouble, you can keep your Helleborus foetidus healthy and thriving.
Troubleshooting Tips for Specific Issues
One of the most common issues gardeners face with Helleborus foetidus is yellow leaves. This can be caused by overwatering, underwatering, or exposure to extreme temperatures. To remedy this issue, ensure that your plant is receiving the right amount of moisture – allow the soil to dry slightly between waterings. Avoid getting water on the leaves themselves, as this can cause further damage.
If you’re experiencing poor growth or no blooms, it’s likely due to a lack of nutrients or insufficient light. Consider repotting your Helleborus foetidus in a well-draining potting mix, and fertilize regularly during the growing season (spring-fall). If you suspect that your plant is not receiving enough light, consider moving it to a brighter location.
Some gardeners also encounter issues with poor root development. This can be caused by a variety of factors, including insufficient moisture or nutrients. To prevent this issue, ensure that your Helleborus foetidus is receiving the right amount of water and fertilizer.
Conclusion: Enjoying Your Helleborus Foetidus Plant
Now that you’ve mastered the care and maintenance of your Helleborus foetidus plant, it’s time to enjoy its beauty all year round. We’ll share some final tips on maximizing its growth and enjoyment in this home.
Final Thoughts on Care and Maintenance
As we come to the end of this comprehensive guide to caring for your Helleborus foetidus plant, it’s essential to recap the most critical care tips and reminders. Remember that consistency is key when it comes to providing optimal conditions for your plant.
First and foremost, ensure that you’re planting in well-draining soil with a slightly acidic pH range. This will prevent waterlogged conditions that can lead to root rot. Water your Helleborus foetidus sparingly during the winter months but consistently throughout the spring and summer growth periods. Aim for about 1-2 inches of rainfall or irrigation per week, adjusting as needed based on local climate conditions.
Additionally, provide partial shade in warmer climates and full sun to partial shade in cooler regions. Fertilize lightly after blooming, using a balanced, water-soluble fertilizer diluted according to the manufacturer’s instructions. Prune old flowers, cut back foliage, and divide established clumps every 3-4 years for optimal growth and flowering.
By following these care tips and staying attentive to your plant’s unique needs, you’ll enjoy a thriving Helleborus foetidus in your garden for years to come.
Tips for Sharing Knowledge with Others
As you’ve mastered the care and maintenance of your Helleborus foetidus plant, it’s time to share your knowledge with others. Not only will this help spread interest in this unique plant, but it can also encourage fellow gardeners to try their hand at growing one.
Consider sharing your experiences on social media platforms or online gardening forums, where enthusiasts often seek advice and tips from more seasoned growers. You could also write a guest post for a local gardening blog or even contribute to a larger publication that focuses on plants and gardens.
To get started, think about what aspects of Helleborus foetidus care you’d like to highlight. Perhaps you’ve developed a foolproof method for preventing pests, or have discovered the perfect spot in your garden for them to thrive. Whatever it is, be sure to break down complex topics into easy-to-follow steps and provide examples from your own experience.
Don’t forget to include beautiful photos of your plant, which can help illustrate key points and make your advice more engaging. By sharing your knowledge, you’ll not only be helping others but also enriching the gardening community as a whole.
Frequently Asked Questions
How do I ensure my Helleborus foetidus plant receives the right amount of sunlight for optimal growth?
To determine if your Helleborus foetidus is getting enough sunlight, observe its foliage color and density. If it’s receiving too little light, the leaves may become a deeper green or even pale yellow. Conversely, too much direct sunlight can cause scorching. Ideally, provide filtered or dappled shade for at least 4-6 hours a day.
Can I propagate Helleborus foetidus using leaf cuttings?
Unfortunately, Helleborus foetidus is not easily propagated through leaf cuttings. Instead, focus on division and seed germination methods to multiply your plant. For division, separate the roots gently during spring or fall when the plant is dormant. Prepare a new pot with fresh soil and plant the divided sections about 2-3 inches deep.
What are some common pests that can affect Helleborus foetidus plants?
One of the most prevalent issues affecting Helleborus foetidus is aphids, which can be identified by their small size and white, cottony appearance. To manage these pests, use neem oil or insecticidal soap to control infestations before they spread.
Can I plant Helleborus foetidus in containers?
Helleborus foetidus is a versatile plant that can thrive in containers provided you meet its specific needs. Use a well-draining potting mix and choose a container at least 6-8 inches deep to accommodate the plant’s extensive root system. Keep in mind that Helleborus foetidus prefers moist but not waterlogged conditions.
How do I prevent overwatering, which can lead to root rot in my Helleborus foetidus?
To avoid overwatering and subsequent root rot, check your soil regularly by inserting a finger into the top 2-3 inches of the pot. If the soil feels dry or slightly damp but not waterlogged, it’s time for watering. Make sure to water thoroughly but allow excess moisture to drain out of the container’s drainage holes.