Are you ready to discover a new and fascinating way to grow onions in your garden? The Egyptian walking onion is an ancient variety that has been gaining popularity among gardeners, and for good reason. This unique plant produces edible bulbs on top of its stems, making it a space-saving and low-maintenance addition to any kitchen garden. With its rich history dating back over 2,000 years, the Egyptian walking onion has been used in traditional medicine and cooking for centuries.
In this comprehensive guide, we’ll take you through everything you need to know about growing, caring for, and harvesting your own Egyptian walking onion patch. From planting and maintenance tips to creative uses in the kitchen, we’ll cover it all. Whether you’re a seasoned gardener or just starting out, our expert advice will help you get the most out of this incredible plant.
Introduction to the Egyptian Walking Onion
Get ready to discover one of the most unique and fascinating vegetables you’ve ever grown: the Egyptian walking onion! This section covers its origins, characteristics, and benefits.
What is an Egyptian Walking Onion?
The Egyptian walking onion is a unique and fascinating plant that’s gaining popularity among gardeners. Its botanical name is Allium cepa var. proliferum, which may sound complex, but don’t worry, it’s easy to grow and care for.
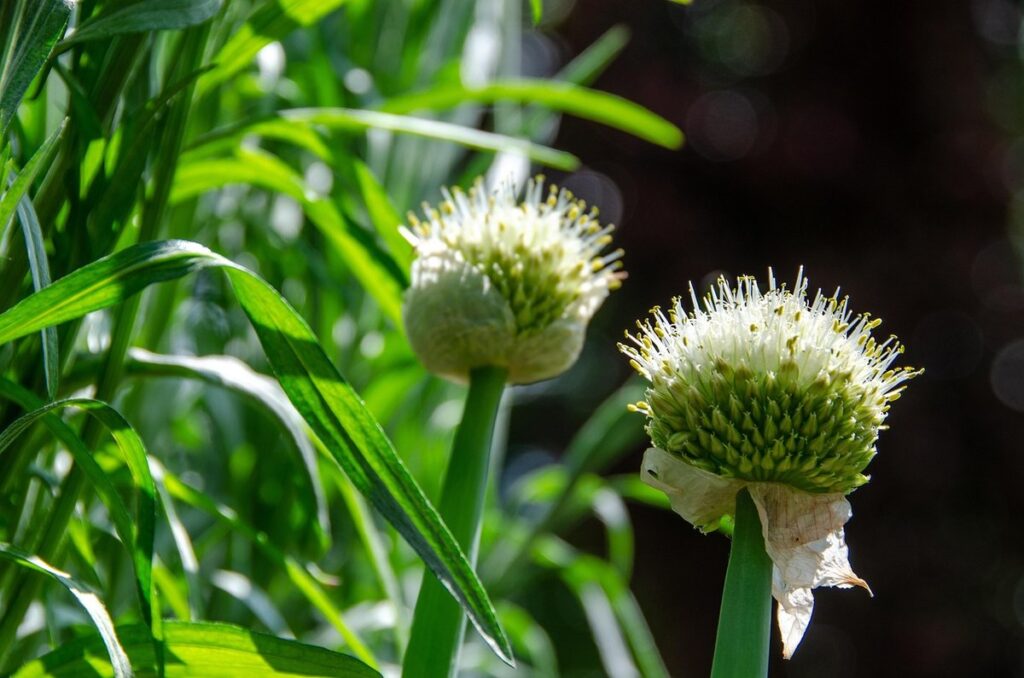
One of the most distinctive features of the Egyptian walking onion is its ability to produce new bulbs on top of a long stem, giving it the appearance of walking or creeping across the soil. This characteristic has led to its name, “walking” onion. As these new bulbs mature, they can be harvested and used in cooking, much like regular onions.
The Egyptian walking onion also has a unique flavor profile that’s often described as sweet and mild, making it an excellent addition to salads, soups, and sauces. Its hardiness and adaptability make it an ideal choice for gardeners who want to grow onions with minimal maintenance. With proper care, the Egyptian walking onion can thrive in containers or directly in the ground, providing a bountiful harvest of delicious bulbs year after year.
History of the Egyptian Walking Onion
The Egyptian walking onion has a rich and fascinating history that spans thousands of years. Originating from Egypt and the Middle East, this plant was highly valued by ancient civilizations for its unique characteristics and culinary uses. The Egyptians prized the walking onion for its hardiness, ability to regrow new bulbs at the top of its stem, and its sweet, mild flavor.
From Egypt, the walking onion spread throughout the Mediterranean region, where it became a staple ingredient in many traditional dishes. The ancient Greeks and Romans cultivated the plant extensively, using it in cooking and as a medicinal herb. As trade routes expanded, the Egyptian walking onion was introduced to other parts of the world, including Europe and Asia.
Despite its long history, the Egyptian walking onion remained relatively unknown in Western gardens until recent years. Its rediscovery has led to a surge in popularity among gardeners and chefs alike, who appreciate its versatility and unique flavor profile. Today, the Egyptian walking onion is grown in many parts of the world, from backyard gardens to commercial farms.
Growing an Egyptian Walking Onion Patch
Now that you’ve got your Egyptian walking onion bulbs, let’s talk about how to grow them into a thriving patch that will produce for years to come.
Choosing the Right Location for Your Patch
When it comes to choosing the right location for your Egyptian walking onion patch, several factors come into play. First and foremost, you’ll want to consider the climate. Egyptian walking onions prefer a temperate climate with moderate temperatures ranging from 60°F to 80°F (15°C to 27°C). They can tolerate some frost but are sensitive to extreme heat or cold.
In terms of soil type, these onions thrive in well-draining, fertile soil that’s rich in organic matter. Aim for a pH between 6.0 and 7.0, as this will provide the perfect balance for healthy growth. Make sure your chosen location receives at least six hours of direct sunlight per day. However, some afternoon shade can be beneficial to prevent scorching.
Additionally, consider factors like moisture and wind protection. Egyptian walking onions prefer consistent moisture levels but don’t like standing water. They also benefit from a bit of wind protection to prevent damage to their delicate leaves.
Planting and Preparing the Soil
When planting an Egyptian walking onion patch, preparing the soil is crucial for optimal growth. Choose a location with full sun and well-draining soil, as these onions prefer dry conditions. Test the pH level of your soil to ensure it falls within the ideal range of 6.0-7.0.
To prepare the soil, mix in compost or aged manure to improve its fertility and structure. You can also add a balanced fertilizer according to the manufacturer’s instructions. For a more natural approach, cover crops like clover or rye can be incorporated into the soil to increase nitrogen levels.
Plant Egyptian walking onion sets 1-2 inches deep, 4-6 inches apart in rows that are 12-18 inches apart. Alternatively, you can start seeds indoors 8-10 weeks before the last frost date and transplant them outside when they have 2-3 sets of leaves. Water thoroughly after planting and keep the soil consistently moist during the first few weeks after transplantation.
Care and Maintenance of an Egyptian Walking Onion Patch
To keep your Egyptian walking onion patch thriving, regular care is crucial, from watering to pruning, which we’ll cover in detail below. Proper maintenance will reward you with a bountiful harvest and healthy plants.
Watering and Mulching Techniques
When it comes to watering and mulching your Egyptian walking onion patch, consistency is key. These onions prefer well-drained soil and full sun, so make sure to water them deeply once or twice a week, depending on weather conditions. It’s essential to check the soil moisture by inserting your finger into the soil up to the knuckle; if it feels dry, it’s time for watering.
Mulching is also crucial in maintaining a healthy environment for your onion plants. Apply a 2-3 inch layer of organic mulch such as straw or wood chips around the base of the onions. This will help retain moisture, suppress weeds, and regulate soil temperature. However, be cautious not to over-mulch, which can cause the onions to rot.
As your onions begin to form bulbs, you’ll need to reduce watering to prevent them from becoming too large. During this stage, mulching becomes even more critical in preventing weed growth and retaining moisture. Remember to keep a close eye on weather conditions, adjusting your watering schedule accordingly to ensure your Egyptian walking onion patch remains healthy and thriving.
Fertilization and Pest Control
To maintain a healthy and thriving Egyptian walking onion patch, fertilization is crucial. These onions are heavy feeders and require regular nutrient replenishment to promote growth, bulb formation, and overall plant health. A balanced fertilizer mix should be applied once a month during the growing season, taking care not to over-fertilize as this can lead to weak necks and poor storage quality.
Common pests that may affect your Egyptian walking onions include aphids, spider mites, and thrips. Organic management strategies involve introducing beneficial insects such as ladybugs or lacewings to prey on these pests. Regularly inspecting your patch for signs of infestation and using neem oil or insecticidal soap can help control populations.
Diseases like downy mildew and basal rot are also a concern, often caused by excessive moisture and poor air circulation. Practice good gardening hygiene by removing weeds, rotating crops, and avoiding overwatering to prevent the spread of disease. Regularly inspect your plants for signs of infection and take prompt action to treat affected areas with organic fungicides or sulfur-based treatments.
Harvesting Your Egyptian Walking Onion Patch
Now that your Egyptian walking onion patch is thriving, it’s time to harvest its bulbs and offsets, ensuring a bountiful crop for future years. We’ll walk you through the process of harvesting these unique onions.
Understanding the Life Cycle of the Plant
As you tend to your Egyptian walking onion patch, it’s essential to understand their unique life cycle. During the summer months, your plants will go dormant, but this isn’t a reason to worry – it’s just a natural part of their growth process. What happens is that the plant starts producing offsets or baby onions around the base of the mother bulb.
These offsets are essentially tiny, immature bulbs that grow from the base of the mother plant, which will eventually break away and form new individual plants. The ideal time to harvest these offsets is when they’re about 1-2 inches tall and have formed their own small onion-like shape. It’s a good idea to wait until after the summer solstice when the plants are dormant, as this allows you to minimize damage to the mother plant.
When harvesting, carefully dig around the offset, making sure not to damage any of the surrounding foliage. Gently lift the new bulb out of the soil and trim back the old top growth to about an inch from the base. This will encourage the new offsets to grow and multiply, ensuring your Egyptian walking onion patch remains healthy and productive for years to come.
Techniques for Harvesting Onions and Offsets
When it’s time to harvest your Egyptian walking onion patch, you’ll have several techniques at your disposal. One popular method is to dig up entire plants, typically around 90 to 120 days after planting. This approach allows you to collect mature onions as well as offsets that can be replanted for future harvests.
Alternatively, you can lift individual bulbs from the soil when they’re large enough to handle. Check for this by gently digging near the base of each plant; if the bulbs are around 1-2 inches in diameter, it’s likely time to harvest them. This method is ideal if you want to encourage continuous onion production, as it leaves smaller offsets behind to grow into new plants.
Some gardeners also prefer to pick baby onions at various stages of maturity. You can do this by carefully digging up small bulbs that have formed around the base of the plant, usually when they’re about 1/4 inch in diameter. This will help control the spread of your onion patch and prevent overcrowding.
Uses and Benefits of Egyptian Walking Onions
Egyptian walking onions are incredibly versatile, offering a range of uses beyond just adding flavor to your meals. In this section, we’ll explore their various benefits and practical applications in the kitchen and beyond.
Culinary Uses and Recipes
The unique flavor profile of Egyptian walking onions makes them an excellent addition to various dishes. Their sweet and slightly tangy taste adds depth to both savory and sweet recipes. When cooking with Egyptian walking onions, it’s essential to use the leaves, stems, and bulbs separately, as each part has a distinct flavor.
For savory dishes, try adding the chopped leaves to salads or sautéing the stems with garlic as a side dish. The bulbs can be pickled like traditional onions for a tangy topping. You can also use them in place of regular onions in many recipes, such as soups, stews, and stir-fries.
In baked goods, Egyptian walking onions pair well with sweet ingredients like honey or maple syrup. Try adding the chopped leaves to scones or muffin batter for added flavor. The bulbs can be used as a substitute for traditional onions in bread recipes, giving the loaf a unique twist.
One of the best ways to showcase Egyptian walking onions is by making a simple onion chutney. Simply sauté the chopped stems and bulbs with some oil, salt, and spices, then simmer until thickened. This chutney can be served as a condiment or used as an ingredient in various recipes.
Medicinal and Health Properties
Egyptian walking onions are not only a delightful addition to any garden but also offer numerous health benefits when consumed. One of their most notable properties is their high antioxidant content. Antioxidants play a vital role in protecting the body from free radicals, which can cause cell damage and contribute to various diseases. Eating Egyptian walking onions has been shown to boost the immune system, reduce inflammation, and even exhibit anti-cancer properties.
In addition to their antioxidant properties, Egyptian walking onions have been found to contain compounds that exhibit anti-inflammatory effects. This makes them an excellent choice for individuals suffering from conditions like arthritis or other inflammatory-related disorders. To reap these benefits, simply chop up some fresh Egyptian walking onion tops and toss them into your favorite stir-fry or salad.
Some studies suggest that consuming Egyptian walking onions may also have a positive impact on cardiovascular health by reducing blood pressure and improving lipid profiles. While more research is needed to confirm this, incorporating Egyptian walking onions into your diet can’t hurt and may just provide an added layer of protection against chronic diseases.
Troubleshooting Common Issues in Your Patch
Don’t worry if things don’t quite go as planned in your Egyptian walking onion patch, we’ve got you covered with common issue solutions and troubleshooting tips inside.
Identifying and Resolving Soil-Related Problems
When it comes to growing Egyptian walking onions, soil-related problems can quickly become a major issue. To identify common issues like nutrient deficiencies, pH imbalances, or waterlogged conditions, start by observing your plants’ behavior and physical appearance.
Nutrient deficiencies are often visible in leaf color, size, or growth rate. For example, if your onion leaves turn yellow or pale green, it may be a sign of nitrogen deficiency. Conversely, excessive magnesium can cause dark green or curly leaves. To correct nutrient imbalances, consider conducting a soil test to determine which nutrients are lacking and apply organic amendments accordingly.
Another common issue is pH imbalance. Egyptian walking onions prefer slightly acidic to neutral soil (pH 6.0-7.5). If your soil’s pH is too high or low, plants may struggle to absorb essential nutrients. To adjust the pH, add elemental sulfur to lower it or dolomitic limestone to raise it.
Waterlogged conditions can be just as problematic. Egyptian walking onions don’t like standing water and are prone to root rot in saturated soils. If you notice your onions struggling to dry out between watering sessions, consider improving drainage by incorporating organic matter into the soil or adjusting your irrigation schedule.
Addressing Pests and Diseases
As you tend to your Egyptian walking onion patch, you may encounter some unwelcome visitors – pests and diseases that can quickly spread and damage your crop. Common culprits include aphids, which can be identified by their small size and sticky honeydew droplets on the leaves; slugs, which leave behind a trail of silvery slime and chewed-on plant tissue; and spider mites, which appear as tiny white dots on the undersides of leaves.
To manage these pests organically, start by inspecting your plants regularly and removing any infested areas. For aphids, try introducing natural predators like ladybugs or lacewings to your patch, or spray with a mixture of soap and water. Slugs can be deterred using copper tape around the perimeter of your bed or crushed eggshells among the onions. Spider mites are often controlled by increasing humidity through misting or providing adequate watering.
Some diseases to watch out for include fungal infections like downy mildew, which causes yellowing leaves and a fuzzy growth on stems; and bacterial leaf spot, characterized by small, dark spots on leaves. To prevent these issues, ensure good air circulation around your onions and avoid overwatering, which can create an environment conducive to disease development.
Conclusion: Enjoy Your Harvest
As you’ve successfully cultivated your Egyptian walking onion patch, it’s time to reap the rewards of your labor. Now that the bulbs have formed and the plants are dying back, carefully dig up the entire plant, leaving a small amount of stem attached to each bulb. This will ensure the onions continue to produce new growth from the top, creating a perpetual harvest. You can enjoy your Egyptian walking onions in a variety of ways – use them raw in salads, sauté them with garlic as a side dish, or dry and store them for later use. With proper care and attention, your patch will thrive year after year, providing you with an endless supply of this versatile and delicious ingredient.
Frequently Asked Questions
Can I grow Egyptian walking onions indoors?
Yes, you can successfully grow Egyptian walking onions indoors, but make sure to provide sufficient light, typically 12-14 hours of artificial lighting per day. Keep the temperature between 65-75°F (18-24°C) and maintain high humidity levels to replicate outdoor conditions.
How often should I water my Egyptian walking onion patch?
Water your Egyptian walking onion patch regularly, but avoid overwatering. Check the soil moisture by inserting a finger into the soil up to the knuckle; if it feels dry, it’s time to water again. Mulch around plants can help retain moisture and reduce watering frequency.
Can I harvest onions from Egyptian walking onions immediately after planting?
No, you should allow your Egyptian walking onion patch to establish itself for at least 2-3 months before harvesting. This allows the plant to produce multiple sets of leaves, bulbs, and offsets, ensuring a bountiful crop in subsequent seasons.
How do I store harvested Egyptian walking onions to keep them fresh?
Store harvested Egyptian walking onions in a cool, dry place with good ventilation. You can also hang the tops upside down from a paper bag or breathable container to allow air circulation and help prevent moisture buildup.
Can I use Egyptian walking onions as a natural pest deterrent in my garden?
Yes, Egyptian walking onions have natural insect-repelling properties that can be used as a barrier against pests like aphids, spider mites, and other insects. Plant them around the perimeter of your garden or near affected areas to create a protective zone.