Growing your own apple tree from seed can be a rewarding experience, but it requires patience and dedication. Many people are drawn to the idea of cultivating their own fruit trees, but don’t know where to start. With the right guidance, you can successfully grow a healthy and productive apple tree that will provide you with delicious homegrown apples for years to come.
In this article, we’ll take you through the process of growing an apple tree from seed, covering everything from selecting the right variety to harvesting your crop. We’ll also share expert tips on germination, transplanting, and pest management, so you can overcome common challenges and enjoy a bountiful harvest. Whether you’re a seasoned gardener or just starting out, this guide will give you the confidence to grow a thriving apple tree from seed.
Choosing the Right Apple Variety
When growing apple trees from seed, selecting the right variety is crucial for achieving success and enjoying a bountiful harvest of your favorite apples. In this section, we’ll explore how to choose the perfect apple variety for your needs.
Understanding Apple Tree Types
When growing an apple tree from seed, it’s essential to understand that not all varieties are created equal. Apple trees come in various types, each with its unique growth habits and characteristics. For instance, standard apple trees can grow up to 20 feet tall, making them a great choice for orchards or large gardens. However, they require regular pruning and maintenance to keep them under control.
On the other hand, dwarf and semi-dwarf varieties are more compact, reaching heights of around 6-10 feet. These types are perfect for smaller spaces, such as backyard gardens or containers. They’re also less demanding when it comes to pruning and care. Semi-dwarf trees, in particular, offer a good balance between size and production, making them an excellent choice for home growers.
When choosing the right apple tree type, consider your available space and climate. If you have limited room, dwarf or semi-dwarf varieties might be the way to go. However, if you have more space and are looking for a larger harvest, standard trees could be the better option.
Selecting a Suitable Variety for Your Region
When selecting an apple variety to grow from seed, it’s essential to consider the local climate and soil conditions. This will ensure that your tree thrives and produces a bountiful harvest. To start, research apple varieties that are well-suited for your region. Check with your local nursery or extension office for recommendations on popular and productive varieties in your area.
Consider factors such as temperature extremes, moisture levels, and sunlight exposure when selecting an apple variety. For example, if you live in a cold climate, look for varieties like ‘Honeycrisp’ or ‘Red Delicious’, which are bred to withstand frost and chill hours. On the other hand, if you live in a hot and dry region, choose varieties with drought tolerance such as ‘Gala’ or ‘Fuji’.
Also, consider your soil type when choosing an apple variety. Some varieties prefer well-drained soils while others tolerate heavier clay soils. Be sure to check the specific growing requirements for each variety to ensure they will thrive in your local conditions. By selecting a suitable variety for your region, you’ll set yourself up for success and enjoy a productive harvest from your homegrown apple tree.
Starting from Seed: The Basics
If you’re new to growing apple trees, let’s start at the beginning: understanding how to successfully germinate seeds into healthy seedlings. This is where it all begins!
Preparing Apple Seeds for Planting
Harvesting apple seeds requires careful attention to ensure their viability and readiness for planting. To begin, choose a healthy apple fruit with good seed quality. Select seeds from different varieties to increase the chances of successful germination. Cut the apple in half and carefully scoop out the seeds, taking care not to damage them.
Next, dry the seeds thoroughly by placing them on a paper towel or cloth for several days. This helps remove excess moisture that can lead to rot during storage. It’s essential to note that apple seeds should be air-dried rather than exposed to direct sunlight or high temperatures. Store the dried seeds in an envelope or container with a secure lid, labeling them with the seed variety.
Keep the stored seeds in a cool, dark place, ideally at 40°F (4°C) or lower, to prolong their viability. This is essential for maintaining seed quality and preventing spoilage until planting time. By following these steps, you’ll be able to properly prepare your apple seeds for successful germination and growth into healthy trees.
Sowing Apple Seeds
When it’s time to sow apple seeds, you have two main options: indoors and outdoors. Both methods can be effective, but they require different approaches. For optimal results, start by choosing a healthy seed from a mature apple tree that has been cross-pollinated.
Indoor sowing is ideal for early starts or in regions with short growing seasons. Fill small pots with a well-draining seed starting mix and plant the seeds about ¼ inch deep. Keep the soil moist but not waterlogged, as this can lead to rot. Maintain temperatures between 65°F and 75°F (18°C and 24°C) until germination occurs, usually within 1-3 months.
If you prefer sowing outdoors, wait for the last frost date in your area before planting seeds directly into the soil about ½ inch deep. This method can be more challenging due to variable weather conditions and potential pests or diseases. To increase chances of successful germination, choose a sunny location with well-draining soil and water the seeds gently but thoroughly.
To promote healthy germination, make sure the soil temperature is around 40°F (4°C) before sowing outdoors. This can be achieved by covering the area with a clear plastic sheet or using a warm frame.
Germination and Seedling Care
Now that you’ve successfully germinated your apple tree seeds, let’s move on to caring for those delicate seedlings as they grow into sturdy young trees. We’ll cover essential care tips and techniques to ensure a healthy start.
Understanding Apple Seed Germination Times
When you plant an apple seed, one of the first things to wonder is when it will start growing. The germination time for apple seeds can vary depending on several factors, including the specific variety, temperature, and moisture levels.
Typically, apple seeds take anywhere from 1-3 months to germinate, with some varieties taking up to 4 months. Keep in mind that this is a general estimate, and actual germination times may be shorter or longer. It’s essential to provide optimal conditions for the seedling to grow.
During this time, you can expect the seed to go through several stages of development. First, it will absorb water and swell up. Next, a tiny root will emerge from the bottom of the seed, followed by a small sprout with two leaves. Make sure the soil is consistently moist but not waterlogged during this period.
As a general rule of thumb, check on your seeds every week or two to see if they have started germinating. With proper care and patience, you should start seeing signs of growth within a few weeks to a month after planting.
Providing Optimal Conditions for Seedlings
Light is essential for seedlings to undergo photosynthesis and develop their first leaves. A bright location with indirect sunlight is ideal, but direct sun can be too intense. East- or west-facing windows are perfect spots, while south-facing windows require shade cloth or a UV-filtering window film to prevent scorching.
Watering your seedling requires attention to its specific needs. Overwatering is just as detrimental as underwatering – the roots may rot, and the seedling will collapse. Check the soil daily by inserting a toothpick into it; if it feels dry to the touch, it’s time for another watering. A gentle stream of water can also be used to test the soil.
Seedlings need nutrients from day one to grow strong and healthy. You can use a balanced, water-soluble fertilizer at half the recommended strength to avoid burning the tiny roots. Start with feedings every 7-10 days and adjust as needed based on your seedling’s growth rate.
Transplanting and Pruning
When transplanting a young apple tree from seed, timing is crucial. We’ll walk you through the best practices for transplanting and pruning to ensure your sapling grows strong and healthy.
When to Transplant Apple Trees from Seeds
Transplanting apple trees from seeds into larger containers or directly into the ground is an exciting milestone in their development. However, it’s crucial to do so at the right time to ensure healthy growth and establishment.
When it comes to transplanting seed-grown apple trees, most experts agree that the optimal time is between 12 to 18 months after sowing. This allows the roots to develop sufficiently while still keeping the tree relatively young and adaptable.
One key factor to consider is the temperature. Apple trees are sensitive to extreme temperatures during transplanting, which can cause shock and stress. Spring and fall are generally considered the best seasons for transplanting, as the weather is mild and temperatures are more stable.
Before transplanting, prepare a larger container with well-draining soil or select a suitable location in your garden. Gently remove the seedling from its original pot, taking care not to damage the roots. Plant it at the same depth as before, water thoroughly, and mulch around the base to retain moisture and suppress weeds.
Basic Pruning Techniques for Young Apple Trees
Pruning is an essential part of young apple tree care. It helps control growth, promotes healthy development, and encourages fruiting. When done correctly, pruning can even extend the life of your tree.
Start by understanding why you’re pruning. You want to remove weak or damaged branches that might be competing with healthier ones for water and nutrients. This process is called thinning. Remove about 20-30% of the growth each year to allow the remaining branches to develop strength and vigor.
Next, identify and remove any suckers – shoots growing from the base of the trunk. These can divert energy away from fruiting branches. Cut them off just above a bud or lateral branch using sharp, clean pruning tools.
When removing crossing branches, cut the weaker one at its point of origin to prevent damage to the remaining branch. Make your cuts at a 45-degree angle and about 1/4 inch above a growth node to promote new growth from that area. This technique will help maintain the tree’s natural shape while stimulating healthy development.
Pest and Disease Management
Now that you’ve got your apple tree growing from seed, let’s talk about how to protect it from common pests and diseases that can threaten its health. This section covers essential tips for identifying and managing potential threats.
Common Pests Affecting Apple Trees Grown from Seed
When growing apple trees from seed, it’s essential to be aware of common pests that can affect their health. One of the most prevalent issues is aphids. These tiny insects feed on sap, causing curled or distorted leaves and potentially spreading plant viruses.
Another significant pest affecting apple trees is the codling moth. These moths lay eggs on fruit buds, which then hatch into larvae that burrow into the fruit, damaging it and making it unsuitable for consumption. Regularly inspecting your trees during bud swell can help detect egg-laying activity.
Spider mites are another common problem, particularly in warm and dry conditions. These tiny arachnids feed on sap, causing yellowing leaves and fine webbing. Using physical barriers or introducing beneficial insects like ladybugs or lacewings can help manage spider mite infestations.
To combat these pests effectively, it’s crucial to implement integrated pest management strategies that combine cultural controls (like pruning), biological controls (introducing beneficial insects), and chemical controls (if necessary). Regular monitoring and early intervention are key to preventing pest populations from getting out of control.
Identifying and Managing Diseases in Young Apple Trees
As an apple tree grower, it’s essential to be aware of the common diseases that can affect young trees. Three of the most prevalent ones are powdery mildew, scab, and fire blight. These diseases can weaken your tree and impact fruit production, so recognizing their symptoms is crucial.
Powdery mildew appears as a white, powdery coating on leaves, while scab causes dark spots on apples and branches. Fire blight, on the other hand, creates blackened stems and twigs that resemble burnt wood. To manage these diseases, maintain good sanitation practices by removing any infected leaves or fruit.
Regularly inspect your trees for signs of disease, and treat them promptly with fungicides if necessary. For powdery mildew, you can also use sulfur-based products to control the fungus. Prune affected branches to prevent the spread of disease, and ensure good air circulation around your trees by thinning out surrounding foliage.
It’s also vital to plant disease-resistant varieties and implement integrated pest management strategies to minimize the risk of disease. This may involve monitoring weather conditions, maintaining a healthy root system, and using biological controls like beneficial insects or microorganisms.
Harvesting Your Homegrown Apples
Now that you’ve cultivated your very own apple trees from seed, it’s time to enjoy the fruits of your labor! This section will walk you through the process of picking and preserving your homegrown apples.
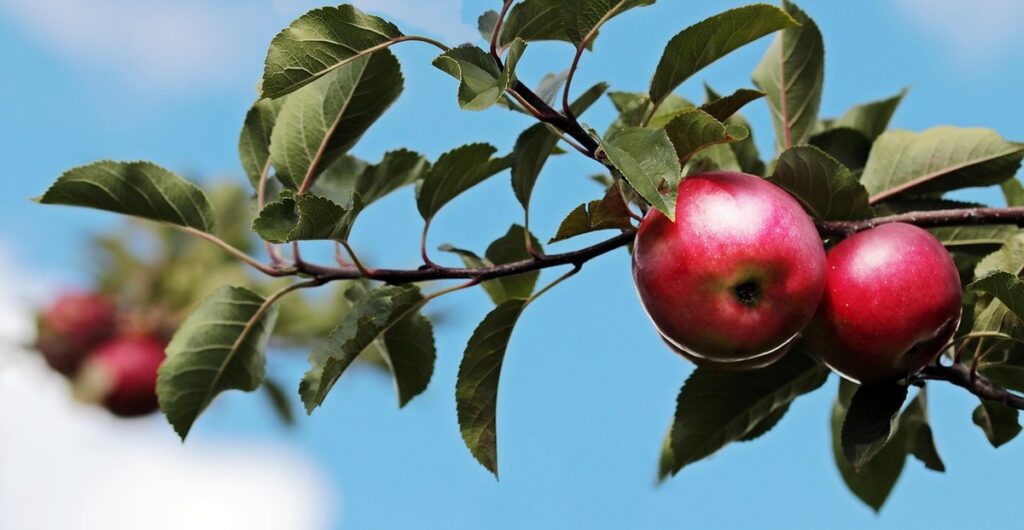
Determining When to Harvest Apple Fruit
When it comes to harvesting your homegrown apples, timing is everything. Different apple varieties have unique signs of ripeness, so it’s essential to know what to look for. For example, some apples like ‘Red Delicious’ and ‘Gala’ are ready to pick when they’re slightly soft to the touch and have a yellow or red blush on their skin.
On the other hand, apples like ‘Granny Smith’ and ‘Fuji’ are typically picked when they’re firm but yield to pressure. It’s also important to consider the sugar content of your apples. A ripe apple will have a sweet, fruity aroma and taste slightly sweet.
To determine the optimal harvest time for your specific variety, try checking the fruit regularly over the next few days or weeks. You can also use a combination of visual cues, such as color changes and texture, to help guide your decision. For most varieties, September and October are prime harvesting months, but this can vary depending on factors like climate and region.
When in doubt, it’s always better to err on the side of caution and pick the apple too early rather than letting it sit on the tree until it’s overripe.
Tips for Preserving Freshly Harvested Apples
Now that you’ve harvested your delicious homegrown apples, it’s time to enjoy them for months to come. Proper storage and preservation will help keep your apples fresh and flavorful, allowing you to cook, bake, and snack on them throughout the year.
For short-term storage (up to 2 weeks), place your freshly picked apples in a cool, dry spot with good air circulation. You can also store them in paper bags or breathable containers to maintain humidity. To extend their shelf life, consider using an ethylene gas absorber, which will slow down ripening.
When it comes to long-term preservation, consider these options:
* Canning: Slice or chop your apples and follow safe canning procedures to enjoy them throughout the year.
* Freezing: Core and slice your apples, then place them in airtight containers or freezer bags for up to 8 months. Use frozen apples in pies, crisps, or as a topping for oatmeal or yogurt.
* Dehydrating: Slice or chop your apples and dry them using a food dehydrator or your oven on the lowest temperature setting.
Try these delicious recipe ideas featuring homegrown apples:
* Apple Cider: Press fresh apple juice to make homemade cider, perfect for sipping hot or cold.
* Apple Pie: Use your homegrown apples in a classic pie filling, topped with a crumbly crust.
Frequently Asked Questions
Can I grow multiple apple trees from a single seed?
Yes, it’s possible to get multiple seeds from a single apple fruit, but keep in mind that the chances of getting identical trees are low due to genetic variation. To increase your chances of growing similar trees, choose apples from a reputable nursery or supplier.
How long does it take for an apple tree grown from seed to produce fruit?
It typically takes 5-10 years for an apple tree grown from seed to mature and produce fruit, compared to grafted trees which can start producing in as little as 2-3 years. However, with proper care and conditions, some varieties may reach maturity faster.
What are the most common pests affecting apple trees grown from seed?
Common pests affecting apple trees include aphids, codling moths, spider mites, and scale insects. Regularly inspect your trees for signs of infestation and take action promptly to prevent damage. Use a combination of physical barriers, organic pesticides, or integrated pest management techniques.
Can I grow an apple tree from seed indoors?
Yes, you can start growing an apple tree from seed indoors in a controlled environment like a greenhouse or indoor potting mix. However, make sure the conditions are optimal for germination and seedling growth, with adequate light, temperature control, and watering schedules.
How do I know if my apple seeds have been successfully stored for planting?
To ensure successful storage of your apple seeds, keep them in an airtight container or bag at a consistent refrigerated temperature (around 32°F to 40°F). Check the seeds regularly for signs of moisture or mold, and replace them every 3-5 years.