Growing your own chestnut tree from a single chestnut can be a fun and rewarding experience, but it requires some knowledge and care. Many people are drawn to this idea because chestnut trees are not only beautiful and majestic, but they’re also incredibly nutritious, providing delicious nuts that are rich in vitamins and minerals.
If you’re one of the lucky ones who’s harvested fresh chestnuts from a mature tree, you might be wondering how to grow your own tree. Perhaps you’ve even tried planting a few seeds, only to have them fail to germinate or grow. Don’t worry – with this article, we’ll walk you through the entire process of growing a healthy and thriving chestnut tree from scratch, including choosing the right chestnut, preparing it for planting, and providing expert tips on common challenges and long-term care. By following our step-by-step guide, you can finally enjoy the joy of cultivating your own chestnut tree, year after year.
Choosing the Right Chestnut
When it comes time to plant, choosing the right chestnut is crucial, as some varieties are better suited for your climate and growing conditions than others. Consider factors like size, growth rate, and disease resistance when selecting a chestnut.
Selecting the Perfect Chestnut
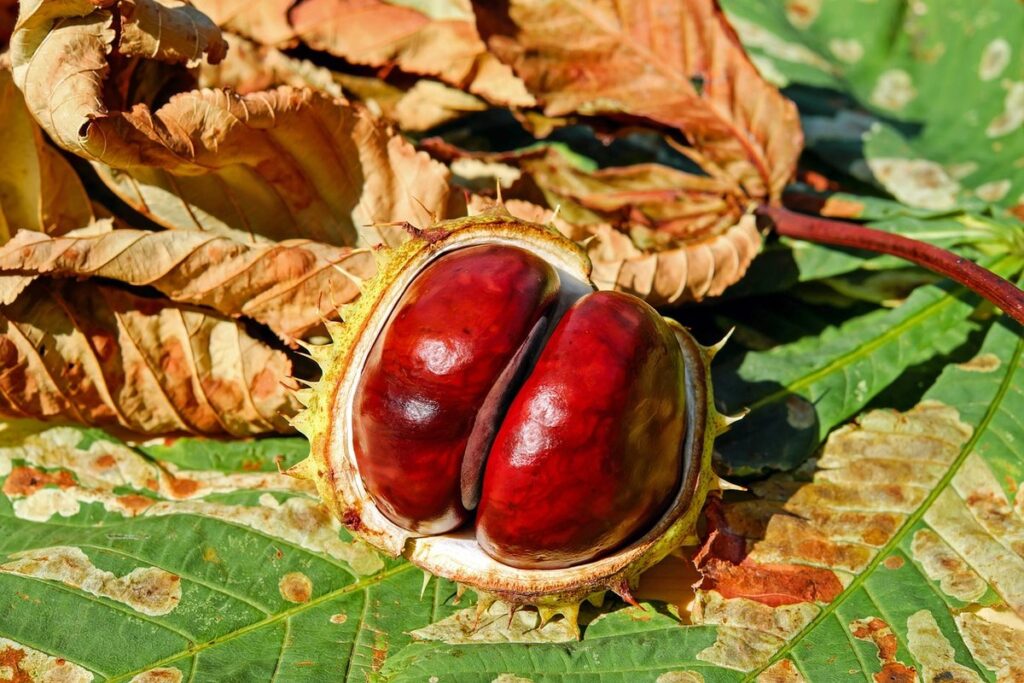
When selecting a chestnut to grow into a tree, it’s essential to choose one that has good potential for growth. A healthy, fresh chestnut will give you the best chance of successfully growing a thriving tree.
First and foremost, inspect the size of the chestnut. Choose one that is plump and firm, with no visible signs of decay or soft spots. A larger chestnut may not necessarily be better than a smaller one – it’s more about finding one that is perfectly ripened. Aim for chestnuts that are between 1-2 inches in diameter, as these tend to have the highest success rate.
Next, examine the shape and color of the chestnut. Look for ones with a smooth, glossy appearance and a uniform brown or tan color. Avoid any chestnuts with cracks, splits, or unusual markings. You can also check the stem end for any signs of mold or rot. A healthy chestnut will have a straight, unblemished stem.
When in doubt, it’s always better to err on the side of caution and choose a smaller chestnut that is perfectly ripened rather than a larger one that may be past its prime. By selecting the perfect chestnut, you’ll set yourself up for success in growing a strong, healthy tree from seed.
Understanding Chestnut Varieties
When it comes to growing a chestnut tree from a chestnut, understanding the different types of chestnuts is crucial for success. There are primarily three main varieties: European, Chinese, and American chestnuts.
European chestnuts (Castanea sativa) are one of the most widely cultivated species. They have a broad canopy and can grow up to 100 feet tall, making them suitable for larger spaces. European chestnuts tend to produce high yields, with an average annual harvest of around 200 pounds per tree. However, they do require regular maintenance to prevent disease.
Chinese chestnuts (Castanea mollissima), on the other hand, are more compact and grow up to 50 feet tall. They have a smaller canopy and require less space, making them ideal for smaller gardens or landscapes. Chinese chestnuts tend to be more resistant to disease but may not produce as high of yields as European chestnuts.
American chestnuts (Castanea dentata) were once the most common variety in North America but are now largely extinct due to a devastating fungal blight. However, there is ongoing research and reforestation efforts underway to restore this species. If you’re interested in growing an American chestnut, be sure to source seeds or seedlings from reputable suppliers.
When selecting a chestnut tree for your garden or landscape, consider the space available, climate conditions, and desired yield. By understanding the unique characteristics of each variety, you’ll be better equipped to choose the right chestnut tree for your needs and create a thriving and productive orchard.
Preparing the Seed
To successfully grow a chestnut tree, it’s essential to prepare the seed properly by removing any pulp and drying it completely to prevent rot. This is a crucial step in your journey.
Cleaning and Drying the Chestnut
When handling chestnuts, it’s essential to clean and dry them properly to prevent rot and fungal infections. Begin by gently scrubbing the chestnut with a soft-bristled brush under running water to remove any dirt or debris that may be clinging to its surface.
Next, soak the cleaned chestnut in a bowl of cold water for about 24 hours. This will help loosen any remaining impurities and make it easier to dry thoroughly. After soaking, use paper towels or a clean cloth to gently pat the chestnut dry. Do not rub the chestnut as this can damage its skin.
To dry the chestnut further, you’ll need to expose it to air. Place the dried chestnut on a wire rack or tray, allowing air to circulate around it completely. The drying process typically takes 1-2 weeks depending on humidity and temperature conditions. Monitor your chestnut regularly for signs of mold or mildew, removing it from the drying area if you notice any unusual growth.
By following these steps, you can help prevent damage to the seed and increase its chances of successful germination and eventual tree growth.
Scoring and Soaking the Chestnut
To encourage root development and increase the chances of successful germination, it’s essential to score and soak the chestnut. Start by carefully cutting a shallow “X” on the surface of the nut, making sure not to cut too deeply into the kernel inside. This scoring process helps to create micro-cracks in the shell, allowing moisture to penetrate and promoting root growth.
Next, place the scored chestnut in a container filled with water or a growth stimulator. The most effective way is to soak it for 24 hours, changing the water every 8-10 hours to prevent bacterial growth. This process softens the shell, making it easier for the radicle (primary root) to emerge.
For an added boost, you can use a commercial growth stimulator specifically designed for seed germination. Follow the product’s instructions and make sure to adjust the soaking time accordingly.
Planting the Chestnut
Now that you’ve prepared a healthy chestnut, it’s time to plant it. Carefully follow these instructions to give your new tree the best chance at a strong start in life.
Selecting a Suitable Location
When choosing a location for planting your chestnut tree from a chestnut, several factors come into play. First and foremost, consider the amount of sunlight the area receives. Chestnut trees prefer full sun to partial shade, so look for a spot that gets at least 6 hours of direct sunlight per day. This will ensure optimal growth and fruit production.
Next, evaluate the soil quality in your chosen location. Chestnut trees thrive in well-draining soil with a pH between 6.0 and 7.0. Avoid areas with heavy clay or sandy soils as they can lead to waterlogging or drought. If you’re unsure about the soil type, consider getting a soil test done to determine its composition.
Drainage is another crucial aspect to consider when selecting a location for your chestnut tree. Look for an area that slopes slightly to prevent water from collecting around the base of the tree. You can also add organic matter like compost or mulch to improve drainage and fertility. By choosing a spot with suitable sunlight, soil quality, and drainage, you’ll set your chestnut tree up for success.
Digging and Preparing the Soil
Digging and preparing the soil is a crucial step in growing a healthy chestnut tree. When planting a chestnut from a seed, it’s essential to dig a hole that’s about twice as wide and just as deep as the root system of the tree. This will give the roots room to spread out and establish themselves.
Before digging, test your soil to determine its pH level and nutrient content. Chestnut trees prefer well-draining, fertile soil with a slightly acidic pH (around 6.0-6.5). If your soil is heavy clay or sandy, mix in some organic matter like compost or well-rotted manure to improve drainage and fertility.
As you dig the hole, loosen the sides to prevent water from accumulating and causing root rot. Add a handful of balanced fertilizer (10-10-10) and mix it into the bottom 6 inches of soil. This will provide essential nutrients for the tree’s early growth stages. Also, consider adding a few cups of bone meal or alfalfa meal to promote healthy root development.
When planting, place the chestnut seedling in the hole, making sure the graft union (if applicable) is at least 2-3 inches above the soil surface. Fill the hole with a mix of topsoil and compost, gently firming it around the roots as you go. Water thoroughly to settle the soil and mulch around the tree to retain moisture and suppress weeds.
Post-Planting Care
Now that you’ve successfully planted your chestnut, it’s essential to provide it with proper care to ensure healthy growth and a bountiful harvest down the road. Here are some crucial steps to follow.
Watering and Mulching
Watering a chestnut tree is crucial during its early stages of growth. It’s essential to water it regularly, but make sure not to overwater. The ideal time to water is when the top 2-3 inches of soil feels dry to the touch. Water thoroughly until you see water seeping from the drainage holes in the pot. As your tree grows and gets transferred to a larger container or directly into the ground, adjust its watering schedule accordingly.
Mulching around the tree is also vital for retaining moisture, suppressing weeds, and regulating soil temperature. Use a 2-3 inch layer of organic mulch such as wood chips or bark around the base of the tree. Keep it at least 4-6 inches away from the trunk to prevent rotting. Replenish the mulch every year or when you notice it breaking down.
Keep in mind that chestnut trees are relatively drought-tolerant once established, so they can survive with minimal watering. However, during the first few years of growth, consistent moisture is essential for its proper development.
Fertilizing and Pruning
As you continue to care for your newly planted chestnut tree from a chestnut, fertilization and pruning become crucial steps to promote healthy growth and prevent disease. Fertilize your tree annually with a balanced fertilizer, following the manufacturer’s instructions. For optimal results, apply it in early spring, when new growth begins.
Pruning is essential to maintain your tree’s shape, promote air circulation, and remove diseased or damaged branches. Prune in late winter or early spring before new growth starts. Cut back any dead or diseased wood to the nearest healthy branch, making clean cuts just above a bud or node. Remove lower limbs to prevent disease from spreading from the ground up.
To avoid damaging your tree’s delicate root system, prune only what is necessary, and never over-prune. It’s also essential to disinfect your pruning tools between cuts to prevent the spread of diseases like blight and powdery mildew.
Common Challenges and Solutions
As you progress through the process of growing a chestnut tree from a chestnut, you’ll likely encounter some challenges that can be addressed with these common solutions. Let’s take a look at what to do when things don’t go as planned.
Pest and Disease Management
As you grow your chestnut tree from a chestnut, it’s essential to be aware of potential pests and diseases that can affect its health. Chestnut blight, for example, is a fungal disease caused by Cryphonectria parasitica that can cause the tree to decline rapidly. Symptoms include cankers, wilting, and defoliation.
To prevent the spread of chestnut blight, make sure to plant your tree in well-draining soil with plenty of sunlight. Avoid watering the tree’s base, as this can create an ideal environment for fungal growth. Regularly inspect your tree for signs of blight and remove any infected branches promptly.
Other pests that may affect your chestnut tree include borers, such as the chestnut borer (Trachykeus spp.), which can cause damage to the tree’s bark and xylem tissue. To control borers, use insecticidal soap or horticultural oil to treat infestations.
Regular pruning of your chestnut tree can also help prevent pest and disease issues by removing any weak growth that may be more susceptible to infection. By staying vigilant and taking proactive steps, you can protect your young tree from these common challenges and give it the best chance to thrive.
Environmental Considerations
When growing a chestnut tree from a chestnut, it’s essential to consider environmental factors that may impact its survival and health. As you nurture your young tree, be prepared for the unpredictable nature of weather conditions.
Chestnut trees are sensitive to extreme temperatures, which can cause damage or even kill the tree if not protected. During frosty periods, the tree may experience cell damage, leading to blackened leaves or worse. To mitigate this risk, choose a location that provides some protection from harsh winds and frost pockets. In regions prone to drought, ensure your tree receives adequate watering, but avoid overwatering, which can also harm the roots.
On the other hand, excessive rain can cause root rot and other issues. Be mindful of soil drainage when planting your chestnut tree. If you live in an area with heavy rainfall, consider elevating the tree or using a raised bed to improve air circulation and reduce water accumulation. By understanding these environmental considerations, you’ll be better equipped to provide your chestnut tree with the care it needs to thrive.
Monitoring Progress and Maintenance
Now that you’ve successfully germinated your chestnut, it’s essential to monitor its progress and maintain a healthy environment for optimal growth. Regular checks will ensure your tree thrives.
Regular Inspections and Record-Keeping
As you continue to nurture your chestnut tree from a seed, it’s essential to regularly inspect its progress and note any issues that may arise. This will help you address potential problems before they become major concerns. Schedule regular inspections at least once a week during the first year of growth, and then gradually reduce the frequency as the tree matures.
During these inspections, look for signs of pests or diseases, such as holes in leaves or stems, yellowing or browning of foliage, or unusual odors. Check the soil moisture by sticking your finger into the soil up to the knuckle; if it’s dry, water your tree. Also, inspect the branches and trunk for any cracks, splits, or signs of decay.
Keep a record-keeping journal to track your tree’s growth, noting dates, weather conditions, and observations. This will help you identify patterns and make informed decisions about pruning, fertilization, and pest control. For example, if you notice that your tree is consistently dropping its leaves during a certain time of year, you may want to adjust your watering schedule or prune it more extensively.
Long-Term Planning for Harvesting
When it comes to growing a chestnut tree from a chestnut, planning for long-term harvesting is crucial. The ideal time to harvest chestnuts depends on several factors, including the specific variety of your tree and the climate you’re in.
In general, chestnut trees take around 5-10 years to mature after planting, but some varieties can be ready as early as 3-4 years or as late as 15 years. Factors that influence yield and quality include soil conditions, moisture levels, sunlight exposure, and pest management. To ensure a bountiful harvest, make sure your tree is receiving adequate nutrients and water.
Aim to harvest chestnuts when they’re fully mature and the leaves on the tree have turned brown. Check for the following signs: the shells are hard and dry, but not cracked; the nuts inside are heavy with moisture, but not too wet. A good rule of thumb is to check your trees regularly in late fall, typically between September and November.
Keep in mind that chestnut trees can produce multiple harvests per season, depending on factors like climate and soil conditions. Plan ahead by noting the dates of previous harvests and adjusting your schedule accordingly to ensure optimal yields.
Frequently Asked Questions
How do I know if my chestnut tree is getting enough sunlight?
Adequate sunlight is essential for a healthy chestnut tree, typically requiring at least six hours of direct sunlight per day. If your tree is situated in a shaded area or has nearby structures blocking sunlight, consider relocating it to a sunnier spot. Keep an eye on your tree’s growth and adjust its placement accordingly.
Can I grow multiple chestnut trees from the same nut?
Yes, you can grow multiple trees from a single chestnut, but make sure to collect seeds from different nuts for optimal genetic diversity. This will help ensure that your trees are well-suited to your specific climate and growing conditions.
How often should I water my newly planted chestnut tree?
Water your young chestnut tree regularly during its first year of growth, aiming for about 1 inch of water per week. Reduce watering frequency as the tree matures, but still maintain a consistent moisture level. Monitor soil moisture by inserting your finger into the soil up to the knuckle.
What are some common pests that can affect my chestnut tree?
Chestnut trees are susceptible to pests like squirrels, deer, and insects like aphids and caterpillars. Implement integrated pest management strategies, including physical barriers, repellents, and organic pesticides as needed. Regularly inspect your tree for signs of infestation.
Can I grow a chestnut tree in a container or must it be planted directly in the ground?
While chestnut trees can thrive in containers, they typically prefer to be planted directly in the ground. If you’re short on space, choose a large, well-draining container with a minimum depth of 12-18 inches and a wide enough diameter for the tree’s mature root system.