Are you looking for a fun and easy way to grow your own avocado tree from seed? You’ve come to the right place! Germinating avocado seeds in water is a popular method that allows you to see the process up close, and it’s surprisingly successful. With the right technique, you can increase your chances of growing a healthy and thriving avocado tree.
In this article, we’ll take you through a step-by-step guide on how to germinate an avocado seed in water. We’ll cover the essential tips for selecting the perfect seed, preparing it for germination, and providing the right conditions for growth. From seed selection to care, we’ll give you all the information you need to successfully grow your very own avocado tree using this method.
Choosing the Right Avocado Seed
When it comes to growing a healthy avocado tree from scratch, choosing the right seed is crucial. Selecting a fresh and plump seed will significantly improve your chances of success.
Selecting Healthy Avocados
When it comes to selecting healthy avocados for germination, there are several factors you should consider. First and foremost, choose avocados that are slightly ripe but not overripe. Ripe avocados tend to have healthier seeds than underripe or overripe ones.
Look for avocados with large seeds, as they will be more likely to germinate successfully. A good seed should be about 1-2 inches long and about 0.5 inches in diameter. Avoid selecting avocados with small or shriveled seeds, as they may not have the nutrients needed to support growth.
The color of the seed is also important. Healthy avocado seeds are usually a light brown or tan color with a slight sheen to them. Some seeds may also have a small pit or scar at one end, which can help guide root development during germination.
When you’re selecting an avocado for its seed, give it a gentle squeeze. A ripe avocado will yield to pressure but should still feel slightly firm. If the skin is too soft or mushy, it’s likely that the seed inside will be underripe or rotten.
Removing the Pit from the Avocado
Removing the pit from a ripe avocado can be a bit tricky, but with the right tools and technique, it’s a breeze. First, make sure you’re working with a ripe avocado – if it’s not yet ripe, try placing it in a paper bag with an apple or banana to speed up the process. Once your avocado is ripe, carefully slice it in half lengthwise around the pit. Then, gently twist the two halves in opposite directions until they separate.
Next, take one of the halves and place it on a cutting board, cut side down. Locate the pit and insert the tip of a spoon or a specialized avocado seed remover into the small indentation at the top of the pit. Gently pry the pit out from under the surrounding flesh. If you don’t have an avocado seed remover, a sharp paring knife can also work – simply insert it into the pit’s indentation and twist until it releases.
Be careful not to press too hard on the pit, as this can cause the surrounding fruit to break apart. With patience and a bit of finesse, you should be able to safely remove the pit from your avocado in no time!
Preparing the Seed for Germination
Before you start soaking that avocado seed, it’s essential to prepare it properly. Let’s walk through the simple steps to ready your seed for germination in water.
Cleaning and Drying the Seed
Cleaning and drying the extracted seed is an essential step to prevent bacterial growth and ensure successful germination. First, gently rinse the seed with lukewarm water to remove any remaining pulp or debris. Use a soft-bristled brush to scrub away any stubborn bits, taking care not to damage the delicate skin of the seed.
Next, use a paper towel or a clean cloth to dry the seed thoroughly, paying extra attention to the crevices and grooves on its surface. This is crucial in preventing moisture from accumulating and fostering bacterial growth. You can also use a desiccant like silica gel or calcium chloride to absorb any excess moisture, if needed.
Once the seed is dry, carefully wrap it in a paper towel or cloth, making sure not to expose it to direct sunlight. Store it in a cool, well-ventilated area for 24-48 hours before placing it in water for germination. This step may seem minor, but it’s essential in creating an environment conducive to healthy seed growth and minimizing the risk of fungal infections. By taking the time to clean and dry your avocado seed properly, you’ll be setting yourself up for success when it comes to achieving a high rate of germination.
Scoring the Seed (Optional)
If you decide to score the seed, it can significantly boost germination rates. Scoring involves making shallow cuts on the surface of the seed to help break down some of the natural defenses that prevent water from entering and initiating the germination process.
To safely score an avocado seed, start by gently rinsing it with warm water to remove any dirt or residue. Next, use a sharp utility knife or a sterile blade to carefully make three shallow cuts across the equator of the seed, being mindful not to cut too deeply into the seed’s inner core. Make sure each cut is about 1-2 mm deep and roughly 10 mm long.
This step can be time-consuming, but it’s essential to maintain precision for optimal results. When done correctly, scoring can lead to an increased likelihood of successful germination – some growers have reported as high as a 90% success rate after scoring their seeds. Just remember that every seed is unique, so keep your expectations realistic and don’t get discouraged if you encounter setbacks along the way.
Germinating the Avocado Seed in Water
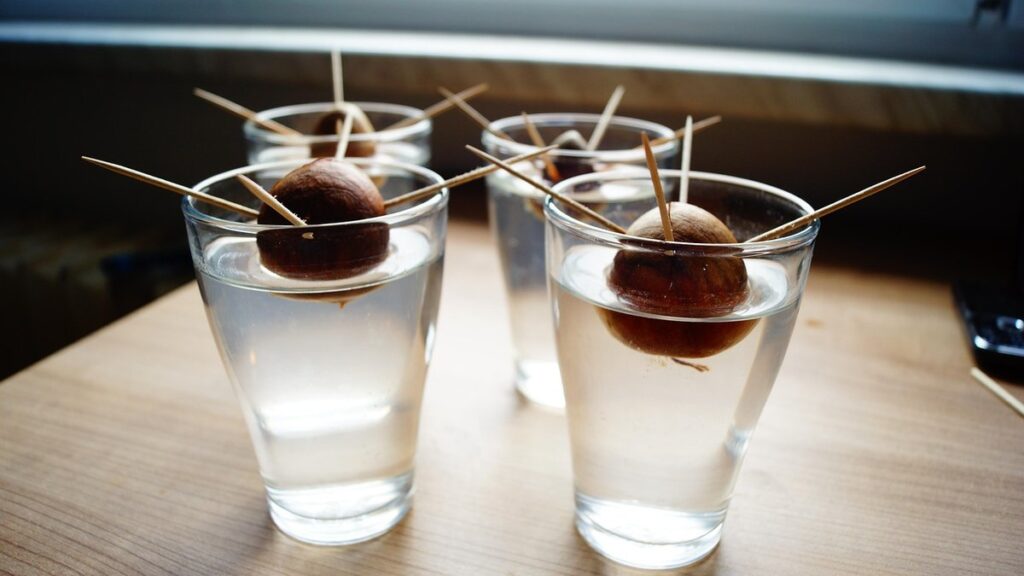
To germinate an avocado seed in water, you’ll need a clear glass or cup and some fresh water, where the seed will begin to sprout. This is one of the easiest ways to get your seed started.
Preparing the Germination Container
Before placing the avocado seed in the water, you’ll need to prepare the container for germination. Start by selecting a clean glass or jar that’s specifically designated for this purpose. Avoid using containers that previously held chemicals or strong-smelling substances, as these can harm the developing root system.
Next, fill the container with fresh, filtered water that’s room temperature (around 70-80°F). Avoid using tap water if possible, as it may contain additives like chlorine or fluoride that can inhibit germination. Instead, opt for distilled or spring water to ensure the best possible start for your avocado seed.
Check the pH level of the water to ensure it falls within the optimal range for avocados (around 5.5-6.5). You can use a pH test strip or a digital pH meter to make this measurement. Once you’ve confirmed the water quality, gently place the avocado seed in the container and cover it with a clear plastic bag or wrap to maintain humidity. This will create an ideal environment for germination to occur.
Planting the Seed
Now it’s time to plant the seed. This is an exciting moment, as you’re about to create a new life from something that was once considered waste. To do this, gently take the avocado seed and place it into the prepared container filled with water. Make sure the seed is fully submerged but not floating on the surface.
If the seed is too large or heavy, it might sink to the bottom of the container. In this case, you can use a toothpick or a small stick to hold it in place. However, be careful not to press down too hard, as this could damage the delicate embryo inside the seed.
As you lower the seed into the water, ensure that its pointed end is facing downwards towards the bottom of the container. This will help prevent any air bubbles from getting trapped and reduce the risk of rot or decay. With a gentle touch, you should be able to place the seed in the correct position without causing any harm.
By following these steps, you’ll have successfully planted your avocado seed in water, marking the beginning of its journey towards becoming a strong and healthy tree.
Caring for the Germinated Seed
Now that your seed has germinated, it’s essential to provide the right care to keep it healthy and thriving. This section will walk you through the specific needs of your newly sprouted avocado seed.
Monitoring Water Levels and Temperature
Monitoring water levels and temperature is crucial for healthy germination and growth. If the water level drops too low, the seed will dry out and fail to sprout. To avoid this, check the water level daily and top it up as needed. A good rule of thumb is to maintain a water level that’s about 1-2 inches deep.
Maintaining optimal temperature is equally important. Avocado seeds prefer warmer temperatures between 65-75°F (18-24°C). However, if you’re growing in a hot climate, keep the seed away from direct sunlight to prevent overheating. On the other hand, if it’s too cold, growth will slow down or even stop.
To give your avocado seed the best chance of germinating, keep the water and temperature consistent. You can use a thermometer to monitor the temperature, but don’t worry too much about precision – just aim for the optimal range. By keeping an eye on both water levels and temperature, you’ll be well on your way to successfully germinating that avocado seed.
Providing Light and Humidity
Once you’ve successfully germinated your avocado seed, it’s essential to provide it with adequate light and humidity conditions for optimal growth. Avocado seeds prefer bright, indirect light, but direct sunlight can be too intense, causing the leaves to become scorched.
If you’re using a sunny windowsill, consider shading the area with a sheer curtain or blinds to filter out harsh rays. Alternatively, invest in grow lights specifically designed for seedlings. These emit a balanced spectrum of light that promotes healthy growth and development. For example, LED grow lights are energy-efficient and produce minimal heat.
Another option is setting up a mini-greenhouse using a propagation tray or a cloche. This will provide a humid microclimate around the seedling, allowing it to thrive in conditions with high humidity levels. To maintain optimal humidity, you can cover the tray or cloche with plastic wrap or a damp cloth and place it on top of the setup.
Monitor your seedling’s response to these conditions, adjusting as needed. Ensure that the light is not too intense or weak, and keep the area around 75-80°F (24-27°C) for optimal growth.
Transplanting the Seedling
Now that you’ve successfully germinated your avocado seed, it’s time to transplant it into a pot and give it some room to grow. This is an exciting step in the process, as your tiny sprout becomes a real plant!
Identifying Seedling Readiness
As you’ve successfully germinated your avocado seed in water, it’s time to assess whether it’s ready for transplanting. A healthy seedling will exhibit distinct signs of readiness, primarily focusing on root development and leaf growth.
Start by gently lifting the seed from its container, taking care not to damage the delicate roots. If they’ve grown a few inches long and have started to form a small root system, it’s likely ready for transplanting. Look for any visible root hairs or fine threads that indicate a healthy, active root zone.
Next, examine the leaves. A mature seedling should have 2-3 sets of true leaves, which are larger and more robust than the initial cotyledons (seed leaves). The leaves should also be a vibrant green color, indicating adequate light exposure and nutrient uptake. If the seedling has developed at least one leaf with two distinct lobes or edges, it’s a good sign that it’s ready for transplanting.
Keep an eye on your seedling’s overall health, including its water intake, and observe how well it responds to changes in its environment.
Preparing the Soil and Container
When transplanting your germinated avocado seedling into soil and a container, it’s essential to prepare the soil and container properly to ensure healthy growth. Start by selecting a well-draining potting mix specifically designed for citrus or tropical plants. Avoid using regular garden soil as it can compact and prevent proper drainage.
Choose a container with good air circulation and adequate drainage holes in the bottom. A minimum of 6-8 inches deep is recommended, but the larger the better. Add a layer of broken pottery or small rocks at the bottom for improved drainage.
Fertilize your seedling sparingly after transplanting, as avocado trees are sensitive to excessive nutrients. Use a balanced fertilizer (10-10-10) and follow the manufacturer’s instructions. Keep in mind that avocado trees prefer slightly acidic soil with a pH between 6.0 and 7.0. Test your potting mix and adjust accordingly.
Make sure the container is large enough for your seedling to accommodate its root system as it grows, allowing for at least an inch of space between the soil surface and the top of the container for watering and aeration. This will provide optimal conditions for your avocado tree to thrive.
Troubleshooting Common Issues
If you’re having trouble getting your avocado seeds to sprout, don’t worry – we’ve got you covered. This section will walk you through common issues and solutions so you can get back on track.
Identifying Common Problems
When germinating avocado seeds in water, you may encounter some common issues that can prevent successful growth. One of the most frustrating problems is mold and rot setting in. This often occurs when the seed sits for too long in stagnant water or if the environment around it becomes humid.
To identify whether your seed has developed mold or rot, look out for white patches or a slimy texture on its surface. If you notice either of these symptoms, carefully remove the affected area with clean scissors and transfer the seed to fresh water.
Another potential issue is pests, such as fruit flies or fungus gnats, laying eggs in the water or near the seed. Keep your germination station clean, dry, and away from direct sunlight to minimize the risk of infestation.
It’s also essential to monitor the temperature and pH levels of the water to prevent bacterial growth and ensure optimal conditions for germination. Regularly check on your seeds and take prompt action if you notice any unusual signs or symptoms. By being vigilant and taking swift action, you can overcome these common issues and successfully grow healthy avocado trees from seed.
Solutions for Overcoming Challenges
If you’re experiencing trouble germinating avocado seeds in water, don’t worry – it’s more common than you think. One of the main challenges is ensuring that the seed stays moist and doesn’t dry out completely, especially if you live in a dry climate.
To prevent this issue from arising in the first place, make sure to keep your seed jar or container in a humid location, such as a greenhouse or under a cloche. You can also cover the top of the jar with plastic wrap or a damp paper towel to maintain moisture levels.
Another challenge is dealing with fungal growths, which can appear as white fuzz on the surface of the water. To remedy this issue, change the water completely and treat it with a mild bleach solution (1 part bleach to 10 parts water). Discard any affected seeds.
Regularly inspect your seedlings for signs of disease or pests, such as black spots or tiny insects. If you notice anything out of the ordinary, take action promptly by pruning off infected areas or introducing beneficial nematodes to control pests. By being proactive and vigilant, you can overcome these common challenges and successfully germinate your avocado seeds in water.
Frequently Asked Questions
How Long Does it Take for an Avocado Seed to Germinate?
Concise, valuable answer…
Germination times can vary from 3-12 weeks, depending on the seed’s quality, water temperature, and light exposure. Generally, you can expect to see roots emerging within 7-10 days after sowing.
Can I Use Tap Water for Avocado Seed Germination?
Concise, valuable answer…
Yes, tap water is suitable for avocado seed germination, but it may contain chlorine or fluoride that could inhibit growth. To minimize risks, use distilled or filtered water instead to create an optimal environment for your seedling.
What If My Avocado Seed Doesn’t Have a Visible Root After 2 Weeks?
Concise, valuable answer…
Don’t worry! Some seeds might take longer to develop visible roots. Check the water level and make sure it’s not too low or high. Gently rock the container back and forth to redistribute the seed in the water.
Can I Germinate Multiple Avocado Seeds at Once?
Concise, valuable answer…
Yes, you can germinate multiple seeds simultaneously using separate containers for each seed. Just be prepared to provide individualized care once they start growing.
Will Over-Exposure to Water Harm My Seedling?
Concise, valuable answer…
Yes, over-exposure to water can lead to root rot and damage your seedling’s chances of survival. Monitor the water level closely and change it every 1-2 weeks to prevent bacterial growth and maintain a healthy environment for your developing roots.
How Can I Tell When My Avocado Seedling is Ready to Transplant?
Concise, valuable answer…
Transplant when your seedling has developed at least two sets of leaves and its stem has reached about 6-8 inches tall. This typically takes around 2-3 months after germination. Harden off the seedling by gradually exposing it to outdoor conditions before transplanting into a larger pot.