Winter is coming, but your appetite for fresh veggies shouldn’t have to go into hibernation. With a little creativity and some expert guidance, you can enjoy a bountiful harvest of cool-season crops like broccoli and kale right from your own backyard – or at least, your own balcony.
The key to success lies in choosing the right containers and location for your winter garden. This means selecting containers with good drainage, placing them in a spot that gets plenty of sunlight, and being mindful of the temperature fluctuations that can occur during the colder months. In this article, we’ll walk you through everything you need to know about creating a thriving winter container garden, from choosing the right crops to preserving your harvest for months to come. By the end of it, you’ll be well on your way to enjoying fresh, homegrown produce even in the dead of winter.
Choosing the Right Containers and Location
When selecting containers for winter vegetable gardening, you’ll want to consider factors such as drainage, size, and material to ensure healthy plant growth. Let’s dive into the specifics of choosing the right containers and location.
Factors to Consider When Selecting Containers
When selecting containers for winter container vegetable gardening, it’s essential to consider their specific design features. Look for containers that are at least 5-7 gallons in size and have a depth of around 8-10 inches. This will provide enough room for the roots of your vegetables to grow without becoming waterlogged.
Choose containers made from materials like plastic, wood, or composite materials that are designed specifically for vegetable gardening. Avoid using decorative planters or containers with small drainage holes, as they can quickly become anaerobic and lead to root rot.
Good drainage is crucial in winter container vegetable gardening, so make sure your chosen containers have sufficient aeration. Look for features like built-in water reservoirs or mesh panels to promote healthy soil circulation. When placing your containers, ensure they receive adequate sunlight (at least 4-6 hours of direct sun) and are situated on a flat surface with good air circulation. By selecting the right container, you’ll set yourself up for success in growing delicious winter vegetables from seed to harvest.
Ideal Locations for Winter Container Gardens
When selecting an ideal location for your winter container vegetable garden, it’s essential to consider three crucial factors: sunlight, wind protection, and accessibility. Most vegetables require at least 4-6 hours of direct sunlight per day, so choose a spot that receives adequate sunlight.
Consider placing containers near walls or on patios, which can provide natural protection from harsh winds and extreme temperatures. However, be mindful of the potential drawbacks: increased risk of frost damage if the wall is cold, and reduced air circulation, which may promote disease.
On the other hand, placing containers in an open area allows for better air circulation, reducing the likelihood of disease. Nevertheless, it exposes your plants to harsh winds, potentially leading to damage or toppling over.
To strike a balance, consider using windbreaks such as burlap screens or evergreen shrubs to shield your containers from strong gusts while maintaining accessibility through narrow pathways or walkways. By carefully evaluating these factors, you can create an optimal location for your winter container vegetable garden.
Selecting the Right Vegetables for Winter Container Gardening
When choosing vegetables for your winter container garden, it’s essential to select varieties that thrive in cooler temperatures and can tolerate potential frosts. We’ll guide you through the top picks for a successful harvest.
Cool-Season Crops for Winter Production
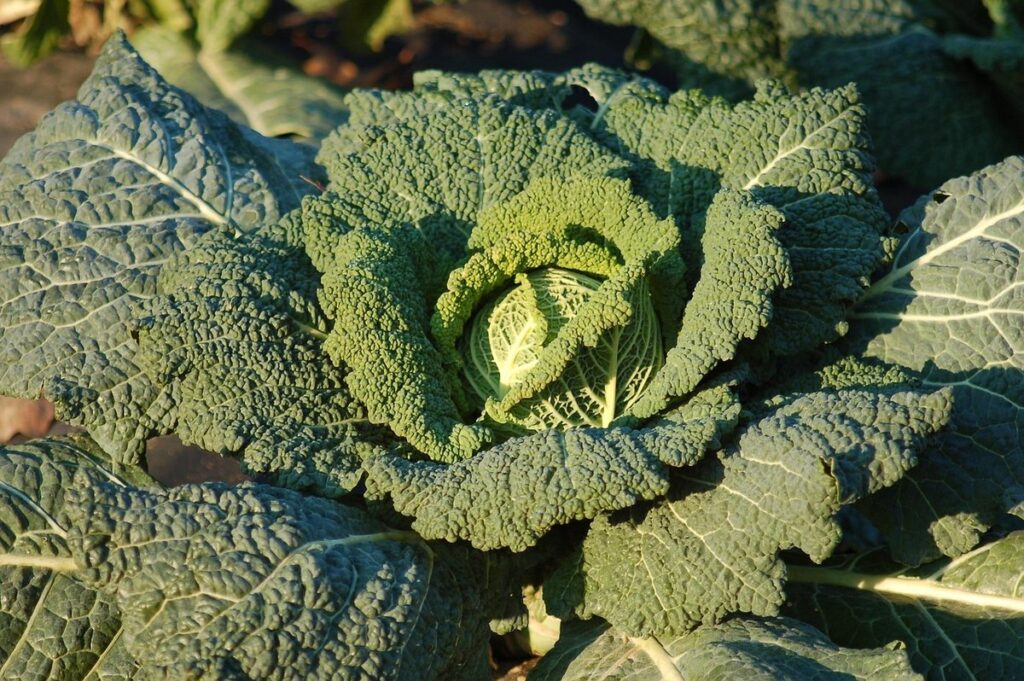
When it comes to winter container gardening, cool-season crops like broccoli, kale, and spinach are ideal for this time of year. These vegetables thrive in the cooler temperatures and can tolerate light frosts, making them perfect for extending the growing season.
Broccoli is a popular choice for winter container gardens due to its ability to mature quickly, typically within 50-60 days. It prefers well-draining soil and partial shade, which makes it an excellent option for containers. Kale, on the other hand, can take around 50-70 days to mature and requires consistent moisture levels. Spinach is one of the fastest-growing crops, maturing in as little as 20-30 days.
To grow these cool-season crops successfully, make sure your container garden has good drainage and a slightly acidic soil pH between 6.0 and 7.0. Most importantly, choose varieties that are specifically bred for cooler temperatures and shorter growing seasons. By following these guidelines, you can enjoy a bountiful harvest of delicious broccoli, kale, and spinach right through the winter months.
Warm-Season Crops for Early Spring Production
While warm-season crops are typically associated with summer production, you can actually get a head start on the growing season by incorporating them into your winter container garden. By leveraging the benefits of early spring production, you’ll be able to enjoy fresh tomatoes, peppers, and eggplants as soon as possible.
One key benefit of growing warm-season crops in winter is that they can tolerate cooler temperatures than most people think. Tomatoes, for instance, can handle light frosts and even a few degrees below freezing before showing damage. Peppers are also surprisingly resilient to cold snaps. With proper protection – such as bringing the container under a covered area or using row covers – these crops can continue producing fruit well into early spring.
If you’re determined to grow warm-season crops in winter, focus on varieties specifically bred for cooler climates and shorter seasons. These will be more forgiving of temperature fluctuations and may even produce earlier than standard varieties. For example, cherry tomatoes like ‘Tumbler’ or ‘Red Robin’ are popular choices for cool-season production.
Preparing Containers for Winter Vegetable Gardening
Before you start planting, make sure your containers are winter-ready by checking their condition and giving them a thorough cleaning to prevent disease from taking hold.
Soil Selection and Preparation
When it comes to winter container vegetable gardening, selecting and preparing the right soil is crucial for optimal growth and yields. This is where high-quality potting mix specifically designed for vegetable gardening comes into play. Unlike regular potting mixes that are formulated for decorative plants or flowers, these specialized mixes are packed with nutrients and microorganisms that cater to the unique needs of vegetables.
To prepare your soil for winter container vegetable gardening, start by choosing a potting mix that contains ingredients such as peat moss or coconut coir, perlite or vermiculite, and compost. These components work together to retain moisture, suppress diseases, and provide essential nutrients for healthy plant growth. Avoid using garden soil from your yard, as it can be too dense and may contain weed seeds or pests that can harm your vegetables.
When preparing the potting mix, make sure to follow these simple steps:
* Add a balanced fertilizer according to the manufacturer’s instructions
* Mix in some organic matter like compost or well-rotted manure to improve soil structure and fertility
* Adjust the pH level of the mix if necessary, as most vegetables prefer slightly acidic to neutral soil conditions
Fertilization and Pest Control Strategies
When it comes to maintaining your winter container vegetable garden, fertilization and pest control are crucial components of its success. For fertilization, you have two primary options: organic and inorganic.
Organic fertilizers, such as fish emulsion or compost tea, provide essential nutrients while promoting soil health. These slow-release fertilizers also help improve the overall structure and fertility of your container’s soil. Consider making your own compost to use as a fertilizer – it’s easy to do and will give you a high-quality, locally-sourced nutrient-rich additive.
Inorganic fertilizers, like Miracle-Gro or balanced 20-20-20 NPK solutions, offer quick results but can have drawbacks such as burning roots if overused. These should be used sparingly and in moderation, following the package instructions carefully.
To prevent pests from becoming a problem, adopt an integrated pest management (IPM) strategy that combines physical barriers, cultural controls, and biological methods. Use fine-mesh screens to cover plants and catch pests like aphids before they infest your garden. Practice good gardening hygiene by regularly inspecting your plants for signs of distress or pest infestation, and remove any infected sections promptly to prevent the spread.
Regularly inspect your plants’ leaves and stems for white powdery patches (powdery mildew), curled or distorted leaves (aphids or spider mites), or actual insects. If you notice any issues, address them with a homemade soap spray made by mixing 1 tablespoon of mild liquid dish soap in one quart of water.
By implementing these fertilization and pest control strategies into your winter container gardening routine, you’ll create an environment where your vegetables can thrive all season long.
Planting Techniques and Timing
When it comes to growing veggies in winter containers, getting the planting timing right is crucial for a bountiful harvest. Let’s explore the best techniques for sowing seeds and transplanting seedlings at the perfect moment.
Sowing Seeds at the Right Time
When it comes to sowing seeds for winter container vegetable gardening, timing is everything. You want to ensure that you’re planting at the right time to give your crops the best chance of optimal growth and maturity during the cooler months.
To determine the best time to sow seeds, consider the soil temperature, daylight hours, and weather patterns in your area. Most winter vegetables require a period of cooler temperatures to germinate and grow, but some can be sensitive to frost. For example, broccoli and cauliflower prefer temperatures between 40°F and 55°F (4°C and 13°C) for optimal growth.
In most regions, it’s best to sow seeds 8-10 weeks before the first frost date. This allows the plants to mature and produce a crop before the cold weather sets in. However, some vegetables like lettuce, spinach, and radishes can be sown as late as 4-6 weeks before the first frost.
Keep an eye on your local weather forecast to plan accordingly. If you live in an area with mild winters, you may be able to sow seeds year-round. But if you’re in a region with harsh winters, it’s best to stick to the general guidelines above.
Transplanting Seedlings into Containers
Transplanting seedlings into containers is an art that requires finesse. You want to minimize shock and ensure a smooth transition for your young plants. Start by gently grasping the seedling at the base of the stem, taking care not to damage the delicate roots.
Place the seedling in the container, and firm the soil around it. Leave about 1-2 inches between seedlings for optimal growth. Water thoroughly after transplanting, making sure not to wash away the soil.
Proper spacing is key to preventing overcrowding, which can lead to disease and reduced yields. A good rule of thumb is to plant at a density that allows for about 6-8 hours of direct sunlight per day.
Aftercare is crucial in this process. Water your seedlings when the top inch of soil feels dry to the touch. Fertilize sparingly, as over-fertilization can cause more harm than good. Monitor your plants closely for signs of stress or disease, and take action promptly if necessary.
Maintenance and Troubleshooting Tips
As you settle into your winter container vegetable garden, unexpected issues can arise. This section offers practical advice for addressing common problems and keeping your plants thriving throughout the season.
Watering Strategies for Winter Container Gardens
Watering your winter container garden can be a challenge due to the low temperatures and reduced evaporation rates. To ensure your plants receive the right amount of moisture, it’s essential to adjust your watering schedule accordingly.
In general, winter container gardens require less water than their summer counterparts. As a rule of thumb, reduce your watering frequency by half during this season. For example, if you were watering your containers every other day in the summer, try watering them only once a week in the winter.
Consider using drip irrigation or soaker hoses to deliver water directly to the roots, minimizing evaporation and runoff. These methods also help prevent fungal diseases that thrive in moist conditions. Check the soil moisture by inserting your finger into the soil up to the first knuckle; if it feels dry, it’s time to water.
In addition to adjusting frequency and method, be mindful of the temperature fluctuations. If temperatures drop below 40°F (4°C), hold off on watering until they rise again. This will prevent root damage and ensure your plants can absorb water efficiently when needed.
Common Pests and Diseases Affecting Winter Containers
As winter container gardens face unique challenges, it’s essential to be aware of common pests and diseases that can impact their success. Aphids, for instance, are tiny sap-sucking insects that can multiply rapidly on leaves, stems, and flowers. To prevent aphid infestations, ensure good air circulation around your containers, and use neem oil or insecticidal soap as a treatment.
Slugs, another common pest, can be detrimental to winter crops like lettuce, spinach, and kale. They thrive in moist environments and feed on leaves at night. To control slugs, hand-pick them at dawn when they’re sluggish (pun intended!), or use copper tape around the container’s rim, which repels them.
Diseases such as powdery mildew and root rot can also affect winter containers. Powdery mildew is a fungal disease that causes white patches on leaves, while root rot results from overwatering, causing roots to decay. To prevent these issues, avoid overhead watering and ensure good drainage by using well-draining potting mix. Regularly inspect your plants for signs of disease, and treat promptly with fungicides or adjust your care routine as needed.
Remember, prevention is key! Keep a watchful eye on your winter container gardens and address any potential problems early on to maintain their health and productivity.
Harvesting and Enjoying Your Winter Container Garden
Now that you’ve successfully cultivated your winter container garden, it’s time to reap the rewards of your hard work by harvesting and enjoying your fresh produce. We’ll walk you through how to do just that.
Understanding the Harvest Window
Determining when your winter container vegetables are ready for harvest is an art that requires attention to visual cues and flavor profile expectations. As a winter container gardener, it’s essential to understand that each crop has its unique characteristics that signal readiness for harvest.
For instance, leafy greens like kale and spinach are ready when they reach the desired size and color. For kale, this typically means the leaves have reached 4-6 inches in length and have a deep green color. Spinach, on the other hand, is ready when it’s tender and has reached about 2-3 inches in height.
Root vegetables like Brussels sprouts and broccoli are ready to harvest when their buds are firm and tightly closed. You can also check for readiness by gently tugging on the stem – if it comes off easily, it’s time to harvest.
When harvesting, make sure to use scissors or a sharp knife to avoid damaging the plant. Cut the leaves or stems at an angle just above a leaf node to promote new growth and prevent rot. By paying attention to these visual cues and flavor profile expectations, you’ll be able to enjoy your winter container vegetables at their peak flavor and texture.
Preserving Winter Produce for Year-Round Enjoyment
The bittersweet moment of harvesting your winter container garden’s bounty has finally arrived! While it’s wonderful to enjoy the fruits of your labor while they’re at their peak freshness, preserving some of that produce for year-round enjoyment can be a game-changer. Not only will you have access to homegrown goodness throughout the seasons, but you’ll also save time and money by reducing food waste.
Let’s explore three popular methods for preserving winter produce: freezing, canning, and dehydrating. Freezing is a great way to preserve delicate herbs like parsley or dill, while canning is perfect for items like tomatoes and carrots. Dehydrating, on the other hand, is ideal for leafy greens like kale and spinach. To get started, simply chop your produce into manageable pieces, blanch them in boiling water (if necessary), and then transfer them to airtight containers or freezer bags.
To incorporate your preserved winter veggies into meals, try making homemade soups, stews, or stir-fries. For example, use frozen spinach to whip up a creamy pesto sauce or canned tomatoes to make a hearty vegetable soup. The possibilities are endless, and with these simple preservation methods, you’ll be enjoying the flavors of your winter container garden all year round!
Frequently Asked Questions
What if I don’t have a spot with direct sunlight for my winter container garden?
Yes, you can still grow a successful winter container garden even without direct sunlight. Look for locations that receive at least four hours of indirect sunlight or consider using grow lights to supplement the natural light.
How often should I water my winter container garden during cold snaps?
During periods of extreme cold, reduce watering to once every 7-10 days. This will help prevent root damage and ensure your plants’ survival. Monitor soil moisture by sticking your finger into the soil up to the knuckle; if it’s dry, it’s time to water.
Can I use the same containers from my summer garden for winter container gardening?
Yes, but make sure to clean and disinfect them thoroughly to prevent any lingering pests or diseases from affecting your new crop. Also, consider upgrading to larger containers with better drainage to accommodate the unique needs of cool-season crops.
How do I know when it’s time to harvest my winter vegetables?
Check for visual cues such as leaf color, texture, and size. For example, broccoli is ready when the buds are tight and green, while kale should be harvested before its leaves become too large and tough. Refer to the specific harvest guidelines for each crop you’re growing.
Can I grow a mix of warm-season and cool-season crops together in my winter container garden?
While it’s technically possible, this approach can lead to competition between plants and increased disease transmission. For optimal results, group similar temperature requirements together to create a more balanced and thriving ecosystem within your containers.