Are you ready to indulge in the sweet taste of homegrown watermelons? Growing your own watermelons can be a delightful experience, but it requires some know-how. With so many varieties available, choosing the right one for your garden can be overwhelming. That’s where our comprehensive guide comes in – we’ll walk you through the process of selecting the perfect watermelon variety, preparing the soil, sowing seeds, and providing optimal care from watering to harvesting. We’ll also cover essential tips on pest management and pruning to ensure your watermelons grow big and juicy. By following these steps, you’ll be enjoying fresh, healthy watermelons right in your own backyard – no more relying on store-bought ones! In this article, we’ll break down the entire process into manageable parts, making it easy for beginners to start growing their own watermelon.
Choosing the Right Variety
When it comes to growing watermelon, selecting the right variety is crucial for success. This section will help you navigate the vast options and choose a watermelon that thrives in your garden conditions.
Understanding Watermelon Types
When it comes to growing watermelon, choosing the right variety is crucial. With numerous types available, selecting one that suits your climate, space, and preferences can be overwhelming. Let’s break down the different types of watermelons and their characteristics.
Sweet watermelons are a popular choice among gardeners, prized for their high sugar content and juicy flesh. They come in various sizes, from small to large, and mature quickly within 70-80 days. Seedless watermelons, on the other hand, have been bred to eliminate seeds, making them a convenient option. However, they tend to be more expensive and less sweet than their seeded counterparts.
Miniature watermelons are perfect for small spaces or containers, producing smaller fruits that mature within 60-70 days. These compact varieties require minimal care and can thrive in tight areas. Other types include ‘Yellow Doll’, a yellow-fleshed variety with high sweetness levels, and ‘Sugar Baby’, a popular miniature watermelon known for its sweet taste.
When selecting a watermelon type, consider your climate, available space, and personal preferences. For example, if you live in an area with limited growing season, choose a variety that matures quickly. If you have a small garden or container, opt for a miniature watermelon that requires less space to grow.
Selecting Disease-Resistant Varieties
When selecting disease-resistant varieties of watermelons, it’s essential to consider common diseases such as fusarium wilt and anthracnose. These conditions can significantly impact your crop yield and quality. To minimize the risk of infection, look for varieties that have built-in resistance.
Some popular disease-resistant watermelon varieties include ‘Sugar Baby’, ‘Yellow Doll’, and ‘Carolina Cross’. These types have been bred to withstand fusarium wilt and anthracnose, making them a great choice for gardeners who want to avoid using chemical fungicides. When choosing a resistant variety, check the seed packet or consult with your local nursery staff about the specific disease resistance traits of the variety.
In addition to selecting disease-resistant varieties, maintaining good gardening practices is crucial in preventing disease outbreaks. This includes providing adequate air circulation, watering at soil level, and avoiding overwatering, which can create an environment conducive to fungal growth. By choosing a resistant variety and following best practices, you’ll be well on your way to growing a healthy and productive watermelon crop.
Preparing the Soil
Before you can plant those juicy watermelon seeds, it’s crucial to prepare your soil for optimal growth. This step involves loosening and enriching the dirt to create a fertile environment.
Testing Your Soil pH
Soil pH plays a crucial role in watermelon growth, and understanding its level is essential for optimal production. Watermelons prefer a slightly acidic to neutral soil pH, ranging from 6.0 to 7.0. If the pH level is too high or too low, it can affect nutrient availability, leading to poor fruit development and reduced yields.
To determine your soil’s pH level, you’ll need a soil testing kit or consult with a local nursery or extension office for guidance on how to collect a sample. If using a kit, follow these steps:
* Dig a small hole about 8-10 inches deep in the area where you plan to plant watermelons.
* Collect a small amount of soil from the bottom of the hole and mix it with the provided testing solution.
* Compare the resulting color to the chart included with the kit to determine your pH level.
Remember, accurate results depend on taking multiple samples and averaging the results. This will give you an idea of your soil’s overall pH level and help you make informed decisions for optimal watermelon growth.
Amending Your Soil
When growing watermelons, it’s essential to create a fertile and well-structured soil environment that will support healthy plant growth. One of the most effective ways to achieve this is by amending your soil with organic matter. Organic matter such as compost or manure acts as a natural fertilizer, providing nutrients and improving the overall health of your soil.
Compost can be made from kitchen scraps, leaves, and other yard waste, making it an affordable and sustainable option for gardeners. To incorporate compost into your soil, mix 2-3 inches of it into the top 6-8 inches of soil before planting. Alternatively, you can create a layer of compost on top of the soil as a mulch to retain moisture and suppress weeds.
When selecting organic matter, look for products that are high in nitrogen, phosphorus, and potassium (NPK). These nutrients will support healthy plant growth and fruit development. Some examples of NPK-rich organic matter include chicken manure, cow compost, and worm castings. By incorporating these amendments into your soil, you’ll be providing the essential building blocks for a thriving watermelon crop.
Sowing Watermelon Seeds
To ensure a successful harvest, let’s start by learning how to sow watermelon seeds properly and understand their specific requirements for optimal growth.
When to Plant
When planting watermelon seeds, timing is everything. You’ll want to consider two key factors: frost dates and climate. In most regions, it’s best to plant watermelon seeds after the last frost date of your area has passed. This ensures that the seedlings will have a head start on the growing season without being vulnerable to frost damage.
In warmer climates, you can plant watermelon seeds as soon as the soil is workable in late winter or early spring. However, if you live in an area with shorter growing seasons, such as the northern United States or Canada, you’ll want to wait until late spring to mid-summer for optimal results.
In regions with a long growing season, like tropical and subtropical climates, watermelon seeds can be planted year-round. But even in these areas, it’s essential to keep an eye on weather forecasts to avoid planting during periods of heavy rainfall or extreme heat, which can hinder seedling development.
By taking these factors into account, you’ll be well on your way to successfully growing delicious and juicy watermelons from seed.
Sowing Techniques
When it comes to sowing watermelon seeds, you have two main options: direct sowing and transplanting. Direct sowing involves planting the seeds directly into the soil where they will mature. This method is ideal for small gardens or containers, as it saves time and effort.
To direct sow, create a mound of soil about 6-8 inches high and 3-4 feet in diameter. Plant 2-3 seeds per mound, about 1 inch deep. Thin the seedlings to the strongest one when they have 2-3 sets of leaves. Make sure the mounds are at least 6 feet apart to allow for proper air circulation.
Transplanting involves starting the seeds indoors in pots or cell packs and then transferring them to the garden. This method is better suited for larger gardens, as it allows you to control the soil quality and temperature. Start the seeds indoors about 2-3 weeks before the last frost date in your area, and transplant them outside when they have 2-3 sets of leaves.
When spacing watermelon plants, keep in mind that they need plenty of room to spread out. A general rule of thumb is to plant at least 6 feet apart for small varieties and 10 feet apart for larger ones. This will give the plants enough space to grow without becoming overcrowded.
Watering and Irrigation
Now that you’ve planted your watermelon seeds, it’s time to talk about watering and irrigation – two crucial steps for a healthy and thriving crop. Proper hydration is essential for fruit production.
Understanding Watermelon’s Water Needs
When it comes to watering your watermelon plants, knowing exactly when and how much to water is crucial for optimal growth. The amount of water a watermelon plant requires changes at different stages of its development.
Seedlings (1-2 weeks old): At this stage, the seedling needs consistent moisture but not overwatering. A gentle soaking in a saucer or a watering can with room temperature water will provide enough moisture for about 5-7 days. Make sure the soil isn’t too wet, and avoid getting water on the leaves to prevent fungal diseases.
Transplanting (1-2 weeks after seedling stage): When transplanting seedlings into larger containers or directly into the garden, ensure the soil is consistently moist but not waterlogged. Water deeply once a day for the first few days until new roots establish.
Vining Stage (4-6 weeks after transplanting): At this point, watermelon plants need about 1-2 inches of water per week from rainfall or irrigation. Reduce watering as the weather cools down in fall to prevent overwatering and potential fungal diseases.
Implementing a Drip Irrigation System
Drip irrigation systems are an excellent choice for watermelon plants, as they allow for targeted watering and reduce evaporation. By delivering water directly to the roots, drip irrigation systems conserve up to 70% more water than traditional sprinkler systems.
When implementing a drip irrigation system for your watermelon crop, start by laying out the tubing and emitters according to the plant’s spacing. Typically, you’ll need about 1-2 gallons of water per hour for each mature watermelon plant. You can purchase pre-made drip irrigation kits specifically designed for vegetable gardens, or create your own using a hose barb and dripline.
To ensure optimal performance, bury the tubing at least 6 inches deep to prevent overheating and clogging. Keep an eye on your plants’ water needs and adjust the flow rate as necessary. During periods of high heat or dry spells, you may need to increase the water supply to prevent watermelon plants from wilting. Regularly inspect your drip irrigation system for any blockages or leaks to maintain its efficiency.
Pest and Disease Management
As you nurture your watermelon plants, pests and diseases can quickly become a problem; let’s discuss how to identify and manage common issues. Effective management is key to a healthy harvest.
Common Pests Affecting Watermelon
Watermelon crops are susceptible to various pests that can cause significant damage and reduce yields. Some common pests affecting watermelon include aphids, whiteflies, and squash bugs. Aphids are small, soft-bodied insects that feed on plant sap, causing curled or distorted leaves. They can also transmit diseases such as cucumber mosaic virus.
Whiteflies, on the other hand, are tiny flying insects that feed on plant juices, causing yellowing or stunted growth. Squash bugs are larger, flat insects that feed on plant sap, causing wilting and discoloration of leaves.
To control these pests, inspect your watermelon plants regularly for signs of infestation. Use neem oil or insecticidal soap to control aphid populations. For whiteflies, use yellow sticky traps or introduce natural predators such as ladybugs or lacewings into the garden. Squash bugs can be controlled by removing weeds and debris that provide hiding places.
Keep in mind that prevention is key; use row covers to prevent pests from reaching your watermelon plants in the first place. By taking proactive measures, you can minimize the risk of pest infestations and ensure a healthy, productive harvest.
Managing Fungal Diseases
Watermelons are susceptible to various fungal diseases that can have a significant impact on yields and fruit quality. One of the most common issues is powdery mildew, which appears as a white, powdery coating on leaves and stems. To identify this disease, look for patches or areas with a fine dusting on the surface.
Preventing fungal diseases like powdery mildew requires good gardening practices. Make sure to provide adequate air circulation by spacing plants at least 3-4 feet apart. This will help reduce humidity levels around the vines and prevent moisture from accumulating.
To treat powdery mildew, use a fungicide specifically designed for this purpose. Apply it as directed on the product label, usually in early morning or evening when the sun isn’t intense. Spraying should target all affected areas, including leaves and stems.
Frequent inspection of plants is essential to catch any issues early on. Regular watering, pruning, and crop rotation can also help prevent fungal diseases from taking hold.
Supporting Growth with Pruning and Training
As you nurture your watermelon plant, it’s essential to prune and train its vines to promote healthy growth, maximize fruit production, and prevent damage from overgrowth. Regular pruning will keep your plant thriving.
Pruning for Optimal Growth
Pruning is an essential aspect of growing watermelons that often gets overlooked. However, it plays a crucial role in promoting even growth, fruiting, and sunlight penetration. When left unpruned, watermelon vines can become tangled and overgrown, leading to reduced air circulation, increased disease susceptibility, and uneven fruit development.
To prune your watermelon vine effectively, start by removing any weak or spindly growth. This will help direct the plant’s energy towards producing larger, more productive shoots. Next, trim back long runners that are not producing fruit to encourage bushy growth. Leave 3-4 main vines intact and allow them to spread outwards from the center of the plant.
Regular pruning also helps improve sunlight penetration within the plant canopy. As watermelon leaves grow upwards, they can block sunlight from reaching lower parts of the plant. Pruning encourages horizontal growth, allowing more light to reach developing fruit and promoting even ripening. By pruning regularly, you’ll be rewarded with healthier plants that produce bigger, juicier melons.
Using Trellises or Cages
Using trellises or cages is an excellent way to support watermelon plants and promote healthy growth. By providing a structure for the vines to climb on, you can encourage the plant to produce more fruit and make harvesting easier.
One of the main benefits of using trellises or cages is improved air circulation around the plant. Watermelon plants are susceptible to fungal diseases that thrive in humid environments. By elevating the plant above the soil level, you create space for air to circulate and help prevent moisture from accumulating, which can lead to disease.
To set up a trellis or cage, choose a sturdy structure that is at least 6 feet tall. Place it near the watermelon plant when it’s still young, about 1-2 weeks after transplanting. Gently twine the vines around the trellis, working your way from the base to the top. Make sure to leave enough space between each fruit for even growth.
By providing support with a trellis or cage, you can enjoy a bountiful harvest of juicy watermelons all season long!
Harvesting Your Watermelon Crop
Now that your watermelons are ripe, it’s time to learn how to harvest them safely and efficiently to enjoy their juicy sweetness for weeks to come. We’ll walk you through the best harvesting techniques.
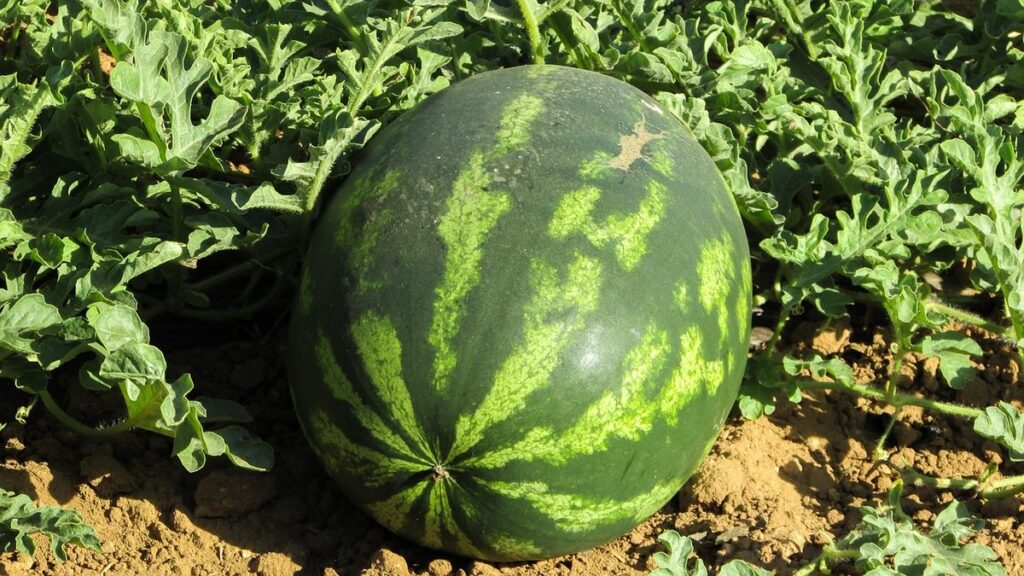
Checking for Ripeness
Checking for ripeness is crucial when harvesting watermelons to ensure they are picked at their sweetest and most flavorful. To check if a watermelon is ripe, start by looking for a creamy yellow spot on the underside of the fruit, which is where it rested on the ground during ripening. This spot will be slightly soft to the touch.
Next, pick up the watermelon and gently thump it with your fingers. A ripe watermelon should have a deep, hollow sound. If it sounds metallic or tinny, it may not be ripe yet. You can also check the weight of the watermelon – a ripe one will be heavy for its size.
When you cut into a ripe watermelon, the interior flesh should be a vibrant orange color and have a sweet aroma. If the flesh is pale or has a soapy taste, it’s likely not ripe yet. To avoid over-ripening, harvest your watermelons when they’re slightly underripe, as they’ll continue to ripen off the vine.
Remember, different varieties of watermelon may have varying levels of sweetness and texture, so it’s essential to get a feel for how your specific variety should look and taste.
Handling and Storage Tips
Once you’ve harvested your watermelons, it’s essential to handle and store them properly to maintain their quality. One of the most critical factors is temperature control. Watermelons are sensitive to heat, so avoid storing them in direct sunlight or near heating vents. Instead, keep them in a cool, dry place with a consistent temperature between 50°F and 70°F (10°C and 21°C).
To prevent damage during handling, use soft materials like blankets or towels to cushion the fruit. Avoid stacking watermelons on top of each other, as this can cause pressure points that lead to bruises and soft spots.
For long-term storage, consider a cool, dark place with high humidity. A basement or root cellar is ideal, but if you don’t have access to such a space, a refrigerator will do in a pinch. Store watermelons away from strong-smelling foods, as they can absorb odors easily.
Frequently Asked Questions
How can I ensure my watermelon variety is well-suited for my local climate?
If you’re unsure which watermelon variety to choose, start by researching the specific growing conditions required by your chosen variety. Check the seed packet or consult with a gardening expert to determine if the variety is resistant to common pests and diseases in your area.
Can I grow watermelons in containers or do they require extensive space?
Yes, you can grow watermelons in containers, but make sure they are at least 5-gallons in size to accommodate the spreading vines. Use a well-draining potting mix and provide adequate support for the vines using trellises or cages.
How often should I fertilize my watermelon plants?
Fertilize your watermelon plants regularly, ideally once a month during the growing season. A balanced fertilizer with equal N-P-K ratios will provide necessary nutrients for optimal growth. You can also side-dress with calcium and magnesium to prevent blossom-end rot.
What’s the best way to protect my watermelon crop from pests?
Implement integrated pest management (IPM) techniques, which combine physical barriers, traps, and organic or chemical controls to manage pests. Regularly inspect your plants for signs of damage and take swift action to address any issues that arise.
Can I grow multiple types of watermelons in the same garden bed?
Yes, you can grow multiple types of watermelon in the same garden bed, but ensure they have enough space and are not competing for resources. Plant varieties with different growth habits or maturation periods together to promote efficient use of space and reduce pest pressure.