Growing your own delicious tomatoes from seed can be incredibly rewarding. Not only do you get to enjoy fresh, flavorful produce all season long, but you also gain the satisfaction of nurturing these plants from tiny seeds into bountiful harvests. However, growing tomatoes from seed can be a daunting task, especially for beginners. With so many varieties to choose from and potential pitfalls like disease and pests lurking around every corner, it’s easy to get discouraged.
But don’t worry! In this article, we’ll take the mystery out of growing tomatoes from seed and provide you with expert tips on choosing the right variety, sowing seeds, transplanting, and managing common pests and diseases. By following our simple advice, you’ll be well on your way to enjoying a crop of disease-free, mouthwatering tomatoes that will make your gardening friends green with envy!
Choosing the Right Tomato Variety
When it comes to growing tomatoes from seed, selecting the right variety is crucial for a successful harvest. This section will help you navigate the numerous options and choose the perfect tomato for your garden.
Understanding Tomato Classification
When it comes to growing tomatoes from seed, understanding the different types of tomato varieties is crucial for success. There are primarily two categories of tomato plants: determinate and indeterminate. Determinate tomatoes, also known as bush tomatoes, grow compactly and produce a single harvest of fruit at once. These varieties are ideal for containers or small gardens where space is limited.
Indeterminate tomatoes, on the other hand, are vining plants that continue to grow and produce fruit throughout the season. They require support and can be more challenging to manage but offer higher yields. Another popular type is cherry tomato, which produces small, bite-sized fruits in abundance. Heirloom tomatoes are also gaining popularity for their unique flavors and colors.
When selecting a variety for homegrown tomatoes, consider factors such as climate, soil quality, and personal preference. If you’re new to growing tomatoes from seed, start with determinate varieties or cherry tomatoes for easier management. As you gain experience, experiment with indeterminate and heirloom varieties for more complex flavor profiles and yields.
Factors to Consider When Selecting a Variety
When selecting a tomato variety, several key factors come into play to ensure you choose a cultivar that thrives in your specific growing conditions. Climate is one of the most significant considerations, as some varieties are bred specifically for hot and dry climates, while others excel in cooler, more temperate regions.
For gardeners with limited space, compact or dwarf varieties are ideal, as they produce fruit just as well as larger plants but take up significantly less room. If disease resistance is a top priority, look for varieties that have built-in immunity to common tomato pests like blight and fusarium wilt.
Lastly, think about the flavor profile you’re after: do you prefer sweet and juicy or tangy and acidic? Some popular heirloom varieties, such as Brandywine and Cherokee Purple, offer complex, intense flavors that are a cut above standard supermarket tomatoes. In contrast, cherry tomatoes like ‘Sungold’ or ‘Red Robin’ pack a punch of sweetness in every bite.
Ultimately, the best variety for you will depend on your unique growing circumstances and personal preferences.
Preparing the Seed Starting Mix
When starting seeds for tomatoes, it’s essential that you prepare a high-quality seed starting mix to give your young seedlings the best chance at success. This mix should be well-draining and rich in nutrients.
The Importance of Seed Starting Mix
When it comes to growing tomatoes from seed, using a high-quality seed starting mix is crucial for successful germination and healthy seedling development. This specialized potting mix is designed specifically for seedlings and contains the right balance of nutrients and moisture-retentive properties.
A good seed starting mix should have some key characteristics that distinguish it from regular potting soil. Look for a mix that is sterile, meaning it has been treated to kill any weed seeds or fungal spores that might inhibit germination. It should also be well-draining, allowing excess water to escape and preventing waterlogged roots. Additionally, the mix should have a pH between 5.5 and 6.5, which is slightly acidic, ideal for tomato seedlings.
When selecting a seed starting mix, read the label carefully and choose one that specifically says “seed starting mix” or “germination mix.” Some popular brands even offer specialized mixes tailored to specific types of seeds, including tomatoes.
DIY vs. Store-Bought Seed Starting Mixes
When it comes to preparing the seed starting mix for your tomato seeds, you may be wondering whether to make your own mix or buy a pre-mixed one from the store. Both options have their pros and cons, which we’ll explore below.
Making your own seed starting mix can be cost-effective in the long run, as you can purchase the individual ingredients in bulk. However, it requires some planning and effort upfront to create a balanced mix that meets the needs of your tomato seeds. You’ll need to select a combination of peat moss or coconut coir, vermiculite, perlite, and fertilizers that provide the right pH level and nutrient content.
On the other hand, buying pre-mixed seed starting mixes is convenient and saves time. Many gardeners swear by these commercial blends, which are specifically formulated to meet the needs of various types of plants, including tomatoes. However, store-bought mixes can be pricey, especially if you’re growing a large number of seeds.
In terms of performance, research suggests that homemade seed starting mixes can outperform commercial ones when it comes to seed germination and seedling growth. This may be due to the customizable nature of DIY mixes, which allows you to tailor the blend to your specific needs.
Ultimately, whether to make your own or buy a pre-mixed seed starting mix depends on your personal preferences, budget, and experience level. If you’re short on time but want control over the ingredients, buying a high-quality commercial mix may be the best option for you. On the other hand, if you enjoy experimenting with different recipes and are willing to invest some time upfront, making your own seed starting mix can be a rewarding experience that yields great results.
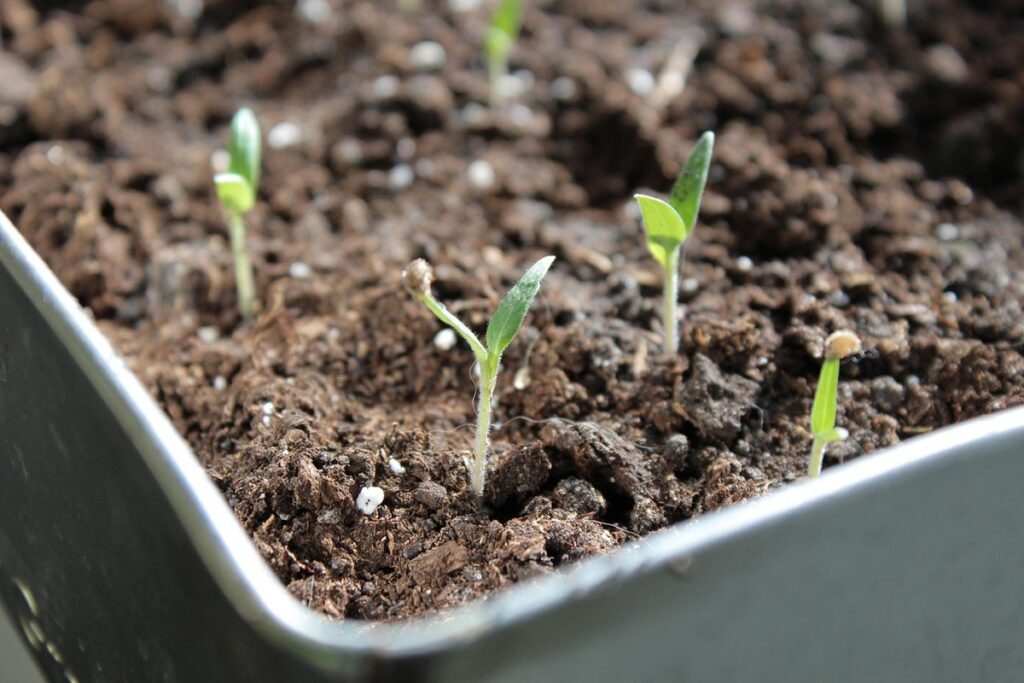
Sowing Tomato Seeds
Let’s dive into sowing tomato seeds, a crucial step that sets the stage for a successful harvest. Follow these essential tips to get your seeds off to a great start.
The Optimal Time to Sow Tomato Seeds
Timing is everything when it comes to sowing tomato seeds. You see, tomatoes are sensitive to temperature and weather conditions, which can either encourage or hinder their growth. To give your seedlings the best chance of success, you need to sow them at the right time.
In most regions, it’s essential to wait until the soil has warmed up sufficiently before sowing tomato seeds directly into the ground. The ideal soil temperature for tomato germination is between 55°F (13°C) and 70°F (21°C). If your area experiences frequent frosts or has a short growing season, consider starting your tomatoes indoors 4-6 weeks before the last frost date. This way, you can transfer them outside when the weather warms up.
When sowing seeds indoors, make sure to provide them with adequate light. Tomato seedlings require at least 12 hours of daylight to develop strong stems and roots. Once you’ve transferred your seedlings outdoors, ensure they receive full sun for at least 6 hours a day.
Seed Starting Techniques
When it comes to sowing tomato seeds, you have several techniques to choose from. Direct sow is one of the simplest methods, where you sow the seeds directly into the garden bed at the right depth and spacing for mature plants. This approach saves time and labor but can be challenging, especially if you’re new to gardening.
Another popular method is transplanting seedlings, which involves sowing seeds in cell trays or biodegradable pots and then transferring them to individual containers when they have 2-3 sets of leaves. This technique allows for better control over soil quality and moisture levels but requires more equipment and handling.
Using biodegradable pots or cell trays can be a convenient alternative to traditional seed starting materials. These pods are designed to break down in the soil, reducing waste and making it easier to handle delicate seedlings. They often come with their own fertilizer or have built-in water reservoirs for effortless watering.
When choosing your method, consider factors such as available space, equipment, and personal preference. Whichever technique you select, make sure to sow seeds at the correct depth (about ¼ inch) and spacing (1-2 inches apart).
Caring for Seedlings
Once you’ve got your seedlings up and running, it’s essential to give them the right care to ensure they thrive. In this next step, we’ll cover the specific needs of young tomato plants.
Providing Adequate Light and Temperature
When transplanting tomato seedlings into larger containers, it’s crucial to create an environment that supports their growth and development. Young seedlings require adequate light, temperature control, and humidity levels to thrive.
Light is a critical factor for seedling growth. Tomato seedlings need bright light to undergo photosynthesis, but direct sunlight can be too intense, causing scorching of delicate leaves. Place seedlings 2-3 feet away from south-facing windows or use grow lights with adjustable intensity. For indoor setups, LED grow lights are an excellent option as they provide a broad spectrum of light while using minimal energy.
Temperature control is also vital for seedling development. Most tomato varieties prefer daytime temperatures between 65°F to 70°F (18°C-21°C) and nighttime temperatures around 55°F (13°C). Avoid placing seedlings near heating or cooling vents, fireplaces, or drafty windows that can cause temperature fluctuations.
Maintaining optimal humidity levels is essential for young seedlings. Seedlings prefer a humid environment, typically between 50% to 70%. To achieve this, you can cover the container with a clear plastic bag or use a cloche to maintain moisture while preventing fungal diseases.
Watering and Fertilization Practices
When it comes to growing tomatoes from seed, proper watering and fertilization practices are crucial for their early development. Seedlings require consistent moisture levels, but overwatering can be detrimental, leading to root rot and other problems.
To achieve the right balance, check the soil moisture by sticking your finger into the soil up to the first knuckle. If it feels dry, it’s time to water. Aim for about 1-2 inches of water per week, either from rainfall or irrigation. Be mindful that seeds sown in pots or containers may require more frequent watering due to their smaller root systems.
Maintaining optimal pH levels is also vital, as tomatoes prefer a slightly acidic soil environment with a pH between 6.0 and 7.0. Regularly test your soil’s pH using a testing kit and adjust it if necessary.
Fertilization should begin after seedlings have two sets of true leaves. Use a balanced fertilizer (10-10-10 NPK) at half the recommended strength to avoid burning your young plants’ roots.
Transplanting Seedlings
Now that you’ve got your seedlings growing strong, it’s time to give them some space: learn how and when to transplant them into larger containers or directly into the garden. Transplanting is a crucial step in giving your tomatoes room to thrive.
The Right Time to Transplant
When to transplant tomatoes from seedlings can be a bit tricky, but don’t worry, it’s easier than you think. The goal is to give them enough time to develop strong roots and leaves before moving them to larger containers or directly into the garden.
Here are some signs that your tomato seedlings are ready for transplanting: They should have at least two sets of true leaves, which means they’ve gone beyond their initial cotyledons (seed leaves). Their stems should be sturdy enough to support the weight of fruit and foliage. The roots should have filled the original container or started to grow out of it.
Check on your seedlings every few days to assess their progress. Typically, this process takes 2-4 weeks after germination. If you start seeds indoors under grow lights, they’ll need more time to develop before being transplanted outside. Look for a minimum of 6-8 hours of direct sunlight or 12-14 hours under supplemental lighting.
Be cautious not to transplant seedlings when the soil is too wet, as this can cause them to become waterlogged and increase the risk of root rot. Wait until the soil feels dry to the touch but still moist enough to hold a finger imprint. Transplanting at this stage will give your tomato seedlings the best chance to thrive in their new environment.
Transplant Shock Prevention Techniques
Transplanting seedlings can be a delicate process, and minimizing transplant shock is crucial for their survival. To harden off your seedlings, start by moving them to a shaded area outdoors 7-10 days before transplanting. Gradually increase their exposure to sunlight over the next few days, allowing them to acclimate to outdoor conditions.
Another technique to prevent transplant shock is using neem oil or other root stimulants. These products help promote healthy root growth and reduce stress on the plant during transplantation. Mix a small amount of neem oil with water according to the product’s instructions and use it as a foliar spray 24 hours before transplanting.
Adjusting soil pH can also contribute to transplant shock prevention. Tomatoes prefer slightly acidic to neutral soil, typically between 6.0-7.0 pH. If your transplant medium has a high pH, mix in some peat moss or sulfur to lower it. This will help prevent root shock and promote healthy growth after transplantation.
Pest and Disease Management
To ensure a healthy tomato crop, it’s essential to know how to prevent and address common pests and diseases that can affect your plants. We’ll cover the most effective methods for managing these issues.
Common Tomato Pests and Diseases
As you nurture your tomato seedlings and watch them grow, it’s essential to be aware of common pests and diseases that can wreak havoc on your harvest. Tomatoes are a favorite among gardeners, but they’re also a magnet for unwanted critters.
Hornworms are one of the most destructive tomato pests. These large, green caterpillars can consume leaves, stems, and even the fruit itself. Their damage is often accompanied by frass (insect waste) on the plants. To control hornworms, hand-pick them from the plant or use Bt (Bacillus thuringiensis) spray.
Aphids are another common pest that can infest tomato plants. These tiny, sap-sucking insects can spread disease and stunt growth. Check your plants regularly for sticky honeydew droplets, which are a sign of aphid infestation. Use neem oil or insecticidal soap to control aphid populations.
Blossom end rot is a common fungal infection that causes the tomato fruit to rot from the inside out. This condition often appears as a brown spot on the blossom end of the fruit. It’s caused by calcium deficiency, which can be mitigated by using high-calcium fertilizers or adding crushed eggshells to the soil.
Fungal infections like late blight and early blight can also devastate your tomato crop. These diseases often appear as yellowing leaves, black spots, or a fuzzy growth on the stems. To prevent fungal infections, maintain good air circulation around the plants, remove infected foliage, and use fungicides when necessary.
By being aware of these common pests and diseases, you’ll be better equipped to prevent damage and ensure a healthy harvest. Regularly inspect your plants for signs of infestation or infection, and take action promptly if you notice any issues.
Organic and Integrated Pest Management (IPM) Techniques
When it comes to growing tomatoes from seed, managing pests and diseases is crucial for a healthy crop. Fortunately, there are many effective organic and integrated pest management (IPM) techniques you can use.
One popular method is companion planting, where certain plants are grown alongside each other to deter pests or attract beneficial insects. For example, basil repels aphids and whiteflies, while marigold repels nematodes and attracts beneficial nematode-hunting nematodes. Planting these companions near your tomato seedlings can help reduce pest pressure.
Neem oil is another powerful tool in IPM. Derived from the seeds of the neem tree, it contains azadirachtin, a natural insecticide that disrupts insect growth and development. Mix neem oil with water according to the label instructions and spray it on your tomato plants to control pests like aphids, whiteflies, and spider mites.
Garlic spray is another natural pest deterrent you can make at home. Blend 3 cloves of garlic with 1 quart of water and let it sit for 24 hours before straining and spraying it on your tomatoes. This will help repel aphids and other pests.
Row covers are also a great way to protect your tomato plants from pests and diseases. These lightweight, breathable fabrics allow light and air to reach your plants while keeping insects and fungal spores out. They’re especially useful for protecting young seedlings from pests like slugs and snails.
Frequently Asked Questions
Can I grow tomatoes from seed in a cold climate?
Yes, you can still grow tomatoes from seed in a cold climate, but it requires extra care. Start your seeds indoors 6-8 weeks before the last frost date, and then transplant them outside when the weather warms up. Use a cold frame or other protection to extend the growing season.
How do I prevent transplant shock when moving my tomato seedlings outdoors?
Transplant shock can be minimized by hardening off your seedlings before transplanting. Start by moving them to a shaded area outdoors for 1-2 hours, gradually increasing the time over the course of 7-10 days. This will help them adjust to outdoor conditions and reduce stress.
What are some common pests that can affect my tomato plants, and how do I control them?
Common pests like hornworms, aphids, and whiteflies can be managed using organic and integrated pest management (IPM) techniques. Use neem oil or insecticidal soap to control infestations, and introduce beneficial insects like ladybugs and lacewings to your garden.
Can I use regular potting soil as a seed starting mix for tomatoes?
No, it’s not recommended to use regular potting soil as a seed starting mix for tomatoes. Seed starting mixes are specifically designed to provide the necessary nutrients and structure for young seedlings. Regular potting soil can be too dense and may lead to poor drainage and root problems.
How long do tomato seeds typically take to germinate?
Tomato seeds typically take 7-14 days to germinate, depending on factors like temperature, moisture, and variety. Keep the soil consistently moist but not waterlogged during this period, as this will help promote healthy growth.