Are you ready to grow your own delicious homegrown tomatoes and fragrant basil? With just a few simple steps, you can enjoy fresh, flavorful ingredients right in your own backyard. Planting tomatoes and basil is an ideal activity for beginners, as they are relatively easy to care for and require minimal space. But don’t let their ease of cultivation fool you – with the right techniques and knowledge, you can coax the most out of these popular herbs and vegetables. In this comprehensive guide, we’ll walk you through everything from selecting the perfect varieties to managing pests and harvesting your crops at their peak flavor and fragrance. Whether you’re a seasoned gardener or just starting out, this beginner’s guide has got you covered!
Choosing the Right Varieties
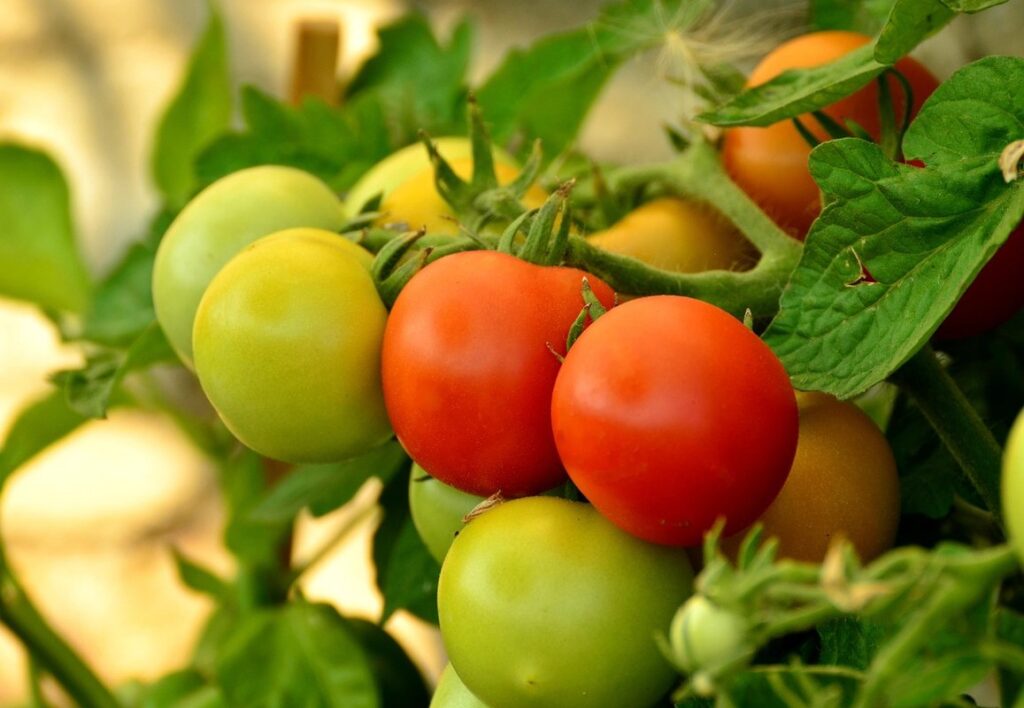
When it comes to planting tomatoes and basil, choosing the right varieties is crucial for a bountiful harvest. This selection will make all the difference in your garden’s success.
Selecting Tomato Varieties for Your Climate
When it comes to selecting tomato varieties for your climate, you have a wide range of choices. Different types of tomatoes thrive in various conditions, so it’s essential to choose the right ones for your region.
Let’s start with some popular varieties: cherry tomatoes are perfect for small gardens and containers, producing bite-sized fruits in abundance. They’re also heat-tolerant and drought-resistant, making them ideal for warm climates. On the other hand, beefsteak tomatoes love cooler temperatures and well-drained soil, making them suitable for temperate zones.
Roma tomatoes, also known as plum tomatoes, are great for sauces and canning due to their elongated shape and dense flesh. They prefer warmer weather and full sun, so they’re perfect for Mediterranean climates. To choose the best variety for your climate, consider factors like temperature, sunlight, and soil type. Check the seed packet or consult with local nurseries to determine which varieties thrive in your specific region.
In addition to these popular varieties, look for disease-resistant and high-yielding options that match your garden’s conditions. With so many choices available, it’s easy to find the perfect tomato variety for your climate and enjoy a bountiful harvest.
Picking the Perfect Basil Variety
When it comes to picking the perfect basil variety, you’ll be spoilt for choice with the numerous options available. Let’s start with the most popular one: sweet basil (Ocimum basilicum). This is the classic Italian basil, often used in caprese salads and pesto sauces. Its sweet, slightly spicy flavor makes it a versatile addition to many Mediterranean dishes.
Thai basil (Ocimum basilicum var. thyrsiflora) has a more pungent aroma and taste than sweet basil, with anise-like notes. It’s commonly used in Southeast Asian cuisine, particularly in Thai and Vietnamese cooking. This variety is perfect for adding depth to stir-fries and curries.
Lemon basil (Ocimum x citriodorum) has a distinctive citrusy flavor and aroma, making it ideal for seafood dishes and salads. Its bright, zesty taste also pairs well with vegetables like bell peppers and eggplant.
Each of these varieties can be grown alongside tomatoes, but some are more suitable than others due to their growth habits and flavor profiles. Experimenting with different basil types will help you find the perfect match for your cooking style and favorite recipes.
Preparing the Soil
Before you start planting, let’s get your soil ready for a thriving tomato and basil harvest by loosening and aerating it. This simple step will set the stage for lush growth.
Testing Your Soil pH Levels
Testing your soil pH levels is crucial before planting tomatoes and basil. This simple yet essential step will ensure that both plants receive optimal nutrients to thrive. Soil pH measures the acidity or alkalinity of the soil, ranging from 0 to 14. Most vegetables prefer a slightly acidic to neutral soil pH between 6.0 and 7.0.
To test your soil pH levels, you can purchase a DIY soil testing kit at most gardening stores or online. Follow the instructions provided with the kit to collect a small sample of your soil and mix it according to the manufacturer’s guidelines. Alternatively, send a sample to a laboratory for more accurate results. If your soil is too alkaline (high pH), add sulfur-based products to lower the pH. Conversely, if your soil is too acidic (low pH), add lime to raise the pH.
For tomatoes, an ideal soil pH range is between 6.0 and 7.0, while basil prefers a slightly acidic to neutral soil pH of around 6.5. Avoid planting in extremely acidic or alkaline conditions, as this can lead to nutrient deficiencies and reduced yields.
Amending Your Soil with Organic Matter
When it comes to planting tomatoes and basil, a crucial step often overlooked is preparing the soil for optimal growth. One essential aspect of this process is amending the soil with organic matter, which plays a vital role in improving its structure and fertility. Compost and manure are two common and effective options for achieving this.
Composting involves breaking down kitchen scraps and yard waste into a nutrient-rich fertilizer that replenishes the soil’s nutrients. Adding compost to your tomato and basil beds can increase their yields by up to 20% while also enhancing the plants’ resistance to diseases and pests. Manure, on the other hand, is an excellent source of nitrogen, phosphorus, and potassium – essential macronutrients for plant growth.
To incorporate organic matter into your soil, start by mixing in a 2-3 inch layer of compost or well-rotted manure about 6-8 inches deep. This will allow the organisms to break down the material and make it available to the plants. For smaller areas, you can also use a hand fork to gently aerate the soil and mix in a smaller amount of organic matter. Regularly adding organic matter to your soil will lead to healthier, more productive crops over time.
Planting Tomatoes
When it comes to planting tomatoes, choosing the right variety and understanding their specific growing needs is crucial for a bountiful harvest. Let’s dive into the specifics of planting tomatoes.
Preparing the Seedlings for Transplanting
Before transplanting your seedlings outside, it’s essential to harden them off to ensure they can withstand outdoor conditions. This process typically takes 7-10 days and involves gradually exposing the plants to sunlight, wind, and cooler temperatures.
Start by moving the seedlings to a shaded area outdoors for 1-2 hours a day, then gradually increase the duration over the next few days. You can also start acclimating them to wind by placing them near an open window or outside on a breezy day. If you’re planting in full sun, make sure to bring the seedlings back inside at night to prevent scorching.
Monitor your seedlings’ response to outdoor conditions and adjust the hardening-off process accordingly. Be cautious of extreme temperatures, as seedlings can quickly become stressed if exposed to sudden changes. If possible, choose a location with some protection from harsh winds or intense sunlight to give your plants the best chance at success.
Planting Tomatoes at the Right Depth
When planting tomatoes at home, it’s essential to get the depth just right. Tomato seedlings typically prefer their roots to be buried up to their first true leaves, which is usually around 1-2 inches deeper than the soil level they were previously growing in. This may seem counterintuitive, but giving them enough root space allows for healthy growth and a more robust harvest.
To plant at the right depth, start by gently digging a hole that’s about twice as wide and just as deep as the seedling’s pot. Place the tomato seedling in the center of the hole, making sure its roots are spread out evenly around the soil. Then, fill in the remaining space with well-draining potting mix, taking care not to compact the soil too much.
The distance between each plant is also crucial for promoting healthy growth and preventing disease from spreading quickly through your garden. A general rule of thumb is to leave about 2-3 feet of space between each tomato plant.
Caring for Basil
To keep your basil plants healthy and thriving, you’ll need to provide them with the right conditions and care, including regular watering and pruning. With these tips, you’ll be enjoying fresh basil in no time!
Watering and Mulching Basil Plants
Watering basil plants is an art that requires attention and care. Overwatering can lead to root rot and other diseases, while underwatering can cause stress and reduce yields. To strike the perfect balance, aim to water your basil plants when the top 1-2 inches of soil feels dry to the touch. Check the moisture level by sticking your finger into the soil up to the knuckle. Water them thoroughly, making sure not to splash or pour excess water on the leaves.
Mulching around the basil plants is also crucial for maintaining a healthy environment. Organic mulch like straw or wood chips helps retain moisture in the soil and suppresses weeds that can compete with your basil for nutrients. Apply a 2-3 inch layer of mulch around the base of the plants, keeping it at least 1 inch away from the stem to prevent rot. Replenish the mulch as needed throughout the growing season. Regular watering and mulching will not only promote healthy growth but also help repel pests like aphids and whiteflies that can damage your basil leaves.
Pruning Basil for Maximum Growth
Regular pruning of basil is essential for maximum growth and a bountiful harvest. When left unpruned, basil can become leggy and produce fewer leaves, reducing its flavor and aroma. By pruning your basil regularly, you’ll encourage bushy growth, promote root development, and increase the plant’s resistance to pests and diseases.
To prune your basil effectively, start by examining the plant’s shape. Look for any dead or damaged leaves and remove them completely. Next, identify the tips of the stems and cut them back to about one-third of their length using a pair of clean scissors or pruning shears. This will encourage new growth and prevent the plant from flowering.
After pruning, gently massage the remaining leaves to stimulate cell division and promote healthy growth. Repeat this process every 1-2 weeks to maintain your basil’s optimal shape and size. With regular pruning, you’ll be rewarded with a lush, fragrant crop of fresh basil perfect for adding flavor to your favorite dishes.
Supporting Tomato Plants
To ensure your tomato plants thrive, it’s essential to provide them with a sturdy support system to prevent overcrowding and promote healthy growth. Let’s explore some effective ways to do just that.
Trellising Tomatoes for Vertical Growth
When it comes to supporting tomato plants, trellising is an essential technique for vertical growth. But with so many options available, which one should you choose? Let’s explore the different methods of trellising tomatoes.
One popular option is using tomato cages. These are essentially wire or metal enclosures that provide support and structure for the plant as it grows. They’re easy to set up and can be reused year after year. However, they can take up a significant amount of space in your garden.
Another method is using stakes. Simply drive a stake into the ground next to your tomato plant and gently tie the stem to it with twine or clips. This method works well for smaller varieties of tomatoes and takes up minimal space.
For more advanced growers, there’s the “Colorado Green” system. This involves creating a series of wire trellises that are spaced out in a grid pattern. The plants are then trained to grow up these wires using clips and twine. This method provides maximum support for heavy yields and can be easily adapted to different varieties of tomatoes.
In terms of practical advice, it’s essential to choose the right type of trellising system based on your specific needs. Consider factors such as space constraints, plant variety, and desired level of yield when making your decision.
Mulching Around Tomato Plants
Mulching around tomato plants is an essential practice that offers numerous benefits for these delicious and nutritious fruits. One of the primary advantages of mulching is weed suppression. Weeds compete with tomatoes for water and nutrients, which can lead to reduced yields and weakened plant health. By applying a 2-3 inch layer of organic mulch such as straw, bark chips, or grass clippings around your tomato plants, you’ll prevent weeds from growing and reduce the need for manual weeding.
Another significant benefit of mulching is moisture retention. Mulch acts as an insulating barrier that helps to retain soil moisture, reducing the frequency of watering and minimizing evaporation. This is especially crucial during hot summer months when tomatoes require consistent hydration to produce well. To maximize these benefits, apply mulch around your tomato plants once they’re about 12 inches tall, leaving a small gap at the base for air circulation. Water thoroughly before applying the mulch to prevent it from washing away or getting soggy.
By incorporating this simple yet effective practice into your gardening routine, you’ll enjoy healthier, more robust tomato plants and a more manageable harvest.
Common Pests and Diseases
As you tend to your tomatoes and basil, be aware of common pests that can harm your plants, such as aphids, whiteflies, and hornworms. Here are some easy ways to identify and control them.
Identifying and Managing Common Tomato Pests
Tomato pests can be a frustrating problem for even the most experienced gardeners. Among the most common culprits are hornworms, aphids, and whiteflies. These tiny critters may seem insignificant on their own, but they can quickly multiply and decimate an entire crop.
Hornworms, in particular, are notorious for stripping tomato plants bare of their leaves and fruit. To control them, inspect your plants regularly and hand-pick any visible worms. You can also use Bt (Bacillus thuringiensis) spray or spinosad to target the hornworm larvae.
Aphids and whiteflies, on the other hand, are typically easier to manage using organic methods. Neem oil can be used to repel these pests, while introducing beneficial insects like ladybugs or lacewings can help maintain a natural balance in your garden. Regularly spraying water on your plants can also dislodge aphids and whiteflies.
By being vigilant and taking prompt action, you can prevent these common pests from ruining your tomato harvest. Remember to monitor your plants closely and take preventive measures before the problem escalates.
Recognizing and Treating Fungal and Bacterial Diseases
As a tomato and basil enthusiast, it’s essential to be aware of common fungal and bacterial diseases that can affect these plants. Fungal diseases like blight can be devastating if left untreated, causing leaves to turn yellow and eventually drop off. Look out for circular or oval-shaped lesions on the leaves, which may have a grayish or white center.
Bacterial diseases, such as bacterial spot, are also prevalent among tomatoes and basil. These diseases cause small, dark spots to form on the leaves, often accompanied by a sticky substance that can attract pests.
To prevent fungal and bacterial diseases from taking hold:
* Maintain good air circulation around your plants
* Avoid watering them during peak sun hours
* Remove any infected leaves or stems immediately
* Practice crop rotation and use resistant varieties when available
Some common causes of these diseases include:
* Overwatering, which creates an ideal environment for fungal growth
* Poor air circulation, which allows bacteria to spread more easily
* Infected tools or seeds that are not properly sterilized
Harvesting Tomatoes and Basil
Now that your tomato and basil plants are thriving, it’s time to reap the rewards of all your hard work and harvest these delicious herbs and vegetables. This is where the fun really begins!
Timing Your Tomato Harvest for Flavor and Texture
Determine when tomatoes are ripe by checking their color, texture, and stem attachment. A ripe tomato will have a deep, rich color that’s consistent across the fruit. Avoid judging ripeness solely on size or weight, as some tomato varieties may remain small but still be fully mature.
Gently grasp the tomato at its base, where it meets the stem. If it comes off easily, it’s likely overripe and ready to eat. If it resists being pulled away from the plant, it’s not yet ripe. The skin should also feel slightly soft to the touch, but still firm enough to hold its shape.
For cherry tomatoes and other small varieties, check for a slight give when pressed gently on one side. For larger tomatoes, this test may not be as effective, so rely more on color and stem attachment.
If you’re unsure about ripeness, wait another day or two – overripe tomatoes are still edible and can add depth to sauces and soups.
Preserving Fresh Basil through Freezing or Drying
When you’ve harvested an abundance of fresh basil, you might find yourself wondering what to do with it all. Preserving basil through freezing or drying is a simple and effective way to enjoy its flavor throughout the year.
Freezing is one of the most convenient methods for preserving basil. You can chop the leaves finely and place them in airtight containers or freezer bags, making sure to remove as much air as possible before sealing. Frozen basil is perfect for adding to soups, sauces, and pesto. To use it, simply thaw the desired amount and add it to your recipe.
Drying is another popular method for preserving basil, either by air-drying or using a food dehydrator. Tie the stems together in small bunches and hang them upside down in a warm, dry place. Alternatively, you can place the leaves on a baking sheet and dry them in a low oven (150°F – 200°F) for 1-2 hours. Store dried basil in airtight containers to maintain its flavor.
To make the most of your preserved basil, consider making a few staples like frozen pesto or dried basil seasoning. This will not only save you time but also ensure that you always have fresh-tasting herbs on hand.
Frequently Asked Questions
What if I’m new to gardening and not sure where to start with planting tomatoes and basil?
Don’t worry, it’s completely normal! Start by reading the entire guide from beginning to end to get a solid understanding of the basics. Then, begin with small steps like preparing your soil, selecting the right varieties for your climate, and planting your seedlings at the correct depth. As you gain experience, move on to more advanced topics like pruning and trellising.
How can I keep my basil plants healthy and pest-free?
To prevent pests and diseases, make sure to water and mulch your basil plants regularly, keeping the soil consistently moist but not waterlogged. Also, keep an eye out for signs of common problems like aphids, whiteflies, or fungal infections, and address them promptly using organic methods whenever possible.
Can I plant tomatoes and basil together in the same container?
Yes, you can definitely grow both tomatoes and basil together in the same container! In fact, they complement each other well and can benefit from each other’s growth. Just be sure to choose a large enough container with good drainage and provide enough space for both plants to spread out.
How long will it take before my tomatoes are ready to harvest?
The time it takes for your tomatoes to mature depends on the variety you’ve chosen, as well as weather conditions and soil quality. Generally, cherry tomatoes are ready in about 60-70 days, while larger varieties like beefsteak can take up to 90 days or more. Keep an eye out for signs of ripeness, such as a vibrant color and slight softening of the skin.
What if I notice my tomato plants aren’t producing fruit – is it a sign of disease or nutrient deficiency?
No, a lack of fruit production doesn’t necessarily mean there’s a problem with your tomatoes. It could be due to various factors like insufficient light, inadequate pollination, or even just because the plant hasn’t reached its full potential yet. Check if your plants are receiving enough direct sunlight and ensure they’re well-supported using trellises or stakes. If you’re still unsure, consult with a local gardening expert for personalized advice.