Are you struggling to keep your clover plants healthy and thriving? Do you want to bring some vibrancy to your garden with these adorable, three-leaf wonders? Clover plant care is easier than you think! With a little knowledge and the right techniques, you can enjoy lush green growth, vibrant blooms, and a beautiful display of white or pink flowers. In this article, we’ll share expert tips on how to plant, water, and maintain your clover plants for optimal health and appearance. From soil preparation to pruning and pest control, we’ve got you covered with the insider advice you need to take your clover garden to the next level. Whether you’re a seasoned gardener or just starting out, keep reading to discover how to make your clover plant thrive!
Understanding Clover Plants
When it comes to understanding clover plants, knowing their unique characteristics and growth habits is key to providing optimal care. Let’s dive into what makes these plants special.
Types of Clover
There are several types of clover plants that can thrive in different conditions and provide various benefits to your garden. Let’s take a look at some of the most common types.
White clover (Trifolium repens) is one of the smallest and most popular types, growing only about 1-2 inches tall. It has tiny white flowers and prefers well-drained soil in partial shade. White clover is great for lawns and meadows as it forms a dense mat that crowds out weeds.
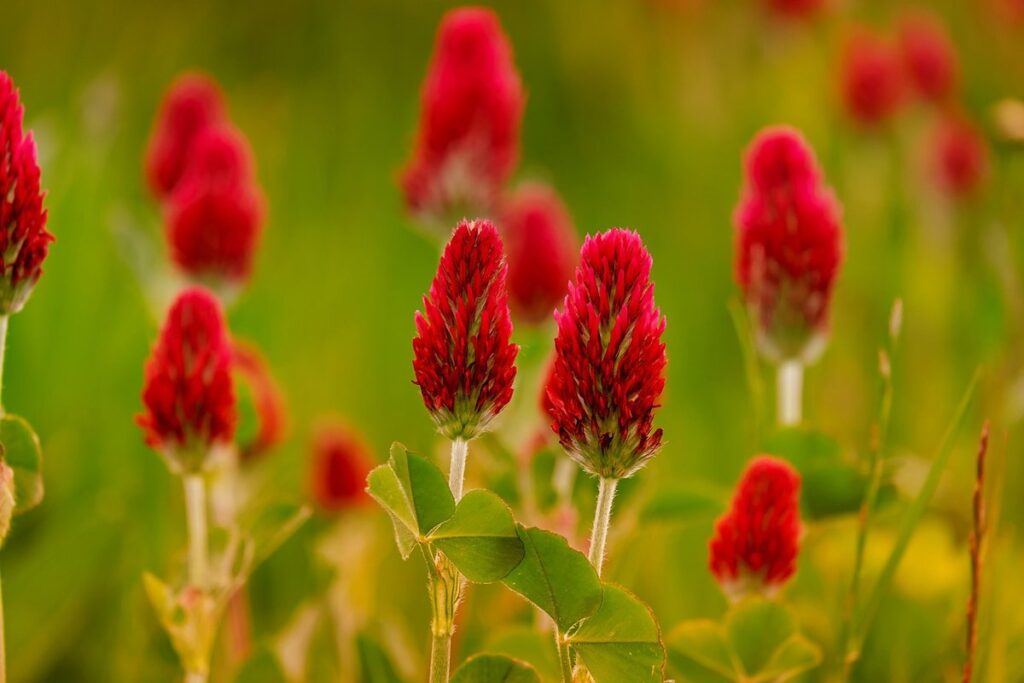
Red clover (Trifolium pratense), on the other hand, grows taller at around 2-3 feet high and has bright red or pink flowers. It prefers moist soils and full sun to partial shade, making it ideal for areas with moderate rainfall.
Other types of clover include microclover, which is even smaller than white clover but has a higher yield; sweet clover (Melilotus officinalis), which produces fragrant flowers; and arrowleaf clover (Trifolium vesiculosum), known for its high nitrogen content. Understanding the different characteristics of each type will help you choose the best one for your garden’s specific needs.
Each type has unique requirements, so it’s essential to research the right conditions and care for your chosen variety. By doing so, you’ll be able to create a thriving clover garden that provides beauty and benefits to your outdoor space.
History and Benefits of Clover
Clover has been a staple in gardening for centuries, and its benefits are numerous. In ancient Rome, clover was used as a fertilizer and cover crop to improve soil quality. Fast forward to today, and we know that clover’s unique properties make it an essential addition to any garden.
One of the most significant advantages of clover is its ability to fix nitrogen in the soil. This means that instead of relying on external fertilizers, clover takes atmospheric nitrogen and converts it into a form that plants can use. This process not only reduces the need for synthetic fertilizers but also improves soil health and structure.
In addition to nitrogen fixation, clover has other benefits that make it an excellent choice for gardeners. It’s a low-maintenance plant that requires minimal watering and care. Clover also helps to reduce soil erosion, suppress weeds, and attract beneficial insects like bees and butterflies. By incorporating clover into your garden, you’ll not only be improving the health of your plants but also creating a more sustainable and balanced ecosystem.
Choosing the Right Location for Your Clover Plant
When it comes to growing a healthy and thriving clover plant, selecting the right location is crucial. This means choosing a spot that provides your clover plant with the perfect balance of sunlight and shade.
Sunlight Requirements
When it comes to choosing the right location for your clover plant, understanding the sunlight requirements is crucial. Different types of clover plants have varying levels of sun tolerance, so it’s essential to know which ones you’re growing.
White clover, for example, prefers partial shade and can tolerate as little as 4 hours of direct sunlight per day. Red clover, on the other hand, requires full sun and can handle up to 8 hours of direct sunlight daily. Microclover is another option that’s tolerant of full sun but also excels in partial shade.
To provide the right amount of sunlight for your clover plant, choose a location that receives the recommended amount of direct sunlight for your specific variety. If you’re growing white clover, consider planting it under a tree or near a north-facing wall to receive gentle, filtered light. For red clover and microclover, select a spot that gets full sun but is also protected from extreme heat by providing some shade during the hottest part of the day.
Remember to observe your plant’s response to its environment and adjust as needed. With proper sunlight and care, your clover plant will thrive and provide a beautiful display of color and texture in your garden.
Soil Preparation
Before planting your clover, it’s essential to prepare the soil to provide the best possible environment for growth. Clover prefers a slightly acidic to neutral soil pH, ranging from 6.0 to 7.0. If your soil is too alkaline or acidic, it can affect the plant’s ability to absorb nutrients.
To determine your soil’s pH level, you can purchase a soil testing kit or have it analyzed by a local nursery or extension office. Based on the results, you may need to add lime to raise the pH or sulfur to lower it. It’s also crucial to ensure the soil has adequate nutrient levels, particularly nitrogen, phosphorus, and potassium.
When preparing your soil, avoid overwatering, which can lead to root rot and other issues. Instead, aim for well-draining soil with a mix of organic matter like compost or manure to improve its structure and fertility. Aim to till the soil about 8-10 inches deep to loosen any compacted areas and incorporate amendments as needed. This will give your clover a strong foundation for growth and help it thrive in your garden.
Planting and Establishing Clover
When it comes to growing clover, planting and establishing a healthy root system is crucial for your plants’ success. Let’s dive into the essential steps for getting your clover off to a great start.
Sowing Seeds vs. Buying Seedlings
When it comes to planting clover, you have two main options: sowing seeds directly into the ground or buying seedlings. Both methods have their pros and cons, which we’ll dive into below.
Sowing seeds can be a cost-effective and exciting way to establish a new clover garden. You can purchase high-quality clover seeds from a reputable supplier and sow them in your desired location. This method allows you to achieve a large area coverage with minimal costs. However, it requires more patience as the germination process can take anywhere from 7-14 days. Make sure to follow the specific sowing instructions for your chosen clover variety.
Buying seedlings, on the other hand, offers faster results and can give your clover garden a head start in establishing itself. Seedlings are typically available at nurseries or online retailers and have already developed roots, allowing them to thrive more quickly. This method is ideal for areas with poor soil quality or those who want instant gratification. However, it can be more expensive than sowing seeds directly.
Ultimately, the choice between sowing seeds and buying seedlings comes down to your specific needs and preferences. If you have the time and resources, sowing seeds can be a great option. But if you’re short on time or want to quickly establish a lush clover garden, seedlings are the way to go.
Spacing and Overcrowding
When it comes to planting clover, one of the most common mistakes is overcrowding. This can lead to a range of problems, including reduced growth rates, increased susceptibility to disease, and decreased overall health.
To avoid overcrowding, make sure to plant clover at the right density. A general rule of thumb is to space individual plants 3-4 inches apart for white clover, while red clover should be planted 6-8 inches apart. This will give each plant enough room to grow and spread its roots without competing with its neighbors.
If you’ve already planted your clover too densely, don’t worry – it’s not the end of the world. Simply thin out the plants by removing some of the weaker or more crowded individuals, leaving about 6-8 inches between each remaining plant. This will help prevent overcrowding and give your clover a chance to thrive.
Remember, proper spacing is crucial for promoting healthy growth and preventing disease in your clover crop. By planting at the right density and giving your plants enough room to breathe, you’ll be well on your way to a thriving garden that’s full of vibrant, healthy clover.
Watering and Maintenance
Now that you’ve got your clover plants established, it’s time to learn how to keep them happy and healthy with regular watering and maintenance routines. This is where the real magic happens!
Frequency and Amount of Watering
When it comes to watering your clover plant, getting it just right is crucial. Overwatering and underwatering can both be detrimental to its health. As a general rule of thumb, clover plants prefer well-draining soil and moderate watering. Water your clover plant when the top 1-2 inches of soil feel dry to the touch.
For optimal growth, aim to provide about 1-2 gallons of water per square foot of garden bed per week. However, this can vary depending on weather conditions. If you’re experiencing hot or dry spells, you may need to water more frequently. Conversely, if it’s been raining consistently, you can reduce the frequency.
Watch out for signs of overwatering, such as yellowing leaves and a soft, mushy texture. On the other hand, underwatered clover plants will display wilted or droopy leaves. Be mindful of these warning signs to adjust your watering schedule accordingly. Aim to water in the morning, allowing the plant to absorb the moisture throughout the day. This will also help prevent fungal diseases that thrive in moist environments.
Mulching and Fertilization
When it comes to maintaining a healthy clover plant, mulching and fertilization play crucial roles. Mulch helps retain moisture, suppress weeds, and regulate soil temperature – all of which are vital for a thriving clover garden.
To start with mulching, choose organic materials like straw, bark chips, or leaves that will break down over time without affecting the soil’s pH level. Spread a 2-3 inch layer around the base of your clover plant, keeping it at least 6 inches away from the stems to prevent moisture buildup. Replenish the mulch as needed to maintain its depth and effectiveness.
As for fertilization, clover is a nitrogen-fixing plant that can benefit from low-nitrogen fertilizers in moderation. You can apply a balanced fertilizer (10-10-10 N-P-K) during the spring growth season or opt for organic options like compost tea or manure tea to provide essential micronutrients.
Aim to fertilize your clover plant every 4-6 weeks, but avoid over-fertilizing, as this can lead to nutrient imbalances and negatively impact the soil’s ecosystem. Regularly monitoring the plant’s response will help you adjust the fertilization schedule accordingly.
Common Problems and Pests
Don’t let pests and problems get in the way of your thriving clover garden! In this next section, we’ll tackle common issues that can affect your plants.
Diseases Affecting Clover
Clover plants are susceptible to various diseases that can weaken their growth and even lead to death. One of the most common diseases affecting clover is powdery mildew, a fungal infection that causes white powder-like growth on leaves. To identify powdery mildew, look for circular or oval patches with a fine, downy growth on the underside of leaves.
Another disease affecting clover is root rot, caused by overwatering and poor drainage. Symptoms include soft, mushy stems and yellowing leaves. If you suspect root rot, stop watering immediately and improve soil drainage by adding organic matter like compost or perlite.
To prevent diseases in your clover plants, maintain good air circulation by spacing them appropriately, and ensure proper watering habits. Regularly inspect your plants for signs of disease and remove any affected areas to prevent the spread of infection. Use fungicides as a last resort, following the manufacturer’s instructions carefully. Keep in mind that preventative measures are always more effective than treating diseases after they occur.
Insect Pests
Clover plants are susceptible to various insect pests that can cause significant damage if left unchecked. One of the most common insect pests affecting clover is the aphid, which feeds on plant sap and can lead to curled or distorted leaves. Whiteflies and spider mites also target clover plants, causing yellowing or bronzing of foliage.
To control these pests organically, start by introducing beneficial insects such as ladybugs or lacewings into your garden. These natural predators will feed on the aphids, whiteflies, and spider mites, reducing their populations. Another effective method is to use neem oil, which can be sprayed directly onto affected areas to repel and kill insect pests.
In addition to these methods, maintain good garden hygiene by removing weeds and debris that may harbor insect eggs or larvae. Regularly inspect your clover plants for signs of infestation and take action promptly to prevent the problem from escalating. By adopting a proactive approach to pest management, you can enjoy a thriving and healthy clover plant all season long.
Using Clover in Your Garden: Ideas and Applications
Whether you’re a seasoned gardener or just starting out, incorporating clover into your garden design can add a touch of elegance and functionality. Let’s explore some creative ideas for using clover in your outdoor space.
Lawn Alternatives
If you’re looking for a low-maintenance lawn alternative that’s also good for the environment, consider using clover as an option. One of the benefits of using clover is its ability to require less water and mowing compared to traditional lawns. Clover can tolerate foot traffic, making it perfect for areas with high usage.
Some popular ways to use clover as a lawn alternative include:
• White clover (Trifolium repens) and red clover (Trifolium pratense) are often used together in meadow-style gardens.
• You can mix clover seeds with other native wildflowers or grasses for a more diverse look.
• Clover lawns work well for small spaces, such as patios or balconies.
Keep in mind that clover may require some initial setup and maintenance to get it established. This includes preparing the soil and controlling weeds before sowing the seeds. However, once it’s up and running, you’ll enjoy the benefits of a lush, low-maintenance ground cover with minimal upkeep needed.
Companion Planting
Companion planting with clover is a game-changer for gardeners of all levels. By strategically pairing clover with other plants, you can create a thriving ecosystem that benefits from the unique characteristics of this versatile legume. So, which plants benefit from clover’s presence? For starters, planting garlic or chives alongside clover can help repel aphids and other pests that target these popular herbs.
But that’s not all – clover also makes an excellent companion for strawberries, carrots, and beets. Its deep taproots bring up nutrients from the subsoil, making them available to these shallow-rooted crops. For example, in a study conducted by the University of California, researchers found that planting white clover alongside strawberries increased yields by 25% due to improved soil fertility.
To repel pests and attract beneficial insects, plant marigolds or nasturtiums with your clover. These flowers release chemicals that deter nematodes and other pests, creating a safer environment for your plants to grow. Experiment with different combinations of companion plants to create a balanced ecosystem in your garden – the possibilities are endless!
Frequently Asked Questions
Can I grow clover plants in containers?
Yes, you can definitely grow clover plants in containers! Choose a container with good drainage to prevent waterlogged soil. Use a well-draining potting mix and follow the same care instructions as for in-ground planting. Just keep in mind that clover prefers full sun to partial shade, so choose a location accordingly.
How do I know if my clover plants are receiving enough sunlight?
Observe your clover plants during different times of day. If they appear pale or stretched out, it might be due to insufficient sunlight. White clover, for instance, requires at least 4-6 hours of direct sunlight daily. Consider moving them to a brighter location or supplementing with grow lights if necessary.
Can I use clover plants as a groundcover in lawns?
Yes! Clover plants are an excellent alternative to traditional lawn grasses. They’re low-maintenance, drought-tolerant, and require less mowing. White clover is a popular choice for lawns due to its compact growth habit and ability to crowd out weeds.
How often should I fertilize my clover plants?
Fertilize your clover plants once or twice a year with a balanced fertilizer (e.g., 10-10-10 NPK). Avoid over-fertilizing, as this can lead to weak growth and reduced blooming. You can also use compost tea or manure tea for an organic alternative.
Can I grow different types of clover plants together?
Yes! Mixing different types of clover plants can create a beautiful and diverse garden display. Just ensure that the companion plants have similar growing requirements, such as sunlight and soil preferences. For example, white clover pairs well with red clover or trefoil.