As the air grows crisper and the days shorter, many gardeners are turning their attention to growing delicious garlic at home. While it’s true that spring is typically considered the ideal time for planting garlic, fall can also be a great season for getting a head start on next year’s harvest. However, successful sprouting in the fall requires some careful planning and attention to detail – from choosing the right variety of garlic for your climate to ensuring optimal growing conditions.
In this article, we’ll delve into the factors that affect bulb formation during the fall sprouting process, as well as provide expert tips on creating an ideal environment for healthy growth. We’ll also cover post-harvest care techniques to ensure your homegrown garlic stays fresh and flavorful throughout the year. Whether you’re a seasoned gardener or just starting out, we’ll show you how to successfully grow garlic in fall and enjoy a bountiful harvest all year round.
Understanding Garlic Bulb Formation
When growing garlic, it’s essential to understand how bulbs form so you can encourage healthy development and maximize yields. This process is crucial for a successful fall harvest.
The Basics of Garlic Bulbs
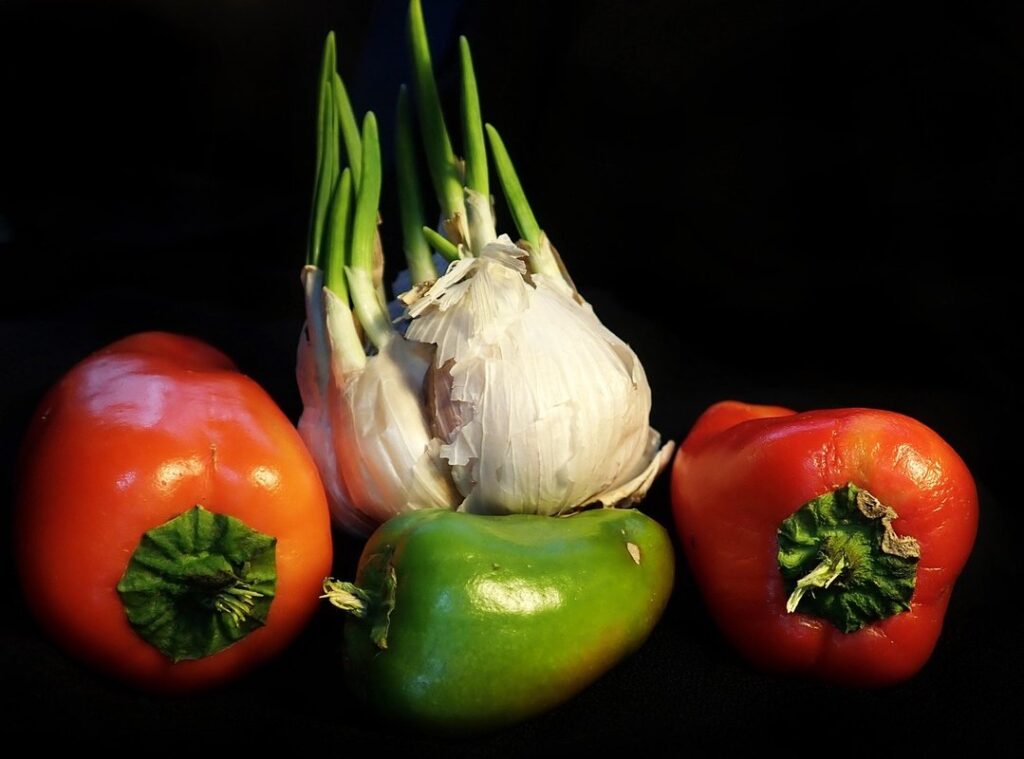
A garlic bulb is essentially a collection of immature cloves that have not yet separated from one another. These bulbs develop from individual cloves as they grow and mature, and are typically formed during the summer months when daylight hours are longest. As the plant reaches its maximum height, it begins to produce flowers or seed heads. However, for most commercial garlic varieties, these flowers will never fully develop and are often removed by farmers.
Under ideal conditions, a single clove can produce a bulb with multiple cloves of its own, forming what’s known as a “daughter set” within the parent bulb. This process is influenced by factors such as soil quality, moisture levels, and temperature, which all impact the plant’s ability to store energy and develop new growth.
To encourage healthy bulb formation for future harvests, it’s essential to allow your garlic plants to mature fully before harvesting. This usually means waiting until the tops of the plants begin to yellow and fall over, signifying that the bulbs have reached their maximum size.
Factors Affecting Bulb Formation
When it comes to garlic bulb formation, several factors come into play. One of the most critical elements is soil quality. Garlic needs well-draining, fertile soil with a pH between 6.0 and 7.0 to grow healthy bulbs. If your soil lacks essential nutrients or has poor drainage, it can hinder bulb development.
Temperature also plays a significant role in garlic bulb formation. Most garlic varieties prefer temperatures between 40°F (4°C) and 70°F (21°C). Avoid planting garlic in areas with extreme temperature fluctuations, as this can lead to weak or deformed bulbs.
Moisture levels are another vital aspect of bulb development. Garlic needs consistent moisture throughout the growing season. However, overwatering can be detrimental, causing rot and disease. Aim for about 1 inch (2.5 cm) of water per week, either from rainfall or irrigation.
Sunlight exposure also affects garlic bulb formation. While garlic prefers full sun, partial shade can help prevent scorching in areas with intense sunlight. Aim for at least 6 hours of direct sunlight per day to promote healthy growth and bulb development.
By paying attention to these factors, you can create an optimal environment for your garlic to thrive and produce delicious bulbs.
The Role of Day Length in Garlic Growth
As garlic sprouts in fall, understanding the role of day length is crucial for optimal growth and bulb formation. Day length plays a significant impact on the development of garlic plants, influencing the transition from vegetative to reproductive growth. When garlic bulbs receive longer days, they are triggered to produce more foliage, but as days shorten, they redirect energy towards bulbing.
The optimal day lengths vary depending on the stage of growth. For example, during the initial growth phase, garlic requires long days (14-16 hours) to promote healthy foliage development. However, once bulbs begin to form, shorter days (10-12 hours) stimulate the maturation process. It’s essential to note that excessive daylight can lead to weak bulb formation, so balancing day length is crucial.
When growing garlic in fall, it’s common for natural daylight to be longer than ideal. To encourage healthy bulbing, provide shade or use blackout cloth during peak sunlight hours (usually between 10 am and 4 pm) to simulate shorter days. By understanding and manipulating day lengths, you can promote robust bulb formation and a successful harvest.
Preparing for Fall Sprouting
To successfully sprout garlic in fall, it’s essential to prepare your cloves and growing space ahead of time, ensuring optimal conditions for healthy growth. This includes selecting a suitable location with ample sunlight and maintaining a consistent temperature.
When to Plant Garlic
When it comes to planting garlic for fall sprouting, timing is everything. The ideal time to plant garlic depends on several factors including your climate, region, and the specific cultivar you’re using.
In general, most garlic varieties are planted 6-8 weeks before the first frost date in your area. This allows the bulbs to establish themselves and start growing roots before winter sets in. For example, if you live in a region with a first frost date of October 15th, it’s best to plant garlic around August or September.
However, some regions have longer growing seasons and can plant garlic as late as November. It’s also worth noting that certain cultivars, like ‘Robust’ and ‘Elephant’, are more tolerant of cooler temperatures and can be planted later than others.
To determine the best planting time for your area, consult a local gardening calendar or check with your nursery to see what varieties they recommend for fall sprouting.
Choosing the Right Variety
When it comes to fall sprouting, choosing the right garlic variety is crucial for success. Not all garlic varieties are created equal, and some are better suited for indoor growing conditions than others.
Consider a hardy garlic variety that can tolerate cooler temperatures and moisture fluctuations. These types of garlic typically have a thicker skin, which helps protect them from disease and pests. Some popular options include ‘Rocambole’ and ‘Silverskin’, both known for their robustness and ability to thrive in less-than-ideal conditions.
Another important factor is flavor profile. If you’re looking for a strong, pungent garlic taste, opt for a variety like ‘Elephant’. On the other hand, if you prefer a milder flavor, consider ‘Softneck’ varieties like ‘Russian Giant’.
It’s also worth noting that some garlic varieties are specifically bred for their ability to produce large cloves or high yields. If these characteristics are important to you, research varieties like ‘Creole’ and ‘Beltsville Bunching’, which are known for their exceptional performance in indoor growing conditions.
Ultimately, the key is to choose a variety that meets your needs and preferences. Consider factors such as hardiness, flavor profile, and yield potential when making your selection.
Pre-Sprouting Care
Before sprouting begins, it’s essential to prepare the soil and garlic bulbs for optimal growth. Start by selecting a spot with full sun and well-draining soil. If your soil is heavy clay or sandy, mix in some organic matter like compost or well-rotted manure to improve its structure.
When planting garlic, choose healthy bulbs with firm, papery skin. Avoid breaking up the cloves or separating them too far apart, as this can cause uneven growth and reduced yields. Plant the garlic bulbs 4-6 inches deep, pointing the base of each clove towards the soil. Space them about 6-8 inches apart to allow for proper air circulation.
To retain moisture and suppress weeds, apply a 2-inch layer of mulch around the garlic plants. You can use organic materials like straw, grass clippings, or wood chips, but avoid covering the crowns (where the leaves meet the bulb). Keep the mulch layer thin to prevent waterlogged soil and potential rot. Regularly inspect your garlic plants for signs of pests or diseases, taking action promptly if you notice any issues.
Encouraging Sprouting
To successfully encourage sprouting, it’s essential to provide your garlic bulbs with the right environment and care during the fall season. We’ll dive into specific techniques for promoting healthy growth.
Providing Adequate Moisture
Maintaining optimal moisture levels is crucial for successful garlic sprouting. As you encourage your garlic bulbs to grow new green shoots, ensure that they receive adequate water without overwatering them. A general rule of thumb is to keep the soil consistently moist but not waterlogged.
To monitor moisture levels, stick your finger into the soil about an inch deep. If it feels dry, it’s time to water. Aim for a light sprinkling or misting, as this will help prevent fungal diseases from taking hold in the humid environment. Be cautious of overwatering, which can cause roots to rot and kill the sprouting bulb.
Check your garlic plants daily, especially during periods of drought or high heat. Increase watering frequency if necessary, but avoid getting water on the leaves to prevent fungal infections. Keep an eye out for signs of drought stress, such as yellowing leaves, wilting, or a general decline in growth rate. Adjust your watering schedule accordingly to maintain healthy, thriving garlic sprouts.
Offering Suitable Temperature Conditions
When it comes to encouraging garlic sprouts to grow during fall, temperature plays a crucial role. Garlic prefers cooler temperatures between 60°F (15°C) and 75°F (24°C), which is why fall is an ideal time for sprouting.
To create the perfect microclimate for your garlic, start by choosing a location that receives indirect sunlight and has good air circulation. Avoid direct sunlight as it can cause temperature fluctuations that may inhibit growth.
To further enhance the temperature conditions, you can use row covers or shade cloth to filter out intense sunlight and maintain a consistent temperature range. This will also help prevent fungal diseases from taking hold in warmer temperatures.
Some gardeners even go so far as to create an indoor microclimate using grow lights and heated propagation trays to control both light and temperature levels. If you’re experimenting with this method, be sure to start with seedlings or cloves that are specifically bred for indoor growing conditions.
Monitor your garlic’s response to these conditions closely, making adjustments as needed to achieve optimal growth. With a little planning and attention to detail, you can coax healthy sprouts from your bulbs even in the cooler fall temperatures.
Minimizing Pests and Diseases
As you cultivate your fall-sown garlic crop, it’s essential to protect it from pests and diseases that can ruin your sprouting efforts. Organic control methods are a great starting point. For example, introducing beneficial insects like ladybugs or lacewings can help control aphid populations. Neem oil, a natural insecticide, can also be used to deter pests without harming the environment.
Cultural practices play a significant role in minimizing pest and disease issues. Ensure your garlic cloves are planted at the right depth (about 4-6 inches deep) and spacing (about 6-8 inches apart). This allows for good air circulation, which helps prevent moisture-borne diseases like powdery mildew and downy mildew.
To maintain a healthy environment, keep the soil consistently moist but not waterlogged. Avoid over-fertilizing, as this can attract pests like aphids and spider mites. Instead, opt for natural fertilizers like compost or well-rotted manure to promote robust plant growth. By implementing these strategies, you’ll create an optimal growing condition that minimizes the risk of pest and disease damage to your fall-sown garlic crop.
Managing Fall Sprouts
Now that you have successfully sprouted your garlic, it’s time to learn how to care for and manage these new growths as they thrive in the fall season. We’ll walk through some essential tips for maintaining healthy fall sprouts.
Recognizing Optimal Harvest Time
When it comes to harvesting fall sprouts, timing is everything. You’ll want to identify when they’re at their optimal size, color, and flavor. To do this, you’ll need to take a closer look at the development of each individual bulb.
Start by examining the garlic sprout’s coloration. As it grows, the green shoots will gradually turn from bright green to a more muted, yellowish hue. This is a sign that the plant is beginning to focus its energy on forming a new bulb underground. Next, check the size of the sprouts. Typically, when they reach about 6-8 inches in height and have at least three sets of leaves, it’s time to begin harvesting.
As for flavor, if you gently pull on one of the green shoots, you should feel some resistance, indicating that a new bulb has begun to form. This is also an indicator of optimal harvest time.
Harvesting Techniques
When it’s time to harvest fall sprouts, it’s essential to do so carefully to avoid damaging the bulb and disrupting subsequent growth cycles. The goal is to cut off the sprout at the base of the stem, just above a growing point, without removing too much foliage.
To minimize disruption, wait until the sprouts have reached 6-8 inches tall before harvesting. This allows for optimal root development while minimizing stress on the bulb. Cut or pinch off the sprout with scissors or your fingers, making sure to leave about an inch of stem attached to the bulb. This will help the plant recover and continue producing new growth.
Harvesting at the right time is crucial; if you wait too long, the bulb may become dormant, affecting future yields. In most cases, fall sprouts are ready for harvest around 3-4 weeks after emergence. Keep in mind that over-harvesting can stress the plant and impact subsequent growth cycles.
Monitor your garlic plants regularly to determine when they’re ready for harvesting. Check for signs of maturity, such as yellowing or browning of the leaves, which indicate that the bulb is almost ready.
Post-Harvest Care
After carefully harvesting your fall garlic sprouts, it’s essential to focus on post-harvest care to preserve their quality and extend shelf life. Proper handling and storage techniques can make a significant difference in the longevity of your harvest.
Firstly, clean the harvested garlic bulbs gently with a soft brush or cloth to remove any dirt or debris. This prevents moisture from accumulating and causing rot or mold. Next, allow the garlic to air-dry for 1-2 weeks, either by laying them out on paper bags or cardboard boxes in a well-ventilated area. This helps dry out the necks of the bulbs, making them easier to store.
Once dried, store your harvested garlic in a cool, dark place with good ventilation. Avoid storing them near heating vents or direct sunlight as this can cause moisture buildup and promote spoilage. You can also hang the garlic bulbs from a string or twine, allowing air to circulate around each bulb. This method helps prevent moisture accumulation and extends shelf life.
Remember, proper post-harvest care is crucial for maintaining the quality of your fall garlic sprouts. By following these simple steps, you’ll be able to enjoy your harvest for months to come!
Common Issues and Solutions
As you plant garlic bulbs, you may encounter some unexpected surprises – don’t worry, we’ve got solutions to common problems like sprout growth at the wrong time.
Over-Sprouting or Under-Sprouting
When it comes to garlic sprouting in fall, two common issues that gardeners face are over-sprouting and under-sprouting. Over-sprouting occurs when the garlic bulb begins to produce too many green shoots, while under-sprouting happens when the shoots emerge slowly or fail to appear at all.
Symptoms of over-sprouting include a mass of green shoots growing from the center of the bulb, which can be unsightly and even lead to rot if not addressed. This is often caused by excessive moisture, warm temperatures, or poor air circulation. To prevent over-sprouting, make sure to provide adequate space between garlic bulbs and ensure good air circulation around them.
Under-sprouting, on the other hand, can be a sign of inadequate light, poor soil quality, or insufficient water supply. If you notice that your garlic is taking too long to sprout, try moving it to a spot with more direct sunlight or enriching the soil with organic matter. In some cases, under-sprouting may indicate that the garlic bulbs are not mature enough yet – be patient and give them time to develop.
Keep in mind that over-sprouting can weaken the bulb’s flavor and storage quality, while under-sprouting can delay harvest time. By monitoring your garlic’s progress and adjusting growing conditions as needed, you can avoid these issues and enjoy a healthy, bountiful harvest.
Sprouting Failure
Don’t be discouraged if you notice that your garlic bulbs have sprouted successfully for several seasons only to encounter difficulties one fall. It’s not uncommon for issues to arise when attempting to sprout garlic in the cooler months. If you’ve followed all the necessary steps and still haven’t seen any signs of new growth, there are a few potential reasons why this might be happening.
Firstly, check that your garlic bulbs are suitable for fall sprouting. Some varieties aren’t designed for this type of cultivation, so make sure to choose a variety known for its ability to sprout in cooler temperatures. Also, ensure that the soil temperature is at least 40°F (4°C) before planting, as this can affect the germination process.
If you’ve confirmed that your garlic bulbs and soil conditions are correct, there might be an issue with the moisture levels. Garlic requires consistent but not excessive watering to sprout successfully. If the soil is too dry or waterlogged, it could hinder the growth of new shoots.
Tips for Preventing Repetitive Issues
As you’ve experienced fall garlic sprouting for the first time, it’s natural to feel frustrated with the unexpected issues that pop up. To avoid getting caught off guard again, remember that prevention is key. Monitoring and adapting to the changing conditions are crucial in preventing repetitive problems.
Start by keeping a close eye on your garlic plants’ development throughout the fall season. Observe any changes in their color, texture, or growth rate. If you notice any unusual patterns or signs of stress, take action immediately.
Regularly inspect the soil temperature and moisture levels to prevent overwatering, which can lead to rot and other issues. Adjust your watering schedule accordingly, taking into account factors like weather forecast and humidity.
Also, maintain a clean growing environment by removing weeds, debris, and pests that can cause stress to your garlic plants. Keep your records of past seasons’ growth patterns and note any recurring issues so you can address them proactively next time around.
Frequently Asked Questions
How do I know if my fall-planted garlic is healthy enough for sprouting?
A healthy crop of garlic will typically show signs of green shoots emerging from the soil by late summer or early fall. Look for a vibrant green color and firm, plump bulbs that feel heavy in your hand. If you’re unsure, gently dig up a few cloves to inspect their condition.
What’s the ideal temperature range for fall-sprouted garlic?
Garlic prefers cooler temperatures between 40°F (4°C) and 70°F (21°C). Avoid placing potted garlic in areas that receive direct sunlight or are prone to extreme temperature fluctuations. Keep them in a shaded spot with consistent moisture levels.
How can I prevent pests and diseases from affecting my fall-sprouted garlic?
To minimize the risk of pests and diseases, ensure your garlic is planted in well-draining soil with adequate space between each bulb. Regularly inspect your crop for signs of infestation or disease, such as yellowing leaves, black spots, or white powdery residue. Use organic pest control methods whenever possible.
Can I still harvest fall-sprouted garlic if it’s been affected by frost?
Yes, some garlic varieties can tolerate light frosts. However, prolonged exposure to freezing temperatures will damage or kill the crop. If you’ve experienced a frost event, carefully inspect your garlic for signs of damage. Harvest any undamaged bulbs immediately and store them in a cool, dry location.
What’s the best way to store harvested fall-sprouted garlic?
To preserve flavor and aroma, store freshly harvested garlic in a cool, dry place with good air circulation. You can also consider freezing or dehydrating your garlic for longer-term storage. Be sure to label and date each container to keep track of when you harvested each batch.