If you’re looking to add some much-needed cheer to your winter days, growing paperwhites indoors is an excellent way to do so. These beautiful bulbs are easy to care for and provide stunning white blooms that can brighten up even the darkest of rooms. But growing paperwhites isn’t just a fun hobby – it’s also a great way to bring some greenery into your home during the cold winter months when other plants may struggle to thrive. In this article, we’ll walk you through the process of growing paperwhites from bulbs and provide tips on how to care for them so they produce beautiful blooms. We’ll also cover common issues that can arise and offer solutions to troubleshoot them. By following our guide, you’ll be enjoying a winter bloom in no time!
Understanding Paperwhite Care and Requirements
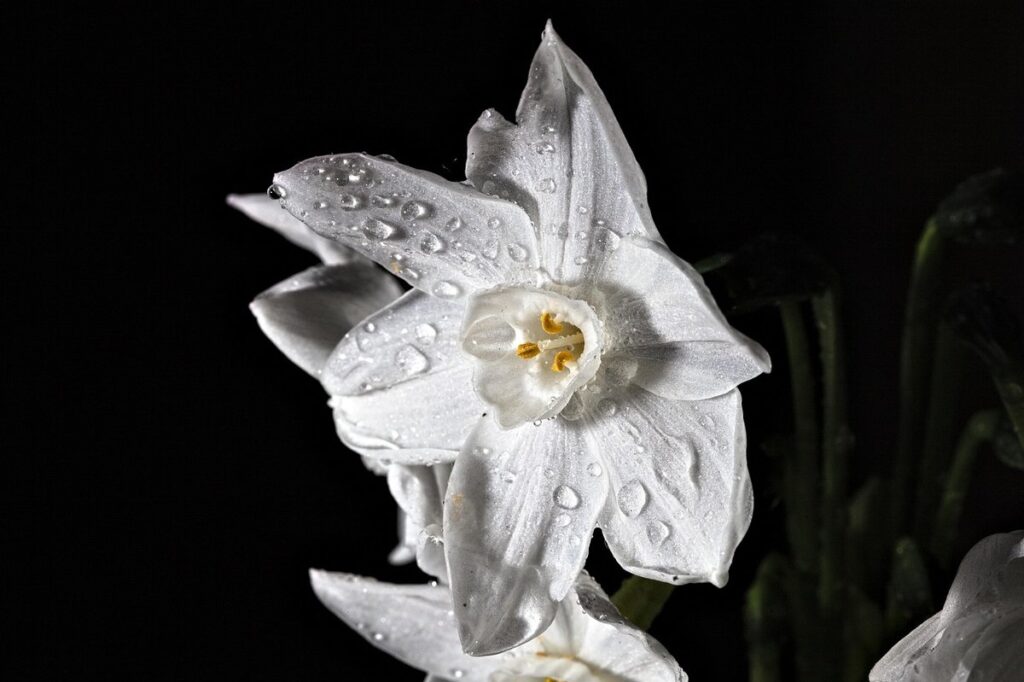
To grow beautiful paperwhites, it’s essential you understand their specific care requirements to prevent common issues and ensure a successful bloom cycle. Let’s dive into the specifics of caring for your paperwhites.
Choosing the Right Variety
When it comes to growing paperwhites, choosing the right variety is crucial for optimal results. There are several types of paperwhites available, each with its own unique characteristics and growth habits. For example, some popular varieties like ‘Ziva’ and ‘Jewel of Desert’ produce large white blooms, while others like ‘Galilaea’ have smaller, more delicate flowers.
When selecting a variety, consider the space you have available for your paperwhites to grow. Some varieties can reach up to 12-18 inches in height, so make sure you have enough room for them to thrive. You should also think about the color and shape of the blooms – do you prefer large, showy flowers or smaller, more delicate ones?
To check if your paperwhite bulbs are suitable for growing, look for signs like fresh scales on the bulb and a firm, slightly springy texture. Avoid bulbs with mold or mildew, as these can spread disease to other plants. If you’re unsure about the quality of your bulbs, consider consulting with a local nursery or gardening expert for guidance.
Optimal Growing Conditions
When it comes to growing paperwhites, understanding their optimal conditions is crucial for successful blooming. To begin with, these bulbs prefer cooler temperatures between 65°F and 70°F (18°C and 21°C) during the day and around 55°F (13°C) at night. This temperature fluctuation helps regulate the growth cycle of your paperwhites.
In terms of light, paperwhites require bright, indirect sunlight to photosynthesize efficiently. A south-facing window is ideal for indoor growing, but be mindful not to expose them directly to harsh sunbeams that might cause scorching. If you’re growing outdoors, choose a spot with dappled shade or partial sunlight.
When it comes to watering, paperwhites need consistent moisture, especially when in bloom. Allow the soil to dry slightly between waterings, and avoid overwatering, which can lead to rot and other problems. Water your bulbs gently but thoroughly, making sure not to get any on their delicate petals.
Soil Preparation and Potting
When it comes to growing paperwhites, the soil preparation and potting process is crucial for their optimal development. Paperwhites prefer well-draining soil that is rich in organic matter, making a mix specifically designed for bulbs an ideal choice. You can either purchase a pre-mixed bulb fertilizer or create your own blend by combining peat moss, perlite, and vermiculite.
To prepare the soil, fill the pot with 2-3 inches of the mixed soil, leaving enough space for the bulbs to be planted at least 4-6 inches deep. Gently firm the soil around each bulb to prevent settling or shifting during watering. If planting directly into the ground, choose a location with full sun and well-draining soil.
When repotting paperwhites, make sure not to damage the delicate roots by gently separating them from the original pot’s soil. Place the bulbs in their new home, leaving enough space for the stems to grow without being crowded. Water sparingly until growth begins, as excess moisture can lead to rot and poor bulb health.
Forcing Paperwhite Bulbs for Winter Bloom
To coax your paperwhites into blooming during winter, you’ll need to trick them into thinking spring has arrived by forcing their bulbs indoors. This process is relatively simple and requires some careful planning.
Preparing the Bulbs in Advance
To ensure that your paperwhite bulbs are ready to bloom on schedule, it’s essential to prepare them in advance. This involves selecting the right bulbs and storing them properly before planting.
When choosing paperwhite bulbs for forcing, look for those labeled as ‘forced’ or ‘narcissus’. These varieties have been specifically bred for indoor cultivation and will perform well under the conditions of a forced growth period. Select bulbs that are firm to the touch and have no visible signs of mold or rot.
Next, store your selected bulbs in a cool, dry place with good ventilation. This could be a garage, shed, or cupboard that’s not prone to moisture buildup. Keep them away from direct sunlight and heat sources. The ideal storage temperature is between 40°F and 50°F (4°C and 10°C). Store the bulbs pointy end up to prevent moisture from collecting on the base of the bulb.
By following these simple steps, you’ll be able to keep your paperwhite bulbs in a state of dormancy until it’s time to force them into bloom.
Planting and Aftercare
When planting paperwhite bulbs for winter bloom, timing is everything. The ideal time to plant them indoors is around 8-10 weeks before you want them to bloom. This allows the bulbs enough time to produce roots and shoots before they start flowering. Make sure to choose a container that’s at least 6-8 inches deep to accommodate the bulb’s growth.
Plant the paperwhites about 3-4 times deeper than their height, making sure the base of the bulb is facing upwards. This will help prevent the stem from growing too long and top-heavy. Water them well after planting and keep the soil moist but not waterlogged during the growing process.
As the bulbs start to grow, you can expect to see green shoots emerging within 3-4 weeks. Keep the soil consistently moist and provide indirect sunlight for optimal growth. Once the flowers start blooming, move the pot to a brighter location, but avoid direct sunlight which can cause the flowers to fade quickly. With proper care, paperwhites can bloom for 2-6 weeks indoors, providing a beautiful and fragrant winter wonderland in your home.
Troubleshooting Common Issues
If you’re experiencing issues with your paperwhites, don’t worry – we’ve got some common solutions right here. From yellowing leaves to failed blooms, let’s tackle these problems together!
Overwatering and Underwatering Problems
When it comes to growing paperwhites, two common mistakes that can hinder their blooming potential are overwatering and underwatering. Identifying the symptoms early on is crucial to correcting these issues.
Overwatering can cause the stem to become soft, mushy, and prone to rotting. Leaves may turn yellow or develop brown spots, while roots may start to decay. On the other hand, underwatering can lead to wilted leaves and a droopy appearance. To prevent overwatering, ensure your paperwhites are planted in well-draining soil mix and avoid watering them too frequently. Allow the top inch of soil to dry out between waterings.
To correct underwatering, increase the frequency of watering but be cautious not to overdo it. Check the moisture level by sticking your finger into the soil up to the first knuckle. If the soil feels dry, it’s time to water. Monitor your plants closely and adjust your watering schedule accordingly.
Preventive measures include checking the soil regularly and adjusting the watering frequency based on environmental conditions such as temperature and humidity. By being mindful of these factors, you can provide your paperwhites with the right amount of moisture, promoting healthy growth and optimal blooming potential.
Pests and Diseases Prevention
When growing paperwhites indoors, it’s not uncommon to encounter pests and diseases that can damage your plants. One of the most common pests to look out for is spider mites, which are tiny, spider-like insects that feed on plant sap. To recognize them, check for fine webbing on the leaves or a yellowish discoloration.
Another potential pest is mealybugs, small, white, cottony insects that can be found on the stems and leaves. They secrete a sticky substance called honeydew, which can attract ants and promote fungal growth.
If you notice any of these pests, try using natural remedies like neem oil or insecticidal soap to control infestations. Mix neem oil with water according to the label instructions and spray it on the affected areas. For more severe infestations, chemical treatments like permethrin may be necessary.
As for diseases, paperwhites are susceptible to root rot caused by overwatering. Check your plants’ roots regularly and repot them if you notice any signs of rot. Fungal diseases like gray mold can also occur when the temperature is too high or the humidity is too low. To prevent these issues, maintain a consistent watering schedule and keep the area around your paperwhites well-ventilated.
In extreme cases, apply fungicides according to the product’s instructions.
Tips for Extending the Blooming Season
To make the most of your paperwhite blooms, check out these expert tips for extending their season and keeping them fresh and vibrant all winter long. We’ve got the inside scoop on how to keep them flowering.
Encouraging Reblooming
To encourage reblooming in your paperwhites, it’s essential to follow some simple yet effective strategies. One crucial step is deadheading – removing the flower stalks after they’ve bloomed. This may seem counterintuitive, as you’re essentially cutting off the finished product. However, this process helps direct the plant’s energy towards producing new growth and potentially, new blooms.
Pruning also plays a vital role in promoting reblooming. Cut back the foliage to about half its original height after the blooming period. This will encourage the plant to focus on developing new roots and stems, increasing the chances of future flowering.
Fertilizing your paperwhites can also stimulate reblooming. Feed them with a balanced, water-soluble fertilizer during the growing season (spring and summer). Avoid over-fertilizing, as this can lead to weak growth and fewer blooms. Finally, ensure your paperwhites receive adequate light, but not direct sunlight, which can scorch their delicate foliage. By adjusting these growing conditions and following these steps, you’ll be well on your way to enjoying multiple blooming cycles from your paperwhite bulbs.
Forcing Paperwhites Again
Forcing paperwhite bulbs to bloom again is definitely possible with the right care and attention. Once they’ve finished blooming, it’s essential to allow them to go dormant before attempting to force them again. This means cutting back the flower stalks to within an inch of the bulb and allowing the foliage to die back naturally.
During dormancy, store the bulbs in a cool, dry place with good air circulation. This can be a garage, basement, or even a cardboard box in a corner of your home. Keep them away from direct sunlight and moisture, as this can encourage rot and decay. The ideal temperature for dormant paperwhites is between 40°F to 50°F (4°C to 10°C).
After about 3-4 months, you can begin the process of forcing new growth by providing light, water, and warmth. Plant them in a pot with good drainage, and place it in a bright location but out of direct sunlight. Water sparingly until green shoots appear, then gradually increase moisture levels as needed. With proper care, your paperwhites should bloom again within 2-3 months, giving you a beautiful display of white flowers to enjoy once more.
Conclusion: Enjoying Your Blooming Paperwhites
Now that your paperwhites have bloomed, it’s time to enjoy their delicate beauty and fragrance. Let’s explore how to keep them thriving and add to your home decor.
Display Ideas and Tips
As you enjoy the beautiful blooms of your paperwhites, it’s time to think about how you want to display them. A traditional vase is always a classic choice, but why not get creative and try something new? You could place the stems in a decorative apothecary jar or a vintage mercury glass container for a unique look.
For a more dramatic effect, consider grouping several paperwhite stems together in a large urn or planter. This will create a stunning display that’s perfect for your dining table or entryway. To add some extra flair, you can surround the blooms with pinecones, evergreen branches, and other natural elements to create a winter wonderland scene.
To keep your paperwhites looking their best, remember to change the water in their vase every few days to prevent bacterial growth. Also, avoid placing them near direct sunlight or heat sources, as this can cause the flowers to wilt quickly. With proper care, you should be able to enjoy these beautiful blooms for 2-3 weeks.
Next Steps and Planning Ahead
Now that you’ve enjoyed your paperwhites’ brief but beautiful bloom, it’s time to think ahead. After all, these lovely bulbs are worth growing again and again.
As the blooms fade, carefully remove the flowers and foliage, allowing the bulbs to begin recharging for next year’s show. This is also an excellent opportunity to plant new bulbs in your garden or indoor space.
For those who’ve had success with paperwhites this season, mark your calendars for planting time (typically 8-10 weeks before the desired bloom period) and prepare to repeat the process. As for storage, simply dry the bulbs thoroughly and store them in a cool, dark place until it’s time to replant.
In subsequent years, you can expect your paperwhites to bloom at roughly the same time as before. This is because they’re naturally inclined to sprout when temperatures drop and daylight hours decrease. Plan ahead by keeping your bulb stash tidy and ready for next year’s growth cycle.
FAQ: Frequently Asked Questions
We know you might have some questions before growing paperwhites, so we’ve put together this helpful FAQ to cover the basics and get you started.
Quick Answers to Common Queries
One of the most common queries we receive is regarding the ideal soil pH for growing paperwhites. To set the record straight: paperwhites prefer well-draining soil that’s slightly acidic to neutral, with a pH range of 6.0-7.0. If your soil tests higher than this, you can amend it with peat moss or sulfur to bring down the pH.
Now, about watering schedules – how often should you water your paperwhites? The answer is simple: when the top inch of soil feels dry to the touch. Water thoroughly until you see water coming out of the drainage holes, but make sure not to overwater, which can lead to root rot. We recommend checking the soil moisture daily during the blooming period.
Frost protection is another crucial aspect to consider. Since paperwhites are sensitive to frost, it’s essential to bring them indoors or provide protection when temperatures drop below 32°F (0°C). You can cover your plants with a sheet of plywood or burlap, or move them to a protected area like a garage or sunroom.
Some growers also wonder if they need to fertilize their paperwhites. The answer is yes – but only during the growing stage, not while they’re in bloom. We recommend using a balanced fertilizer at half the recommended strength to promote healthy growth and flowering.
Lastly, what’s the ideal temperature for paperwhite growth? They prefer daytime temperatures between 65-75°F (18-24°C) and nighttime temperatures around 55-60°F (13-15°C). Avoid placing your plants near heating vents or radiators, as this can cause them to dry out quickly. By following these simple tips, you’ll be well on your way to growing thriving paperwhites that will brighten up any room.
Frequently Asked Questions
Can I force paperwhites to bloom at different times?
Yes, you can manipulate the flowering time of your paperwhites by adjusting the temperature. For an early winter bloom, keep the bulbs in a cool place (around 40°F/4°C) for 10-12 weeks before moving them to a warmer location. Conversely, if you want to delay the bloom, store the bulbs in a cooler spot after they’ve finished flowering.
How do I prevent overwatering and underwatering problems?
To avoid these common issues, check the soil moisture daily. Water paperwhites when the top 1-2 inches of soil feel dry to the touch. Make sure not to get water on the bulb itself, as this can cause rot. Also, keep in mind that paperwhites require less water during their dormant period.
Can I grow paperwhites in containers indoors with artificial light?
Yes, you can grow paperwhites in containers using LED grow lights or south-facing windows. Provide 12-14 hours of supplemental lighting to promote healthy growth and flowering. Use a well-draining potting mix and maintain temperatures between 65-75°F (18-24°C) for optimal results.
How long do I need to keep the bulbs after they’ve finished blooming?
After paperwhites finish blooming, allow the foliage to die back naturally. This can take several weeks to a few months. Once the leaves have yellowed and collapsed, you can remove them, and store the bulbs in a cool, dry place until next year’s forcing.
Can I use a potting mix specifically designed for indoor plants?
Yes, using a potting mix formulated for indoor plants is an excellent choice for growing paperwhites. These mixes typically have improved drainage and fertility properties that will support healthy bulb growth and flowering.