Growing your own lavender can be a wonderful experience, but it requires some know-how. With so many varieties to choose from, it’s easy to get overwhelmed. Not only do you need to pick the right type for your climate and soil, but also learn how to care for it properly. Whether you’re a seasoned gardener or just starting out, cultivating lavender can be a rewarding hobby that brings beauty and fragrance to your outdoor space.
In this article, we’ll guide you through the basics of growing lavender like a pro. We’ll cover everything from selecting the perfect variety to harvesting and storing your bountiful blooms. By following our expert tips and tricks, you’ll be well on your way to enjoying a thriving lavender patch that brings joy and serenity to your garden.
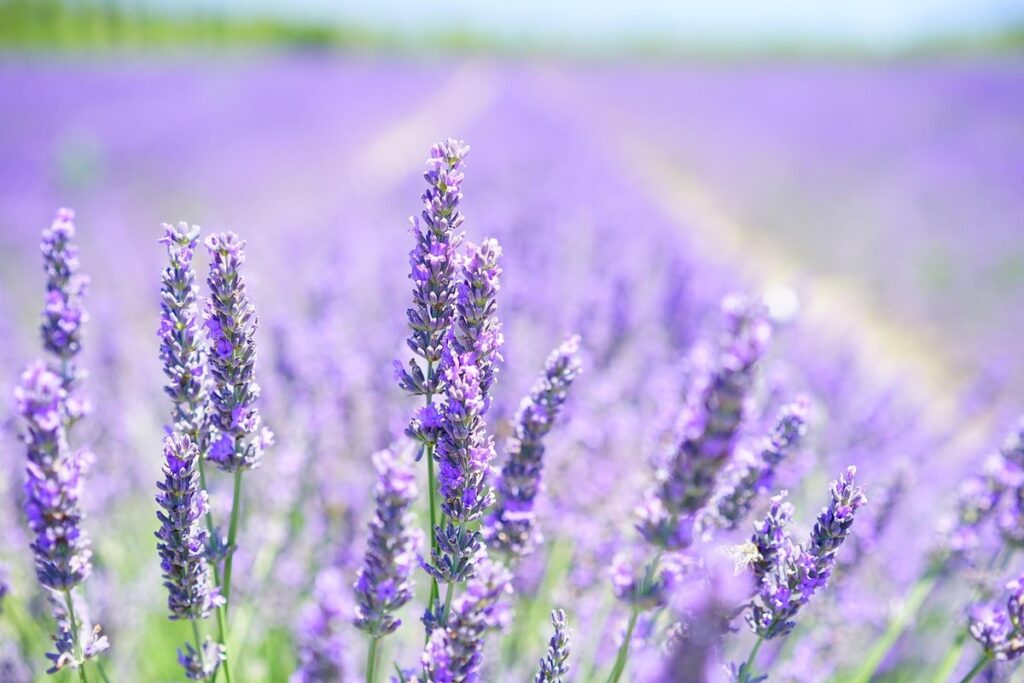
Choosing the Right Variety
Now that you know the basics of growing lavender, it’s time to choose a variety that suits your needs and climate. With hundreds of options, selecting the right one can be overwhelming!
Understanding Lavender Types
When it comes to growing lavender, understanding the different types can be overwhelming. However, each variety has its unique characteristics, growth habits, and uses that set them apart from one another.
English Lavender (Lavandula angustifolia) is a popular choice for its compact growth habit and delicate purple flowers. It’s an excellent choice for English gardens, as it thrives in cooler climates with moist soil. French Lavender (Lavandula stoechas), on the other hand, boasts larger, more vibrant blooms and is often used in potpourri and sachets due to its strong fragrance. Spanish Lavender (Lavandula stoechas subsp. pedunculata) has a more upright growth habit and is often used as a hedge or border plant.
When selecting the best variety for your garden, consider factors such as climate, soil type, and desired use. For example, if you live in a hot and dry climate, Spanish Lavender may be a better choice due to its drought tolerance. If you’re looking for a compact option, English Lavender is an excellent selection. By choosing the right variety for your specific needs, you can ensure a bountiful harvest of beautiful lavender blooms.
Soil and Climate Considerations
When growing lavender, it’s essential to consider the ideal soil conditions and climate requirements for optimal growth. Lavender thrives in well-draining soil with a pH between 6.0 and 7.0, making it suitable for many regions worldwide. However, if your soil is too alkaline or acidic, amendments can be made to adjust the pH levels.
In terms of nutrient requirements, lavender doesn’t need rich soil, but it does benefit from regular fertilization with a balanced fertilizer during its growing season (spring-fall). Over-fertilizing can lead to weak growth and decreased oil production, so moderation is key. Mulching around plants also helps retain moisture and suppress weeds.
When it comes to climate considerations, lavender requires full sun to partial shade, depending on the variety. Most lavenders prefer temperatures between 65°F (18°C) and 80°F (27°C), making them ideal for Mediterranean or temperate climates. Be mindful of extreme weather conditions, such as heavy rainfall or intense heatwaves, which can damage plants.
Consider planting lavender in areas with low humidity to prevent root rot. Regular watering is necessary, but ensure the soil drains well to avoid waterlogged soil conditions.
Preparing the Soil and Planting Lavender
To grow healthy lavender plants, proper soil preparation is crucial, which we’ll cover next. Let’s dive into how to create a perfect environment for your lavender to thrive in.
Soil Preparation 101
Soil preparation is often overlooked, but it’s a crucial step in growing healthy and thriving lavender plants. Before you start planting, it’s essential to test the pH levels of your soil. Lavender prefers well-draining alkaline soils with a pH between 6.0 and 7.0. If your soil is too acidic or too alkaline, it can affect nutrient availability and cause root damage.
To add organic matter, mix in 2-3 inches of compost or well-rotted manure into the top 6-8 inches of soil. This will improve drainage, aeration, and nutrient retention, creating an ideal environment for lavender roots to grow. You can also use peat moss or perlite to enhance water-holding capacity and structure.
Eliminate weeds and pests by removing any debris, rocks, or weeds from the planting area. Use a garden fork to loosen compacted soil, then rake it smooth. Finally, sterilize your tools with soap and water to prevent transferring diseases to your lavender plants. By following these simple steps, you’ll create a perfect base for your lavender to thrive and produce an abundance of fragrant blooms.
Proper Planting Techniques
When planting lavender, it’s essential to get it right from the start. This will ensure that your plants establish a strong root system and grow into healthy, fragrant bushes. To begin with, choose a location that receives full sun and has well-draining soil – lavender hates wet feet!
For spacing, plant individual plants about 12-18 inches apart. This allows for good air circulation and prevents overcrowding, which can lead to disease issues. If you’re planting multiple rows, make sure to space them at least 3-4 feet apart.
When digging the holes, make sure they are not too deep – lavender prefers a slightly raised crown. Plant the roots so that the crown (where the stem meets the roots) is level with or just above the soil surface. Firm the soil gently around the roots and water thoroughly to settle the plant in place. By following these simple steps, you’ll be well on your way to growing healthy, thriving lavender plants.
Caring for Lavender Plants
To keep your lavender plants thriving, you’ll want to learn how to properly water, prune, and fertilize them, as these factors can make all the difference in their health and productivity. Proper care will also help prevent common issues like pests and diseases.
Watering and Moisture Management
When it comes to watering and moisture management for lavender plants, it’s easy to get caught up in the fear of underwatering versus overwatering. However, getting this balance just right is crucial for healthy growth and a bountiful harvest. Here are some tips to help you navigate this delicate dance.
First and foremost, understand that lavender prefers well-draining soil and can be susceptible to root rot if the soil is too moist. To avoid this, make sure your pot has good drainage holes in the bottom or consider using a container specifically designed for succulents and cacti. Water your lavender plant when the top 1-2 inches of soil feels dry to the touch – this usually translates to watering every 3-4 days during hot summer months.
In dry climates, it’s essential to conserve water without sacrificing the health of your plant. Try implementing a drip irrigation system or soaker hose, which delivers water directly to the roots and reduces evaporation. You can also use rain barrels to collect and store rainwater for later use – this is not only eco-friendly but also a great way to reduce your water bill.
By following these tips, you’ll be well on your way to mastering the art of watering and moisture management for your lavender plant. Remember: less is often more when it comes to giving your plant what it needs to thrive!
Fertilization and Pruning Practices
When it comes to fertilizing lavender plants, it’s essential to provide them with the right nutrients at the right time. Lavender requires a balanced diet of nitrogen, phosphorus, and potassium (NPK) to promote healthy growth and blooming. Choose a fertilizer that is specifically formulated for herbs or flowers, as these will have the correct NPK ratio.
Apply a light application of fertilizer in early spring, when new growth begins. You can also fertilize again in mid-summer, after the blooming period has ended. However, be careful not to over-fertilize, as this can lead to weak stems and poor root development.
Proper pruning is also crucial for promoting healthy growth and encouraging blooming. Prune your lavender plant back by one-third to one-half each spring, removing any dead or damaged wood. This will help control the shape of the plant and encourage new growth. You can also trim off any spent blooms after they’ve faded to promote more flowering.
Pest and Disease Management
When it comes to growing a lush and healthy lavender patch, keeping pests and diseases at bay is crucial. We’ll walk you through some essential tips for managing common issues that might affect your blooms.
Common Pests and How to Combat Them
Lavender plants can be susceptible to various pests that can harm their growth and productivity. Some common pests that affect lavender include aphids, whiteflies, and spider mites.
Aphids are small, soft-bodied insects that feed on the sap of lavender leaves, causing curled or distorted leaves. To control aphid infestations, use neem oil or insecticidal soap as a spray to directly target the pests. You can also introduce natural predators like ladybugs or lacewings to your garden to help control aphids.
Whiteflies are tiny insects that feed on plant sap and secrete honeydew, attracting ants and promoting fungal growth. Use yellow sticky traps to capture whiteflies, or spray insecticidal soap directly on the plants. Regularly inspect your lavender plants for signs of whitefly infestation, such as yellowing leaves or a sticky substance on the leaves.
Spider mites are tiny arachnids that feed on plant sap, causing fine webbing on the leaves and stems. To control spider mite infestations, spray water or neem oil directly on the affected areas to disrupt their feeding cycle. Regularly inspect your lavender plants for signs of spider mite infestation and take action promptly to prevent further damage.
To prevent pest infestations in the first place, maintain good garden hygiene by regularly removing weeds and debris that can attract pests. Water your lavender plants properly, avoiding overwatering that can create an ideal environment for pests. Regularly inspect your plants and take action at the first sign of pest activity to ensure a bountiful harvest.
Fungal Diseases and Prevention Strategies
Lavenders are prone to various fungal diseases that can significantly impact yields and plant health. Root rot and leaf spot are among the most common issues. Root rot occurs when excess moisture in the soil creates an ideal environment for fungal growth, causing the roots to decay. This often results from overwatering or poorly draining soil. Leaf spot, on the other hand, is caused by fungi that infect leaves through damaged tissue or water splashes.
To prevent root rot and leaf spot, maintain good hygiene practices in your garden. Water plants in the morning to allow excess moisture to evaporate throughout the day. Avoid overhead watering, which can lead to fungal spores settling on leaves. Ensure proper drainage by using well-draining soil mixes and avoiding areas with standing water. Crop rotation is also essential; avoid planting lavender in the same spot where a susceptible crop was grown recently. Regularly inspect plants for signs of infection and remove infected parts promptly to prevent further spread.
Harvesting and Storing Lavender
Now that you’ve nurtured your lavender plants to maturity, it’s time to reap the rewards of your hard work by harvesting and storing these fragrant flowers for use in teas, potpourri, and more. Proper storage techniques will help preserve their color and scent.
Timing the Harvest
Timing the harvest of lavender blooms is crucial to ensure optimal quality and fragrance. The flowers should be cut when they are fully open, but not yet past their prime. This can usually be determined by checking for a slight softening around the edges and a slightly more relaxed texture compared to the buds.
When examining individual stems, look for a light blue or purple hue, depending on the variety, as this is an indication that they are ripe for harvesting. Avoid picking lavender when it’s too wet, as this can cause it to be heavy with moisture, leading to mold and decay.
To harvest, use clean and sharp pruning shears or loppers, cutting just above a leaf node (where a leaf meets the stem) to encourage new growth. For larger quantities, you can also use scissors or even pinch off individual blooms by hand. It’s essential to handle lavender gently during harvesting to prevent bruising and damage.
For optimal preservation, harvest in the morning after dew has dried but before heat sets in for the day. This will help minimize water loss and reduce spoilage.
Drying and Preserving Methods
When it comes to preserving your fresh lavender harvest, there are several methods you can use to dry and store it for later use. One of the simplest methods is air-drying, which involves tying the stems together in small bunches and hanging them upside down in a warm, dry location with good airflow.
Another popular method is oven-drying, which involves placing the lavender on a baking sheet lined with parchment paper and setting your oven to its lowest temperature setting (usually around 150-200°F). This method works best for small batches of lavender and can be done for several hours at a time. It’s essential to keep an eye on the temperature to avoid overdrying or burning the flowers.
Freezing is also an excellent option, especially if you want to preserve the fragrant oils in your lavender. Simply chop the stems finely and place them in an airtight container or freezer bag. This method helps retain the color and scent of the lavender and can be used for potpourri, crafts, or culinary purposes.
It’s worth noting that proper drying and storage techniques will significantly impact the quality and longevity of your preserved lavender. To achieve the best results, make sure to dry your lavender slowly and evenly, and store it in airtight containers away from direct sunlight and moisture. This will help preserve the delicate flowers for months to come.
Advanced Techniques and Tips
Now that you have a solid foundation, let’s dive into some advanced techniques and tips to help you take your lavender growing skills to the next level. From pruning to propagation, we’ve got you covered!
Companion Planting and Crop Rotation
Companion planting involves pairing lavender with other plants that complement its growth and reduce potential issues. A common pairing is with rosemary, which repels pests that target lavender like aphids and whiteflies. Oregano is another beneficial companion plant for lavender as it improves soil health by attracting beneficial insects and fixing nitrogen.
Crop rotation helps maintain soil fertility and structure by introducing new crops that replenish nutrients and alter the soil ecosystem. Lavender benefits from being followed by a legume crop, such as beans or peas, which fix atmospheric nitrogen and enhance soil’s water-holding capacity. Alternating between different plants like lavender and tomatoes also reduces pest buildup and prevents overuse of a particular nutrient.
Some lavender varieties are more suited for companion planting than others; ‘Hidcote’ is a good choice due to its moderate growth habit. When implementing companion planting, remember that overcrowding can harm plant development. Plant companions at a suitable distance to avoid competition for resources like water and nutrients.
Lavender in Containers and Small Spaces
Growing lavender in containers and small spaces is a great way to bring this lovely herb into your home, even if you don’t have a sprawling garden. When it comes to selecting the right container size and materials for your lavender plant, keep in mind that smaller pots can dry out quickly, so choose a pot with good drainage holes to prevent waterlogged soil.
For small spaces, consider using hanging baskets or tiered planters to maximize vertical space. These types of containers allow you to grow multiple plants at once, making the most of your available room. When selecting a container, also think about the material – terra cotta or ceramic pots are great for drainage and can help regulate soil temperature.
To promote healthy growth in small spaces, be mindful of the amount of sunlight your lavender plant receives. Lavender loves full sun, but if you’re growing it indoors or in a shaded area, consider using grow lights to supplement natural light. Also, don’t forget to prune your lavender regularly to encourage bushy growth and prevent it from becoming leggy. With the right care and attention, your container-grown lavender will thrive even in the smallest of spaces.
Frequently Asked Questions
Can I grow lavender indoors if I don’t have a garden?
Lavender can be grown indoors, but it requires proper lighting and care. Choose a container with good drainage and place the plant near a sunny window or under grow lights. Keep in mind that indoor lavender may require more frequent watering due to reduced transpiration.
How do I know if my lavender is too stressed from heat or drought?
Monitor your lavender’s foliage and flowers for signs of stress, such as yellowing leaves or wilted blooms. If you notice these symptoms during hot weather, increase watering to about 1 inch per week. However, be cautious not to overwater, which can lead to root rot.
What are some common pests that target lavender plants?
Common pests that target lavender include aphids, whiteflies, and spider mites. To prevent infestations, keep your plants clean by removing weeds and debris around the base. Regularly inspect your plants for signs of pests and treat promptly with insecticidal soap or neem oil.
Can I grow lavender in containers if I have limited space?
Yes, you can grow lavender in containers, making it perfect for small spaces or balconies. Choose a container that’s at least 6-8 inches deep to accommodate the plant’s taproot. Use well-draining potting mix and water regularly, but avoid overwatering.
What are some creative ways to use dried lavender?
Dried lavender is versatile and can be used in potpourri blends, wreaths, or as a garnish for baked goods and drinks. You can also use it in crafts like soap-making, sachets, or as a natural insect repellent. Get creative and experiment with different uses for your home and garden!