Are you tired of constantly buying green onions for your cooking, only to watch them wilt away in the fridge? Well, we’ve got good news for you: growing green onions from scraps is easier than you think! With a few simple steps and some basic care, you can have a continuous harvest of fresh, crunchy green onions right at home. In this step-by-step guide, we’ll walk you through everything you need to know about growing green onions from scraps, including preparation, planting, and care tips. Whether you’re a seasoned gardener or a kitchen newbie, our tips will show you how to grow green onions with minimal effort and maximum results. By the end of this article, you’ll be well on your way to enjoying fresh, homegrown green onions all year round!
Preparing the Scrap Material
Now that you’ve harvested some green onion, it’s time to prepare the scraps for planting. Let’s get started by cleaning and trimming them up!
Choosing Healthy Scap Material
When it comes to growing green onions from scraps, selecting healthy material is crucial. You can’t grow a robust and flavorful crop if you start with rotting or moldy stems. Look for scraps that have no visible signs of mold, mildew, or rot. Check the base of the stem where it meets the roots – any softness or blackening in this area is a red flag.
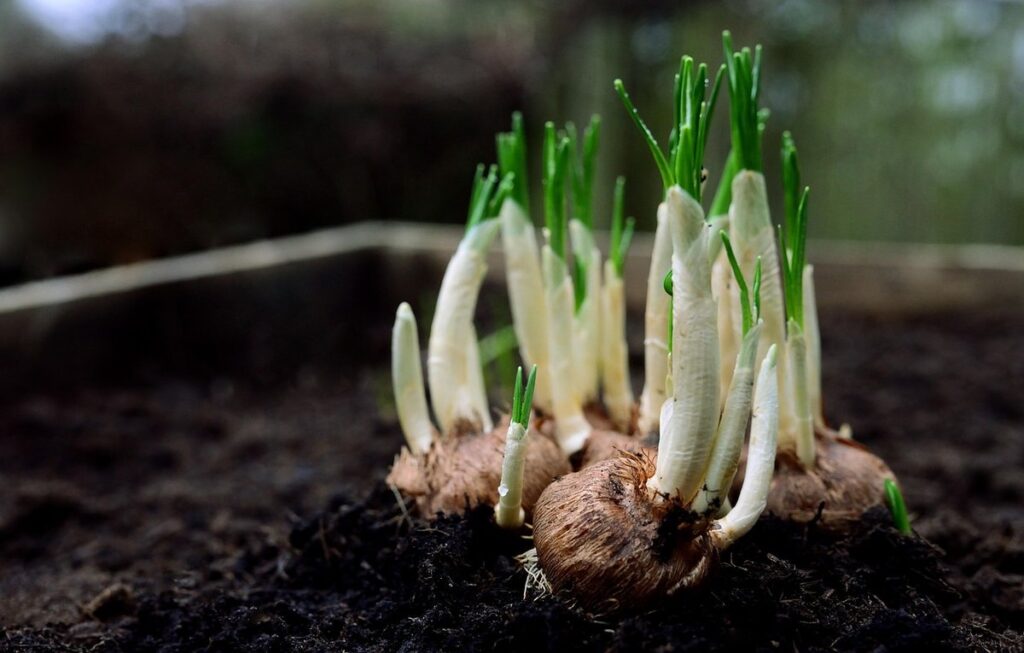
To identify suitable material, choose green onion scraps that still have their roots intact. These should be white and firm to the touch. If your scraps are starting to dry out, you can try rehydrating them by placing them in a glass of water for 24 hours before using.
When selecting your scraps, avoid any with visible signs of damage or pest infestation. A healthy green onion scrap will have bright green leaves and a crunchy texture. Don’t be afraid to get a little picky – it’s better to wait another day for the right material than risk growing a poor crop from subpar scraps.
Cleaning and Sanitizing the Scap Material
When selecting scraps for growing green onions, it’s essential to clean and sanitize them thoroughly to prevent diseases and pests from affecting the growth process. This step may seem insignificant, but it can make all the difference between a healthy crop and a disappointing outcome.
Start by gently washing the selected onion tops under cold running water to remove any dirt or debris. Next, submerge the scraps in a bowl of warm water mixed with 1 tablespoon of unscented bleach per quart of water for about 5-7 minutes. This solution helps kill bacteria, fungi, and other microorganisms that might be present on the surface.
After soaking, drain the solution and rinse the onion tops under cold running water to remove any remaining bleach residue. Dry the scraps with a clean towel or let them air-dry before proceeding to the next step in your green onion growing journey. By taking this crucial step, you’ll minimize the risk of contamination and set yourself up for success in growing healthy, delicious green onions from scratch.
Planting the Scrap Material
Now that you have your green onion scraps ready, it’s time to plant them and give them the right conditions to grow. This is where things get exciting!
Preparing the Potting Mix
When it comes to growing green onions from scraps, using the right potting mix is crucial for healthy growth. A well-draining potting mix specifically designed for growing green onions will help prevent waterlogged soil, which can lead to root rot and other problems.
To prepare the potting mix, you’ll want to choose a high-quality mix that contains ingredients like perlite, vermiculite, or coconut coir. These materials will help improve drainage and aeration in the soil. You can also add a small amount of compost or worm castings to provide essential nutrients for your green onions.
When creating your potting mix, be sure to follow these steps: fill a container about 1/3 full with the prepared potting mix, then gently place the onion scrap on top, making sure not to bury it too deeply. Leave enough space between each layer of scraps to allow for proper growth and air circulation. This will create an ideal environment for your green onions to grow, with adequate water and nutrient supply.
Remember, a good potting mix can make all the difference in successful green onion growth.
Planting the Scap Material in Pots or Containers
Now that you have your cleaned and sanitized scrap material ready, it’s time to plant it in pots or containers. To do this, choose a container with good drainage holes to prevent waterlogged soil. Fill the container with a well-draining potting mix, leaving about an inch at the top for watering.
Gently place the green onion scraps into the pot, making sure they’re buried up to their necks (the white base of the onion). Space them out about 2-3 inches apart, depending on how large you want your green onions to grow. For optimal growth, plant them about an inch deep in the potting mix.
As a general rule of thumb, use a container that’s at least 6-8 inches deep to allow for proper root development. You can also use small pots or even yogurt containers as long as they have good drainage holes. Just be sure to water well after planting and keep the soil consistently moist but not waterlogged.
Remember, green onions don’t require a lot of space, so you can plant multiple scraps in a single container. This will encourage them to grow closer together, which is perfect for harvesting individual stalks as needed.
Providing Optimal Growing Conditions
To give your green onion scraps the best chance at growing into healthy, delicious new plants, you’ll need to provide optimal conditions. This includes choosing a suitable location and maintaining proper temperature and humidity levels.
Lighting Requirements
When growing green onions from scraps, providing optimal lighting is crucial for their growth and development. As a general rule of thumb, green onions require bright indirect light to grow well. This can be achieved by placing them near an east- or west-facing window, where they will receive soft, gentle light throughout the day.
Direct sunlight, on the other hand, can be too intense for green onions and may cause them to become scorched or develop brown tips. If you don’t have a window with indirect light, you can also use grow lights to provide the necessary illumination. Aim for an intensity of around 1-2 watts per square inch to promote healthy growth.
In terms of hours of light, green onions typically require at least 12-14 hours of light per day to produce a good crop. You can supplement this with artificial lighting during the night or in periods of low natural light. Keep in mind that excessive light can lead to over-growth and bulb formation, so be sure to monitor your plants’ progress and adjust their lighting accordingly.
Watering Schedule
Maintaining a consistent watering schedule is crucial when growing green onions from scraps. Overwatering can lead to root rot and kill the onion, while underwatering can cause it to become weak and develop brown tips. To avoid these issues, check the moisture levels in the potting mix by sticking your finger into the soil up to the first knuckle. If the soil feels dry, it’s time to water.
Water your green onions when the top 1-2 inches of soil feel dry to the touch. Avoid getting water on the leaves or crown (where the roots meet the stem) as this can cause rot and other problems. Instead, water at the base of the plant, allowing the potting mix to absorb the moisture. A good rule of thumb is to water your green onions when the soil feels dry, but before it becomes parched.
In general, you’ll want to water your green onions every 2-3 days during hot weather and less often in cooler temperatures. Keep an eye on the plant’s response to watering and adjust your schedule accordingly.
Caring for Green Onion Seedlings
Now that you have successfully germinated your green onion seeds, it’s time to nurture them into healthy seedlings. In this crucial stage of growth, proper care is essential.
Monitoring Growth and Transplanting
As you watch your green onion seedlings grow from scraps, it’s essential to monitor their progress closely. Check on them daily, making sure they have enough light and water. Keep an eye out for signs of overcrowding: if the leaves start to bend or touch each other, it’s time to give them more space.
When transplanting, choose a container that is at least twice as wide and just as deep as the original pot. This will give the roots room to spread out and absorb water and nutrients more efficiently. Harden off your seedlings by gradually exposing them to outdoor conditions over 7-10 days before transplanting directly into a garden bed.
Pay attention to the growth rate: if you notice the plants growing at an alarming pace, it might be a sign that they need more light or nutrients. Keep in mind that green onions prefer cooler temperatures and consistent moisture levels. Transplant them when they have 2-3 sets of leaves, making sure not to disturb their roots too much.
Transplanting your seedlings into larger containers will provide them with ample space to grow without becoming pot-bound.
Fertilization and Pruning
As your green onion seedlings grow, it’s essential to provide them with the right nutrients for optimal growth. Fertilizing at different stages of development can make a significant difference in their health and productivity. Start by feeding your seedlings with a balanced fertilizer once they have two sets of leaves. This will give them a boost of nitrogen, phosphorus, and potassium.
As they continue to grow, you can switch to a higher-nitrogen fertilizer to promote leaf growth. However, if you want to encourage bulb formation, use a fertilizer rich in phosphorus. This will help your green onions focus energy on developing their bulbs rather than just leaves.
Pruning is another crucial step in caring for your green onion seedlings. Remove any weak or damaged leaves to prevent the spread of disease and encourage healthy growth. You can also cut back the top set of leaves by about half to direct the plant’s energy towards bulb development. Prune your green onions every week or two to maintain their shape and promote a continuous harvest.
Common Issues and Troubleshooting
Don’t worry if things don’t go as planned, we’ve got you covered! This section will walk you through common problems and their easy solutions to get your green onion growing back on track.
Pests and Diseases
As you care for your green onion seedlings, it’s essential to be aware of common pests and diseases that can affect their growth. Whiteflies, aphids, and spider mites are notorious pests that can infest green onions, causing curled or distorted leaves.
To prevent these unwanted visitors, ensure your workspace is clean and free from debris. Inspect your seedlings regularly for signs of pests, such as sticky honeydew droplets or actual insects on the leaves. If you notice any issues, treat them immediately with neem oil or insecticidal soap according to the product’s instructions.
Diseases like powdery mildew and root rot can also harm green onion seedlings. These often result from overwatering or poor air circulation. To prevent disease, provide your seedlings with adequate space for air movement and avoid watering too frequently. If you do encounter a diseased plant, remove it immediately to prevent the spread of infection.
By staying vigilant and taking proactive steps, you can minimize the risk of pest and disease issues in your green onion garden.
Tips for Extending Harvest Periods
To maximize yields and extend harvest periods, it’s essential to know when to sow new seeds and how often to harvest. Typically, green onions are ready for harvesting about 1-2 weeks after sowing. However, you can continue to harvest individual stalks as needed by leaving the roots intact in the soil. This method is known as “cut-and-come-again” harvesting.
For continuous harvests, sow new seeds every week or two to ensure a steady supply of green onions. You can also use this opportunity to rotate your crops and add some diversity to your garden. For example, if you’ve been growing lettuce or herbs in that spot, now’s the perfect time to replant it with something new.
By following these simple strategies, you’ll be able to enjoy a continuous supply of fresh green onions all season long. Remember to keep the soil consistently moist and provide enough sunlight for optimal growth. With proper care and attention, your green onion harvest can last well into the fall months.
Conclusion and Future Plantings
Now that you’ve successfully grown a new crop of green onions, let’s take a look at what to do next: reviewing your harvest and planning for future plantings.
Recap of Key Takeaways
To successfully grow healthy green onions from scraps, it’s essential to recap the key takeaways from our step-by-step guide. Proper preparation is crucial, starting with selecting fresh, firm onion scraps and trimming them to encourage new growth. Next, preparing a well-draining potting mix and using a shallow container can help prevent waterlogged soil and root rot.
Care and maintenance are equally important, including providing the right amount of light, watering when necessary, and fertilizing occasionally. It’s also vital to monitor for pests and diseases, taking prompt action if you notice any issues. By following these key takeaways, you’ll be well on your way to growing delicious green onions from scraps in no time.
Remember, patience is key as it may take a few weeks for your onion scraps to sprout and mature. With consistent care and attention, however, you can enjoy fresh homegrown green onions all season long. By incorporating these simple tips into your gardening routine, you’ll be able to grow healthy and flavorful green onions from scraps with ease.
Planning Your Next Green Onion Harvest
Now that you’ve successfully grown green onions from scraps and are enjoying their flavor and convenience, it’s time to plan for future harvests. To maintain a continuous supply of fresh green onions, consider the following strategies:
When to Sow New Seeds: Typically, you can sow new seeds every 1-2 weeks, depending on your desired frequency of harvest. This allows you to have a steady supply of green onions while preventing overproduction. For example, if you’re sowing seeds in a container, you can transplant them into individual pots once they’ve reached about 6 inches tall.
Harvesting Frequency: To encourage continuous growth and prevent the green onions from flowering, harvest them when they reach about 6-8 inches tall. This will also help to promote new bulb formation, allowing you to cut and use the leaves while letting the bulbs regrow.
Timing Your Harvest: Consider your climate and growing conditions when planning for future harvests. In regions with warmer temperatures, it’s best to sow seeds every 7-10 days to prevent overgrowth. Conversely, in cooler climates, you may be able to space out seedings by 2-3 weeks.
By implementing these strategies, you’ll be well on your way to maintaining a consistent supply of fresh green onions from scraps, all year round.
Frequently Asked Questions
Can I use old or wilted green onion scraps to grow new ones?
Yes, you can still try to revive wilting green onions by trimming the base and placing them in a glass of water for a few days before planting them. However, it’s essential to inspect the scraps carefully for any signs of mold, mildew, or rot. Healthy roots are crucial for successful growth.
How long will it take for my green onion seedlings to mature?
The maturation time for green onions can vary depending on factors like climate, watering schedule, and growing conditions. Generally, you can expect to harvest your green onions within 20-30 days after planting the scraps. Keep in mind that continuous harvesting will encourage new growth.
Can I grow green onions indoors year-round with proper care?
Yes, green onions are suitable for indoor cultivation and can thrive in well-lit areas with temperatures between 65°F to 75°F (18°C to 24°C). Ensure adequate watering and fertilization to promote healthy growth. However, if your home has limited natural light, consider using grow lights to supplement the necessary lighting requirements.
How often should I water my green onion seedlings?
Water your green onions when the top inch of soil feels dry to the touch. Avoid overwatering, which can lead to rot and other issues. A general rule is to water every 2-3 days during hot weather or every 4-5 days in cooler conditions.
Can I propagate green onions using only the leaves?
No, it’s not recommended to propagate green onions using only the leaves, as they do not produce viable roots for new growth. Instead, use the entire scrap material with roots intact to ensure successful propagation and a healthy harvest.