Growing your own dill plants can be a game-changer for any home cook or gardener. Not only is fresh dill a staple in many cuisines, but it’s also incredibly easy to grow with the right guidance. But let’s face it, trying to coax those delicate seeds into robust, fragrant stalks can be frustrating, especially if you’re new to gardening.
That’s why we’ve put together this comprehensive guide on how to grow dill plants successfully. From choosing the perfect variety and sowing the right seeds, to harvesting and storing fresh and dry dill, we’ll cover it all. In this article, you’ll learn expert tips on soil preparation, climate control, fertilization, pruning, pest management, and more, so you can enjoy a bountiful harvest of fragrant, delicious dill every time. Whether you’re a seasoned gardener or just starting out, our advice will help you grow healthy, thriving dill plants that’ll elevate your cooking to the next level.
Choosing the Right Variety and Seeds
When it comes to growing dill, selecting the right variety and seeds is crucial for success. In this next step, we’ll walk you through how to choose the perfect dill seeds for your garden.
Understanding Dill Varieties
When it comes to growing dill, you’ll find that there are several varieties to choose from, each with its own unique characteristics and growth habits. One of the most popular varieties is Mammoth Dill, known for its tall stalks that can grow up to 3 feet in height. This variety is ideal for making pickles and other large-batch dill recipes.
Another popular choice is Fernleaf Dill, a compact variety that’s perfect for small gardens or containers. It grows to be around 1-2 feet tall and has delicate, lacy leaves that add a fresh flavor to any dish. If you’re looking for a more decorative option, Bouquet Dill is the way to go. This variety features beautiful, umbel-like flowers that are perfect for adding a pop of color to your garden.
When selecting a dill variety, consider the space you have available and how you plan to use the herb. Mammoth Dill may be too tall for small gardens, while Fernleaf Dill is ideal for compact spaces. Bouquet Dill is perfect for adding visual interest to your garden without taking up too much room.
Some popular heirloom varieties include Dukat Dill and Mammoth Dukat, which are known for their large, fragrant leaves and tall stalks. These varieties are a great choice if you’re looking for a more authentic, old-fashioned dill flavor.
Selecting High-Quality Seeds
When it comes to growing dill plants, selecting high-quality seeds is crucial for optimal germination and a healthy harvest. Fresh seeds are essential, as older seeds may have lower viability rates or even be sterile. Look for packets with a “sow by” date that’s within the past year, and avoid buying from sources that don’t provide this information.
Another consideration is the type of seed: heirloom versus hybrid. Heirloom seeds are open-pollinated, meaning they can be saved and replanted from one generation to the next. They often offer more diverse characteristics, such as flavor or texture, but may not be as disease-resistant as hybrids. Hybrid seeds, on the other hand, are bred for specific traits like compact growth or high yield, but their offspring may not retain these characteristics.
To ensure optimal germination, store your seeds properly in a cool, dry place – an airtight container is ideal. Keep them away from direct sunlight and moisture, which can damage the delicate seed coating. By choosing fresh seeds and following proper storage techniques, you’ll be well on your way to growing healthy, thriving dill plants.
Preparing the Soil and Climate
To grow healthy dill plants, you’ll first need to prepare the soil by loosening it to a depth of 12-18 inches and adding compost if necessary.
Understanding Dill’s Soil Requirements
When it comes to growing dill plants, understanding their soil requirements is crucial for a bountiful harvest. Dill prefers well-draining soil with a pH range between 6.0 and 7.0. This slightly alkaline to neutral soil condition allows the plant’s roots to absorb essential nutrients efficiently.
To create an optimal environment for your dill plants, focus on incorporating organic matter into your soil. Compost or aged manure can help raise the soil’s pH level while providing much-needed nutrients. A 2-3 inch layer of mulch or straw will also aid in retaining moisture and suppressing weeds, reducing the need for excessive watering.
For optimal growth, dill requires a balanced mix of nutrients. Soil tests may reveal that your garden needs additional phosphorus or potassium to support healthy root development and leaf production. Consider adding a slow-release fertilizer during planting time to provide sustained nourishment throughout the growing season.
In addition to nutrient availability, it’s also essential to ensure your soil has good drainage. A poorly draining soil can lead to waterlogged conditions that encourage fungal diseases and root rot.
Creating a Suitable Climate for Dill
To create a suitable climate for dill growth, it’s essential to consider three critical factors: sunlight, temperature, and humidity. Dill requires full sun to partial shade, with at least six hours of direct sunlight per day. If you’re growing indoors, place the plants near an east- or west-facing window or under grow lights. For outdoor cultivation, ensure that your garden receives sufficient sunlight throughout the day.
Temperature also plays a significant role in dill growth. The ideal temperature range is between 60°F and 70°F (15°C to 21°C), with some tolerance for cooler temperatures. Avoid exposing dill plants to extreme heat above 80°F (27°C) or frost, as this can damage the foliage.
Maintaining optimal humidity levels is also crucial for healthy dill growth. Indoor conditions typically have adequate humidity, but outdoor environments may fluctuate significantly. To mitigate this, water your dill plants regularly and ensure good air circulation around them. This will help prevent fungal diseases that thrive in humid environments.
Planting and Transplanting Dill
When planting or transplanting dill, it’s essential to choose a location with plenty of sunlight and well-draining soil to ensure healthy growth. Follow these steps for successful establishment.
Sowing Seeds Directly or Starting Indoors
When it comes to planting dill, you have two popular options: sowing seeds directly into the garden bed or starting them indoors and transplanting outside. Each method has its benefits and challenges.
Direct sowing is a straightforward process that eliminates the need for potting soil, seed trays, and indoor lighting. Simply scatter your dill seeds in the prepared garden bed and water them well. This method allows dill plants to develop strong taproots from the get-go, which can make them more resistant to transplant shock later on. However, direct sowing also means you’ll need to ensure a consistent moisture level during germination and seedling establishment.
Starting seeds indoors offers more control over temperature and humidity conditions, resulting in healthier seedlings. You can sow dill seeds in cell packs or small pots about 2-3 weeks before the last frost date for your area. Once they have two sets of leaves, transplant them into larger containers and harden off before moving them outside. This method allows you to get a head start on the growing season, but it also risks disturbing the taproot when transplanting.
Tips for Healthy Seedling Development
When you’re growing dill from seeds, it’s essential to give your seedlings the best possible start. This means paying close attention to their watering needs, as over- and under-watering can both be detrimental to healthy growth.
Water your seedlings when the top inch of soil feels dry to the touch, but avoid letting them sit in waterlogged soil for extended periods. As a rule of thumb, check on them every other day during the first week after sowing. Once they’ve developed their second set of leaves, you can gradually increase the time between watering.
In terms of fertilization, seedlings require a balanced diet to promote robust growth. Use a low-strength fertilizer (about 10-20-10 NPK) and follow the instructions for application rates. You can also side-dress with a high-phosphorus fertilizer to encourage healthy root development.
Pruning is another critical aspect of dill seedling care. Remove any weak or spindly growth, as this will direct energy towards developing strong stems and leaves. Pinch off flower buds when they appear, as this will prevent the plant from going to seed too quickly. By following these simple steps, you’ll be well on your way to raising healthy, thriving dill plants.
Supporting Dill Growth with Fertilizers and Pruning
To keep your dill plants thriving, it’s essential to provide them with the right balance of nutrients through fertilization and pruning. Regular care will ensure a bountiful harvest every time.
Organic vs. Synthetic Fertilizers: Which is Best?
When it comes to fertilizing your dill plants, you’re likely faced with a choice between organic and synthetic options. Both types have their benefits and drawbacks that are worth considering.
Organic fertilizers, such as compost or manure tea, provide slow-release nutrients that promote healthy growth without burning the roots of your dill plant. They also tend to be more environmentally friendly since they’re made from natural materials. For example, adding a handful of worm castings to the soil around your dill plants can boost their nutrient intake and lead to larger yields.
On the other hand, synthetic fertilizers like ammonium nitrate or urea offer a quick fix for nutrient deficiencies but can also harm the environment if misused. They contain high levels of nitrogen that can promote excessive foliage growth at the expense of root development.
If you’re looking for an eco-friendly option, consider making your own organic fertilizer by recycling kitchen scraps and mixing them into compost. A balanced mix of these natural nutrients will help support your dill plant’s growth without causing any harm to the environment.
Mastering Pruning Techniques for Optimal Growth
Pruning is an essential aspect of dill cultivation, as it not only helps control plant height but also promotes bushy growth and encourages flowering. To master pruning techniques for optimal dill growth, start by removing the lower leaves of the seedling once they reach about 6-8 inches tall. This will prevent the plant from becoming leggy and encourage branching.
For mature plants, prune the flower stalks as soon as the buds begin to form. This will redirect the plant’s energy towards leaf production, resulting in a more bushy appearance and increased flavor. To control height, pinch off the top set of leaves when the plant reaches about 12-18 inches tall. This will encourage lateral growth and prevent the plant from becoming too leggy.
Regular pruning also encourages dill to produce new flowers throughout the growing season. Simply snip off individual flower stalks, leaving a small portion of stem intact. This will stimulate the plant to produce new blooms and maintain its bushy appearance. By mastering these pruning techniques, you’ll be able to optimize your dill growth and enjoy a bountiful harvest all season long.
Common Pests and Diseases Affecting Dill Plants
When growing dill plants, it’s essential to be aware of common pests and diseases that can cause problems, such as aphids and powdery mildew.
Identifying Common Pests and Their Treatments
Aphids, spider mites, and whiteflies are some of the most common pests that affect dill plants. These tiny insects can cause significant damage to the leaves, stems, and flowers, reducing yields and affecting plant health.
To control aphid infestations, try spraying your dill plants with a mixture of soap and water (1 tablespoon of mild dish soap per quart of water). For severe cases, you can use insecticidal soap or neem oil according to the product’s instructions. Keep in mind that overusing these chemicals can harm beneficial insects.
Spider mites are often mistaken for white powder on leaves but actually cause fine webbing between the stems and leaves. Use a mixture of 1 quart of water, 1 tablespoon of mild dish soap, and 1 teaspoon of neem oil to control spider mite infestations. Regularly inspect your plants for any signs of pests and take action immediately.
Whiteflies are small, winged insects that can spread diseases. To manage whitefly populations, use yellow sticky traps near the affected area or introduce natural predators like ladybugs. For severe cases, use pyrethrin sprays according to product instructions.
Recognizing and Managing Fungal Diseases in Dill
Fungal diseases can be a significant threat to dill plants, causing damage to leaves, stems, and roots. Some common fungal diseases that affect dill include powdery mildew, leaf spot, and root rot.
Powdery mildew is characterized by a white or grayish powder on the surface of leaves, while leaf spot appears as small, circular lesions with yellow or black centers. Root rot, on the other hand, causes the roots to decay, leading to wilting and plant death.
Causes of fungal diseases in dill include high humidity, poor air circulation, and excessive moisture. Prevention strategies include maintaining good air circulation around plants, watering carefully to avoid overwatering, and removing infected leaves or stems.
To treat fungal diseases, apply a fungicide specifically labeled for use on dill. For root rot, repot the plant in fresh potting mix, making sure to disinfect any tools used during the process. Avoid using homemade remedies like neem oil or soap solution, as they can harm the plant further. By recognizing the signs of fungal diseases and taking prompt action, you can save your dill plants from these debilitating conditions.
Harvesting and Storing Fresh and Dry Dill
Now that your dill plants are thriving, it’s time to think about harvesting them at their peak flavor and aroma. This includes tips on when and how to cut fresh dill for immediate use.
Timing and Methods for Fresh Dill Harvest
Timing and methods for fresh dill harvest are crucial to unlocking its full flavor and texture potential. The ideal time to harvest dill leaves is when the plant reaches about 6-8 inches tall, usually around 20-30 days after sowing. Pinch off individual stems with your fingers or use scissors to avoid damaging the plant.
For optimal flavor, harvest dill leaves in the morning, as they tend to lose their potency throughout the day. To preserve fresh dill, place the harvested stems in a container filled with water, and refrigerate them immediately. This will keep the dill fresh for up to 5 days. You can also freeze dill by chopping it finely and placing it in an airtight container or freezer bag.
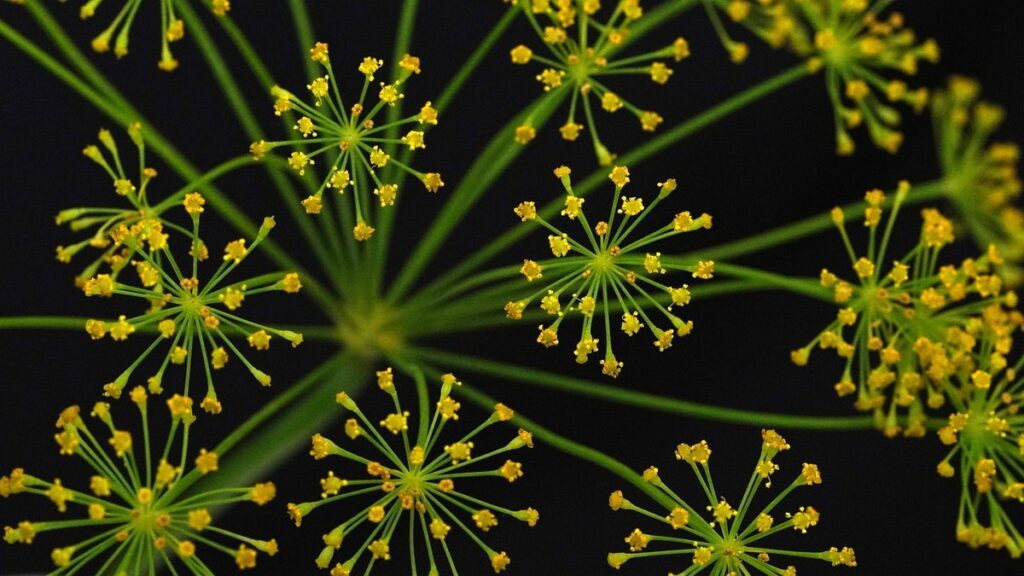
When harvesting dill flowers, wait until they reach their full color, usually around 40-50 days after sowing. Pick off individual buds or entire stems, depending on your preference. Dried dill flowers can be stored for up to 6 months if kept away from direct sunlight and moisture. By following these simple tips, you’ll be able to enjoy the full flavor and aroma of your homegrown dill throughout the growing season.
Drying and Storing Dill for Long-Term Use
When it’s time to preserve your dill harvest for long-term use, you have several options. One of the simplest and most cost-effective methods is air-drying. Simply tie a bunch of fresh dill stems together with twine or a rubber band, and hang them upside down in a warm, dry, dark place with good airflow. This method can take anywhere from 1-3 weeks, depending on the humidity level.
For faster results, you can use an oven to dry your dill. Preheat it to its lowest temperature setting (usually around 150°F), and spread out the dill bunches in a single layer on a baking sheet lined with parchment paper. Leave the door slightly ajar to maintain airflow, and let it dry for 1-2 hours. Keep an eye on it to prevent over-drying.
Freezing is another great option, especially if you plan to use your dried dill in cooking or infuse oil. Simply chop the fresh dill finely and spread it out on a baking sheet lined with parchment paper. Place the sheet in the freezer until the dill is frozen solid, then transfer it to an airtight container or freezer bag.
To maintain quality, store your dried dill in a cool, dark place like a pantry or cupboard. Keep it away from direct sunlight and moisture, which can cause the herbs to lose their flavor and aroma. Use glass containers with tight-fitting lids to prevent air from seeping in and spoiling the herbs.
Frequently Asked Questions
What if I accidentally overwater my dill seedlings?
Overwatering can be a common mistake, but it’s easily preventable. Check your soil regularly, and make sure not to waterlog the roots. If you notice any signs of root rot or yellowing leaves, adjust your watering schedule immediately. To avoid this issue in the future, ensure good drainage by mixing compost into your soil, and avoid getting water on the plant’s foliage.
Can I grow dill indoors, even if my climate isn’t ideal for it?
Yes, you can still grow dill indoors, but it will require more attention to lighting and temperature. Choose a container with good drainage, and provide at least 4-6 hours of direct sunlight or use grow lights. Keep the soil consistently moist, but not waterlogged, and maintain a temperature between 65-75°F (18-24°C).
How often should I prune my dill plants to encourage bushy growth?
Dill loves regular pruning to promote healthy growth and prevent flowering. Pinch off flower buds as soon as they appear, and trim back the plant by about one-third every week or two. This will encourage new growth, keep your plant bushy, and prolong its harvest period.
What are some common pests that can damage my dill crop?
Some common pests that can affect dill include aphids, spider mites, and caterpillars. To prevent infestations, use physical barriers or row covers when planting, and monitor your plants regularly for signs of pests. If you do encounter an issue, treat it promptly with insecticidal soap or neem oil according to the product’s instructions.
Can I save dill seeds from my harvest for replanting next season?
Yes! Saving dill seeds is a great way to propagate new plants and preserve your favorite variety. After harvesting your dill, allow the flowers to dry completely on the plant, then remove them and dry further in a warm, dry place. Store the dried seed heads in an airtight container until you’re ready to replant next season.