Growing your own cabbage at home can be a game-changer for salad lovers and health enthusiasts alike. Not only is it incredibly cost-effective, but it also allows you to control the quality and freshness of your produce. With so many varieties to choose from, selecting the right type of cabbage can be overwhelming. But don’t worry, we’ve got you covered.
In this comprehensive guide, we’ll walk you through every step of growing delicious and healthy cabbage at home. From choosing the perfect variety to preparing the soil and planting with care, we’ll cover it all. Whether you’re a seasoned gardener or just starting out, our expert tips will help you harvest a bountiful crop of crunchy, nutrient-rich cabbage that’s bursting with flavor.
Choosing the Right Variety and Growing Conditions
To grow cabbage successfully, you’ll need to choose a variety that thrives in your climate and provide it with the right growing conditions. This includes soil, sunlight, and temperature considerations.
Understanding Cabbage Varieties
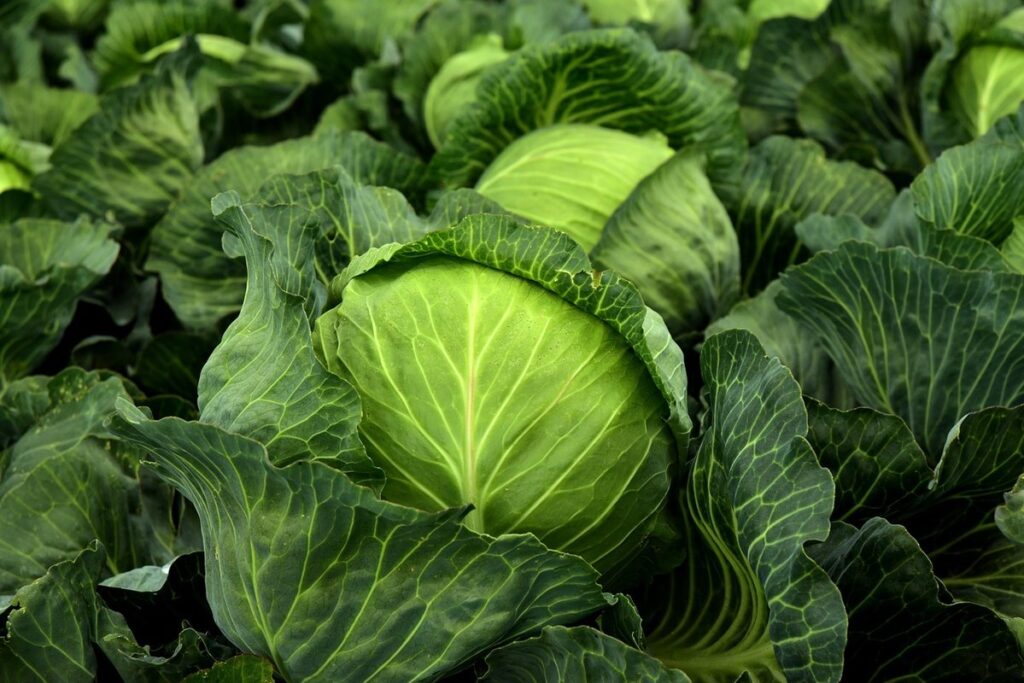
Cabbage is a versatile vegetable that comes in many shapes, sizes, and flavors. When choosing the right variety for your garden, it’s essential to consider factors like climate, space, and intended use. Let’s take a closer look at some of the most common types of cabbage.
For cooler climates, try growing ‘Early Jersey Wakefield’, a popular variety that matures in about 60 days. Its compact size makes it perfect for smaller gardens or containers. On the other hand, ‘January King’ is ideal for warmer regions and can be harvested from October to January. This variety grows larger than others, with dense, green heads.
Other notable varieties include ‘Savoy’, known for its crinkled leaves and delicate flavor, and ‘Red Express’, a fast-growing variety that’s ready in as little as 50 days. When choosing a cabbage variety, consider the space you have available, your climate, and how often you plan to harvest. Selecting the right variety will ensure a successful crop and delicious results.
For optimal growth, make sure to provide full sun and well-draining soil with a pH between 6.0 and 7.0. Regular watering and fertilization will also promote healthy development.
Factors Affecting Cabbage Growth
When growing cabbage, it’s essential to consider the factors that affect its growth. Soil quality plays a significant role, as cabbage prefers well-draining, fertile soil with a pH between 6.0 and 7.0. A mix of compost or manure can enrich the soil, improving its structure and nutrient content.
Temperature also impacts cabbage growth, with ideal temperatures ranging from 60°F to 75°F (15°C to 24°C). Avoid exposing your cabbage plants to extreme temperature fluctuations, as this can cause bolting. Consistent moisture levels are crucial, but overwatering can lead to root rot and other issues. Ensure the soil drains well to prevent waterlogged conditions.
Sunlight requirements vary depending on the variety, with some preferring full sun and others tolerating partial shade. Research your specific cabbage variety’s needs and provide it with the optimal amount of sunlight. By optimizing these conditions, you’ll set your cabbage plants up for a successful harvest. Aim to maintain consistent moisture levels, avoid extreme temperatures, and ensure adequate soil quality for healthy growth.
Preparing the Soil for Cabbage Planting
Before you plant your cabbage, it’s essential to prepare the soil by loosening and aerating it to ensure optimal growth. This simple process will make all the difference in your harvest.
Testing and Amending Your Soil
Testing and amending your soil is crucial to create an environment that’s conducive to healthy cabbage growth. Just like humans, plants have specific needs, and cabbage is no exception. To ensure optimal results, it’s essential to understand the pH level and nutrient composition of your soil.
The ideal pH range for cabbage is between 6.0 and 7.0, slightly acidic to neutral. If your soil’s pH falls outside this range, it may lead to deficiencies in micronutrients or macronutrients necessary for growth. For instance, if the pH is too high (above 7.5), the plant may experience iron deficiency, stunted growth, and reduced yields.
To test your soil’s pH level, you can use a DIY kit or send a sample to a laboratory for analysis. Based on the results, make amendments accordingly. Add elemental sulfur or aluminum sulfate to lower the pH if it’s too high, or dolomitic limestone to raise it if it’s too low.
Composting and Fertilizing for Optimal Growth
Composting and fertilizing play crucial roles in cabbage production. Not only do they promote healthy growth, but they also increase yields and improve disease resistance. Compost is rich in nutrients that are essential for plant development, including nitrogen, phosphorus, and potassium.
When used as a mulch or incorporated into the soil, compost helps to retain moisture, regulate soil temperature, and suppress weed growth. This creates an ideal environment for cabbage plants to thrive. For example, a study by the University of California found that compost application increased yields in cabbage crops by up to 25%.
To create a nutrient-rich fertilizer for your cabbage plants, consider using a balanced formula or making your own compost tea. A balanced fertilizer typically contains a mix of nitrogen (N), phosphorus (P), and potassium (K) at a ratio of 10-10-10. Compost tea, on the other hand, is made by steeping compost in water to create a liquid solution rich in beneficial microbes.
To get started with composting for your cabbage plants:
* Set aside a designated area for composting
* Collect kitchen scraps and yard waste
* Mix the materials regularly to ensure proper carbon-to-nitrogen ratio
* Allow the compost to break down over several weeks or months
This process may seem time-consuming, but the payoff is worth it: healthier plants with improved yields and disease resistance.
Planting Cabbage Seeds or Seedlings
To get a head start on growing delicious cabbage, you’ll need to decide whether to sow seeds directly into your garden or start seedlings indoors and transplant them later. Let’s explore both options in more detail.
Sowing Seeds Indoors or Directly in the Garden
When it comes to sowing cabbage seeds, you have two main options: starting them indoors 4-6 weeks before the last frost date or planting them directly into the garden when the weather permits. Both methods have their advantages and disadvantages.
Sowing cabbage seeds indoors allows for earlier germination and gives young seedlings a head start on the growing season. This method is ideal if you live in an area with unpredictable spring weather or if you want to get a jumpstart on your harvest. However, it requires more care and attention as seedlings need adequate light, water, and nutrients.
On the other hand, direct sowing into the garden can be less finicky, but it’s dependent on the weather. Seeds should be planted when the soil has warmed up to at least 40°F (4°C) and the danger of frost has passed. Direct sowing is a great option if you have limited space indoors or prefer a more hands-off approach.
Keep in mind that cabbage seedlings can be transplanted from indoor containers into the garden once they have 2-3 sets of leaves, but make sure to harden them off first to prevent shock.
Transplanting Seedlings with Care
When transplanting seedlings to larger containers or into the garden bed, it’s essential to handle them with care. Delicate roots are easily damaged during handling, which can lead to shock stress and even plant death.
To minimize damage, gently remove the seedling from its container by running a knife or spatula around the edges to loosen the soil. Place your fingers on either side of the stem, just above the root ball, and carefully lift it out. Avoid pulling on the leaves, as this can cause the roots to be ripped apart.
Minimize shock stress by acclimating your seedlings to outdoor conditions before transplanting them. Start by moving them to a shaded area for 1-2 weeks before gradually exposing them to direct sunlight over several days. Water your seedling thoroughly before and after transplanting, and keep the soil consistently moist but not waterlogged during this transition period.
Be cautious when handling seedlings with fragile leaves or stems, as these are more prone to damage. Use a soft-bristled brush or a damp cloth to gently clean off any debris or excess soil that may be clinging to the roots or leaves. By taking your time and being gentle, you can ensure a smooth transition for your seedlings and give them the best chance at thriving in their new environment.
Caring for Your Cabbage Crop
To keep your cabbage crop thriving, you’ll want to focus on regular watering and fertilization to prevent pests and diseases from taking hold. Proper care also includes protection from extreme weather conditions.
Watering and Mulching Techniques
Consistent moisture levels are crucial for cabbage growth. Cabbage plants need about 1-2 inches of water per week, either from rain or irrigation. To achieve this, it’s essential to establish a watering routine that takes into account the crop’s water requirements at different stages of development.
Mulching around your cabbage plants can help retain soil moisture and reduce water waste. Organic mulch such as straw or wood chips will break down over time, adding nutrients to the soil while keeping it cool and moist. Apply a 2-3 inch layer of mulch around each plant, leaving about an inch at the base for air circulation.
To further conserve water, consider using soaker hoses or drip irrigation systems. These deliver water directly to the roots, minimizing evaporation and runoff. Water your cabbage plants during the cooler morning hours to prevent excessive transpiration. By implementing these techniques, you can ensure consistent moisture levels and healthy growth throughout the season. Regularly check soil moisture by inserting a finger into the soil up to the knuckle; if it feels dry, it’s time to water.
Pest and Disease Management
Cabbage crops are susceptible to various pests and diseases that can significantly impact yields. One of the most common issues is aphids, small insects that feed on sap, causing curled leaves and stunted growth. To manage aphid infestations, use neem oil or insecticidal soap as a foliar spray. For severe cases, introduce natural predators like ladybugs or lacewings to control populations.
Slugs and snails are another concern for cabbage growers. These nocturnal pests feed on leaves and stems at night, causing significant damage. To prevent slug and snail infestations, use copper tape around the garden bed, crush eggshells on the soil surface, or apply diatomaceous earth to dehydrate them.
Club root is a more serious fungal disease affecting cabbage crops worldwide. It causes the roots to swell, stunting growth and reducing yields. To manage club root, rotate your cabbage crop with other plants from different families (e.g., legumes) and maintain good soil hygiene by removing infected plants and sterilizing tools. Consider using fungicides as a last resort if the infestation is severe.
Regular monitoring and prompt action can help prevent pest and disease damage to your cabbage crop. Keep an eye out for signs of infestation, and use a combination of organic and chemical control methods to protect your crop.
Encouraging Healthy Growth and Harvesting
Now that your cabbage plants are thriving, it’s time to focus on encouraging healthy growth and harvesting them at their best. This means knowing when to fertilize and how to bring in a successful harvest.
Monitoring for Signs of Maturity
Monitoring for Signs of Maturity is crucial to ensure you harvest your cabbage at the optimal time. To determine if your cabbage is ready, start by checking its size. A mature head of cabbage should be firm and compact, with a diameter of around 6-8 inches (15-20 cm). Some varieties may grow larger or smaller, so it’s essential to check the specific growth characteristics for your chosen variety.
Next, examine the color of the leaves. As cabbage matures, the outer leaves will turn a deep green, while the inner leaves remain lighter in color. The color change is an indication that the head is forming and ready for harvest. Check the texture by gently squeezing the head. A mature cabbage should feel firm but not hard, with no signs of soft spots or damage.
When you notice these signs, it’s time to harvest your cabbage. Cut the stem just above the soil line using a sharp knife or garden tool. Harvesting at the optimal time ensures the best flavor and texture for your cabbage. Over-maturity can lead to tough, fibrous leaves, while under-ripe cabbages may be too dense and lack flavor.
Storage and Post-Harvest Care
To keep your freshly harvested cabbages fresh for an extended period, proper storage is crucial. Store them in a cool, dry place with good ventilation, away from direct sunlight and heat sources. A temperature range of 32°F to 40°F (0°C to 4°C) is ideal. You can also store them in a root cellar or a basement with consistent temperatures between 35°F and 45°F (2°C and 7°C).
For long-term storage, you can use techniques like blanching and freezing or pickling. Blanch the cabbage in boiling water for 3-5 minutes to inactivate enzymes that cause spoilage. Then, immediately submerge it in an ice bath to stop the cooking process. After draining and patting dry, you can freeze it for up to 8 months.
Preserving cabbages also offers numerous benefits. Pickling is a popular method where you soak shredded cabbage in a brine solution (water, vinegar, salt, and spices) for several weeks or months. This method not only extends shelf life but also enhances the flavor and texture of the cabbage.
Troubleshooting Common Issues
Don’t worry if things don’t go as planned, we’ve got you covered! This section tackles common cabbage growing issues and provides solutions to get your harvest back on track.
Identifying and Addressing Growing Problems
As you nurture your cabbage crop, it’s not uncommon to encounter some growing pains. One of the most frustrating issues is slow growth, which can be caused by inadequate light, temperature fluctuations, or poor soil quality. To address this problem, ensure that your cabbage plants are receiving at least 6 hours of direct sunlight per day and maintain a consistent temperature between 60-70°F (15-21°C).
Another common issue is nutrient deficiencies, particularly nitrogen, which is essential for leaf growth. Inspect your plants’ leaves regularly for signs of yellowing or stunted growth, and consider adding a balanced fertilizer to the soil. For example, a well-balanced fertilizer like 10-10-10 NPK can provide all the necessary macronutrients for healthy cabbage growth.
Pests are another significant problem that can decimate your cabbage crop. Common pests include aphids, slugs, and caterpillars, which can be controlled using integrated pest management (IPM) techniques. For instance, introducing beneficial insects like ladybugs or lacewings can help control aphid populations, while hand-picking or using physical barriers can deter slugs and caterpillars.
Preventing future occurrences is just as important as addressing the issue itself. To avoid slow growth, make sure to plant cabbage varieties that are suitable for your climate and soil type. Regularly inspect your plants for signs of nutrient deficiencies and pests, and take action promptly to prevent infestations from getting out of hand.
Some preventive measures include crop rotation, which can help break disease cycles and reduce pest pressure. Additionally, maintaining good garden hygiene practices, such as removing weeds and debris, can also go a long way in preventing future issues. By staying vigilant and taking proactive steps, you’ll be well on your way to growing a healthy and thriving cabbage crop that will reward you with delicious harvests for months to come.
Frequently Asked Questions
Can I grow cabbage in containers if my garden is too small?
Yes, you can grow cabbage in containers as long as they are at least 6-8 inches deep to accommodate the taproot of the plant. Make sure the container has good drainage holes and use a well-draining potting mix specifically designed for vegetables.
How often should I water my cabbage plants during hot weather?
Cabbage plants need consistent moisture, especially when they’re producing heads. Water your plants deeply once or twice a week, depending on weather conditions, making sure not to overwater which can lead to rot and other diseases. Keep the soil consistently moist but not waterlogged.
What are some common pests that target cabbage crops and how do I manage them?
Aphids, slugs, and caterpillars are common pests that target cabbage crops. To manage them, use physical barriers like fine mesh or fine netting to prevent insects from reaching your plants. For slugs, remove weeds and debris where they can hide, and set up traps with beer or yeast. For caterpillars, spray with Bt (Bacillus thuringiensis) or introduce natural predators.
Can I grow cabbage in a greenhouse if it’s too cold outside?
Yes, you can grow cabbage in a greenhouse if the temperature is above 40°F (4°C). Make sure to provide supplemental lighting for the plants and maintain adequate ventilation to prevent fungal diseases. You can also use row covers or other shading materials to control temperature extremes.
How do I store harvested cabbage heads to keep them fresh longer?
To store harvested cabbage heads, place them in a cool, dry location with good air circulation. Store them separately from apples and pears as these fruits release ethylene gas that can cause the cabbage to ripen faster. Keep the storage area between 32°F (0°C) and 40°F (4°C).