Are you ready to grow your own giant pumpkins from seed? It’s a rewarding experience that requires patience, attention to detail, and a bit of know-how. With the right guidance, you can successfully cultivate these majestic vegetables in your garden. Choosing the right variety is crucial – selecting a pumpkin type that thrives in your climate will make all the difference. We’ll walk you through the process of preparing your soil, sowing those precious seeds, and providing the care your pumpkin plants need to reach their full potential. From selection to harvest, we’ve got you covered. In this article, we’ll share expert tips on growing giant pumpkins from seed, ensuring you enjoy a bountiful crop come autumn.
Choosing the Right Variety
When it comes to growing pumpkins from seed, selecting the right variety is crucial for success. This means considering factors like climate, space, and personal preference when choosing the perfect pumpkin type for your garden.
Understanding Pumpkin Types and Their Characteristics
When growing pumpkins from seed, it’s essential to understand that not all varieties are created equal. With numerous types of pumpkins available, selecting the right variety can be a daunting task. Let’s start by exploring some of the most popular pumpkin types and their unique characteristics.
Jack-o-lantern pumpkins are perfect for carving and lighting up your porch on Halloween. They typically have symmetrical, rounded shapes and sweet, stringy flesh. Sugar pie pumpkins, on the other hand, are ideal for baking and cooking. These compact pumpkins have smooth, orange skin and a sweet, fine-grained texture.
Ornamental pumpkins come in an array of colors and patterns, making them perfect for adding a pop of color to your garden or home decor. They can be quite large, with some varieties reaching up to 50 pounds! Consider the space you have available when selecting an ornamental pumpkin variety. Another factor to consider is disease resistance – if you live in an area prone to powdery mildew or other fungal diseases, choose a variety that’s bred for resistance.
Some popular varieties include ‘Jack Be Little’, ‘Baby Boo’, and ‘Jarrahdale’. When selecting a variety, keep in mind the climate and growing conditions in your area. Some pumpkins are more tolerant of heat or cold than others, so make sure to research the specific needs of each variety.
Factors Influencing Seed Selection
When it comes to growing pumpkins from seed, selecting the right variety is crucial for a successful harvest. But what factors should you consider when choosing the perfect seeds for your garden? Climate and soil type are two essential factors that can impact seed selection.
In regions with short growing seasons or cold winters, choose varieties that mature quickly (around 100 days) to ensure they have enough time to ripen before the first frost. On the other hand, if you live in a warm climate, select varieties that take longer to mature (over 120 days). Soil type is also a consideration – for example, ‘Jack Be Little’ pumpkins are compact and thrive in smaller spaces with poor soil.
Your personal preference for pumpkin size, shape, and color can also influence seed selection. Do you want large, symmetrical gourds or smaller, irregularly-shaped ones? Make sure to choose high-quality seeds from reputable sources to ensure they are disease-free and have a high germination rate. Check the seed packet or supplier’s website for information on the variety’s specific growing requirements.
Choose seeds that are specifically bred for your region’s climate and soil conditions. Some suppliers even offer ‘regional’ seed varieties, which are tailored to local climates and growing conditions.
Preparing the Soil
Before you can plant those seeds, it’s essential to prepare your soil for optimal pumpkin growth. We’ll walk you through the steps to create a fertile environment for your pumpkins to thrive.
Assessing and Amending Your Soil
Before you can start planting pumpkin seeds, it’s essential to assess and amend your soil to create an optimal environment for growth. One of the most critical factors is pH level – pumpkins prefer a slightly acidic to neutral soil pH between 6.0 and 7.0.
To determine your soil’s pH level, you can purchase a DIY soil testing kit or send a sample to a lab for analysis. You’ll also want to check the nutrient content of your soil. Pumpkin plants require a balanced diet of nitrogen (N), phosphorus (P), and potassium (K) to produce healthy leaves, stems, and fruit.
To amend your soil, start by adding organic matter like compost or well-rotted manure to improve its structure and fertility. If your soil test reveals low levels of N, P, or K, apply a balanced fertilizer according to the manufacturer’s instructions. Avoid over-fertilizing, as this can harm pumpkin plants.
Aim to create a mix that mimics a natural forest floor – rich in organic matter and with a slightly acidic pH. This will give your pumpkin seeds the best chance of germinating and growing into healthy, productive vines.
Creating a Sunny Location
When growing pumpkins from seed, it’s essential to provide them with optimal sunlight conditions. Pumpkins need full sun exposure to produce well, so choose a location that receives direct sunlight for at least 6 hours a day. If possible, select a spot that gets morning sun and afternoon shade to prevent scorching.
If you’re starting from scratch, consider creating a sunny location in your garden by removing any obstructions or trees that may be blocking sunlight. Clear the area of weeds and debris, and level the ground for better drainage. You can also use solarization techniques to kill weeds and pests by covering the area with clear plastic sheeting.
When selecting an existing spot, look for areas with minimal tree cover and no nearby buildings that could cast shade. Check the soil pH and adjust it if necessary, as pumpkins prefer a slightly acidic to neutral soil pH (around 6.0-7.0). By providing your pumpkin seedlings with full sun exposure, you’ll be well on your way to growing healthy, thriving pumpkins.
Sowing Seeds
Start by preparing a healthy seed starting mix and gently placing 2-3 pumpkin seeds on its surface, firming them down to ensure good contact.
Understanding Seed Depth and Spacing
When sowing pumpkin seeds, it’s essential to get the seed depth and spacing just right. Pumpkins are a vining crop that requires adequate space to spread out and produce fruit. A good rule of thumb is to plant seeds 1 inch deep and 3-4 feet apart. However, some varieties like ‘Jack Be Little’ and ‘Baby Boo’ are compact and can be planted closer together, about 2-3 feet apart.
To calculate the correct spacing for your pumpkin patch, consider the mature size of the vines. A general guideline is to plant seeds at least 5 feet apart in all directions to accommodate their spread. You can also use a square foot gardening layout, where each seedling gets its own 12×12 inch block of soil. This will give you more control over spacing and help prevent overcrowding.
For example, if you’re planting ‘Atlantic Giant’ pumpkins, which can produce vines that reach up to 10 feet long, make sure to plant them at least 6-8 feet apart in all directions. Remember, proper seed depth and spacing are crucial for healthy growth and fruit production.
Planting Techniques and Tips
When planting pumpkin seeds, it’s essential to use the right techniques to give them the best chance of germinating and growing strong. A seed starting mix is specifically designed for starting seeds indoors, and it provides better drainage and aeration than regular potting soil.
To create a mini-greenhouse effect, cover your seed tray or individual cells with clear plastic wrap or a cloche. This will help retain moisture and warmth, promoting germination. Make sure the wrap or cloche is not too tight, as this can cause overheating and lead to fungal diseases.
When sowing seeds, avoid pushing them too deep into the soil – pumpkin seeds are small and need light to germinate, so plant them about ¼ inch deep. You should also be careful not to overwater your seeds, as this can cause the seeds to rot before they have a chance to sprout.
Some common mistakes to watch out for include sowing seeds too close together, which can lead to overcrowding and reduced air circulation. It’s best to sow them about 1-2 inches apart in the tray or cells.
Caring for Seedlings
Now that you have a batch of healthy seedlings, it’s essential to provide them with the right conditions to thrive and grow into robust pumpkin plants. This section will cover the key aspects of caring for your young pumpkins.
Watering and Irrigation Strategies
Consistent moisture levels are crucial during the germination phase of pumpkin seedlings. This is because seeds need to stay moist for optimal growth and development. If the soil becomes too dry, it can slow down or even stop germination altogether.
To achieve consistent moisture, you’ll want to invest in a reliable irrigation system. Soaker hoses or drip irrigation systems are excellent options as they deliver water directly to the roots of the seedlings. These systems minimize evaporation and runoff, ensuring that your seedlings receive exactly what they need without wasting a single drop.
As for scheduling, aim to keep the soil consistently moist during the first week after sowing seeds. Water lightly but frequently to avoid washing away delicate seeds or disturbing young seedlings. Once germination has occurred, you can gradually reduce watering to about 1-2 inches per week. Keep in mind that different climate zones and weather conditions may require adjustments to your irrigation schedule.
Pest and Disease Management
As you care for your pumpkin seedlings, it’s essential to monitor them regularly for signs of pest and disease infestations. Common pests that can affect pumpkin plants include aphids, whiteflies, and squash bugs, which can cause damage to leaves, stems, and fruit.
Keep an eye out for these signs of infestation:
* Aphids: Small, soft-bodied insects that secrete a sticky substance called honeydew
* Whiteflies: Tiny, flying insects that feed on plant sap
* Squash bugs: Brown or black insects with a flat body shape
Diseases like powdery mildew and fusarium wilt can also affect pumpkin plants. Powdery mildew appears as a white, powdery coating on leaves, while fusarium wilt causes yellowing or wilting of stems.
To prevent infestations, ensure good air circulation around your seedlings, water carefully to avoid overwatering, and use row covers to keep pests away. If you do notice an infestation, treat the affected areas with neem oil or insecticidal soap. For diseases, remove infected leaves or stems, and apply a fungicide specifically labeled for pumpkin crops.
Regular monitoring and prompt action can help prevent pest and disease problems from taking over your pumpkin patch.
Training and Pruning
Proper training and pruning of your pumpkin vines is crucial for optimal growth, so let’s dive into these essential steps to support your plant.
Supporting Pumpkins as They Grow
As you cultivate your pumpkin plants from seed, it’s essential to provide support as they grow. This is crucial for promoting healthy stem development and preventing damage from heavy fruit. Without proper support, the plant may become weighed down by its massive vines and gourds, leading to a weakened structure that’s more susceptible to disease.
One effective way to offer support is by using trellises or cages specifically designed for pumpkins. These structures can be placed next to the seedlings when they’re around 2-3 feet tall and spaced about 12 inches apart. As the vines spread out, gently weave them through the trellis or cage, securing them with twine or clips if necessary.
This technique will help keep the fruit off the ground, reducing the risk of rot and other diseases that thrive in moist environments. It’ll also allow for better air circulation around the plant, which can help prevent fungal growth. By providing support to your pumpkins as they grow, you’ll be encouraging a strong, healthy stem that’s better equipped to carry its load.
Pruning Techniques and Timing
Pruning pumpkin plants may seem counterintuitive when you’re trying to grow a big, healthy fruit. However, regular pruning is essential for promoting a strong, balanced plant that will produce high-quality pumpkins. By removing select leaves and stems, you can control the direction of growth, increase air circulation, and reduce disease susceptibility.
Pruning also encourages the plant to focus its energy on producing more fruit rather than foliage. As a general rule, prune your pumpkin plant when it reaches about 2-3 feet tall. Remove any weak or spindly growth, as well as any leaves that are touching the soil. This will help prevent fungal diseases from taking hold.
To maximize fruit size, wait until the male flowers have been pollinated before pruning any of the female flowers’ leaves. You can do this by simply pinching off the smaller leaves around the base of each flower, or removing them entirely if they’re getting in the way of other growth. By doing so, you’ll allow the plant to channel its energy towards developing the pumpkin rather than producing more foliage.
Harvesting and Storage
Now that your pumpkin plants are mature, it’s time to learn how to harvest them carefully and store them properly to enjoy their bounty for months to come. Proper handling will ensure they remain fresh and healthy.
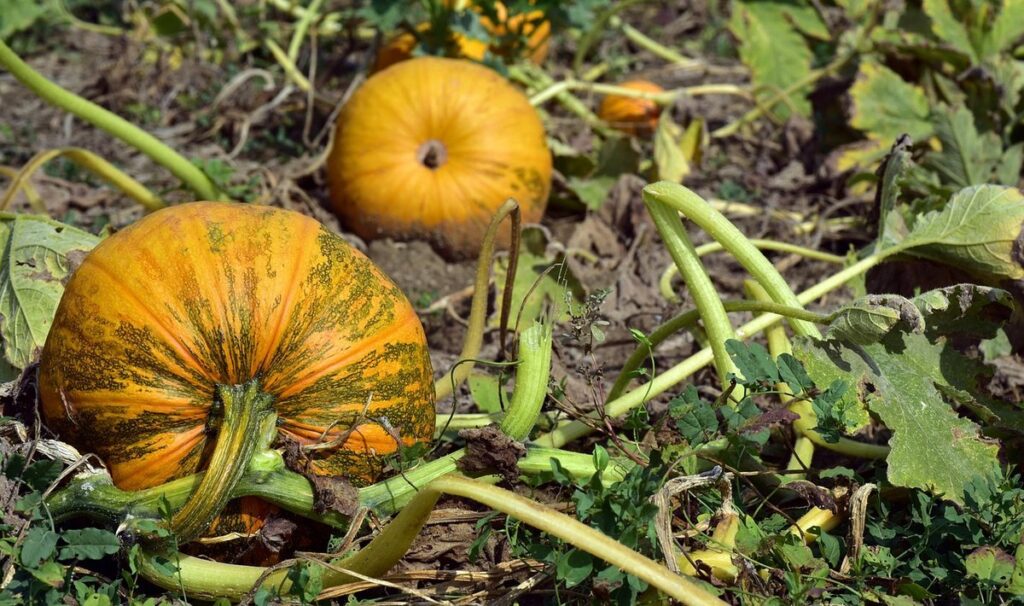
Identifying Mature Pumpkins
As your pumpkin vines start to dry and turn golden brown, it’s time to check for mature pumpkins. A fully grown pumpkin will have undergone a series of visual changes that signal it’s ready for harvest. First, the rind should be hard and smooth, with no soft spots or bruises.
Look for a rich orange color, which can range from a deep burnt orange to a light yellow-orange hue, depending on the variety. Some heirloom pumpkins may retain a green or white patch near the stem. The size of your mature pumpkin will also give away its readiness – a fully grown pumpkin should be around 10-20 pounds (4.5-9 kg), depending on the specific type.
Gently check for any soft spots, but avoid squeezing too hard, as this can cause damage to the rind and lead to decay. To harvest your pumpkins without causing harm, use a sharp knife or garden tool to cut the stem about 3-4 inches (7-10 cm) from the vine. Be careful not to pull on the vines, as this can leave behind a weak spot that may attract pests or diseases.
Avoid harvesting in extreme weather conditions, such as during heavy rain or intense sunlight. Instead, choose a calm morning with moderate temperatures. This will help minimize damage and ensure your pumpkins arrive at their final destination unscathed.
Storing Your Harvest
Proper storage of harvested pumpkins is crucial to maintain their quality and extend their shelf life. To keep your pumpkins fresh for as long as possible, you’ll need to store them in a cool, dry place with good ventilation.
Temperature plays a significant role in pumpkin storage. Store pumpkins in an area with a consistent temperature between 50°F (10°C) and 60°F (15°C). Avoid storing pumpkins near heating vents or radiators, as high temperatures can cause the skin to become soft and vulnerable to decay.
Maintaining optimal humidity is also essential. Pumpkins prefer a humid environment, but not too humid – aim for 50-70% relative humidity. This will help prevent moisture from accumulating on the surface, reducing the risk of mold and rot.
To ensure good air circulation, store pumpkins in a single layer, with space between each one. You can also cover the top of the storage area with cheesecloth or a breathable mesh to keep dust out while allowing air to pass through.
When storing pumpkins for an extended period, make sure they’re clean and dry before placing them in storage. A simple dusting or wiping with a damp cloth will help remove any dirt or debris that could contribute to spoilage.
Frequently Asked Questions
How do I know if my climate is suitable for growing giant pumpkins?
Before selecting a pumpkin variety, it’s essential to consider your local climate and its impact on the growth of these massive vegetables. Check your average temperature, rainfall, and sunlight hours to ensure they align with the specific needs of the varieties you’re considering. Some pumpkin types are more tolerant of extreme weather conditions than others.
Can I grow multiple types of pumpkins in the same garden?
Yes, you can grow multiple types of pumpkins in the same garden, but it’s crucial to provide each variety with its unique growing requirements and space needs. Some pumpkins, like Jack-o-lantern varieties, spread out significantly during growth, while others remain more compact.
How often should I water my pumpkin plants?
Adequate watering is vital for giant pumpkin production, especially when the fruit starts to grow. Water your pumpkin plants deeply once or twice a week, depending on soil moisture and climate conditions. Make sure not to overwater, as this can lead to fungal diseases and root rot.
What are some common pests that target pumpkins, and how do I control them?
Common pests like aphids, squash bugs, and powdery mildew can significantly impact pumpkin yields. Regularly inspect your plants for signs of infestation and take action promptly. Use natural pest control methods like neem oil or insecticidal soap to manage populations.
Can I grow pumpkins in containers if my garden space is limited?
Yes, you can successfully grow pumpkins in large containers (at least 5-gallons) with good drainage. Make sure the container has enough space for your pumpkin’s spread and select a variety that thrives in containers. However, keep in mind that container-grown pumpkins might require more frequent watering and fertilization due to limited soil capacity.