Canna lilies are a breath of tropical beauty in any garden, but their stunning blooms and striking foliage require some expert care to truly thrive. If you’re struggling to coax these gorgeous flowers into bloom or simply want to ensure they continue to dazzle year after year, it’s time to get down to the nitty-gritty of canna lily care.
In this comprehensive guide, we’ll delve into the essential tips and tricks for growing and maintaining healthy, vibrant canna lilies. From planting and watering techniques to fertilizing, pruning, and propagating these show-stopping flowers, we’ve got you covered. Whether you’re a seasoned gardener or just starting out, our expert advice will help you unlock the full potential of your canna lily plants and enjoy their breathtaking blooms all season long.
Choosing the Right Canna Lilies
When selecting canna lilies for your garden, there are several factors to consider to ensure you choose varieties that thrive in your climate and soil conditions. Let’s take a closer look at what to think about.
Understanding Canna Lily Types
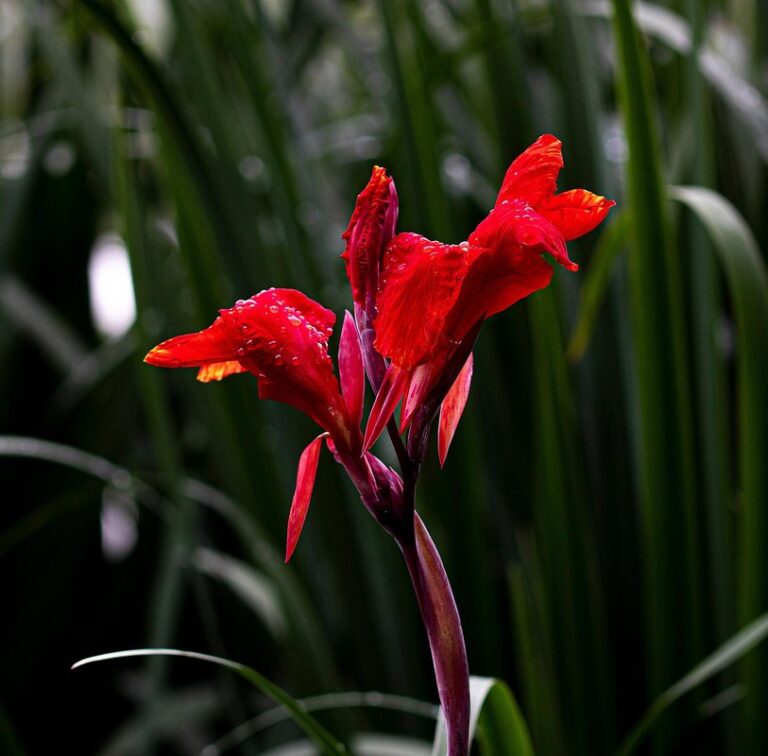
Canna lilies come in a stunning array of colors and shapes, making them a popular choice for gardeners. With over 20 different species to choose from, it’s essential to understand the unique characteristics of each type to select the perfect one for your landscape.
One of the most common types is the Canna glauca, known for its striking blue-green foliage and vibrant orange flowers. This variety thrives in moist environments and can grow up to 6 feet tall, making it ideal for pond or lake edges. On the other hand, the Canna edulis boasts large, showy red flowers that attract hummingbirds and butterflies.
For smaller spaces, consider the compact Canna ‘Phaison’ or ‘Red Sentinel’, which top out at around 2-3 feet tall. These varieties are perfect for containers or mixed borders. When selecting a canna lily type, think about your climate, available sunlight, and desired flower color. Research specific growing conditions for each variety to ensure you’re giving your plants the best chance to thrive.
Some popular types of canna lilies include ‘Pretoria’ (known for its bright pink flowers), ‘Tropicanna’ (with its unique yellow and red stripes), and ‘Red King’ (boasting bold, crimson blooms). By choosing a type that suits your needs, you’ll be well on your way to creating a stunning canna lily display in your garden.
Selecting Healthy Rhizomes or Bulbs
When selecting healthy rhizomes or bulbs from reputable suppliers, it’s essential to evaluate their quality carefully. Look for suppliers that have a good track record of shipping healthy and disease-free plants. Check the supplier’s website or ask about their growing and harvesting practices to ensure they follow proper protocols.
Consider the appearance of the rhizome or bulb. Healthy ones should be firm and free from soft spots, mold, or mildew. Avoid any that show signs of rotting or decay. Also, inspect for any visible insects or eggs. Check the packaging carefully, making sure there’s no moisture trapped inside which can cause fungal growth.
It’s also crucial to understand the potential disease issues associated with imported rhizomes or bulbs. Canna lilies are susceptible to pests and diseases like fusarium wilt, root rot, and leaf spot. Be aware of these risks when purchasing from suppliers, especially those that import plants from regions prone to these diseases. Research the supplier’s reputation online, read reviews, and ask for references to ensure you’re getting healthy, disease-free rhizomes or bulbs.
Planting and Establishing Canna Lilies
When planting canna lilies, it’s essential to choose a spot that provides full sun to partial shade, as this will help prevent overgrowth. Select a location with well-draining soil.
Preparing the Soil
When preparing the soil for planting canna lilies, it’s essential to consider their unique requirements. Canna lilies thrive in well-draining soil with a pH between 6.5 and 7.5, slightly acidic to neutral. If you’re testing the pH level of your soil and find it too alkaline or acidic, take steps to adjust it before planting.
To ensure good drainage, add organic matter like compost or well-rotted manure to improve soil structure. You can also create a raised bed with a mix of topsoil, perlite, and vermiculite for better water retention and aeration.
Canna lilies are heavy feeders and require fertile soil rich in nutrients. Incorporate balanced fertilizer into the soil before planting, following the manufacturer’s instructions. A general rule is to fertilize once a month during the growing season, but avoid overfertilizing as this can lead to weak stems and fewer blooms.
Planting Rhizomes or Bulbs
When planting rhizomes or bulbs, it’s essential to follow some key steps to ensure successful establishment. Start by gently removing any old soil from the roots of the rhizome or bulb. Then, prepare a hole that is about 2-3 times deeper than the height of the rhizome or bulb. Place the rhizome or bulb in the hole with its “eyes” (small buds on the top) facing upwards.
Space rhizomes 12-18 inches apart to allow for proper air circulation and growth, while bulbs can be planted 6-8 inches deep and spaced about 12 inches apart. Fill the hole with a well-draining potting mix, firming it gently around the roots as you go. To secure the rhizome or bulb in place, gently press down on the soil to settle it.
As an added precaution, you can also use a layer of mulch or landscape fabric to help retain moisture and suppress weeds. Make sure not to bury the eyes of the rhizome or bulb too deeply, as this can cause them to rot. With proper care, your newly planted rhizomes or bulbs should be well-established within a few weeks.
Watering and Fertilizing Canna Lilies
To ensure your canna lilies thrive, you’ll want to master the art of watering and fertilizing – two crucial steps in their care. We’ll dive into the details of how often and what type of nutrients are ideal for these tropical beauties.
Understanding Water Requirements
When it comes to watering your canna lilies, understanding their unique needs is crucial. The climate and soil type you’re working with play a significant role in determining the right amount of water for your plants.
In hot and dry climates, canna lilies require more frequent watering, typically every 2-3 days during peak summer months. On the other hand, in cooler and wetter climates, they may only need to be watered once a week. The type of soil you’re using also affects their water requirements – well-draining soils will allow for less frequent watering, while heavy clay soils can retain too much moisture.
But how do you know if you’re overwatering or underwatering your canna lilies? Signs of overwatering include yellowing leaves, soft stems, and root rot. Conversely, signs of underwatering are wilted leaves, crispy tips, and a general decline in plant health. To determine the right watering schedule for your plants, check the soil moisture by inserting your finger into the soil up to the knuckle – if it feels dry, it’s time to water.
Fertilization Strategies
When it comes to fertilizing canna lilies, you have several options to choose from. Organic and synthetic fertilizers are two popular types that cater to different growing preferences. Organic fertilizers, such as fish emulsion or compost tea, promote healthy soil ecosystems and minimize environmental impact. Synthetic fertilizers, like 20-20-20 balanced fertilizer, provide a more rapid nutrient boost but may require repeated applications.
For container-grown canna lilies, consider using a water-soluble fertilizer specifically designed for tropical plants. These fertilizers typically contain micronutrients that support leaf growth and flowering. Apply fertilizers according to the manufacturer’s instructions, usually every 1-2 weeks during the growing season. It’s essential to monitor your plant’s response to fertilization and adjust application schedules as needed.
A balanced fertilizer with a slightly higher phosphorus content (such as 15-30-15) can encourage healthy root development and flowering. When using fertilizers, keep in mind that over-fertilization can cause more harm than good. Start with low to moderate applications and gradually increase the frequency or amount based on your plant’s response.
Pruning and Maintenance
To keep your canna lilies thriving, it’s essential to prune them regularly and perform other maintenance tasks to ensure they continue to bloom beautifully year after year.
Timing and Techniques
When it comes to pruning and maintaining your canna lily plants, timing is everything. As a general rule of thumb, it’s best to prune your canna lilies in the spring when new growth begins to emerge from the rhizomes or bulbs. This will give you a head start on promoting healthy growth and preventing any potential damage to the delicate rhizomes.
To prevent damage to the rhizomes or bulbs, be sure to cut back the foliage to about 3-4 inches above the ground. This will not only help promote new growth but also give you a clear view of the rhizomes, making it easier to spot any signs of disease or pests. When pruning, use clean and sharp tools to prevent spreading diseases.
You should also prune your canna lilies after blooming has finished for the season. Cut back the flower stalks about 6-8 inches above the foliage to encourage a second flush of blooms in some varieties. Remember to remove any dead or dying leaves or stems to keep your plants looking their best and prevent the spread of disease.
Keep an eye on your canna lilies throughout the growing season, making sure to water and fertilize them regularly. This will help promote healthy growth and ensure that your plants continue to thrive for years to come.
Pest and Disease Management
As a canna lily grower, it’s essential to be aware of the common pests and diseases that can affect these beautiful plants. One of the most prevalent issues is aphids, which can spread viruses between plants if not caught early. To prevent infestations, inspect your canna lilies regularly for signs of aphid activity, such as curled or distorted leaves.
Slugs and snails are another common problem, especially in moist environments. These pests can chew through stems and leaves, causing significant damage to the plant. Use copper tape or crushed eggshells around the base of your canna lilies to deter slugs and snails.
Leaf spot and root rot are two diseases that often affect canna lilies. Leaf spot is caused by fungal spores that thrive in humid conditions, while root rot occurs when the roots sit in waterlogged soil for extended periods. To prevent these issues, ensure good air circulation around your plants, avoid overwatering, and remove any infected leaves or stems.
Regularly inspecting your canna lilies will help you catch potential problems before they escalate. By taking proactive steps to prevent pests and diseases, you’ll be able to enjoy healthy and thriving canna lily plants all season long.
Propagation and Division
To grow more canna lilies, you’ll want to learn how to propagate them successfully through division and proper plant care techniques. This will help you multiply your favorite varieties quickly and easily.
Propagating from Rhizomes or Bulbs
When it comes to propagating new canna lily plants from established rhizomes or bulbs, timing is crucial. The best time to do this depends on your location and climate. In regions with mild winters, you can propagate year-round, while in areas with colder winters, spring or early summer is the ideal time.
To start, gently dig up an existing rhizome or bulb, taking care not to damage any of the delicate roots or tubers. Remove any dead or dying tissue to promote healthy growth. Next, separate the sections of the rhizome or divide the bulbs, making sure each new plant has at least one growing point (a “node”) and some roots.
For rhizomes, you can cut them into sections using a sharp knife or pruning tool, each section ideally having two nodes and some roots. Place these sections in a well-draining potting mix and keep them moist but not waterlogged until new growth appears. Bulbs, on the other hand, can be divided by gently separating the individual bulbs, making sure each has its own growing point and roots.
It’s essential to handle both rhizomes and bulbs with care, as they are sensitive to root disturbance and moisture stress. By following these steps and timing your propagation efforts correctly, you should be able to successfully grow new canna lily plants from your existing ones.
Dividing Established Canna Lilies
When to Divide Established Canna Lilies
Dividing established canna lily plants is an essential part of their care. This process helps maintain the plant’s health and promotes new growth. It’s recommended to divide mature canna lilies every 3-4 years, as their rhizomes tend to outgrow their containers or become congested in the soil.
To determine if your canna lily needs division, inspect its roots. If you notice the rhizome has grown too large for its container or is producing fewer blooms than usual, it’s time to divide the plant. Look for “eyes” on the rhizome – these are small, bud-like structures that will produce new shoots and roots when separated.
When handling the rhizome, make sure to gently wash off any excess soil, taking care not to damage the delicate eyes. Use a sharp, sterile knife or garden tool to cut through the rhizome, separating sections with at least one eye each. Replant the divisions in well-draining soil, water thoroughly, and keep the soil consistently moist during the first growing season after division. This will help your canna lily plant establish itself and thrive in its new home.
Frequently Asked Questions
Can I grow canna lilies indoors if my outdoor climate is not suitable?
Yes, with the right conditions, you can successfully grow canna lilies indoors. Provide bright, indirect light and maintain a warm temperature between 65-75°F (18-24°C). Watering should be more frequent, as indoor conditions can lead to root rot. Fertilize regularly, but avoid over-fertilizing.
How often should I divide my established canna lilies to keep them healthy?
Divide your canna lilies every 3-4 years or when the rhizomes become overcrowded. This promotes new growth and prevents the risk of disease from waterlogged soil. Choose a time with minimal frost, ideally during spring or fall.
Can I propagate canna lilies using only the leaves?
While canna lily leaves are essential for photosynthesis, they cannot be used as a standalone method for propagation. You’ll need to either use healthy rhizomes or divide established plants to produce new growth.
How do I prevent crown rot in my canna lilies during wet weather?
To prevent crown rot, ensure your soil drains well and water is not accumulating around the plant’s base. Apply a 2-inch layer of organic mulch around the plant to absorb excess moisture. Avoid overhead watering; instead, use soaker hoses or water at the base.
Can I transplant canna lilies in the middle of their growing season?
Yes, but it’s best to do so when they’re dormant or during a brief break between growth cycles. Transplanting during active growth can cause stress and potentially lead to disease issues. Choose a time with minimal frost for optimal results.