Are you ready to join the world of organic gardening? With its numerous benefits, buckwheat is becoming increasingly popular among gardeners who want to cultivate their crops without harming the environment. Not only does it add a unique twist to your salads and stir-fries, but buckwheat also serves as a valuable companion plant that repels pests and improves soil health. If you’re interested in learning how to grow this nutritious crop using organic methods, you’ve come to the right place. In this article, we’ll explore the ins and outs of growing, harvesting, and cooking with buckwheat. We’ll also tackle common issues that may arise during the process. By the end of it, you’ll be well-equipped to start your very own buckwheat garden and reap its numerous benefits for years to come.
Introduction to Buckwheat as a Crop
Let’s start by exploring where buckwheat comes from and why it’s becoming an increasingly popular crop for organic gardeners, especially in temperate climates.
Benefits of Using Buckwheat in Your Garden
Buckwheat is an excellent choice for organic gardening due to its unique set of benefits that promote a healthy and balanced ecosystem. One of the most significant advantages of buckwheat is its ability to fix nitrogen in the soil, which makes it an ideal crop for improving soil fertility naturally. This process allows buckwheat to provide essential nutrients to itself and nearby plants, reducing the need for synthetic fertilizers.
In addition to its nitrogen-fixing properties, buckwheat also attracts beneficial insects to your garden. Its tall spikes of small white flowers are a haven for pollinators like bees and butterflies, which are essential for maintaining ecosystem health. This is especially important in organic gardening, where the use of pesticides is minimized or eliminated.
By incorporating buckwheat into your garden, you’ll create a welcoming environment that supports biodiversity while reducing your reliance on external inputs. This not only promotes soil health but also enhances overall plant productivity and resilience to pests and diseases.
Choosing the Right Variety for Your Climate
When choosing the right buckwheat variety for your garden, climate plays a crucial role. Buckwheat is a hardy crop that can thrive in various conditions, but it’s essential to select a variety that suits your region’s specific needs.
First, consider your region’s temperature and precipitation patterns. If you live in a hot and dry climate, look for buckwheat varieties bred specifically for heat tolerance, such as ‘Kabini’ or ‘Tatsoi’. These varieties can withstand temperatures up to 100°F (38°C) and require less water.
In cooler climates, opt for varieties like ‘Burgundy’ or ‘Tri-color’, which are more resistant to cold temperatures. If you live in an area with limited space, choose compact or dwarf varieties like ‘Rosy Ruby’ that produce smaller plants but still yield a good harvest.
It’s also essential to consider your soil type and pH level when selecting a buckwheat variety. For example, if you have acidic soil, look for varieties that are tolerant of low pH levels. By choosing the right variety for your climate, you’ll ensure a healthy and productive buckwheat crop in your garden.
Soil Preparation and Planting
Before planting buckwheat, make sure you’ve prepared your soil properly by loosening it to a depth of 12 inches. This will ensure healthy roots can establish themselves quickly.
Preparing Your Soil for Buckwheat
Before planting buckwheat, it’s essential to prepare your soil for optimal growth. Start by testing your soil’s pH levels using a DIY kit or sending a sample to a lab for analysis. Buckwheat prefers slightly acidic to neutral soil with a pH between 6.0 and 7.0. If your soil is too alkaline, you’ll need to add elemental sulfur to lower the pH.
In addition to pH testing, also determine if your soil lacks essential nutrients. Conduct a nutrient test to identify any deficiencies in nitrogen, phosphorus, or potassium (NPK). Based on the results, amend your soil with organic matter like compost or well-rotted manure. These additions will improve soil structure, increase water retention, and provide a boost of beneficial microorganisms.
Consider incorporating cover crops into your rotation plan to replenish nutrients and add organic matter over time. For example, planting legumes like clover or beans can fix nitrogen in the soil, reducing the need for synthetic fertilizers. By taking these steps, you’ll create an ideal environment for buckwheat to thrive and produce healthy, nutritious yields.
Sowing Seeds and Spacing Considerations
When sowing buckwheat seeds, it’s essential to consider the right depth and spacing for maximum yields. As a rule of thumb, sow buckwheat seeds about 1-2 inches deep, depending on soil type and moisture levels. This allows for even germination and prevents shallow roots from getting scorched by direct sunlight.
Buckwheat prefers well-draining soil, so avoid compacting the soil when sowing to prevent waterlogging. Space rows 12-18 inches apart, with individual plants about 6-8 inches apart within each row. This allows for proper air circulation and access to light, reducing the risk of fungal diseases that thrive in dense environments.
When timing your planting, consider the climate and region you’re gardening in. In general, sow buckwheat seeds when soil temperatures reach around 60°F (15°C). Aim to plant about 6-8 weeks before the last frost date for your area to ensure a successful harvest. Keep in mind that buckwheat is a cool-season crop, so it does best in temperatures between 40°F and 70°F (4°C and 21°C).
Companion Planting with Buckwheat
Buckwheat is a versatile crop that can be paired with many other plants to create a harmonious and thriving garden ecosystem. Learn how to companion plant buckwheat for better growth and less pest problems.
Attracting Pollinators and Beneficial Insects
Buckwheat’s towering height makes it an ideal crop for attracting pollinators and beneficial insects to your garden. As a bee-friendly plant, buckwheat provides a rich source of nectar and pollen for these essential visitors. Its tall stature allows it to compete with other plants for space, creating a microclimate that shelters and supports a diverse array of beneficial insects.
Buckwheat’s large flowers are particularly attractive to honeybees, which are drawn to the plant’s abundant nectar and pollen stores. In fact, studies have shown that buckwheat is one of the top three bee-friendly crops in North America. By incorporating buckwheat into your garden, you can create a haven for pollinators and beneficial insects, such as ladybugs and lacewings.
To maximize the benefits of buckwheat’s pollinator-attracting properties, plant it near other flowers that bloom at different times to provide a constant source of nectar and pollen throughout the growing season. This will attract an array of beneficial insects and support a balanced ecosystem in your garden.
Using Buckwheat to Repel Pests
Buckwheat’s strong scent is one of its most valuable assets when it comes to companion planting. The unique aroma emitted by the plant has been shown to repel a range of pests that can cause significant damage to crops, including aphids, whiteflies, and spider mites.
When planted alongside susceptible crops, buckwheat acts as a natural deterrent, preventing these pests from taking hold. For example, aphid populations have been known to decline significantly when buckwheat is grown in close proximity to infested plants. This is because the scent of buckwheat confuses the pests’ navigation systems, making it difficult for them to locate their host plants.
To harness buckwheat’s pest-repelling properties, try planting a border of buckwheat around your garden beds or interspersing it with other crops that are susceptible to infestation. Some great companion plantings include pairing buckwheat with tomatoes, peppers, and cucumbers – all common targets for whiteflies and aphids.
By incorporating buckwheat into your organic gardening strategy, you can create a more balanced ecosystem that reduces the need for pesticides and promotes healthy crop growth.
Harvesting and Drying Buckwheat
When harvesting and drying buckwheat, timing is crucial to preserve its nutritional value and flavor. Learn how to expertly pick and dry your buckwheat crop for maximum yield.
Timing and Techniques for Optimal Harvest
When it’s time to harvest your buckwheat crop, timing is everything. Buckwheat is typically ready for harvesting about 14-16 days after the flowers have bloomed and turned a light brown color. To ensure you’re getting the maximum nutritional content and flavor out of your crop, it’s essential to harvest at the right stage.
As a general rule, buckwheat should be harvested when the seeds are plump and fully formed, but still green. If you wait too long, the seeds will begin to dry out and lose their moisture content, which can affect their nutritional value and flavor. To check for readiness, gently pull on a stalk – if the seeds come off easily, it’s time to harvest.
To harvest buckwheat, use a sickle or a sharp knife to cut the stems near the base of the plant. You can also use a scythe or a small reaper, depending on the size of your crop. It’s essential to harvest in dry weather to prevent moisture from accumulating and causing mold or rot.
When it comes to drying buckwheat, air-drying is the best method. Spread the cut stems out in a single layer on a dry surface, such as a tarp or a sheet. Bring them inside at night to protect them from dew and continue drying for several days until they’re completely dry. You can also use a dehydrator or a food dryer to speed up the process.
Remember to monitor your crop regularly during the drying process, as buckwheat can easily become over-dried and lose its nutritional value. With patience and attention to detail, you’ll be enjoying delicious, homegrown buckwheat in no time!
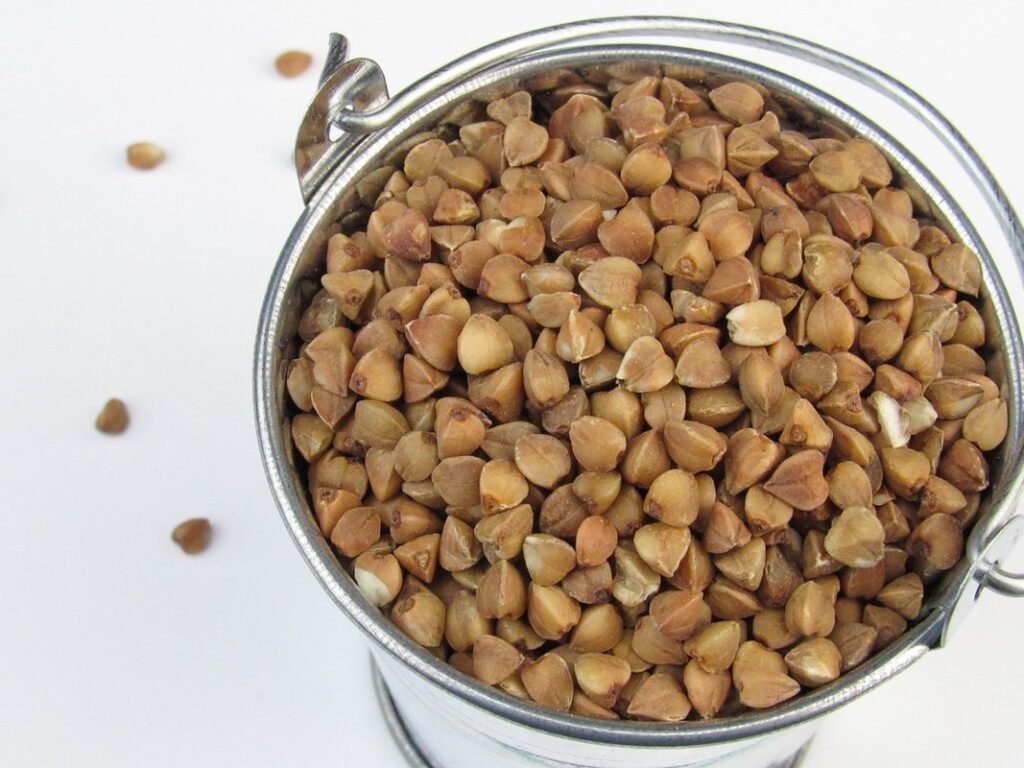
Drying and Storing Your Harvested Crop
Proper drying and storage of harvested buckwheat are crucial to maintaining its quality and preventing spoilage. To dry buckwheat, spread it out in a single layer on trays or racks, allowing air to circulate freely. This can be done indoors or outdoors, but ensure the area is well-ventilated to prevent moisture accumulation.
For optimal drying, the ideal temperature range is between 60°F and 80°F (15°C and 27°C). Avoid direct sunlight, as it can cause buckwheat to become brittle and lose its flavor. Monitor the drying process closely, checking on the crop every few hours to ensure even drying.
Once dry, store your harvested buckwheat in airtight containers, such as glass jars or plastic bins with tight-fitting lids. Store these containers in a cool, dark place, like a pantry or cupboard. Check your stored buckwheat regularly for signs of moisture or mold, and discard any spoiled grain to maintain the quality of your harvest.
To prevent mold from forming, ensure that the storage area remains dry and well-ventilated. Keep containers away from direct sunlight and heat sources, such as radiators or heaters.
Using Buckwheat in Your Organic Garden
Buckwheat is a versatile crop that can be used as a natural pest repellent and fertilizer in your organic garden, making it an excellent addition to your growing routine. Here’s how to get started!
Incorporating Buckwheat into Rotations
When incorporating buckwheat into your rotation plans, consider its benefits as a cover crop. Buckwheat is an excellent option for breaking disease and pest cycles in your garden. Its unique properties allow it to suppress the growth of weeds, reduce soil compaction, and even attract beneficial insects that prey on common pests.
One of the key advantages of using buckwheat as a cover crop is its ability to smother out weeds. By planting buckwheat between harvests or at the end of a growing season, you can prevent weeds from taking over your garden beds. This not only reduces competition for water and nutrients but also minimizes the need for herbicides.
In addition to suppressing weeds, buckwheat also serves as a nutrient-rich mulch when it’s incorporated into the soil after harvest. Its high levels of potassium help to promote healthy microbial activity, which in turn supports the development of beneficial fungi and bacteria that break down organic matter.
When planning your rotation with buckwheat, consider planting it in areas where other crops have struggled with pests or diseases. This can include areas infested with slugs, snails, or whiteflies. By incorporating buckwheat into these areas, you can create a healthier balance of microorganisms and reduce the risk of disease outbreaks in subsequent plantings.
Cooking with Buckwheat: Recipes and Tips
Buckwheat is a superfood that’s not just great for our health, but also incredibly versatile in the kitchen. In this section, we’ll explore some delicious recipes that showcase its unique flavor and texture, as well as provide tips on how to store and handle buckwheat for optimal cooking.
One of the most common ways to cook buckwheat is by making soba noodles or groats. To make soba noodles, simply rinse 1 cup of buckwheat flour with water until it forms a dough-like consistency. Knead the dough for about 10 minutes until it’s smooth and pliable. Wrap the dough in plastic wrap and let it rest for at least an hour before rolling it out into thin sheets. Slice the noodles into thin strips and cook them in boiling water for 2-3 minutes.
When cooking with buckwheat, make sure to rinse it thoroughly before using to remove any impurities. You can also store buckwheat flour or groats in a cool, dry place for up to 6 months. Buckwheat is also a great addition to salads, stews, and soups – simply toast the groats in a pan with some oil until crispy, then toss them with your favorite ingredients.
Some other delicious ways to cook buckwheat include making pancakes or crepes by mixing buckwheat flour with eggs and milk. You can also use buckwheat as a substitute for oats in oatmeal recipes, adding nuts, seeds, or dried fruits for extra flavor and texture.
Troubleshooting Common Issues
Buckwheat gardening can be a rewarding experience, but it’s not without its challenges. Let’s tackle some of the common issues that may arise and find solutions together.
Dealing with Pests and Diseases
As an organic gardener growing buckwheat, it’s essential to be aware of common pests and diseases that can affect your crop. Buckwheat is generally a low-maintenance crop, but it’s still susceptible to issues like powdery mildew, leaf spot, and aphids.
Powdery mildew is a fungal disease that causes white powder to form on leaves. To prevent it, ensure good air circulation around your plants and avoid overhead watering. If you notice symptoms, treat with a mixture of neem oil and water (1:10 ratio) or use a copper-based fungicide.
Leaf spot diseases like septoria leaf spot and cercospora leaf spot can also occur. Regularly inspect your plants for black spots or lesions on leaves. Remove infected leaves to prevent the disease from spreading, and treat with a bacteriostatic soap solution (1 tablespoon soap per gallon water).
Aphids are common pests that feed on buckwheat sap, weakening plants. Use neem oil or insecticidal soap to control infestations. Encourage beneficial insects like ladybugs and lacewings by planting flowers nearby.
Regularly inspect your crop for signs of stress, and take action promptly to prevent pest and disease issues from getting out of hand.
Addressing Soil and Climate Challenges
Adapting to soil and climate challenges is crucial for a successful buckwheat crop. One common issue many gardeners face is poor drainage, which can lead to waterlogged soil and root rot in buckwheat. To address this, consider incorporating raised beds or terracing into your garden design. These features allow excess water to drain away from the roots, reducing the risk of disease.
Climate-wise, buckwheat is a cool-season crop that thrives in temperatures between 60-75°F (15-24°C). However, extreme heat or drought can still impact yields. To mitigate these effects, provide shade for your buckwheat plants during peak sun hours using row covers or other shading methods. This will not only reduce stress but also help conserve moisture.
When dealing with challenging soils, consider adding organic amendments like compost or manure to improve structure and fertility. These additions can also enhance the soil’s water-holding capacity, reducing the need for frequent watering. Regular monitoring of your soil’s pH levels is also essential, as buckwheat prefers a slightly acidic to neutral soil environment.
By implementing these strategies, you’ll be better equipped to tackle specific soil or climate challenges and ensure a healthy, productive buckwheat crop.
Conclusion: Maximizing Your Buckwheat Harvest
Now that you’ve nurtured your buckwheat crop, it’s time to reap the rewards and maximize your harvest for a bountiful supply of this versatile and nutritious grain. Let’s explore how to get the most out of your buckwheat harvest.
Recap of Key Takeaways
To ensure you can successfully grow and utilize your buckwheat crops, let’s recap the key takeaways from our previous sections. When it comes to preparing the soil for planting, make sure to choose a spot with full sun and well-draining soil. As we discussed earlier, buckwheat prefers slightly acidic to neutral soil pH, ranging from 6.0 to 7.0.
In terms of crop rotation, remember that buckwheat is an excellent companion plant due to its ability to repel pests and attract beneficial insects. This makes it a great addition to your organic gardening arsenal. Additionally, don’t forget the importance of mulching around your buckwheat plants to retain moisture and suppress weeds.
During the growing season, keep in mind that buckwheat is relatively low maintenance but does require adequate watering, especially during hot and dry spells. Regularly inspect your plants for signs of pests or diseases, and take action promptly if you notice any issues.
By following these guidelines and tips, you’ll be well on your way to a bountiful and healthy buckwheat harvest that’s perfect for enjoying in a variety of ways – from cooking with it as a whole grain to making delicious pancakes and other baked goods.
Encouragement for Continued Exploration
As you reflect on the journey of growing buckwheat organically, it’s clear that this crop has much to offer. Not only does it thrive in poor soil conditions and requires minimal maintenance, but it also provides a versatile source of protein-rich flour and pseudo-cereal. The benefits of incorporating buckwheat into your organic gardening practice are numerous, from attracting beneficial pollinators to enriching the soil with its natural nutrients.
As you continue to experiment with buckwheat, keep in mind that every season will bring new opportunities for growth and learning. Consider expanding your crop rotation by alternating between buckwheat and other nutrient-dense plants like legumes or leafy greens. This approach not only maintains soil fertility but also encourages biodiversity within your garden ecosystem.
Don’t be afraid to push the boundaries of what’s possible with buckwheat. Research new recipes that showcase its unique flavor and texture, or explore innovative ways to use its seeds as a natural dye or pest repellent. The possibilities are endless, and we encourage you to keep exploring – after all, it’s in embracing the unknown that true growth occurs.
Frequently Asked Questions
Can I grow buckwheat in containers or indoors?
You can definitely try growing buckwheat in containers or indoors, but it’s essential to ensure that your setup provides enough space for the plants to spread out and receive adequate sunlight. Buckwheat prefers full sun and well-draining soil, which might be more challenging to replicate in a contained environment. Start with a small batch and monitor the growth to see if it works for you.
How do I maintain the nitrogen-fixing properties of buckwheat?
To maximize the benefits of buckwheat’s nitrogen fixation, make sure to rotate your crops regularly and include other legumes or cover crops in your rotation. Avoid over-fertilizing with synthetic fertilizers, as this can disrupt the soil ecosystem and reduce the effectiveness of buckwheat’s natural fertilizer contribution.
Can I use buckwheat as a companion plant for all types of vegetables?
While buckwheat is an excellent companion plant for many vegetables, it’s not suitable for all. Be cautious when pairing buckwheat with plants that have shallow roots or require high levels of nutrients, such as Brussels sprouts or cabbage. Research specific companion planting combinations to ensure the best results.
How do I dry and store harvested buckwheat for long-term use?
To preserve the quality of your harvested buckwheat, it’s crucial to dry it thoroughly before storing. Use a food dehydrator or spread the grain in a single layer on a baking sheet and dry it slowly at low temperatures (around 100°F). Once dry, store the buckwheat in airtight containers to maintain its flavor and nutritional value.
Can I use buckwheat as a cover crop during the winter months?
Yes. Buckwheat can be used as an excellent cover crop during the winter months due to its ability to suppress weeds and provide erosion control. Plant the seeds in late fall or early spring, depending on your climate, to take advantage of this benefit.