Germinating cherry seeds can be a fascinating and rewarding experience for gardeners, but it requires some knowledge and patience. With so many varieties to choose from, selecting the right cherry seed is crucial for success. Not all cherry seeds are created equal, and their quality greatly affects the chances of germination.
In this article, we’ll walk you through the process of how to successfully germinate cherry seeds. We’ll cover essential topics such as variety selection, seed quality control, and optimal growing conditions to give your cherry tree the best start in life. Whether you’re a seasoned gardener or a beginner looking to try something new, our comprehensive guide will provide you with the tools and confidence to grow a healthy and productive cherry tree from seed.
Choosing the Right Cherry Variety and Seed Quality
When it comes to successfully germinating cherry seeds, selecting the right variety and high-quality seed is crucial. You’ll want to choose a variety that’s well-suited for your climate and growing conditions.
Selecting a Suitable Cherry Tree for Seed Germination
When selecting a cherry tree for seed germination, it’s essential to choose a variety that is known to produce viable seeds. Some cherry tree varieties are more likely to produce seeds with high germination rates than others. For example, sweet cherries (Prunus avium) and sour cherries (Prunus cerasus) tend to produce viable seeds, whereas ornamental cherry trees may not.
Consider the factors that contribute to a healthy and fertile seed. Look for cherry trees grown from grafted wood, as these are more likely to produce high-quality seeds. Avoid trees that have been treated with chemicals or pesticides, as these can affect seed viability. Also, choose cherry trees from a reputable nursery or supplier that specializes in producing high-quality fruit trees.
To increase your chances of getting viable seeds, consider the specific growing conditions of the tree. Cherry trees grown in areas with full sun and well-drained soil tend to produce more viable seeds than those grown in shady or waterlogged conditions.
Inspecting and Preparing Cherry Seeds for Germination
When inspecting cherry seeds for germination, it’s essential to check their viability first. Hold the seed between your thumb and index finger, and gently squeeze it. A viable seed should have a slight give when pressed, indicating that the embryo is alive. Conversely, a dead or non-viable seed will feel hard and brittle.
Next, remove any debris or pulp from the seed. Use a soft-bristled brush to gently sweep away any visible impurities. Avoid scrubbing too hard, as this can damage the delicate skin of the seed.
To prepare cherry seeds for germination, you’ll need to create an environment that mimics their natural conditions. Start by soaking the seeds in water for 24 hours. This will help soften the outer layer and encourage the embryo to break through. After soaking, drain the water and place the seeds on a paper towel or cloth, allowing them to air-dry for another 24 hours. This step is crucial, as excess moisture can lead to rot and reduce germination rates.
Soaking and Stratification Methods for Enhanced Germination
To take your cherry seed germination to the next level, we’ll explore two key methods: soaking and stratification, which can significantly boost success rates. Let’s dive in!
Water-Soaking Method for Cherry Seed Germination
To enhance germination rates, you can use the water-soaking method for cherry seeds. Begin by soaking 1-2 tablespoons of cherry pits in a glass of lukewarm water (around 70-80°F) for about 24 hours. Ensure the seeds are completely submerged and change the water if it becomes cloudy.
After soaking, place the seeds on a paper towel or cloth, allowing them to air dry for several hours. This step helps prevent fungal growth and promotes even germination. Next, plant the dried seeds about ¼ inch deep in seed starting mix, keeping the soil consistently moist but not waterlogged.
A suitable environment for germination is key – place the container in a spot with indirect sunlight (around 8-12 hours) and maintain temperatures between 65-75°F. Monitor the seeds closely for signs of germination within the first week or two.
Watch out for potential problems like fungal growth, which can be caused by overwatering. If you notice mold or mildew, discard the affected seeds to prevent contamination. With proper care, the water-soaking method can significantly boost your cherry seed’s chances of successful germination.
Cold Stratification for Cherry Seeds: A Detailed Guide
Cold stratification is an essential step for germinating cherry seeds, especially if they’re harvested from mature pods. This process mimics the natural winter chill that these seeds would experience in their wild habitats. To replicate this effect, you’ll need to create a consistent cold temperature, typically between 35°F and 45°F (2°C and 7°C).
For cold stratification, place the cherry seed in a plastic bag or airtight container with some moistened peat moss or vermiculite. Seal it tightly to maintain humidity, but ensure there’s still air circulation within the container. Place this setup in your refrigerator at a consistent temperature between 35°F and 45°F (2°C and 7°C). The stratification period can last anywhere from 30 to 90 days, depending on the seed variety and your location.
During this time, the seed will undergo physiological changes that prepare it for germination. After the stratification period, remove the container from the refrigerator and sow the cherry seed in a pot filled with well-draining soil, usually around 1-2 inches deep. Water gently but thoroughly, and keep the soil consistently moist but not waterlogged.
Preparing the Germination Station: Materials and Setup
To get started, let’s talk materials and setup for your germination station. You’ll need a few specific items to create an optimal environment for cherry seed germination.
Essential Tools and Equipment for Cherry Seed Germination
To successfully germinate cherry seeds, you’ll need some essential tools and equipment. Start by selecting a suitable container for each seed – plastic cups or small pots work well. The container should have drainage holes to prevent waterlogged soil.
Choose a high-quality potting mix specifically designed for seed starting. This type of soil will provide the right balance of nutrients and moisture retention. You’ll also need grow lights, especially if you’re germinating seeds indoors during winter months. LED grow lights are an excellent option as they emit minimal heat and energy-efficient.
Don’t forget a watering can or cup with a long spout for precise water application. This will prevent overwatering, which can be detrimental to the seed’s growth. A thermometer is also crucial to monitor soil temperature, typically between 65°F to 75°F (18°C to 24°C), during the germination process.
Some additional tools you might find useful are a pair of tweezers for gently placing seeds into their designated containers and a clean spray bottle filled with water for maintaining humidity levels. Ensure all equipment is thoroughly cleaned before use to prevent contamination.
Creating an Optimal Environment for Cherry Seed Germination
Creating an optimal environment for cherry seed germination requires careful consideration of light exposure, temperature control, and humidity levels. When it comes to lighting, cherry seeds don’t require direct sunlight but do need a period of cold stratification, typically 30-60 days at temperatures around 35°F (2°C). You can simulate this process by placing the seeds in a refrigerator or an unheated garage.
For optimal germination, maintain a consistent temperature between 65°F to 75°F (18°C to 24°C) once the cold stratification period is complete. This range allows for steady growth and development without shocking the seedlings. To regulate temperature, use a heating mat or a warm location like a sunny windowsill.
Humidity levels should be maintained between 70% to 80%. You can achieve this by covering the container with plastic wrap or placing it in a humidifier-filled room. Keep in mind that overwatering is a common mistake; seeds need moisture but not excess water, which can lead to rot and poor germination rates. Monitor your seedlings closely, ensuring they don’t sit in standing water.
Starting the Germination Process: Planting and Monitoring
Once you have your cherry seeds ready, it’s time to start the germination process by planting them correctly and monitoring their progress to ensure healthy growth. This is where patience comes into play!
Sowing Cherry Seeds: Depth and Spacing Considerations
When sowing cherry seeds, it’s essential to get the depth and spacing just right to ensure healthy germination. As a general rule of thumb, plant cherry seeds about ¼ inch (6-8 mm) deep in a seed starting mix. This allows for even moisture absorption and prevents the seed from drying out.
When it comes to spacing, keep each seed at least 1-2 inches apart. This will prevent overcrowding, which can lead to fungal diseases and make it difficult for the seedlings to grow properly. If you’re planting multiple seeds in a tray or container, use a staggered pattern to maximize space without compromising growth.
Remember that cherry seeds are relatively small, so handle them carefully to avoid damaging the delicate embryo inside. Gently press the soil around each seed to secure it in place, making sure not to compact the soil too much. Keep the soil consistently moist during the germination process, and you should start seeing tiny sprouts emerge within 1-3 weeks.
By following these guidelines for depth and spacing, you’ll be well on your way to successfully sowing cherry seeds and starting a thriving new tree.
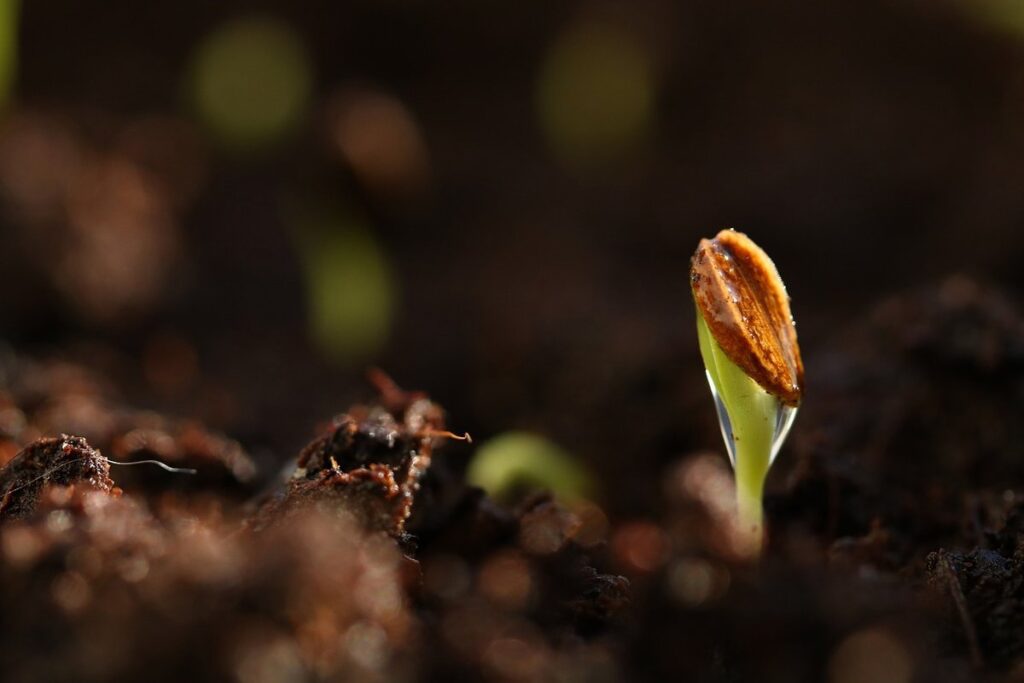
Monitoring Seedlings: Signs of Growth and Common Issues
As you wait for your cherry seedlings to germinate, it’s essential to monitor their progress closely. Look for signs of growth, such as a small white root emerging from the seed or a tiny sprout pushing its way through the soil. This usually happens within 7-10 days after planting.
Some common issues that may arise during this stage include:
• Overwatering: If you notice your seedlings developing soft, mushy stems or roots that are rotting, it’s likely due to too much water.
Corrective action involves reducing watering frequency and ensuring the soil has good drainage.
• Underwatering: Dull or yellowish leaves can indicate insufficient moisture. Increase watering schedule while maintaining a balance with overwatering.
Keep an eye out for pests like fungus gnats or spider mites, which thrive in moist environments. Regularly inspect your seedlings for any signs of infestation and take corrective action promptly.
Regular checks also help prevent nutrient deficiencies. Cherry seedlings require a balanced fertilizer mix to promote healthy growth.
Transferring Seedlings to Individual Pots or a Larger Container
Once your cherry seedling has reached 2-3 inches tall, it’s time to transfer it to individual pots or a larger container to provide more room for growth and development. This process is crucial for continued progress.
When to Transfer Cherry Seedlings from the Germination Station
When transferring cherry seedlings from the germination station to individual pots or larger containers, timing is crucial. Seedlings typically develop their first set of leaves within 1-2 weeks after germination, and this is usually when they need more space to grow.
As a general rule, wait until your seedlings have at least two sets of true leaves before transferring them to individual pots. This ensures that the delicate roots are not disturbed during the transplant process. Make sure the soil in the new container is moist but not waterlogged, and gently place the seedling into its new home.
Some cherry varieties grow faster than others, so keep an eye on your seedlings’ growth rate. For example, some sweet cherry varieties like ‘Bing’ or ‘Rainier’ tend to develop more quickly than sour cherries like ‘Montmorency’. Monitor your seedlings’ progress and transfer them when you notice significant growth in the first 2-3 weeks after germination.
Transitioning Cherry Seedlings to Outdoor Conditions
When transplanting your cherry seedlings to outdoor conditions, it’s essential to take necessary precautions to ensure their survival. One of the most critical steps is acclimating them to direct sunlight. Seedlings grown indoors under grow lights or artificial lighting may not be able to tolerate full sun immediately.
To avoid shocking the seedlings, gradually introduce them to outdoor conditions over a period of 7-10 days. Start by moving them to a shaded area for a few hours a day and gradually increase their exposure to direct sunlight. Monitor your seedlings’ response and adjust the acclimation process as needed.
Another crucial consideration is potential pests or diseases that may be present in your outdoor environment. Inspect your seedlings regularly for signs of infestation, such as white powdery patches (powdery mildew) or tiny holes in the leaves (slugs). Regularly inspect the soil for fungal growth or aphids and treat promptly if necessary.
Keep an eye out for common pests like deer, rabbits, and voles that might view your cherry seedlings as a tasty snack. Consider using repellents or physical barriers to protect your plants until they’re established enough to fend off these threats on their own.
Frequently Asked Questions
Can I use cherry seeds from store-bought cherries for germination?
Yes, but the success rate may be lower due to potential seed degradation during transportation and storage. It’s recommended to purchase high-quality cherry seeds specifically labeled as “viable” or “germinable” for the best results.
How long does it take for a cherry seedling to reach maturity after germination?
The time it takes for a cherry seedling to mature can range from 3-5 years, depending on factors such as climate, soil quality, and specific variety. Regular pruning and care during this period will help promote healthy growth.
What are the benefits of cold stratification over water-soaking methods?
Cold stratification can improve germination rates by simulating natural winter conditions that cherry seeds would normally experience in their native habitat. This method also helps break dormancy and prepares the seed for optimal growth.
Can I grow multiple types of cherry trees from a single batch of seeds?
Yes, but it’s essential to separate the seeds by variety during the germination process to prevent cross-pollination and ensure accurate identification of each tree type. This requires proper record-keeping and labeling of each seedling as it grows.
How do I know if my cherry seedlings are healthy enough for outdoor transfer?
Monitor your seedlings for signs of robust growth, such as sturdy stem development, leaf density, and root establishment. Avoid transferring seedlings that show signs of weakness or disease to prevent setbacks during the transition process.