Are you ready to add a touch of elegance to your garden with one of the most striking flowers around? Foxgloves are a favorite among flower enthusiasts, and for good reason – their tall spikes of delicate bells in shades of pink, purple, and white are a stunning sight. But growing these beauties can be a bit tricky if you don’t know where to start. That’s why we’ve put together this comprehensive guide on how to grow foxgloves, covering everything from selecting the right variety for your climate to troubleshooting common issues that might pop up along the way. In this article, we’ll take you through the step-by-step process of cultivating stunning foxgloves in your garden, so whether you’re a seasoned gardener or just starting out, you’ll be well on your way to enjoying these gorgeous flowers in no time.
Choosing the Right Variety and Growing Conditions
When it comes to growing foxgloves, selecting the right variety and understanding its specific growing conditions is crucial for success. We’ll walk you through these essential factors next.
Understanding Foxglove Types and Varieties
When it comes to growing foxgloves, understanding the different types and varieties can be overwhelming. However, knowing the unique characteristics of each type will help you choose the perfect one for your garden.
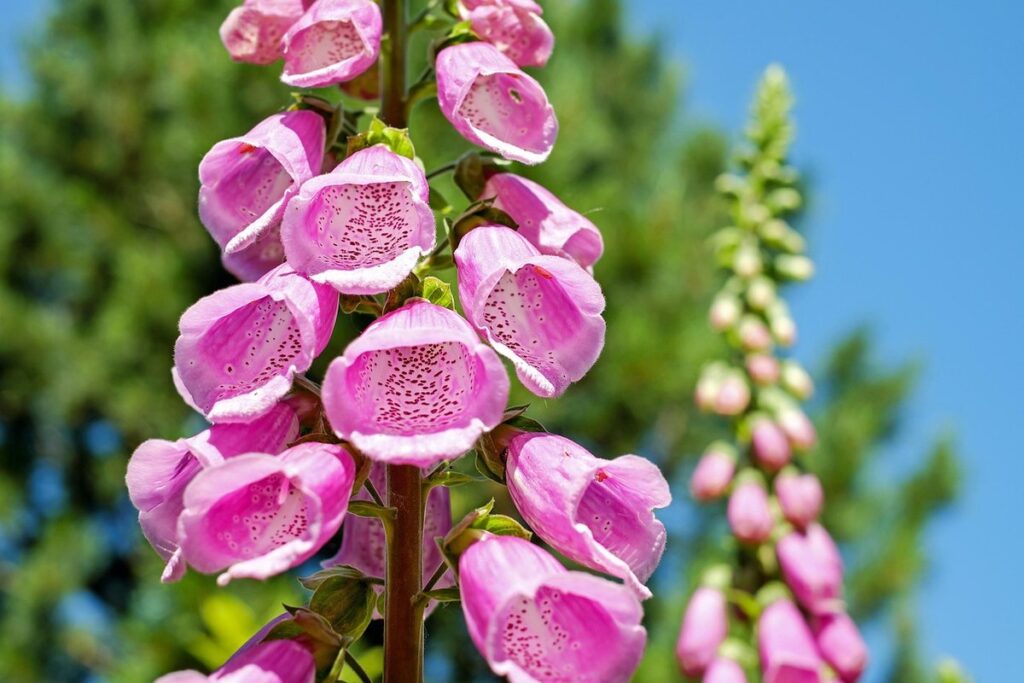
There are several main species of foxglove, including Digitalis purpurea, also known as the common foxglove. This variety is a classic choice, reaching heights of up to 5 feet and producing tall spikes of purple flowers in late spring. It’s a great choice for adding drama to any garden bed.
Another popular variety is Digitalis grandiflora, which is often referred to as the large-leaved foxglove. As its name suggests, it has larger leaves than other varieties and produces even taller spikes of white or pink flowers in mid-summer. This variety is perfect for creating a lush, tropical feel in your garden.
Digitalis x valinii, also known as the hybrid foxglove, is a cross between Digitalis purpurea and Digitalis grandiflora. It combines the best qualities of both parents, producing tall spikes of white or pink flowers with large, velvety leaves. This variety is great for adding a touch of elegance to your garden.
When choosing a foxglove variety, consider factors such as growth habits, flowering times, and maintenance needs. Some varieties are more drought-tolerant than others, while some require staking to prevent them from toppling over in the wind. By selecting the right variety for your specific climate and conditions, you’ll be well on your way to growing beautiful foxgloves that will thrive in your garden.
Selecting a Suitable Location for Your Foxglove
When selecting a location for your foxglove, it’s essential to consider the climate, soil type, and sunlight exposure. Foxgloves prefer well-drained soil that is rich in organic matter, so choose a spot with a mix of sand and loam or add compost to improve drainage.
If you live in USDA zones 4-6, where frost can be a concern, look for a location that receives morning sun and afternoon shade. This will help protect the plants from harsh midday sun and prevent damage from frost. In warmer climates (USDA zones 7-9), foxgloves can tolerate full sun but still require some shade during the hottest part of the day.
Check your soil’s pH level before planting, as foxgloves prefer slightly acidic to neutral conditions (pH 6.0-7.0). If your soil is alkaline or heavy clay, consider amending it with acidic compost or perlite to improve drainage and fertility.
Ultimately, choose a location that provides the right balance of sunlight, water, and nutrients for your foxgloves to thrive.
Planting Foxgloves from Seed or Division
When it comes to propagating foxgloves, you have two main options: sowing seeds directly into the ground or dividing established plants. Let’s take a closer look at both methods.
Starting Foxgloves from Seeds
Starting foxglove seeds indoors 6-8 weeks before the last frost date allows for earlier blooms and a head start on the growing season. Sow seeds 1/4 inch deep and 2-3 inches apart in seed trays filled with well-draining seed starting mix. Keep the soil consistently moist, but not waterlogged, as this can lead to rot and poor germination.
For direct sowing in the garden, choose a location with full sun and rich, well-draining soil. Sow seeds 1/4 inch deep and 2-3 inches apart, allowing for proper spacing as they grow to be around 2-4 feet tall. Foxglove seeds typically take 7-14 days to germinate, but this can vary depending on factors like temperature and moisture.
To ensure the best possible germination rate, maintain a consistent soil temperature between 65-75°F (18-24°C). Avoid overwatering, as this can lead to poor germination or seed rot. Keep the soil lightly covered with a thin layer of vermiculite or fine grit to prevent washing away during watering. By following these guidelines, you’ll be well on your way to successfully starting foxglove seeds and enjoying these beautiful plants in your garden.
Dividing Established Foxgloves for Propagation
Dividing established foxglove plants is an excellent way to propagate them and share with friends or expand your garden. When to divide foxgloves depends on their growth cycle. Typically, you should divide them after they have finished blooming in late summer or early fall when the foliage has begun to die back.
To prepare for division, dig up the entire plant, including as much of its root system as possible. Gently wash away excess soil to inspect the roots and identify any dead or damaged areas. Cut these off using a sharp, sterile tool, taking care not to damage any healthy tissue.
Next, choose sections with at least two growing points (where leaves meet the stem) to ensure each division can regrow into a new plant. Replant the divisions in well-draining soil with their roots spread out evenly and water them thoroughly. Keep the soil consistently moist during the first few weeks after replanting, and then gradually reduce watering as the plants establish themselves. With proper care, your divided foxglove plants will soon be producing beautiful blooms.
Care and Maintenance of Foxgloves
To keep your foxglove plants thriving, you’ll need to follow a few essential care and maintenance tips that will help prevent problems like overcrowding and pest infestations.
Watering and Mulching Foxgloves
Watering and mulching are crucial aspects of foxglove care that often get overlooked. However, providing your foxgloves with adequate water and a layer of protective mulch can make all the difference between a mediocre bloom and a stunning display of flowers.
When it comes to watering, it’s essential to strike a balance between keeping the soil consistently moist and avoiding overwatering, which can lead to root rot. Aim to water your foxgloves deeply once or twice a week during the growing season (spring-fall), depending on weather conditions. Check the soil moisture by inserting your finger into the soil up to the first knuckle – if it feels dry, it’s time for another drink.
As for mulching, apply a 2-3 inch layer of organic material like wood chips, bark, or straw around the base of your foxgloves. This will help retain moisture in the soil, suppress weeds that compete with your plants for water and nutrients, and regulate soil temperature to promote healthy growth. Keep the mulch layer away from the crown of the plant (where the stem meets the roots) to prevent rot.
Fertilizing and Deadheading Foxgloves
When it comes to fertilizing foxgloves, you’ll want to use a balanced fertilizer that’s rich in phosphorus to promote healthy root development and blooming. A 10-20-10 NPK (nitrogen-phosphorus-potassium) ratio is ideal for foxgloves. You can apply a granular fertilizer around the base of the plant in early spring, following the manufacturer’s instructions for application rates.
Deadheading spent flowers is also essential to encourage repeat blooming and prevent seed production, which can be a signal for the plant to focus its energy on producing seeds rather than new growth. To deadhead, simply snip off the faded flower spike at the base of the stem using scissors or pinch it off by hand. This will direct the plant’s energy towards producing more blooms.
Make sure to remove any dead or dying foliage from around the base of the plant as well to prevent disease and pests from taking hold. By fertilizing and deadheading your foxgloves regularly, you’ll be rewarded with a continuous display of stunning spikes in shades of pink, purple, white, and bi-colored.
Common Problems and Pests Affecting Foxgloves
As you tend to your foxglove plants, be aware of potential issues that can arise, such as pests like slugs and snails, which love their tender leaves. Learn how to identify and address these problems early on.
Dealing with Pests and Diseases
When it comes to growing foxgloves, one of the biggest challenges gardeners face is dealing with pests and diseases. Foxgloves are susceptible to several common issues that can affect their health and appearance.
One of the most significant threats to foxgloves is slugs and snails. These slimy creatures love to feast on the tender leaves and stems of foxgloves, especially at night. To combat this issue, consider using copper tape around the base of the plants or placing crushed eggshells near the soil surface to deter them.
Powdery mildew and leaf spot are also common problems affecting foxgloves. Powdery mildew appears as a white, powdery coating on the leaves, while leaf spot causes small, circular spots with dark edges. To prevent these issues, ensure good air circulation around your plants and water them at soil level to avoid wetting the leaves.
Regularly inspecting your foxgloves for signs of pests or diseases will help you catch problems early, making it easier to take action and protect your plants.
Preventative Measures and Organic Controls
To prevent infestations and infections that can harm your foxglove plants, it’s essential to take preventative measures from the outset. One of the most significant threats to foxgloves is slugs and snails, which can cause severe damage to the leaves and flowers. To control these pests organically, try using copper tape around the base of the plant or crushed eggshells nearby – both are known deterrents that can be effective. Additionally, hand-picking and disposing of any unwanted visitors at night, when they’re most active, can also help.
Regularly inspecting your plants for signs of infection or infestation is crucial, too. Keep an eye out for yellowing leaves, black spots, or powdery mildew – these are often indicative of fungal diseases that can spread quickly if not addressed promptly. If you notice any issues, treat the affected area with a fungicide specifically designed to combat foxglove-specific diseases. Furthermore, maintaining good garden hygiene by removing weeds and debris nearby will also help prevent pest and disease buildup.
Encouraging Blooming and Propagation
To encourage those beautiful spikes of tubular bells, you’ll want to focus on providing optimal growing conditions for your foxgloves and learning how to propagate them effectively.
Tips for Promoting Blooms in Foxgloves
To promote blooming in foxgloves, it’s essential to understand their natural growth habits. Foxgloves are biennials, meaning they typically take two years to complete their life cycle. In the first year, they focus on developing a robust root system and foliage, while in the second year, they produce flowers.
To encourage blooming, deadheading is crucial. Remove spent flower stalks as soon as possible after they’ve finished blooming to direct the plant’s energy towards producing new flowers. This technique helps prevent seed production, which can weaken the plant and reduce flowering.
Pruning also plays a significant role in promoting blooms. After the initial bloom period, trim back the flowering stems to about one-third of their height. This will help control the plant’s size and encourage side shoots to develop, leading to more flowers.
Adjusting growing conditions can also impact blooming. Ensure that your foxgloves receive full sun to partial shade and well-draining soil rich in organic matter. Avoid over-fertilizing, as this can promote foliage growth at the expense of flowering. By following these tips, you’ll be well on your way to enjoying an abundance of beautiful blooms from your foxglove plants.
Propagating Foxgloves through Seeds or Cuttings
Propagating foxgloves can be done through seeds or cuttings, offering gardeners a choice of methods to share these beautiful plants with friends and family. For those who prefer to start from scratch, sowing seeds indoors 6-8 weeks before the last frost is an ideal approach.
To begin, obtain high-quality seeds specifically bred for your region’s climate. Sow them about 1/4 inch deep in a seed tray filled with well-draining potting mix. Keep the soil consistently moist and provide adequate light. Transplant seedlings outdoors when they have 2-3 sets of leaves, spacing them 12-18 inches apart.
Cuttings are another viable option for propagation, typically taken during late spring or early summer after the plant has finished blooming. Select healthy stems with plenty of nodes, cut them just above a leaf node using a sharp knife or pruning tool. Remove lower leaves and trim any weak growth to encourage new roots development. Dip the cut ends in rooting hormone powder before planting them 1-2 inches deep in moistened potting mix. Water thoroughly and maintain humidity while awaiting root establishment, usually taking several weeks.
Harvesting and Preserving Foxglove Blooms
Now that your foxgloves are blooming beautifully, learn how to harvest their stunning flowers at the peak of freshness and preserve them for a long-lasting display. This section covers simple techniques for capturing their beauty year-round.
Cutting and Arranging Foxgloves for Fresh Use
Cutting and arranging fresh foxglove blooms is an art that requires some finesse, but with these simple steps, you’ll be creating stunning floral arrangements in no time. When cutting the stems of your foxgloves, make sure to use a sharp knife or pruning shears to avoid crushing the delicate stems.
To prepare your foxgloves for arrangement, remove any leaves that will be below the waterline in your vase. This is crucial for preventing bacterial growth and keeping your blooms fresh for longer. Next, trim the stem at an angle to help the flower absorb water better.
For a show-stopping arrangement, consider grouping your cut foxgloves together in odd numbers, using a mix of tall and short stems to create visual interest. You can also add some greenery like ferns or baby’s breath to fill out the space between the flowers.
Some popular ways to arrange fresh foxgloves include placing them in a single vase as a statement piece, or creating a lush bouquet by combining them with other blooms. With their delicate white or purple hue and statuesque stems, foxglove blooms add an ethereal touch to any arrangement.
Drying and Storing Foxglove Flowers for Later Use
Drying and storing foxglove flowers is an essential step to preserve their beauty for later use. With proper drying and storage methods, you can enjoy your lovely blooms even after they’ve faded. There are several ways to dry foxglove flowers, each with its own advantages.
Air-drying is a simple and cost-effective method that involves tying the stems of the flowers in small bunches and hanging them upside down in a warm, dry place with good air circulation. This method can take up to two weeks to complete, depending on the humidity level in your area. Silica gel drying is another popular method that uses silica gel to absorb moisture from the flowers. Simply place the flowers in an airtight container with silica gel and seal it for 24-48 hours.
For a more efficient method, consider using press drying, which involves placing the flowers between sheets of paper towels or blotting paper and weighing them down under heavy books. This method can dry the flowers in as little as 24 hours. Regardless of the method you choose, make sure to store the dried flowers in airtight containers to preserve their color and texture.
Conclusion: Enjoying Your Beautiful Foxgloves
Now that you’ve successfully grown your foxgloves, it’s time to enjoy their beauty and fragrance. Here are a few tips on how to maximize their display and care for them over the seasons.
Tips for Long-Term Care and Maintenance
As you’ve successfully grown and established your foxglove plants, it’s essential to continue providing them with proper care and maintenance for long-term health and beauty. With regular attention, these stunning plants will reward you with year-after-year blooms.
To ensure your foxgloves thrive, remove spent flower spikes after they’ve faded to encourage a second bloom and prevent seed production. This process also helps direct energy towards foliage development, resulting in robust stems and leaves.
Consider deadheading regularly to keep the plant looking tidy and promote new growth. Prune back overgrown or leggy stems by one-third to maintain a balanced appearance. Water your foxgloves consistently, but avoid overwatering, which can lead to root rot and other issues.
By following these simple care tips, you’ll be able to enjoy the beautiful blooms of your foxgloves for years to come. Remember to monitor their growth and adjust your maintenance routine accordingly to accommodate changing weather conditions and plant requirements.
Encouragement to Share Experiences and Ask Questions
We’ve reached the end of our comprehensive foxglove growing guide, and we hope you’ve found it informative and helpful. As you continue to nurture your beautiful foxgloves, we’d love to hear about your experiences! Whether you’re a seasoned gardener or just starting out, sharing your successes and challenges can be incredibly valuable for all of us.
If you’ve had trouble with pests or diseases, or if you’ve discovered a new favorite variety, please share it in the comments below. Your fellow foxglove enthusiasts will appreciate your insights and advice. Don’t worry about asking “dumb” questions either – we’re here to help and want to support you every step of the way.
What’s been working well for you? Have you tried any innovative techniques or products that have taken your foxglove game to the next level? Share your tips and tricks with us! We’d also love to hear about any unique challenges you’ve faced while growing foxgloves. Your experiences will help others navigate their own foxglove-growing journeys.
Remember, we’re all in this together – let’s learn from each other and enjoy our beautiful foxgloves to the fullest!
Frequently Asked Questions
How Do I Know When to Expect Blooms from My Foxgloves?
Foxgloves typically bloom around late spring to early summer, but this can vary depending on the specific variety, climate, and growing conditions. Generally, you can expect foxgloves to start blooming when they reach a height of 2-3 feet (60-90 cm), which is usually around 6-12 weeks after planting.
Can I Grow Foxgloves in Containers?
Yes, foxgloves can be grown in containers, but they require well-draining soil and full sun to partial shade. Make sure the container is at least 6-8 inches deep to accommodate the plant’s taproot, and water regularly during the first growing season.
How Do I Prevent Foxgloves from Self-Seeding?
To prevent foxgloves from self-seeding, remove the flower spikes before they produce seeds, or deadhead them immediately after blooming. You can also divide and replant established foxgloves every 3-4 years to maintain their vigor and prevent seed production.
Can I Grow Foxgloves in Shaded Areas?
While foxgloves prefer full sun to partial shade, they can tolerate shaded areas, especially in warmer climates. However, growth may be stunted, and blooming might be less prolific. Consider supplementing with additional light sources or moving the plants to a brighter location.
How Do I Handle Common Pests Like Slugs and Snails on My Foxgloves?
Yes. To handle common pests like slugs and snails on your foxgloves, use organic controls such as copper tape around the plant stems, crushed eggshells or sharp gravel near the base, or hand-picking at dawn when they’re most active. Regularly inspecting your plants and using preventative measures can also help minimize damage.