Echeveria succulents are undeniably one of the most beautiful additions to any indoor garden, but their delicate nature can be intimidating for new plant enthusiasts. One of the biggest challenges home growers face is propagating Echeverias successfully, which is essential for sharing plants with friends or creating more space in your collection. Propagation is a crucial step in ensuring healthy growth and preventing common issues like overwatering or under-watering.
In this article, we’ll dive into comprehensive techniques on how to propagate Echeveria leaf and stem cuttings at home. From preparing the cutting site to providing optimal growing conditions, we’ll cover everything you need to know to achieve success with your propagation efforts. By following these simple yet effective methods, you can multiply your beloved succulents and enjoy a thriving indoor garden without worrying about the technicalities of plant reproduction.
The Importance of Propagating Echeveria
Now that you’ve learned how to propagate echeverias, it’s essential to understand why doing so is crucial for these beautiful plants’ survival and your own enjoyment of them. This is where their importance truly shines through.
Why Echeveria Are Popular for Propagation
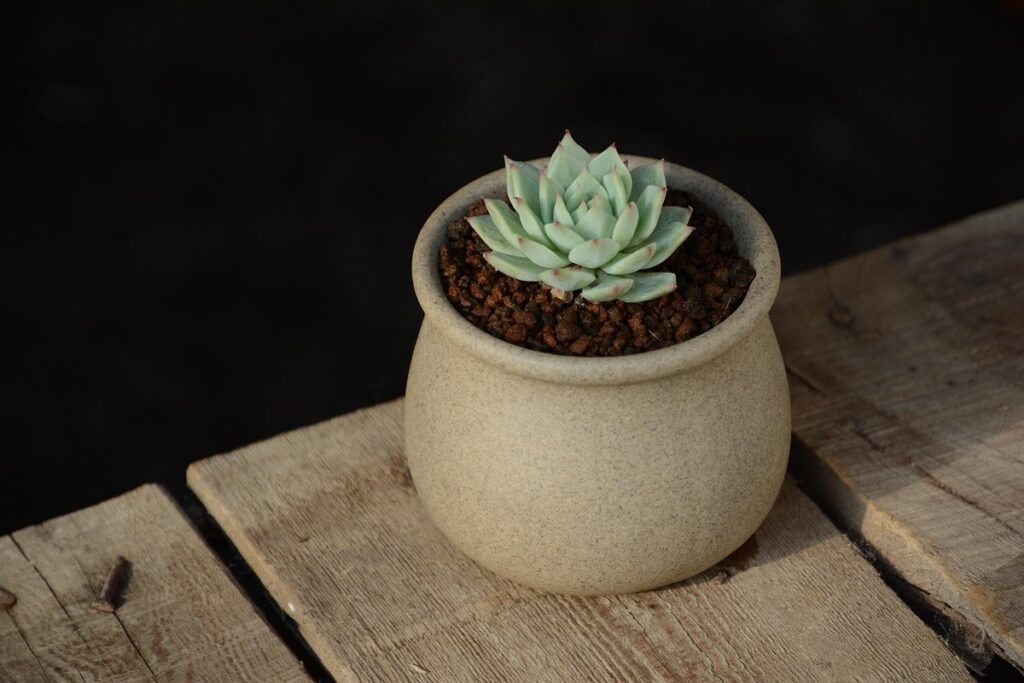
One of the main reasons echeveria are popular among succulent enthusiasts is their unique appearance. Their striking shapes, colors, and patterns make them stand out from other types of succulents. Many varieties have beautiful rosettes with vibrant hues that add a touch of elegance to any space. This visual appeal makes them an attractive choice for propagation.
Another reason echeveria are ideal for propagation is their relatively low maintenance requirements. They can thrive in a variety of conditions, from full sun to partial shade, and can adapt to different soil types. This flexibility allows growers to experiment with various methods and environments when propagating echeveria. In contrast to more demanding succulent species, echeveria are forgiving if you accidentally overwater or underwater them.
Their ease of propagation is also a significant factor in their popularity. Echeveria can be easily reproduced through leaf cuttings, offsets, or division. With just a few simple steps and minimal equipment, growers can multiply these beautiful plants and share them with friends or expand their own collection.
Basic Requirements for Successful Propagation
For successful echeveria propagation, there are several basic requirements that must be met. First and foremost, light is essential for healthy growth and development of new plants. Echeverias require bright, indirect light to photosynthesize and thrive, but direct sunlight can scorch their delicate leaves. A south-facing window or a grow light with a lower intensity setting is ideal.
Temperature also plays a crucial role in echeveria propagation. These plants prefer warmer temperatures between 65°F to 75°F (18°C to 24°C) during the day and slightly cooler temperatures at night. Avoid placing your echeverias near drafty windows, air conditioning vents, or heating radiators.
Watering is another critical aspect of successful propagation. Echeverias are succulents, so they prefer well-draining soil that can dry out slightly between waterings. Water them sparingly, allowing the top inch of soil to dry out before giving them a thorough soaking. A good rule of thumb is to water only when the leaves start to plump up with moisture.
Lastly, use a high-quality potting mix specifically designed for cacti and succulents. This type of mix will help prevent root rot by allowing excess water to drain quickly through the soil.
Types of Echeveria Propagation Methods
Echeveria enthusiasts, you’re probably eager to learn more about spreading the love for these beautiful plants. Let’s dive into the different types of echeveria propagation methods that’ll help you grow new ones!
Leaf Cuttings: The Most Common Method
Leaf cuttings are one of the most common methods for propagating echeveria, and with good reason – they’re relatively easy to do and can be successful with minimal equipment. To get started, choose a healthy leaf from an established echeveria plant, ideally one that’s around 4-6 inches long. Cut the leaf about an inch below the node (where the leaf meets the stem), making sure each cut is clean and smooth.
Next, prepare a propagation tray or pot filled with a well-draining mix specifically designed for cacti and succulents. Dip the cut end of the echeveria leaf into rooting hormone powder or liquid to promote root growth, then gently plant it in the medium, burying about half of the leaf. Water sparingly until roots develop – this can take anywhere from 2-6 weeks.
For optimal results, provide bright, indirect light and maintain temperatures between 65-75°F (18-24°C). Avoid overwatering, which can lead to root rot. With proper care, your echeveria leaf cutting should develop a robust root system in no time, allowing you to transfer it to individual pots once established.
Stem Cuttings: A Less Common but Effective Method
If you’re looking for an alternative to leaf propagation or want to accelerate the process of multiplying your Echeveria collection, stem cuttings can be a viable and effective option. This method involves taking cuttings from mature stems, typically during the spring or summer months when the plant is actively growing.
To take stem cuttings, start by selecting healthy, upright stems with at least two sets of leaves. Using a sharp, clean tool, cut the stem just below a node (where a leaf meets the stem) to create a cutting that’s around 3-4 inches long. Make sure each cutting has at least one “eye” or bud on it, as this is essential for rooting.
Once you’ve taken your stem cuttings, prepare them by removing lower leaves and dipping the cut end in a rooting hormone powder or liquid. This will help stimulate root growth and increase the chances of successful propagation. Place the cuttings in a well-draining potting mix, keeping them warm (around 70-80°F) and moist but not waterlogged. It may take several weeks for roots to develop, after which you can transfer the new plants to individual pots. With proper care, your stem-cutting propagated Echeveria should thrive and produce new offsets in due time.
Propagation Techniques for Specific Echeveria Species
If you’re looking to learn more about specific echeveria species, we’ll dive into the propagation techniques tailored to their unique needs in this next section. From offsets to leaf cuttings, each method has its own benefits and challenges.
Tips and Tricks for Popular Varieties
When it comes to propagating popular Echeveria varieties, there are some key considerations to keep in mind. Let’s take a closer look at some of the most sought-after species and share our expert knowledge on how to successfully propagate them.
For Echeveria ‘Perle von Nürnberg’, a hybrid known for its stunning powdery blue leaves, special care must be taken when removing offsets. These delicate offsets can break easily if handled roughly, so it’s essential to gently twist and pull them from the mother plant. This variety also tends to produce fewer offsets than others, making each one a valuable prize.
Another popular variety is Echeveria ‘Black Prince’, which boasts dark, almost black leaves with powdery silver markings. To propagate this gem, make sure to use the right soil mix – a well-draining potting mix specifically designed for cacti and succulents will help prevent root rot and ensure healthy growth.
When propagating Echeveria ‘Dondo’, keep in mind that it can be more finicky than other varieties. This variety tends to produce smaller offsets, which can lead to over-watering issues if not monitored closely. To avoid this problem, use a propagation tray with individual cells to control the amount of water each offset receives.
For Echeveria ‘Lola’, consider using a rooting hormone gel or powder when propagating. This will give your new plant an extra boost and increase the chances of successful growth.
When in doubt, it’s always best to research specific tips for your particular variety or consult with experienced growers within online communities or forums dedicated to succulent propagation.
Preparing Your Plant for Propagation: Health Checks
Before you can propagate your echeveria, it’s crucial to give your plant a thorough health check to ensure it’s strong and resilient enough to produce healthy offsets. Check for any signs of pests, diseases, or nutrient deficiencies that could compromise the propagation process.
Identifying Healthy Material for Cuttings
When selecting plant material for cuttings, it’s essential to choose healthy sections of your echeveria. This will increase the chances of successful propagation and reduce the risk of disease transmission. So, how do you identify healthy material?
Start by inspecting the leaves and stems of your echeveria. Look for any signs of stress or disease, such as yellowing or browning leaves, black spots, or powdery mildew. Healthy echeverias typically have firm, plump leaves with a vibrant green color. Avoid sections with visible pests like mealybugs, spider mites, or scale.
Another crucial factor is the plant’s overall vigor. Choose sections with robust growth and plenty of new buds forming at the tips of the stems. This indicates that the plant is healthy enough to produce new roots and shoots after propagation.
To prepare your echeveria for cuttings, make sure the selected section is free from any debris or damage. Gently wipe the leaves with a soft brush or cloth to remove any dirt or pests. This will also help to prevent the spread of disease during propagation.
It’s worth noting that some echeverias may exhibit discoloration due to environmental factors like high temperatures, low light, or overwatering. If you notice this type of damage, it’s best to wait until the plant recovers before taking cuttings.
When in doubt, it’s always better to err on the side of caution and choose a healthier section of your echeveria for propagation. This will ensure that your new plants receive the best possible start in life and increase their chances of success.
Troubleshooting Common Issues in Echeveria Propagation
Don’t worry, propagation problems happen to the best of us! In this next section, we’ll tackle common issues that can arise during echeveria propagation and provide practical solutions.
Addressing Root Rot and Other Problems
Even with proper technique and care, problems can arise when propagating Echeveria. One of the most common issues is root rot, which occurs when the roots are consistently waterlogged and start to decay. This can happen if you’re overwatering your cutting or if it’s sitting in a saucer filled with water.
To address root rot, remove the affected plant from its pot immediately and gently wash away any remaining soil. Cut back any soft, mushy roots with sterile scissors, making sure to disinfect them between cuts. Then, repot the Echeveria in fresh, well-draining soil and reduce watering frequency for a few weeks.
Another common problem is overwatering, which can be caused by too much moisture in the air or inconsistent potting mix. To prevent this, ensure that your pot has good drainage holes and that you’re using a well-draining potting mix specifically designed for cacti and succulents. Water sparingly but thoroughly, allowing the soil to dry out slightly between waterings.
Conversely, some Echeveria cuttings may not receive enough water, resulting in under-watering. If you notice this issue, increase watering frequency but be careful not to overdo it. Monitor your plant’s response and adjust as needed.
Preventing future occurrences of root rot and other problems requires attention to detail and a willingness to adapt to changing conditions. Keep an eye on temperature fluctuations, humidity levels, and the specific needs of each Echeveria variety you’re propagating. Regularly inspect your plants for signs of stress or disease and address them promptly.
When it comes to Echeveria propagation, patience and observation are key. Even with mistakes, many problems can be corrected with proper care and attention.
Post-Propagation Care for Echeveria Younglings
Now that you’ve successfully propagated your echeveria babies, it’s time to focus on their post-propagation care and help them thrive into healthy, stunning adults. This section will walk you through the essential steps to ensure a smooth transition for your younglings.
Nurturing Newly Propagated Plants
The newly propagated echeveria younglings are finally starting to grow, and it’s essential to provide them with optimal care to promote healthy growth. After all the excitement of successful propagation, it’s easy to get carried away and neglect their needs.
First and foremost, watering is crucial during this stage. Echeverias prefer well-draining soil, so make sure your younglings are not sitting in waterlogged soil. Water them sparingly, allowing the top inch of soil to dry out between waterings. A good rule of thumb is to water every 7-10 days during the spring and summer months when they’re actively growing.
Fertilization is also vital for promoting healthy growth. Use a balanced, water-soluble fertilizer (20-20-20) at half the recommended strength to avoid burning the roots. Feed your echeveria younglings once a month, but only if their potting mix is well-draining and you’re not overwatering.
Pruning is another essential aspect of post-propagation care. Remove any weak or damaged leaves, as they can drain energy from the rest of the plant. This will also help maintain the echeveria’s natural shape and encourage new growth.
As for repotting, wait until your younglings have outgrown their containers (usually after 6-12 months). Choose a pot that is only slightly larger than the previous one to prevent the soil from becoming too wet.
Remember, patience is key when caring for newly propagated echeveria. Keep an eye on your plants’ specific needs and adjust your care routine accordingly. With proper attention, your younglings will flourish into beautiful, robust echeverias in no time.
Conclusion: Tips for Successful Echeveria Propagation
Now that you’ve mastered the art of echeveria propagation, let’s recap some valuable tips to ensure your new babies thrive and bring joy to your space for years to come.
Recap of Key Points and Final Advice
As we wrap up our comprehensive guide to echeveria propagation, let’s recap the key points and essential tips you’ve learned throughout this journey. By now, you’re equipped with the knowledge to successfully propagate these beautiful succulents, but it’s essential to remember a few crucial things.
Firstly, understanding the different propagation methods is vital for your success. You’ve learned that leaf and stem cuttings are excellent ways to propagate echeveria, while division of mature plants can be an effective method too. Don’t forget the importance of using sterile tools and a clean environment to prevent any contamination or infection.
Another critical aspect we covered was health checks and troubleshooting common issues. Make sure you keep an eye on your propagated plants’ temperature, humidity, and light requirements to ensure they’re happy and thriving. If you encounter problems like rotting roots, yellowing leaves, or pests, don’t hesitate to take action promptly.
In addition to the propagation process itself, post-propagation care is equally important for the long-term health of your echeveria plants. Provide them with a well-draining potting mix, infrequent but thorough watering, and sufficient light. Fertilizing during the growing season will also help promote healthy growth and vibrant colors.
To ensure you’re on the right track, remember to monitor your propagated plants’ progress regularly and adjust their care accordingly. Don’t be afraid to experiment with different methods or environments to find what works best for you and your echeveria babies.
Lastly, propagation is not a one-time task; it’s an ongoing process that requires patience, persistence, and attention to detail. With practice, you’ll become more confident in your abilities, and your echeveria collection will grow exponentially. Keep propagating, experimenting, and learning – the possibilities are endless!
Frequently Asked Questions
How Long Does it Take for Echeveria Leaf Cuttings to Root?
It typically takes around 2-6 weeks for Echeveria leaf cuttings to develop roots, but this timeframe can vary depending on the environment and species. To speed up the process, make sure the soil is consistently moist but not waterlogged.
Can I Propagate Echeveria from a Single Leaf or Must I Use Multiple?
While it’s possible to propagate Echeveria from a single leaf, using multiple leaves or stems increases the chances of successful propagation and produces more robust plants. However, if you only have one viable leaf, go ahead and try propagating it – it might just surprise you with success!
How Do I Know If an Echeveria Cutting Has Successfully Rooted?
Check for signs like new growth, a slight increase in size, or the appearance of tiny white roots. You can also gently remove the cutting from its pot to inspect the root system. Be patient, as some species may take longer than others to develop noticeable roots.
What’s the Best Time to Propagate Echeveria for Optimal Growth?
The ideal time for propagating Echeveria depends on the species and your location. Generally, spring and summer months with plenty of sunlight are best for propagation. Avoid propagating during periods of extreme temperatures or low light, as this can negatively impact the cutting’s ability to root.
Can I Propagate Echeveria in Water or Must I Use Soil?
While it’s possible to propagate Echeveria in water (a method known as “water rooting”), soil is generally a more reliable and stable choice. This is because soil provides a consistent moisture level and supports the development of a strong root system, which is essential for healthy plant growth.