If you’re like many gardeners, you’ve probably encountered the pesky carpenter bee at some point. These buzzing critters can be quite annoying, not to mention the potential damage they can cause to your beloved plants and wooden structures. But did you know that you can actually trap them away using a DIY carpenter bee trap? That’s right – with a little creativity and some basic materials, you can create an effective solution for keeping these unwanted visitors at bay.
This article is your comprehensive guide to building and installing a carpenter bee trap in your garden. We’ll walk you through the step-by-step process of creating the trap itself, as well as share essential tips on where to place it and how to maintain its effectiveness over time. With this DIY solution, you can enjoy a pest-free garden while promoting sustainability and environmental awareness – sounds like a win-win to us!
Understanding Carpenter Bees and Their Impact
Carpenter bees are a common pest that can cause significant damage to your garden, but did you know they’re actually beneficial to some plants? In this section, we’ll explore what makes them tick.
What are Carpenter Bees?
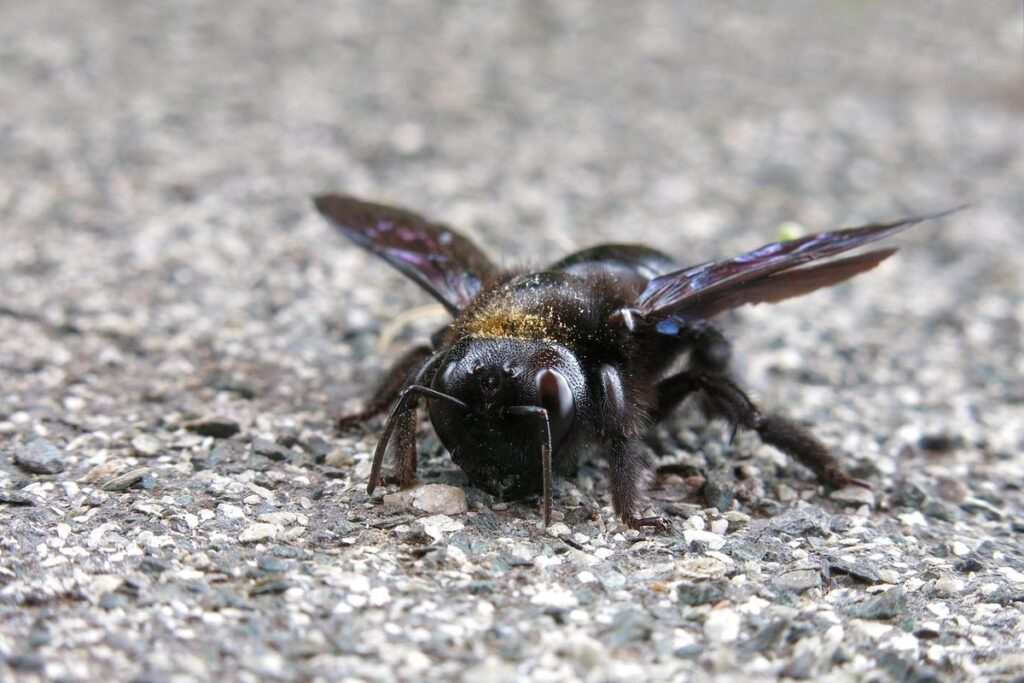
Carpenter bees are large, solitary bees that play a vital role in pollinating gardens and crops. These beneficial insects are often mistaken for their more aggressive cousin, the bumblebee. However, carpenter bees are generally non-aggressive and only become defensive when threatened or provoked.
One of the distinctive features of carpenter bees is their behavior of nesting in wood. Female carpenter bees use their strong jaws to excavate holes in untreated wood, typically around 1-2 inches deep, to lay their eggs and store pollen for their young. This unique behavior allows them to create safe habitats within the wood, protecting themselves from predators.
Despite their potentially damaging nesting habits, carpenter bees are a valuable addition to any garden ecosystem. As important pollinators, they help transfer pollen between flowers, contributing to the reproduction of plants. In fact, studies have shown that carpenter bees are responsible for pollinating over 300 plant species, including many common garden favorites like blueberries and blackberries.
By recognizing the benefits of carpenter bees, you can begin to appreciate their role in your garden’s ecosystem.
Identifying Signs of Carpenter Bee Infestation
If you suspect that carpenter bees have invaded your garden, it’s essential to identify signs of infestation as soon as possible. One of the most obvious indicators is damaged wood, which can be a result of carpenter bee drilling and nesting.
Look for holes with a perfectly round shape, typically between 1/4 inch to 1/2 inch in diameter. These holes are usually smooth on the edges and can be found in various types of wood, including wooden decks, fences, and even trees. Check for multiple holes in close proximity to each other, as carpenter bees often create an entrance hole and one or more nesting cells.
Another sign is sawdust or wood shavings around the affected area. Carpenter bees use their powerful jaws to excavate tunnels, creating a significant amount of debris that can accumulate at the entrance point. If you notice any of these signs, inspect the surrounding areas carefully for additional damage. Keep in mind that carpenter bees typically target undamaged, untreated wood.
If you’re unsure about the extent of the infestation or how to proceed with removal, consider consulting a pest control professional for guidance.
Choosing the Right Materials for Your Trap
When selecting materials for your carpenter bee trap, consider durability and visibility to ensure it blends seamlessly into your garden. Choose a sturdy material that can withstand outdoor conditions.
Selecting the Perfect Wood Type for Your Trap
When it comes to building a carpenter bees trap for your garden, selecting the right type of wood is crucial. The wrong choice can lead to decay, rot, and even damage to your property. Carpenter bees are attracted to certain types of wood, so using the right material will increase their chances of getting caught.
For a DIY carpenter bees trap, it’s recommended to use woods that are resistant to weathering and insect damage. Cedar and redwood are excellent options as they have natural oils that repel insects. You can also consider using pressure-treated pine or fir, but be sure to follow safety guidelines when handling these materials.
Avoid using softwoods like cypress or spruce as they tend to rot quickly and may not hold up well in outdoor conditions. As for hardwoods, oak and maple are good choices, but they might be too dense for the carpenter bees to easily excavate their nests.
When selecting your wood, make sure it’s free of any chemicals or stains that could harm the bees or affect the trap’s performance. A little extra care in choosing the right wood will go a long way in ensuring the success of your DIY carpenter bees trap.
Other Essential Materials Needed for Your Trap
In addition to the materials specifically designed for carpenter bee traps, you’ll need some other essential items to complete your project. Let’s start with a good quality paint that matches the color of your trap and surrounding area. This will help the bees blend in seamlessly, making it easier for them to enter the trap without suspicion.
You’ll also need some type of adhesive, such as silicone or hot glue, to secure any loose parts or attach mesh screens. These are essential components to prevent escape routes and ensure a smooth collection process.
Another crucial item is the mesh itself. You can choose from various types, including aluminum or nylon mesh in different thread counts. Consider using a 1/4 inch mesh size for optimal efficiency. Make sure to cover all openings thoroughly to prevent any unwanted visitors.
Lastly, have some sandpaper on hand to smooth out rough edges and ensure a secure fit of parts together. Remember, the goal is to create an inviting environment that encourages carpenter bees to enter without hesitation.
Designing an Effective DIY Carpenter Bee Trap
To catch carpenter bees without harming them, you’ll need a trap that’s both attractive and easy to build. This section will walk you through designing a successful DIY carpenter bee trap for your garden.
Basic Trap Design Principles
When designing an effective DIY carpenter bee trap, it’s essential to follow basic trap design principles that ensure your device is functional and captures the target insects. One key principle is to create a dark, enclosed space that mimics the carpenter bees’ natural nesting sites. Carpenter bees typically burrow into wood, so your trap should have holes or tubes of varying diameters to accommodate their preferences.
Another crucial aspect is to use the right bait, as carpenter bees are attracted to sweet substances like nectar and pollen. You can fill the trap with a mixture of sugar water and fruit juice or place small amounts of honey on the surface. Avoid using strong-smelling substances that might repel these insects.
To optimize your trap’s effectiveness, consider adding some visual cues. Carpenter bees often prefer traps with a slight curvature or spiral shape, which they find more appealing than straight tubes. Experiment with different designs to see what works best for you and your garden.
Enhancing Your Trap with Add-On Features
To take your DIY carpenter bee trap to the next level, consider adding some strategic features that will increase its effectiveness. One of the simplest and most effective ways to do this is by incorporating lures or attractants. Carpenter bees are attracted to sweet smells and colors, so use this to your advantage.
Try adding a few drops of lemon extract or peppermint oil near the entrance of your trap. These scents mimic the pheromones that carpenter bees use to communicate with each other, making them more likely to enter the trap. You can also try using a mixture of sugar and water as a bait, or even attach a brightly colored ribbon or flag to make the trap stand out.
Remember, it’s all about creating an environment that mimics the natural habitats of carpenter bees. By incorporating these simple features, you’ll be able to capture more of these pesky insects and keep your garden safe from their damage.
Building and Installing Your DIY Carpenter Bee Trap
Now that you have your trap plan, it’s time to build and install it, which we’ll cover next, including tips for securing it in your garden.
Step-by-Step Instructions for Building Your Trap
To build your DIY carpenter bee trap, you’ll need to follow these step-by-step instructions. Start by gathering the necessary materials: a plastic bottle (1-2 liters), some wire mesh (with openings of about 1/4 inch), a hammer, nails, and a drill with a screwdriver attachment.
First, cut the top third off the plastic bottle using scissors or a utility knife. This will serve as the entrance to your trap. Next, cut four pieces of wire mesh to fit around the middle section of the bottle, securing them with wire and a few strategically placed nails. Make sure to leave enough space between each piece for air circulation.
Now, place the bottom third of the bottle back onto the main body, creating a small compartment. Add some bait, such as vegetable oil or tree resin, inside this compartment to attract carpenter bees. Attach the trap to a nearby tree using wire or a screw, making sure it’s at least 5 feet off the ground. Finally, sit back and wait for your unwanted visitors to do their job!
Tips for Placing and Maintaining Your Trap in Your Garden
When placing and maintaining your DIY carpenter bee trap, it’s essential to consider the location and upkeep to ensure its effectiveness. Place the trap in an area where carpenter bees are most active, such as near woodpiles or areas with exposed wood like decks or fences.
Position the trap 3-5 feet off the ground to prevent debris from accumulating and clogging the trap. Also, avoid placing it near water sources or areas prone to moisture, as this can attract other pests.
Regular maintenance is crucial for the trap’s success. Check the trap every week during peak carpenter bee season (May-July) and clean out any captured bees. Replace the bait or lure every 2-3 weeks, as its effectiveness will decrease over time. Use a gentle soap solution to wipe down the trap’s interior after cleaning to prevent attracting other pests.
By following these guidelines, you’ll be able to effectively place and maintain your DIY carpenter bee trap in your garden. This will help you monitor and control the carpenter bee population, protecting your plants from damage.
Common Mistakes to Avoid When Creating a DIY Carpenter Bee Trap
When crafting your own carpenter bee trap, it’s easy to make mistakes that will attract unwanted pests instead of these beneficial bees. This section highlights common errors to steer clear of for a successful DIY project.
Misconceptions About Carpenter Bee Behavior
When it comes to creating an effective DIY carpenter bee trap for your garden, understanding the behavior of these beneficial insects is crucial. However, there are several common misconceptions about carpenter bees that can impact your trap’s effectiveness.
One misconception is that carpenter bees are aggressive and will attack humans in large numbers. While it’s true that male carpenter bees can be territorial, they’re generally not aggressive unless threatened or provoked. In fact, female carpenter bees are responsible for the actual damage to wood structures, as they use their burrowing habits to create holes for nesting.
Another misconception is that carpenter bees only target damaged or rotting wood. While it’s true that carpenter bees prefer softer woods like pine and cedar, they can also infest undamaged wood if it provides a suitable entrance point. This means you don’t need to wait for your wood to become rotten before building a trap – instead, focus on creating an attractive entry point for the bees.
It’s also worth noting that carpenter bees are solitary insects, meaning each female bee has her own nesting site and does not live in colonies like honeybees. This means you can’t expect to trap all of your carpenter bees with a single trap – instead, focus on creating multiple traps placed strategically throughout your garden to increase your chances of success.
Design Flaws That Can Reduce Your Trap’s Performance
When designing your DIY carpenter bee trap, it’s easy to overlook some crucial details that can significantly impact its performance. A well-designed trap should be able to effectively capture and contain carpenter bees without causing harm to the environment or other beneficial insects.
One common design flaw is a poorly sized entrance tunnel. If the tunnel is too narrow, carpenter bees may struggle to enter, while a tunnel that’s too wide can allow other insects to escape with the target species. To avoid this issue, consider using a flexible material like plastic or cardboard for the tunnel, allowing you to adjust its size as needed.
Another mistake is not providing enough space for the captured bees to escape unharmed. Carpenter bees need room to fly around and exercise before being released, so ensure your trap has an adequate “flight area” for them to do so. A good rule of thumb is to include a separate compartment with a mesh or screen for the trapped bees to emerge from.
Keep in mind that carpenter bee traps should be non-toxic and safe for humans and other animals. Avoid using materials like paint, varnish, or glue that can harm these beneficial insects.
Monitoring and Managing Carpenter Bees in Your Garden
To effectively manage carpenter bees, it’s crucial to monitor their activity and behavior in your garden, knowing when to intervene and prevent potential damage. This section will walk you through those essential steps.
How to Monitor Carpenter Bee Activity Without Using a Trap
Monitoring carpenter bee activity without using a trap is definitely possible and can be just as effective. One of the simplest methods is to observe their behavior yourself. By watching your garden regularly, you’ll get a sense of when they’re most active and where they’re nesting. Keep an eye out for the characteristic “buzzing” sound or look for bees hovering around holes in wood.
Another option is to use pheromone traps, which mimic the scent that carpenter bees release to mark their territories. These can be placed strategically around your garden to attract the bees and help you track their activity without harming them. However, keep in mind that these traps won’t capture the actual bees but rather draw them away from your plants.
It’s worth noting that observing and using pheromone traps together can provide a more complete picture of carpenter bee activity in your garden. By combining these methods, you’ll be able to anticipate when they’re likely to appear and prepare accordingly. This is especially helpful if you want to minimize interactions between humans and bees, or simply prefer not to use traps at all.
Integrated Pest Management Strategies for Carpenter Bees
When it comes to managing carpenter bees in your garden, integrated pest management (IPM) strategies are essential for a holistic approach. One effective way to combine physical barriers with trap designs is by implementing a multi-faceted plan that incorporates both deterrents and attractants.
Start by using physical barriers such as screens or fine-mesh netting around plants that carpenter bees frequent, like rose bushes or fruit trees. This will prevent them from accessing the wood to nest in. You can also use plant-based repellents like citronella or lemongrass essential oils to deter them from the area.
In addition to physical barriers, design your traps to attract carpenter bees using UV-reflective colors and pheromone lures that mimic female carpenter bee scents. This will lure them into a trap where they can be humanely removed without harm. For example, you can create a shallow dish filled with sand or wood shavings coated with the pheromone lure to attract males. Place this near areas where you suspect nesting.
By combining these strategies, you’ll be able to manage carpenter bee populations effectively and minimize their impact on your garden. Remember to monitor your traps regularly and adjust your IPM plan as needed based on the effectiveness of each component.
Conclusion and Next Steps
Now that you’ve built your carpenter bee trap, it’s time to wrap up our DIY project and discuss next steps for maintaining a bee-friendly garden. Let’s review what we’ve learned so far.
Recap of Key Takeaways from This Guide
As you’ve reached the end of this comprehensive guide on DIY carpenter bee traps for gardens, let’s recap the key takeaways to help you successfully implement your new knowledge.
You now know the importance of understanding carpenter bees’ behavior and habits, including their preference for wood with moisture content above 20% and their nesting habits. We also discussed the different types of carpenter bee traps, from simple sticky traps to more complex wooden trap designs.
Remember to choose a trap that suits your specific garden needs and preferences, considering factors such as size, material, and ease of use. When setting up your trap, make sure to place it in an area with high carpenter bee activity, ideally near wood sources or flowers that attract them.
Don’t forget to regularly inspect and maintain your trap to ensure its effectiveness and longevity. With these key takeaways in mind, you’ll be well-equipped to create a safe and efficient carpenter bee trap for your garden, protecting your trees and reducing the risk of damage. By following this guide, you’ll be one step closer to enjoying a pest-free and healthy garden.
Additional Resources for Further Learning
If you’re interested in learning more about carpenter bees and how to effectively manage them in your garden, there are several resources available. The Xerces Society is a non-profit organization that provides valuable information on pollinator conservation, including carpenter bee management. Their website offers guides, fact sheets, and research papers on the biology and ecology of carpenter bees.
Additionally, the USDA’s APHIS (Animal and Plant Health Inspection Service) website has a wealth of information on pest management, including carpenter bees. This resource provides guidance on identification, behavior, and control methods for various pests, including carpenter bees.
The National Gardening Association also offers expert advice on managing carpenter bees in gardens through their website and publications. Their articles and guides provide practical tips on how to deter carpenter bees without harming them or using chemicals.
For those who want to dive deeper into the world of entomology, universities such as Cornell University’s Department of Entomology offer online courses and resources on insect biology and ecology. These resources can help you gain a better understanding of carpenter bee behavior and how to manage their populations in your garden.
Frequently Asked Questions
Can I use a carpenter bee trap in areas with high winds or extreme weather conditions?
Yes, but it’s essential to secure the trap properly to prevent it from being blown away or damaged. You can weigh down the trap using rocks or sandbags to ensure its stability.
How long does it take for a carpenter bee trap to become effective after installation?
The effectiveness of a carpenter bee trap can vary depending on several factors, such as the location and number of bees present in your garden. However, with proper placement and maintenance, you can start seeing results within 1-2 weeks.
Can I reuse or recycle materials from an old carpenter bee trap?
Yes, many components of a carpenter bee trap can be reused or recycled. Consider repurposing wooden parts for other DIY projects or reusing the bait container to reduce waste and promote sustainability.
How do I identify if my carpenter bee trap is attracting carpenter bees versus other pollinators?
Check the size and behavior of the insects visiting your trap. Carpenter bees are generally larger than most other pollinators, and they tend to be more aggressive when defending their nests. If you’re unsure, consult with a local gardening expert or entomologist for guidance.
What happens if I notice carpenter bee activity outside of my designated trapping area?
If you notice carpenter bees flying around areas not covered by your trap, it may indicate that they’ve found an alternative nesting site. In this case, consider expanding the trap’s coverage area or using additional traps to ensure a more comprehensive solution.