Are you tired of seeing holes drilled into your wooden garden features, only to find out they’re a result of carpenter bees? These beneficial pollinators may be causing damage to your garden structures, but did you know that attracting them is actually key to promoting healthy growth? By learning how to make and use carpenter bee traps in your garden, you can attract these important pollinators while protecting your property.
In this article, we’ll show you a simple and effective way to create carpenter bee traps using materials readily available at home. We’ll cover the basics of why carpenter bees are beneficial, how to identify them, and most importantly, how to make and use traps that will attract these pollinators to your garden without causing harm. By following our step-by-step guide, you can enjoy a thriving garden while minimizing damage from these unwanted visitors.
Understanding Carpenter Bees and Their Importance
Before we dive into making carpenter bee traps, it’s essential to understand these beneficial pollinators and why they’re a vital part of our ecosystem.
What are Carpenter Bees?
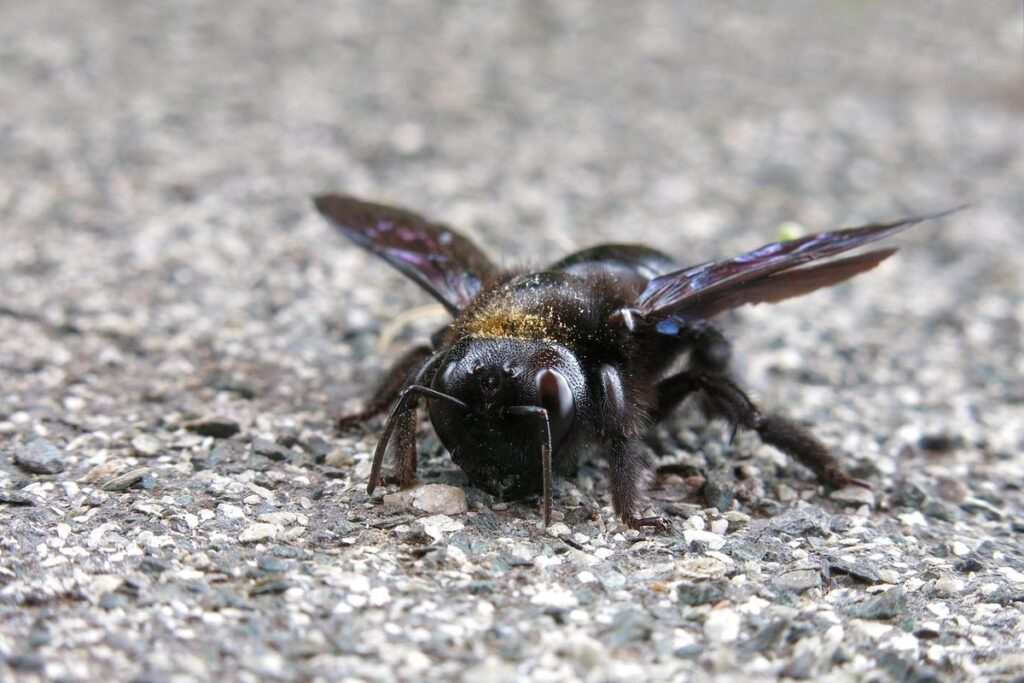
Carpenter bees are large, solitary bees that play a vital role in garden ecosystems. These impressive insects can be identified by their bright colors and distinctive habit of boring holes into wood to make their nests. Males, which lack the stinger, have a shiny black body with bright blue or green highlights, while females are typically dark brown or black.
Despite their intimidating appearance, carpenter bees are beneficial to gardens for several reasons. They’re excellent pollinators, helping to transfer pollen between flowers and facilitating plant reproduction. In fact, studies have shown that carpenter bees can be responsible for up to 25% of a plant’s total pollen collection. Additionally, these bees help control pest populations by preying on aphids, whiteflies, and other garden pests.
One key characteristic of carpenter bees is their non-aggressive nature. They’re generally not interested in stinging humans unless provoked, and are actually quite shy around people. This makes them a great addition to any garden ecosystem. By attracting these beneficial pollinators, gardeners can create a more diverse and thriving environment that requires fewer pesticides and other chemicals.
Benefits of Attracting Carpenter Bees
Attracting carpenter bees to your garden may seem counterintuitive at first, but these beneficial insects offer a multitude of advantages that can boost the health and productivity of your garden. One of the primary benefits is pollination. Carpenter bees are essential pollinators, just like honeybees, and they play a crucial role in transferring pollen between flowers, facilitating seed production.
Moreover, carpenter bees serve as natural pest controllers. They prey on various insects that can harm plants, such as wasps, hornets, and even some species of flies. By attracting carpenter bees to your garden, you’re essentially inviting these beneficial insects to help manage pests naturally. This reduces the need for chemical pesticides and promotes a balanced ecosystem.
To attract carpenter bees, it’s essential to provide them with suitable nesting sites and food sources. Planting flowers that are rich in nectar and pollen is a great starting point. Some examples of such flowers include sunflowers, zinnias, and lavender. By incorporating these plants into your garden design and setting up carpenter bee-friendly habitats, you can reap the rewards of having these beneficial insects on board.
Choosing the Right Materials for Your Trap
When it comes to making a carpenter bee trap, selecting the right materials is crucial for its effectiveness and longevity. You’ll want to choose durable yet lightweight materials that are easy to work with and maintain.
Selecting a Suitable Wooden Component
When selecting a suitable wooden component for your carpenter bee trap, it’s essential to consider durability and cost factors. Softwoods like pine and spruce are affordable options but tend to rot quickly, making them less suitable for outdoor use.
On the other hand, hardwoods such as cedar, cypress, and redwood are more durable and resistant to decay, but they can be pricier. Cedar is a popular choice due to its natural resistance to insects and moisture. It’s also aromatic, which helps deter carpenter bees from nesting in it.
Consider using reclaimed or sustainably sourced wood for your trap to reduce costs while still maintaining durability. If you’re on a tighter budget, you can opt for pressure-treated pine, but be sure to follow safety guidelines when handling treated lumber.
When choosing the right wood, also think about the shape and size of the components needed. For example, if you’re making a tube-style trap, you’ll need straight-grained wood with minimal knots to ensure easy drilling.
Other Essential Materials Needed
In addition to the main trap components, you’ll also need some other essential materials to complete and enhance your carpenter bee trap. One crucial item is wax, which will be used to coat the inner surface of the trap to prevent the bees from escaping once they’ve entered. You can choose between paraffin or soy wax for this purpose.
You’ll also need some sandpaper to smooth out any rough edges on the trap’s surfaces and ensure that the paint or varnish adheres properly. This will not only make your trap more visually appealing but also extend its lifespan by preventing damage from environmental factors like rain or UV rays.
To add an extra layer of protection and aesthetic appeal, you can apply a coat of paint or varnish to the trap’s exterior. This is where creativity comes in – choose colors that blend with your garden’s theme or complement the surrounding foliage for a more natural look. Make sure to follow the manufacturer’s instructions for application and drying times to ensure a smooth finish.
Finally, don’t forget to have some basic gardening tools on hand, such as a hammer, screwdriver, and measuring tape, to facilitate assembly and installation of your trap.
Designing Your Carpenter Bee Trap
Now that you’ve gathered materials and selected a location for your trap, it’s time to design its structure to lure those carpenter bees in. A well-designed trap will maximize your chances of attracting these beneficial pollinators.
Basic Trap Design Principles
When designing an effective carpenter bee trap, there are several fundamental elements to consider. The entrance size and shape of the trap play a crucial role in attracting and capturing these beneficial pollinators.
The entrance should be large enough for carpenter bees to easily enter but small enough to prevent larger insects or mammals from getting inside. A general rule of thumb is to make the entrance about 1-2 inches (2.5-5 cm) in diameter. This size allows carpenter bees to fly in comfortably, while also ensuring that other pests are excluded.
The shape of the entrance can also impact the trap’s effectiveness. For example, a rectangular entrance may attract more carpenter bees than a circular one. Experiment with different shapes and sizes to find what works best for your garden.
Remember to consider the color and texture of the trap as well. Carpenter bees are attracted to dark colors and rough textures, so incorporating these elements into your design can increase its effectiveness.
Customizing Your Trap: Adding Features and Refinements
Now that you’ve designed and built your carpenter bee trap, it’s time to think about ways to enhance its functionality. One of the most effective ways to do this is by adding a landing platform or surface area for the bees to collect on.
Adding a landing platform can be as simple as attaching a small piece of wood or a metal plate to the bottom of your trap. This will provide a safe spot for the carpenter bees to land and collect before falling into the water collection system. You can also consider adding a slight incline or curve to the surface area, which can help guide the bees towards the water.
Another feature you might want to consider is incorporating a water collection system. This can be as simple as attaching a small cup or container to the bottom of your trap, but you may also want to add some kind of funnel or gutter to direct the water into the collection area. By doing so, you’ll not only make it easier to harvest the bees, but also create a more efficient and low-maintenance system.
Building Your Carpenter Bee Trap Step-by-Step
To build a carpenter bee trap, follow these essential steps: first prepare your materials and tools, then assemble the trap according to our instructions.
Preparing the Wooden Component
Before you start constructing your carpenter bee trap, it’s essential to prepare the wooden piece that will serve as its foundation. This involves cutting and shaping the wood into a suitable form for the trap’s design.
Begin by selecting a piece of untreated wood, such as cedar or cypress, which is naturally resistant to rot and insects. For this project, you’ll need a rectangular piece of wood measuring about 6-8 inches long and 4-6 inches wide. Cut the wood using a saw, taking care to smooth out any rough edges.
Next, drill three small holes at regular intervals along one edge of the wooden piece. These holes will serve as the entrance points for the carpenter bees. Be sure to space them about 1 inch apart to allow for easy entry and exit. You can also add a few small grooves or notches around the edges of the wood to provide additional grip for the bees.
Remember, it’s crucial to keep your wooden piece free from any debris or moisture that might compromise its stability or attract unwanted pests. With these basic preparations in place, you’re ready to move on to assembling and constructing your carpenter bee trap.
Assembling the Trap Components
Now that you have all the necessary parts for your carpenter bee trap, it’s time to assemble them. This is a crucial step, as it will determine the effectiveness of your trap. Start by attaching the entrance tunnel to the main body of the trap using the provided screws or adhesive. Make sure it is securely attached and the opening is facing downwards to prevent any debris from entering.
Next, attach the bait chamber to the entrance tunnel, ensuring a smooth transition between the two components. This will allow the carpenter bees to move freely into the trap. You can use a rubber band or a small clip to hold the bait in place within the chamber. Be sure not to overfill it, as this may cause the bees to become disoriented.
Finally, attach the lid or cover to the main body of the trap using hinges and a latch. This will allow you to easily open and close the trap for maintenance and monitoring purposes. Double-check all connections to ensure they are secure and will withstand exposure to the elements. Your trap is now ready to be placed in your garden!
Finishing Touches: Sanding and Coating
Now that you’ve assembled and installed your carpenter bee trap, it’s time to give it some TLC. The finishing touches of sanding and coating will help protect the wood from the elements and extend its lifespan. Start by sanding down the entire trap with a fine-grit sandpaper, paying extra attention to any rough edges or splinters.
This step is crucial in ensuring that your trap remains durable and doesn’t harbor any unwanted pests. Make sure to wear a dust mask when sanding, as the particles can be hazardous to your health. Once you’ve sanded the entire surface, use a clean cloth to wipe away any remaining debris.
Next, apply a waterproof coating to protect the wood from moisture damage. Choose a high-quality exterior-grade varnish or polyurethane that’s specifically designed for outdoor use. Follow the manufacturer’s instructions for application and drying times to ensure a smooth finish. This will help your trap withstand harsh weather conditions and remain effective in attracting carpenter bees.
Baiting Your Carpenter Bee Trap for Success
To ensure your carpenter bee trap is effective, it’s essential to choose the right bait and attractants that will lure these beneficial insects into your trap. We’ll cover the best options for enticing carpenter bees to do their job in your garden.
Choosing the Right Bait Attractants
When it comes to attracting carpenter bees to your trap, choosing the right bait attractant is crucial. You’ve got a few options to consider: sugar water, fruit juice, and commercial attractants.
Start with sugar water as a simple and effective choice. Mix four parts water with one part white granulated sugar in a container. Carpenter bees are attracted to the sweet taste and will often visit your trap in search of this nectar substitute. However, be aware that if left for too long, the mixture can ferment and become less appealing.
Fruit juice is another option, but it’s more specific to certain species. For example, apple or grape juice may attract female carpenter bees, which are drawn to these sweet tastes when searching for nesting sites. You can also try using a combination of fruit juices to create a more diverse attractant.
Commercial attractants offer a convenient and pre-mixed solution. These products often combine the benefits of sugar water and fruit juice with other ingredients that mimic the carpenter bee’s natural environment. Follow the manufacturer’s instructions for mixing ratios and application, as these can vary significantly between brands.
Placement Strategies: Where to Position Your Trap
When it comes to placing your carpenter bee trap in the garden, location is key. You want to position it in an area where these pesky bees are most likely to be attracted to food and shelter. Research suggests that carpenter bees are drawn to areas with high levels of nectar-rich flowers, such as sunflowers, lavender, and coneflowers.
Consider placing your trap near a south-facing wall or fence, as carpenter bees tend to favor these types of surfaces for nesting sites. Avoid placing the trap in an area where it will be shaded by trees or other structures, as this can reduce its effectiveness. In fact, studies have shown that traps placed in direct sunlight can catch up to 50% more carpenter bees than those placed in shadier areas.
Another important factor to consider is the proximity of your trap to water sources. Carpenter bees need water for drinking and egg-laying, so placing the trap near a birdbath or shallow dish filled with water can increase its attractiveness. Experiment with different placements to find the sweet spot (pun intended!) where your trap captures the most carpenter bees.
Maintenance and Upkeep of Your Carpenter Bee Trap
To keep your carpenter bee trap effective, you’ll want to regularly inspect and maintain it, ensuring it remains safe for these beneficial bees. This section covers essential upkeep tasks and tips to help you succeed.
Regular Cleaning and Baiting Schedule
Regular cleaning and bait replenishment are crucial to maintaining an effective carpenter bee trap. Over time, debris and dirt can accumulate on the trap’s surface, attracting pests rather than the desired carpenter bees. Set aside a few minutes each week to remove any visible debris and scrub the trap with mild soap and water.
For optimal results, establish a regular bait replenishment schedule. Carpenter bees are attracted to sweet substances like sugar, honey, or fruit juice. Replace bait every 7-10 days during peak bee activity (spring-fall). This ensures the lure remains potent and continues to draw carpenter bees into your trap.
To make cleaning easier, label each trap with its date of last cleaning and bait replenishment. This will help you track when maintenance is due and ensure consistency across all traps in your garden.
Monitoring Your Trap’s Effectiveness
Monitoring your trap’s effectiveness is crucial to understanding its impact on carpenter bee populations and making adjustments as needed. One way to track success is by monitoring visit frequency – simply count the number of bees visiting your trap each day or week. This will give you a baseline understanding of how many bees are being attracted to the trap.
To take it a step further, consider noting any pollination benefits you observe in your garden. For example, if your carpenter bee trap is attracting multiple bees, and subsequently, you notice an increase in fruit and flower production, it’s likely that the trap is effective.
Keep a log or journal to track your observations over time. This will help you identify trends and patterns, such as which types of flowers or plants are most attractive to carpenter bees. By doing so, you can refine your trap design and location strategy to maximize its effectiveness and support the local pollinator population.
Troubleshooting Common Issues with Your Carpenter Bee Trap
As you set up your carpenter bee trap, it’s not uncommon to encounter a few unexpected problems. This is where we’ll walk through some common issues and offer troubleshooting solutions to get your trap back on track.
Identifying Potential Problems
When creating a carpenter bee trap for your garden, it’s essential to identify potential problems that may arise. One common issue is that the trap may not be attracting enough bees, which can lead to ineffective pollination and wasted effort.
This problem could be caused by various factors, such as the location of the trap being too shaded or having inadequate sunlight. Carpenter bees are attracted to warmth, so a spot with direct sunlight for at least 6 hours a day is ideal. Additionally, if the trap’s entrance hole is too small, it may prevent larger bees from entering, reducing its effectiveness.
Another potential issue is that the trap may be attracting other insects, such as wasps or hornets, which can outcompete the carpenter bees for food and even attack them. To mitigate this problem, consider using a trap design with a built-in exclusion system or installing a separate entrance hole for each species to prevent cross-attraction.
Regular inspections of the trap are also crucial in identifying potential problems early on. Check for signs of infestation, such as chewed wood or holes in the surrounding area, and clean the trap regularly to maintain its effectiveness.
Solutions to Common Problems
If you’re encountering issues with your carpenter bee trap, there are several solutions to address common problems. One of the main culprits is an ineffective bait attractant. If you find that few bees are visiting the trap or none at all, try switching up the scent using different essential oils like peppermint, lemongrass, or eucalyptus.
Another issue may be with the trap design itself. Ensure the trap’s depth and size are suitable for carpenter bees, as these insects prefer larger spaces to navigate through. Consider adding more landing strips or adjusting the placement of the inner container to create a smoother flow for the bees.
If you’re struggling with bee escapees, inspect the mesh material for any tears or gaps. Replace it if necessary or opt for a different type of mesh that’s specifically designed to keep insects in. Additionally, make sure the trap is installed at an optimal height and angle to allow easy access for carpenter bees while minimizing the likelihood of other insects getting stuck.
Frequently Asked Questions
How do I ensure my carpenter bee trap is attractive to the right pollinators?
Ensure your trap has a suitable entrance hole diameter (about 1-2 inches) and is made from untreated, natural wood like cedar or cypress. Place it in an area with full sun to partial shade, near flowers that attract carpenter bees. Baiting with sweet substances like sugar water or fruit juice can also help lure them in.
What if I notice my carpenter bee trap isn’t attracting any pollinators? Should I adjust the bait or location?
Try relocating your trap to a spot with more sunlight and abundant flowers that carpenter bees frequent. Also, consider adjusting the baiting schedule or using different attractants like citronella oil or mint extract. Regular cleaning and maintenance can also help prevent mold buildup.
Can I use pre-made carpenter bee traps instead of making my own?
While store-bought traps are convenient, they may not be as effective or eco-friendly as homemade traps made from natural materials. Additionally, customizing your trap with specific features like a built-in watering system can enhance its effectiveness.
How do I maintain and clean my carpenter bee trap to keep it functional?
Regularly inspect the trap for debris, dead bees, and mold buildup. Clean the interior with soap and water, then rinse thoroughly. Replace the bait every few days or as needed. Consider adding a roof or overhang to protect the trap from rain.
What if I accidentally attract other pests like wasps or yellowjackets instead of carpenter bees?
Use deterrents like citronella oil or mint extract to discourage unwanted visitors. Also, consider using a smaller entrance hole or modifying your trap’s design to be more specific to carpenter bee needs. Regularly inspect the trap and clean it out as needed to prevent pest buildup.