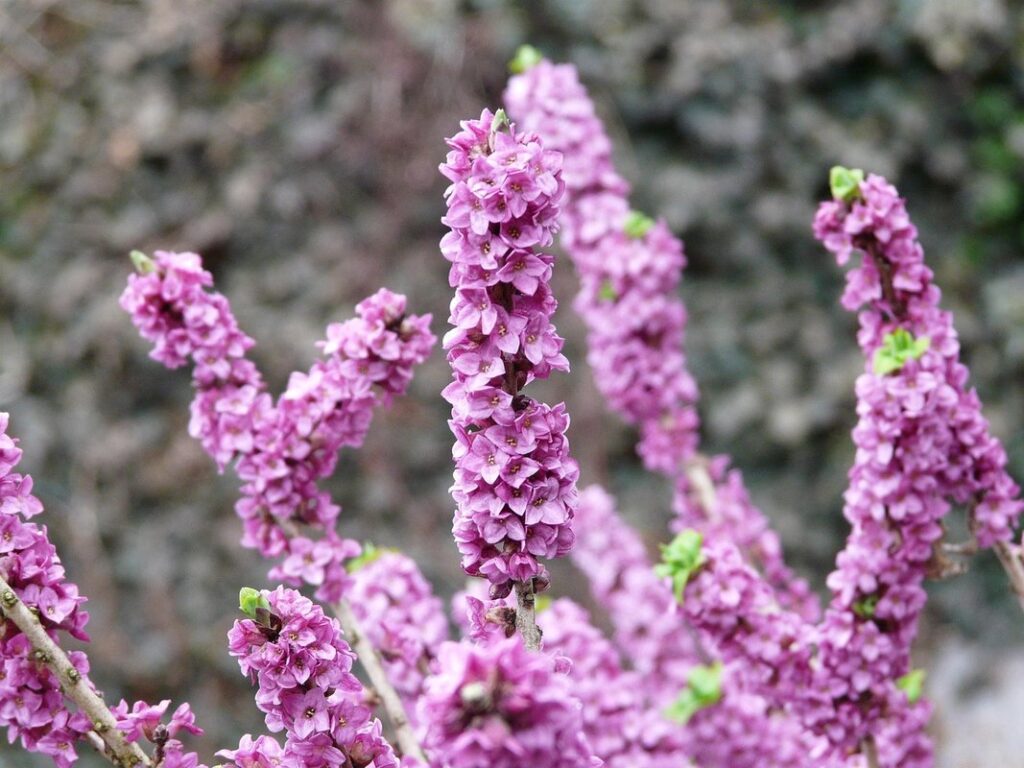
If you’re one of the many gardeners who have fallen in love with Daphne odora’s intoxicating fragrance and beautiful purple blooms, then this guide is for you. With proper care, these stunning plants can thrive in your garden or indoor space, providing a unique charm that will surely impress friends and family alike. However, getting the most out of your Daphne odora requires attention to detail, especially when it comes to choosing the right variety, preparing the soil, fertilizing, pruning, and propagating. That’s where this expert guide comes in – covering everything you need to know about cultivating these delicate yet resilient plants. Whether you’re a seasoned green thumb or just starting out, we’ll walk you through the essential steps for growing healthy Daphne odora plants that will bring joy and beauty to your space.
Choosing the Right Variety
When it comes to growing a Daphne odora, selecting the right variety is crucial for its success. This means choosing one that thrives in your specific climate and soil conditions.
Understanding the Different Types of Daphne Odora
When it comes to choosing the right Daphne odora variety for your garden, understanding the different types is crucial. There are several varieties of Daphne odora, each with its unique characteristics and growth habits.
One of the most popular varieties is ‘Aureo-marginata’, known for its striking golden-edged leaves and clusters of fragrant flowers in shades of pink to purple. This variety thrives in well-draining soil and partial shade, making it an ideal choice for woodland gardens or areas with dry spells.
Another variety worth considering is ‘Rebecca’, which boasts vibrant pink flowers and deep green foliage. This compact variety grows up to 3 feet tall and wide, making it perfect for small spaces or containers. It prefers slightly acidic soil and full sun to partial shade.
It’s essential to research the specific needs of each variety to ensure you provide the right conditions for your Daphne odora to thrive. Be sure to consider factors such as soil type, sunlight exposure, and moisture levels when selecting a variety that suits your garden’s unique characteristics.
Selecting the Best Variety for Your Climate
When selecting a Daphne odora variety, it’s essential to consider the specific climate and growing conditions of your area. This will ensure that your plant thrives and remains healthy year-round.
Daphne odora plants are native to China and Korea, so they typically prefer cooler temperatures. If you live in an area with extreme heat or cold, choose a variety that is more tolerant. For example, ‘Aureo-Marginata’ and ‘Marginalis’ are good options for warmer climates, as they can handle temperatures up to 75°F (24°C).
On the other hand, if you reside in a cooler region, look for varieties like ‘Alba’ or ‘Rosea’, which prefer temperatures between 40-60°F (4-15°C). These plants will also benefit from partial shade and well-draining soil. Consider your local climate data to determine the average temperature range and adjust your selection accordingly.
In addition to temperature tolerance, think about the humidity levels in your area. Daphne odora plants prefer a humid environment, typically between 50-70%. If you live in an arid region, consider using a humidifier or grouping plants together to create a microclimate that meets their needs.
Planting and Establishing Daphne Odora
When planting a new Daphne odora, choosing the right location is crucial. This section will walk you through selecting the perfect spot for your daphne to thrive in your garden.
Preparing the Soil for Planting
When planting Daphne odora, it’s essential to prepare the soil properly to ensure the health and well-being of your new plant. A well-prepared soil can make a huge difference in the growth and development of your daphne odora.
To start, check the pH level of your soil, as daphne odora prefers slightly acidic to neutral soil with a pH between 6.0 and 7.0. If your soil is too alkaline or acidic, it can hinder nutrient uptake and cause poor growth. A simple soil test kit will give you an idea of your soil’s pH level.
Nutrient levels are also crucial for daphne odora’s health. Make sure to add organic matter like compost or manure to enrich the soil with essential nutrients. A general rule of thumb is to mix in 2-3 inches of compost into the top 6-8 inches of soil before planting.
Drainage is another critical factor, as daphne odora doesn’t tolerate waterlogged conditions. If your soil tends to retain water, consider adding a layer of organic matter or perlite to improve drainage and prevent root rot. With proper soil preparation, you’ll set the stage for your daphne odora to thrive and grow beautifully.
Watering and Mulching Techniques
When it comes to watering and mulching your Daphne odora plants, proper technique is essential for healthy establishment. Watering should be done carefully, as overwatering can lead to root rot, while underwatering can cause stress. The ideal time to water is early morning or evening when the soil has a chance to absorb the moisture overnight. Check the soil by inserting your finger into it up to the first knuckle; if it feels dry, it’s time to water.
Mulching helps retain moisture in the soil and suppress weeds, making it an essential practice for Daphne odora care. Organic mulch like bark chips or wood shavings is recommended as they break down slowly and release nutrients into the soil. Apply a 2-3 inch layer of mulch around the base of your plants, keeping it a few inches away from the stems to prevent rot.
It’s also crucial to avoid using weed mats or plastic sheets that can trap moisture and cause more harm than good. Instead, replenish the mulch as needed to maintain a healthy barrier between your Daphne odora roots and the surrounding environment.
Ongoing Care and Maintenance
Now that you’ve got your Daphne Odora thriving, let’s dive into the ongoing care and maintenance tasks to keep it happy and healthy for years to come. This includes pruning, repotting, and more.
Fertilizing Your Daphne Odora Plant
Fertilizing your Daphne odora plant is crucial for its overall health and flowering performance. Since this plant prefers well-drained acidic soil, it’s essential to choose a fertilizer that meets these conditions. Look for a balanced, water-soluble fertilizer with a pH between 5.0 and 6.0.
For optimal results, fertilize your Daphne odora plant in the spring when new growth begins. Dilute the recommended dosage according to the product’s instructions, as over-fertilization can damage the roots. You can also apply a slow-release fertilizer during the growing season for consistent nourishment.
Some examples of suitable fertilizers include Scotts Osmocote 14-14-14 Professional Plant Food and Miracle-Gro Shake ‘n Feed All Purpose Plant Food. These products provide balanced nutrients and meet the acidic soil requirements of your Daphne odora plant.
Aim to fertilize your plant every 2-3 months during the growing season, which typically lasts from spring to fall. Monitor your plant’s response to fertilization and adjust the frequency as needed. Keep in mind that over-fertilizing can lead to weak growth and reduced flowering, so it’s better to err on the side of caution.
In addition to regular fertilization, consider adding a source of sulfur or aluminum sulfate to lower the soil pH if necessary. This will help maintain the optimal acidic conditions for your Daphne odora plant.
Pruning and Training Techniques
Pruning and training are crucial aspects of Daphne odora care that often get overlooked. However, they play a significant role in promoting healthy growth and preventing disease. To prune your Daphne odora effectively, start by removing any dead or damaged branches. Cut them back to the nearest junction with a pair of sharp, clean pruning shears.
Next, focus on maintaining the plant’s shape by cutting back overgrown sections. For example, if you notice that one side of the plant is growing more vigorously than the other, prune it back to encourage balanced growth. Remove any weak or spindly stems and shape the plant into a rounded or vase-like form.
Training your Daphne odora involves providing support for its vigorous stems. Use stakes or trellises to keep the plant upright, especially in areas with strong winds. Prune the stems as needed to direct their growth towards the support system. This will help maintain the plant’s shape and promote healthy root development.
It’s essential to prune your Daphne odora regularly throughout the growing season, typically after it finishes blooming. By doing so, you’ll encourage new growth, prevent disease, and keep the plant looking its best.
Common Problems and Solutions
As you care for your Daphne Odora, you may encounter some common issues that can be easily resolved. Let’s tackle these potential problems together in the following solutions.
Dealing with Pests and Diseases
As a Daphne odora plant owner, it’s essential to be aware of common pests and diseases that can affect your beautiful blooms. These issues can quickly spiral out of control if left unchecked, so recognizing the signs early on is crucial.
Aphids are one of the most common pests that infest Daphne odora plants. These tiny insects feed on sap, causing curled or distorted leaves. If you notice aphid colonies on your plant, treat them immediately with neem oil or insecticidal soap. Regularly inspecting your plant’s undersides and stems can help catch these pests early.
Root rot is another significant threat to Daphne odora plants. Overwatering can cause roots to decay, leading to yellowing leaves and a soft stem. To prevent root rot, ensure good drainage and avoid getting water on the leaves or crown of your plant. If you suspect root rot, repot your plant in fresh potting mix and reduce watering.
Regularly inspect your Daphne odora for signs of pests or diseases, and address them promptly to keep your plant healthy and thriving.
Troubleshooting Common Care Issues
If you notice that your Daphne Odora plant is struggling, there are several common care issues to look out for. One of the most noticeable problems is yellowing leaves. This can be a sign of overwatering or underwatering, so make sure to check your watering schedule and adjust as needed. If the leaves are turning yellow due to a nutrient deficiency, consider using a balanced fertilizer to give your plant a boost.
Another issue you may encounter is poor blooming. This could be caused by insufficient light or inadequate pruning. Check that your plant is receiving at least 4-6 hours of direct sunlight per day and prune any dead or dying branches to encourage healthy growth. You can also try repotting your Daphne Odora in the spring with a slightly acidic potting mix to provide it with the right environment for blooming.
In addition to these issues, you may notice that your plant is not producing new growth. This could be due to root bound conditions or pests like spider mites. Regularly inspect your plant for signs of infestation and repot every 2-3 years to give the roots room to grow.
Propagation and Division
To multiply and refresh your Daphne Odora collection, you’ll need to learn how to propagate and divide these delicate plants correctly. We’ll walk you through each step of this process.
Propagating Daphne Odora through Cuttings
Propagating Daphne Odora through cuttings is a relatively simple process that can be done at home with minimal equipment. To start, gather healthy stems from the mother plant, cutting just above a node (where a leaf meets the stem). Remove lower leaves to prevent waterlogged soil and promote rooting.
Rooting medium plays a crucial role in successful propagation. Use a well-draining mix specifically designed for cuttings, such as perlite or vermiculite mixed with peat moss. Avoid using regular potting soil, which can retain too much moisture and lead to root rot.
Maintain high humidity levels during the rooting process by covering the cutting tray or container with a clear plastic bag or cloche. Place the setup in a bright, indirectly lit area with temperatures between 65-75°F (18-24°C). Check on the cuttings regularly, ensuring they’re not waterlogged and removing any weak or struggling growth.
With proper care, roots should develop within 4-6 weeks. Once established, transfer the new plants into individual pots using a standard potting mix. With a little patience and attention to detail, you can successfully propagate Daphne Odora through cuttings and enjoy more of these beautiful plants in your garden or indoor space.
Dividing Established Plants
Dividing established Daphne odora plants can be a rewarding experience for gardeners. The process involves separating mature roots to create new plants that will thrive in their new environment. Timing is crucial when dividing daphne odora, and it’s recommended to do so during the dormant season (winter or early spring). This allows the plant to focus its energy on developing new growth rather than supporting existing foliage.
To divide an established daphne odora plant:
* Choose a mature plant with multiple stems.
* Dig around the plant carefully, taking care not to damage the roots.
* Gently remove the plant from the soil and separate the roots using a sterile tool or garden fork.
* Replant each section in well-draining soil, making sure the crown (where the stem meets the roots) is level with the surface.
* Water thoroughly after planting and keep the soil consistently moist during the first growing season.
By following these steps, you can create multiple new plants from a single established daphne odora plant. This process not only helps to maintain the health of your plant but also increases its overall growth rate.
Advanced Care Techniques
When it comes to maintaining a thriving Daphne Odora, you’ll want to learn some advanced care techniques to bring out its full fragrance and beauty. This includes pruning strategies and repotting tips for optimal growth.
Using Mulch and Compost
When it comes to providing optimal care for your Daphne odora, using mulch and compost is an essential technique that can greatly enrich your soil and promote healthy plant growth. Mulch acts as a protective barrier against extreme temperatures, retaining moisture in the soil while preventing weeds from competing with your daphne for nutrients.
To reap the benefits of mulching, choose organic materials such as bark chips or pine straw, which break down slowly and won’t alter the pH levels of your soil. A 2-3 inch layer is sufficient, but be cautious not to smother the roots by piling it too high. Composting takes this concept a step further by converting kitchen scraps and yard waste into a nutrient-rich fertilizer.
For composting beginners, start with a mix of ‘green’ materials (food waste, grass clippings) and ‘brown’ materials (leaves, twigs), aiming for a 2:1 ratio. Regularly turn the pile to aerate it, allowing microorganisms to break down organic matter efficiently. The resulting compost can be added directly to the soil or mixed with mulch to create a blend that not only retains moisture but also supplies essential nutrients.
Incorporating Companion Planting
Companion planting is an effective way to enhance the growth and health of your Daphne odora plant. By strategically placing beneficial plants around it, you can create a thriving ecosystem that promotes robust growth, repels pests, and attracts beneficial insects. When selecting companion plants for your Daphne odora, look for species that share similar growing conditions and soil preferences.
Some excellent companion plants for Daphne odora include:
• Boxwood (Buxus sempervirens): This low-maintenance shrub helps maintain a healthy moisture level in the soil and shades the roots of your Daphne odora from extreme temperatures.
• Lavender (Lavandula spp.): The fragrance and oils released by lavender repel pests that target Daphne odora, such as aphids and whiteflies.
• Catmint (Nepeta faassenii): This drought-tolerant perennial attracts beneficial pollinators like bees and butterflies, which promote seed set in your Daphne odora plant.
When planting companions with your Daphne odora, ensure they are placed at least 6-12 inches away from the main stem to prevent overcrowding.
Conclusion: Mastering Daphne Odora Care
Now that you’ve learned the ins and outs of daphne odora care, let’s review what we’ve covered to ensure your plant thrives. Mastering the basics will give you a lifetime of enjoyment from this beautiful shrub.
Recap of Key Takeaways
As you’ve now reached the end of this comprehensive guide to Daphne Odora plant care, let’s take a moment to recap the key points that’ll help you master the art of caring for these lovely plants.
From selecting the right location and soil mix, we discussed how essential it is to provide your Daphne Odora with bright, indirect light. This will not only promote healthy growth but also prevent scorching or discoloration on its delicate flowers. For instance, placing it near an east- or west-facing window can be a great spot for this plant.
We also explored the importance of watering techniques, emphasizing that Daphne Odora prefers well-draining soil to avoid waterlogged conditions. Remember to check the top 1-2 inches of soil daily, and water only when it feels dry to the touch. You can also gently water the plant during its dormant period to prevent drying out completely.
Another crucial aspect we covered was pruning and training techniques to encourage bushy growth and promote blooming. Prune your Daphne Odora after it finishes flowering in spring, cutting back stems by about half their length. This will help maintain a balanced shape and encourage new growth for next year’s blooms.
Regular fertilization is also vital for maintaining the health of your Daphne Odora. We recommended using an acid-based fertilizer during the growing season to promote healthy foliage and flower production. Be sure to follow the manufacturer’s instructions carefully, as over-fertilization can damage the plant.
Lastly, we touched on pest control measures to prevent potential problems like spider mites or mealybugs from taking hold. Regularly inspect your plant for any signs of infestation, and treat promptly if you notice any issues.
By incorporating these key takeaways into your care routine, you’ll be well-equipped to provide your Daphne Odora with the TLC it needs to thrive.
Frequently Asked Questions
Can I grow Daphne odora in a container or does it require direct soil contact?
Yes, you can grow Daphne odora in containers as long as they provide good drainage and are at least 12-18 inches deep to accommodate the plant’s taproot. Make sure to use a well-draining potting mix and keep the container slightly larger than the root ball to allow for growth.
How often should I fertilize my Daphne odora plants, especially during their dormant period?
Fertilize your Daphne odora plants regularly during the growing season (spring-fall) with a balanced fertilizer. However, reduce or skip fertilizing during the dormant period (winter). Instead, focus on maintaining a slightly acidic to neutral soil pH and mulching around the base of the plant to retain moisture.
What are some common pests that can affect Daphne odora plants, and how can I control them?
Daphne odora is susceptible to pests like slugs, snails, and spider mites. To control these pests, use organic or chemical controls as needed, such as hand-picking, neem oil, or insecticidal soap. Maintain a clean garden environment by removing weeds, debris, and infested plants.
Can I propagate Daphne odora through division if the plant is not yet mature?
No, it’s best to wait until your Daphne odora plant has reached maturity (around 2-3 years after planting) before dividing it. This allows the plant to establish a robust root system and reduces stress during propagation. Start by gently removing the suckers from around the base of the mother plant, then pot them up in a well-draining mix.
How do I protect my Daphne odora plants from extreme temperatures and frost damage?
Daphne odora is sensitive to extreme temperatures (below 20°F (-7°C) or above 80°F (27°C)). Protect your plants by providing shade during intense heatwaves, using frost blankets or sheeting during cold snaps, and ensuring they’re planted in an area with some wind protection.