If you’re a backyard chicken enthusiast or a seasoned poultry farmer, you know how crucial it is to maintain a healthy flock. But did you know that one tiny parasite can wreak havoc on your birds’ well-being? Hen mites are a common problem in many flocks, causing discomfort, stress, and even disease in the hens. These pesky parasites feed on their hosts’ blood, leading to anemia, reduced egg production, and increased mortality rates. In this comprehensive guide, we’ll delve into the world of hen mites, exploring how to identify the signs of infestation, prevent them from taking hold, and treat affected flocks effectively. We’ll cover the causes, symptoms, and management strategies you need to keep your hens safe and thriving.
Understanding Hen Mites
Hen mites are tiny, blood-feeding parasites that can wreak havoc on your chicken’s health and well-being. In this next part of our guide, we’ll delve into what these pesky mites look like and how to identify them accurately.
What are Hen Mites?
If you’re dealing with hen mites, it’s essential to understand these tiny creatures first. Hen mites are a type of ectoparasite that specifically infest poultry, especially chickens. They belong to the family Knemidokoptidae and are known for their unique feeding behavior.
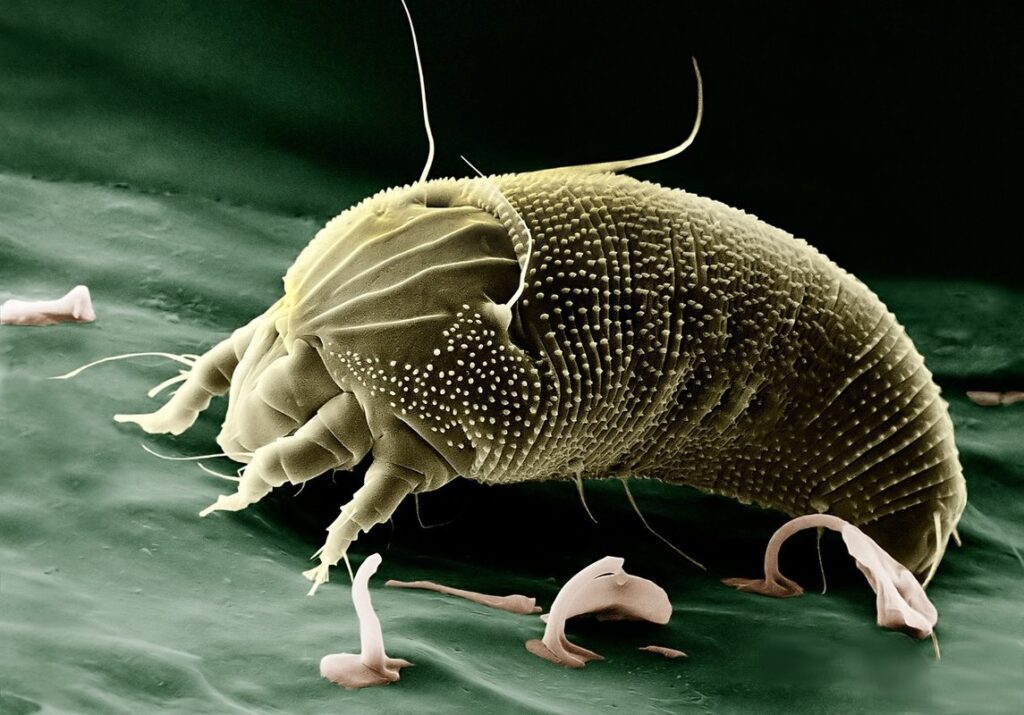
These parasites go through four stages in their life cycle: egg, larva, nymph, and adult. Female hen mites lay eggs on the chicken’s body, which hatch into larvae within 3-5 days. The larvae then molt twice before becoming nymphs, and after another molting process, they reach adulthood. Adult hen mites are about 0.5 mm in length and have distinctive oval-shaped bodies with a rounded back.
Hen mites are nocturnal feeders that thrive in warm environments. They insert their mouthparts into the chicken’s skin to consume its blood and bodily fluids. This feeding behavior causes irritation, discomfort, and even anemia in severe cases. Understanding hen mite behavior is crucial for effective management strategies, which we’ll cover later in this guide.
Signs and Symptoms of Hen Mites Infestation
Identifying a hen mite infestation can be challenging, as it often presents itself through subtle signs and symptoms. One of the most common indicators is excessive scratching and fluffing among your hens. You may notice them excessively scratching their feathers or attempting to remove loose skin, which can lead to hair loss in severe cases.
In addition to these visual cues, hen mites can also cause a strong, unpleasant odor due to their feeding activity. This pungent smell is often described as similar to the scent of dirty socks or mildew. If you notice this unusual aroma emanating from your coop or around your hens, it’s essential to investigate further.
Hen mite infestations can pose health risks for both humans and animals. In severe cases, they can lead to anemia in chickens due to excessive blood loss. Humans may experience minor skin irritation or allergic reactions when coming into contact with affected birds. Regularly inspecting your hens and coop is crucial to prevent the spread of these pesky parasites.
Causes and Risk Factors
Hen mites can infest poultry farms and backyard flocks, so let’s take a closer look at what causes these unwanted visitors to appear in the first place. We’ll explore common risk factors that contribute to hen mite infestations.
How Do Hen Mites Spread?
Hen mites can spread rapidly if not properly contained, making it essential to understand their primary means of transmission. Direct contact with an infested bird is a significant route of infestation. When you touch an infected hen’s feathers or come into close proximity with them, you may inadvertently transfer the mites to your own clothing, equipment, or other birds.
To put this into perspective, consider that a single hen can host thousands of hen mites at any given time. If these mites are not properly treated and contained, they can quickly spread to other birds in close proximity, leading to widespread infestation.
Preventing the spread of hen mites requires vigilance and proper hygiene practices. Always wear protective clothing when handling infected birds or entering areas where hen mites have been present. Regularly wash your hands with soap and water after contact with infected birds or equipment, and use a 3% permethrin solution to disinfect any contaminated items.
Remember, prevention is key in managing hen mite infestations. By understanding how these pests spread and taking steps to prevent their transmission, you can help protect your flock and reduce the risk of future infestations.
Environmental Factors That Contribute to Hen Mite Infestations
When it comes to hen mites, environmental factors play a significant role in their proliferation. One of the primary contributors is high humidity levels within coops or runs. If the air is too damp, it creates an ideal breeding ground for these tiny parasites. You can gauge this by checking your coop’s ventilation system – if it’s not adequately functioning, moisture will accumulate and foster an environment conducive to hen mite infestations.
Another critical factor is temperature. Hen mites thrive in temperatures between 65°F to 85°F (18°C to 30°C), making them common in regions with mild climates. If you live in areas prone to seasonal fluctuations, ensure your coop’s insulation and ventilation are suitable for the changing weather conditions. Poor ventilation is another environmental factor that encourages hen mite populations.
Regularly check for any signs of moisture accumulation or dampness within your coop or run. Ensure adequate airflow by installing fans, improving window size, or increasing the number of air vents to maintain optimal ventilation levels.
Prevention and Control Measures
To keep your flock safe from these pesky pests, we’ll cover effective prevention and control measures to eliminate hen mites before they become a major issue. This includes easy-to-follow steps for minimizing infestations.
How to Inspect for Hen Mites
When inspecting your flock for signs of hen mite infestation, it’s essential to know where to look and what to check for. Start by examining the birds’ behavior, as they may exhibit signs of discomfort or stress due to the presence of mites. Look for unusual scratching or rubbing against objects, which can be a sign that they’re trying to alleviate itching caused by the mites.
Next, visually inspect the birds’ feathers and skin for signs of mite infestation. Check the areas around the vents, cloaca, and legs, as these are common places where mites tend to congregate. Use a magnifying glass or hand lens to get a closer look at the birds’ skin and feathers.
Perform regular inspections, ideally during the spring and fall when mites are most active. Take note of any unusual growth patterns, discoloration, or excessive scratching. Keep in mind that early detection is key to preventing infestations from getting out of control.
Non-Chemical Methods of Hen Mite Control
If you’re looking for non-chemical methods to control hen mite populations, there are several options worth exploring. Diatomaceous earth (DE) is a popular choice among backyard chicken keepers. This powder works by dehydrating the mites, causing them to die off quickly. Sprinkle it around your coop and run, but be sure to wear a mask when applying it, as DE can cause respiratory issues in humans.
Essential oils like tea tree oil and lavender oil have also been shown to repel hen mites. Mix a few drops of the oil with water and spray it around the coop or directly on your chickens’ feathers. However, use this method sparingly, as essential oils can be toxic if ingested by your birds.
Improved coop hygiene is another crucial aspect of non-chemical hen mite control. Regularly clean and disinfect your coop, paying attention to nesting boxes, roosts, and feeding areas. Remove any clutter or debris that may be attracting the mites. By maintaining a clean and well-ventilated coop, you’ll reduce the likelihood of a hen mite infestation in the first place.
Identification and Diagnosis
So, you’ve suspected that your hen has mites – now it’s time to confirm. In this crucial step of diagnosis, we’ll walk you through how to identify these pesky parasites and rule out other potential issues.
How to Identify Hen Mites
Identifying hen mites requires a close look at their physical characteristics. These tiny parasites are usually between 0.5-1 mm in length and are shaped like a sphere with eight legs. Adult hen mites can be pale yellow or reddish-brown, while the larvae tend to be smaller and more transparent.
When checking for hen mites on your hens, look for them around their eyes, ears, and vent areas, as these are common places where they congregate. Observe how the mites move – they tend to scurry quickly when disturbed, often dropping off the hen’s skin if threatened. If you’re having trouble spotting individual mites, try gently stroking your hen’s feathers; if there are any mites present, they’ll likely emerge from their hiding places and cause discomfort.
To get a clear picture of what to look for, it can be helpful to observe hen mites in a magnified environment. A hand lens or a magnifying glass can provide the necessary zoom to identify these tiny creatures accurately.
Laboratory Testing for Hen Mite Infestation
When laboratory testing is necessary for a definitive diagnosis of hen mite infestation, there are several methods that can be employed. One common approach is microscopic examination, where a sample of feathers or skin scrapings is examined under a microscope to identify the presence of mites or their eggs.
A more sensitive and specific method is PCR (polymerase chain reaction), which involves amplifying genetic material from the mites’ DNA to confirm their presence. This test is particularly useful when dealing with low levels of infestation, as it can detect even small amounts of mite DNA.
In some cases, a combination of both microscopic examination and PCR testing may be used to confirm the diagnosis. For example, if a sample tested positive for hen mites using PCR, but no actual mites were visible under the microscope, further investigation would be warranted to determine the source of the infestation.
It’s worth noting that laboratory testing is typically only necessary when a presumptive diagnosis has already been made based on clinical signs and symptoms. If you suspect your flock has been infested with hen mites, it’s essential to take prompt action to prevent further damage and ensure accurate diagnosis through laboratory testing.
Treatment Options
Now that you know how to identify and prevent hen mites, let’s explore your treatment options for a successful recovery. We’ll dive into the various methods available.
Chemical Treatments for Hen Mites
When it comes to chemical treatments for hen mites, there are several options available. Permethrin is one of the most commonly used treatments and works by killing the mites on contact. It’s usually applied directly to the affected areas and can be repeated as necessary.
Another effective treatment is pyrethrin, which also kills mites on contact but tends to be less toxic than permethrin. However, it may require multiple applications to ensure all mites are eliminated.
Insect growth regulators (IGRs) like hydramethylnon work by preventing the mites from reproducing and eventually killing them off over time. This method is often used in conjunction with other treatments for more effective results.
Regardless of the treatment chosen, it’s essential to follow the manufacturer’s instructions carefully and take necessary precautions to avoid exposing yourself or others to the chemical. Always wear protective clothing and apply the treatment in a well-ventilated area to minimize exposure risks.
Keep in mind that some chemicals may have lingering effects on your hens’ health or even cause secondary infestations, so it’s crucial to monitor their behavior closely after treatment and be prepared to adjust as needed.
Natural Remedies for Treating Hen Mites
When it comes to treating hen mites naturally, there are several herbal solutions and homeopathic options that you can consider. One popular remedy is diatomaceous earth (DE), a non-toxic powder made from fossilized algae. When applied topically to the affected areas, DE dehydrates and kills the mites.
Another natural treatment option is neem oil, which can be mixed with water or other oils and sprayed directly on the hens’ feathers. Neem oil works by suffocating the mites and preventing them from reproducing.
You can also try using apple cider vinegar as a natural deterrent against hen mites. Mix equal parts of apple cider vinegar and water in your hens’ drinking water to help create an environment that’s less conducive to mite infestations.
Some homeopathic remedies, such as silica and sulfur, may also be effective in treating hen mites. However, it’s essential to consult with a veterinarian or a qualified holistic practitioner before using any new treatments, especially if you’re unsure about the severity of your flock’s infestation.
Managing Infested Flocks
If you’ve found yourself dealing with a hen mite infestation, effectively managing your flock’s health is crucial to preventing further problems and keeping them comfortable. This involves carefully assessing their situation and taking steps to eliminate the pests completely.
Quarantine Procedures for Infested Birds
When you suspect that some birds in your flock have hen mites, it’s essential to take immediate action to prevent the infestation from spreading to other birds. This is where quarantine procedures come into play.
To start with, move the suspected birds away from the rest of the flock immediately. Set up a separate enclosure or area for them to prevent any potential transfer of mites or diseases through contact or shared air space.
In this isolation zone, ensure that the bedding material is changed frequently and thoroughly cleaned with a solution specifically designed to kill hen mites. Keep an eye on the temperature in this area as well, maintaining it within the range recommended for your birds.
When treating the infested birds, use a systemic treatment that targets the mites directly. For example, you can administer a medication through their feed or water. Monitor these birds closely and be prepared to repeat treatments as necessary, following the product’s instructions carefully.
By isolating the affected birds and implementing effective treatment strategies, you’ll prevent the spread of hen mites within your flock and minimize the risk of other diseases taking hold.
Disinfection Protocols for Coops and Equipment
When it comes to managing an infested flock, disinfection protocols are a crucial step in eradicating hen mites. Before you begin, make sure you have the necessary cleaning supplies and equipment at hand. Start by removing all bedding material, such as straw or wood shavings, from the coop and runs. This will help prevent any remaining eggs or feces from hatching or spreading to other areas.
Next, thoroughly clean and disinfect all surfaces using a solution of one part white vinegar to nine parts water. Pay particular attention to nesting boxes, perches, and any areas where birds tend to congregate. Use a scrub brush to remove any stubborn stains or debris, then rinse with clean water and allow the surfaces to air dry.
Don’t forget to disinfect equipment such as feeders, waterers, and gates. These can harbor mites and their eggs, so make sure to soak them in your cleaning solution for at least 10 minutes before rinsing thoroughly.
Frequently Asked Questions
Can I prevent hen mites infestation by keeping my coop clean?
Yes, regular cleaning of the coop is essential to reduce the risk of hen mite infestations. Remove soiled bedding material, disinfect surfaces with a non-toxic cleaner, and ensure good ventilation in the coop. However, even with thorough cleaning, it’s possible for hen mites to still establish themselves on your flock.
How long does it take to see results after treating hen mites?
The effectiveness of treatment depends on several factors, including the severity of infestation, the treatment method used, and the health of the affected birds. Generally, you may start seeing improvements within a week or two after initiating treatment, but complete eradication can take several weeks to months.
Can I use essential oils to repel hen mites?
Some essential oils, such as tea tree oil and lavender oil, have been suggested as natural deterrents for hen mites. However, their effectiveness is largely anecdotal, and more research is needed to confirm their efficacy. As a complementary measure, these oils may be used in combination with other non-chemical control methods.
How do I know if my flock has developed resistance to chemical treatments?
Signs of resistance include the failure of chemical treatments to show significant improvement in hen mite infestation, or the presence of large numbers of live mites on treated birds. If you suspect resistance, consult a veterinarian for guidance on alternative treatment options and strategies.
Can I treat my flock without isolating them from other birds?
It’s recommended to isolate affected flocks to prevent the spread of hen mites to healthy birds. However, if this is not feasible due to space or logistical constraints, use strict biosecurity measures, such as covering feeders and water containers, and regularly inspecting for signs of infestation.