Are you tired of using chemical fertilizers to nourish your plants? Do you want to reduce waste and create a more sustainable gardening routine? Composting for plant fertilizer is an effective way to achieve these goals. By turning food scraps, leaves, and other organic materials into nutrient-rich compost, you can improve soil health and boost crop yields.
In this comprehensive guide, we’ll walk you through the process of creating high-quality compost that’s perfect for fertilizing your plants. We’ll cover the basics of composting, including what to compost, how to balance pH levels, and tips for speeding up the decomposition process. With our expert advice, you can say goodbye to store-bought fertilizers and hello to a more eco-friendly approach to gardening.
Benefits of Composting for Plant Fertilizer
Composting is a natural way to enrich your soil, and it’s time to explore its many benefits when used as plant fertilizer. Let’s dive into why composting is an essential practice for any gardener.
Reducing Waste and Minimizing Environmental Impact
When you compost, you’re not just creating a nutrient-rich fertilizer for your plants – you’re also making a significant impact on the environment. One of the most significant benefits of composting is its role in reducing greenhouse gas emissions. By diverting organic waste from landfills, composting helps to prevent methane production, a potent greenhouse gas that contributes to climate change.
Composting can also help conserve water by reducing the need for synthetic fertilizers and minimizing soil erosion. When your plants are healthy and thriving due to the nutrients provided by compost, they require less irrigation, which means you’ll use less water. In fact, according to the United States Environmental Protection Agency (EPA), composting can save up to 30% of municipal solid waste that would otherwise end up in landfills.
By incorporating composting into your gardening routine, you’re not only creating a nutrient-rich fertilizer but also contributing to a more sustainable environment.
Increasing Crop Yields and Improving Plant Health
When you incorporate compost into your soil, it can work wonders for plant health and crop yields. One of the primary ways compost benefits plants is by improving soil structure. Compost adds organic matter to the soil, which helps to break up clay particles and bind sand particles together, creating a more balanced and fertile environment for roots to grow.
This improved soil structure also allows water and air to penetrate deeper into the soil, reducing erosion and runoff while promoting healthy root growth. As a result, plants can absorb essential nutrients more efficiently, leading to increased crop yields.
Compost is an excellent source of slow-release nutrients that are easily taken up by plant roots. It’s rich in nitrogen, phosphorus, and potassium – the three primary macronutrients necessary for healthy plant growth. By adding compost to your soil, you’re providing your plants with a steady supply of these essential nutrients.
In addition to its nutrient-rich properties, compost promotes beneficial microbial activity in the soil. These microorganisms help to break down organic matter, making it available to plants and improving overall soil health.
Choosing the Right Composting Method
When it comes to turning food scraps into nutrient-rich fertilizer, choosing the right composting method is crucial. We’ll walk you through the most effective and convenient options for your garden needs.
Backyard Composting for Small Spaces
When it comes to backyard composting for small spaces, many gardeners think it’s not feasible. But with some planning and creativity, you can turn even the tiniest of yards into a thriving composting hub.
First things first: choose a spot for your compost pile that gets plenty of airflow. This will help prevent odors and pests from becoming issues. Consider a location near a water source to make maintenance easier. Avoid placing your compost bin under trees or shrubs, as this can attract unwanted critters and limit accessibility.
Selecting the right bin is also crucial for small spaces. Opt for a compact design that fits snugly against fences or walls, such as a worm composter or a tumbling bin. These styles are perfect for tiny yards and allow you to compost up to 10% of your household waste.
To ensure optimal carbon-to-nitrogen ratios, aim for a mix of 2/3 “brown” materials (dried leaves, shredded newspaper) and 1/3 “green” materials (food scraps, grass clippings). Regularly turning the pile will help maintain this balance, speeding up decomposition and minimizing odors. By following these tips, even small spaces can become composting powerhouses.
Vericomposting: Turning Food Scraps into Fertilizer
Vermicomposting is an efficient and space-saving method of composting that involves using worms to break down organic matter into nutrient-rich fertilizer. This process occurs within a worm composting system, where red wiggler worms consume decaying food scraps, paper products, and other organic materials.
As the worms digest their food, they excrete castings that are rich in nitrogen, phosphorus, and potassium – essential nutrients for plant growth. The key to successful vermicomposting lies in providing a balanced diet of 2/3 “brown” materials (dried leaves, shredded newspaper) and 1/3 “green” materials (food scraps, vegetable peels). Maintaining optimal moisture levels, pH balance, and temperature between 55°F and 77°F also ensures a healthy worm population.
To set up a worm composting system at home, start by purchasing a bin specifically designed for vermicomposting. Add a 4-6 inch layer of “brown” materials, followed by a few handfuls of worms. Continue to add a mix of green and brown materials, gradually increasing the moisture levels as needed. Regularly harvest castings after 2-3 months to utilize as fertilizer in your garden or indoor plants. By following these guidelines, you can successfully convert food scraps into nutrient-dense compost using the power of worms!
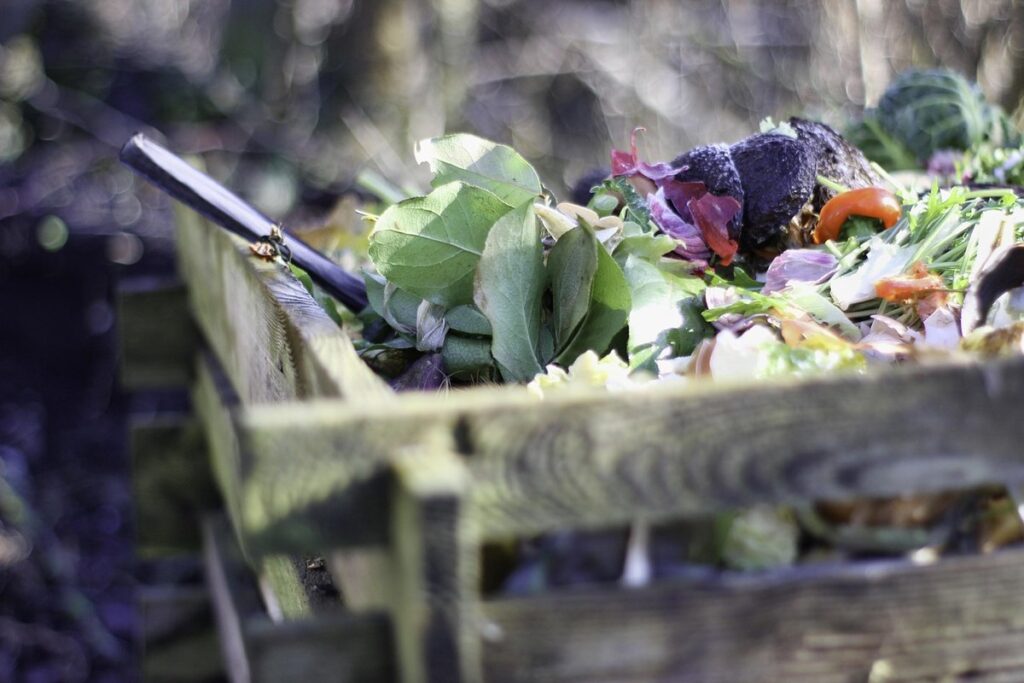
Creating a Compost Pile or Bin
To create a thriving compost pile, you’ll need to set up either a bin or a loose pile in your backyard, taking into account space and desired level of maintenance.
Layering Materials for Optimal Decomposition
When creating a compost pile or bin, it’s essential to layer materials strategically to ensure optimal decomposition. This process is often referred to as “green” and “brown” layering. Green materials are rich in nitrogen (N), while brown materials are high in carbon (C). By alternating between these two types of materials, you’ll create a balanced compost pile that will break down efficiently.
Green materials include food scraps, grass clippings, and manure from herbivores like rabbits or horses. These items are high in nitrogen but may lack carbon content. Brown materials, on the other hand, are low in nitrogen but abundant in carbon. Examples of brown materials include dried leaves, shredded newspaper, and straw.
To create a balanced compost pile, start with a 4-6 inch layer of brown materials at the bottom. This will provide structure and help with airflow. Next, add a 2-3 inch layer of green materials on top. Continue alternating between layers, ending with a layer of brown materials to prevent pests from being attracted to the nitrogen-rich scraps. Aim for a mix that contains about 25-30% green material and 70-75% brown material.
Monitoring Moisture and Temperature Levels
Maintaining optimal moisture levels is crucial for a balanced decomposition process. Aim to keep your compost pile or bin at about 60% moisture content. This can be achieved by adding water when the mixture feels dry to the touch, and mixing well to ensure even distribution.
To monitor temperature fluctuations, use a thermometer inserted into the center of the pile or bin. The ideal temperature range for decomposition is between 130°F and 140°F (54°C to 60°C). If the temperature exceeds this range, it may indicate overheating, which can lead to unpleasant odors and nutrient loss.
Regularly checking moisture levels and temperature will help you maintain a healthy composting environment. For example, if your pile or bin is too dry, microorganisms responsible for decomposition may slow down their activity. Conversely, if the mixture is too wet, anaerobic conditions may prevail, leading to unpleasant odors and attracting pests.
Aim to check moisture levels every 2-3 days and temperature once a week. Adjust your maintenance schedule accordingly based on your observations.
Managing Compost Pile Odors and Issues
Don’t let unpleasant odors or issues with your compost pile hold you back from creating nutrient-rich fertilizer for your plants. We’ll walk through common problems and solutions to get your composting on track.
Minimizing Unpleasant Odors with Proper Aeration
Proper aeration is key to minimizing unpleasant odors in your compost pile. When materials like food scraps and grass clippings break down, they release nitrogen-rich compounds that can create a pungent smell. To prevent this, ensure good airflow by adding brown materials like dried leaves or shredded newspaper to balance out the green materials. Aim for a mix of 2/3 “brown” materials (high in carbon) and 1/3 “green” materials (high in nitrogen).
Another crucial factor is maintaining the right carbon-to-nitrogen ratio. If there’s too much nitrogen-rich material, it can lead to anaerobic conditions where microorganisms break down organic matter without oxygen. This process produces ammonia gas, causing strong odors. Regularly turning your compost pile or bin allows air to penetrate and speeds up decomposition.
Additionally, consider using aeration tools like pitchforks or compost turners to manually mix the materials and increase airflow. Some compost bins also come with built-in ventilation systems or are specifically designed for aerated composting. By implementing these strategies, you can create an odor-free composting environment that produces nutrient-rich fertilizer for your plants.
Dealing with Common Problems like Pests or Mould
When dealing with composting, it’s not uncommon to encounter some common problems that can be frustrating and even unpleasant. One of the most annoying issues is pest infestations. Rodents, insects, and other creatures are attracted to the nutrient-rich environment of a compost pile. To prevent this, make sure your pile has adequate carbon-to-nitrogen balance, which will help kill off weed seeds and insect eggs. You can also cover your pile with wire mesh or hardware cloth to keep pests out.
Another issue that may arise is mould growth. This usually happens when the compost is too wet or if it’s not being turned regularly. To prevent mould, ensure you’re maintaining a mix of “green” (nitrogen-rich) and “brown” (carbon-rich) materials in your pile. You should also aim for a moisture level that’s like a damp sponge – not soaking wet. Regular turning will help speed up the decomposition process and prevent anaerobic conditions that lead to mould growth.
If you do encounter pests or mould, don’t worry! It’s relatively easy to correct these issues. Simply turn your pile more frequently to aerate it, add more brown materials to balance out the carbon-to-nitrogen ratio, or use natural pest control methods like diatomaceous earth.
Using Compost in Your Garden
Now that you’ve learned how to make compost, let’s talk about putting it to use in your garden, where it’ll really bring your plants to life.
Applying Compost to Improve Soil Structure
When applying compost to improve soil structure, it’s essential to focus on enhancing its water-holding capacity and root development. Compost is rich in humus, a substance that helps aggregate soil particles together, increasing its ability to retain moisture. To utilize this benefit, spread a 2-inch layer of compost over the topsoil, tilling it gently into the soil surface.
As you till, make sure to maintain a consistent moisture level to help the humus break down and penetrate deeper into the soil. This process can take anywhere from a few weeks to several months, depending on factors such as temperature and soil type. Once integrated, your compost will have improved water retention by up to 20%, allowing plants to draw from this stored resource rather than constantly seeking new water.
This increased water-holding capacity also has the added benefit of reducing soil erosion and runoff, which can be especially valuable for gardeners dealing with heavy rainfall or droughts. In addition to its water retention properties, compost promotes healthy root development by providing essential nutrients like nitrogen, phosphorus, and potassium.
Composting for Specific Plant Needs: Acid-Loving Plants or Legumes
When it comes to composting for specific plant needs, some plants require tailored approaches that meet their unique nutritional requirements. Acid-loving plants like azaleas and rhododendrons come to mind, as they thrive in acidic soils with a pH level of 5.5 or lower.
To create acidic compost for these plants, you can follow these steps: add more brown materials such as pine needles, oak leaves, or peat moss to your compost pile, which are naturally acidic. You can also incorporate citrus scraps, coffee grounds, and tea bags into the mix, as they contribute to an acidic environment.
Another consideration is legumes, like beans and peas, which benefit from a slightly acidic to neutral soil pH (around 6.0-7.0). To create a balanced compost for these plants, focus on adding nitrogen-rich materials such as grass clippings, vegetable scraps, or manure tea, alongside carbon-rich ingredients.
Keep in mind that you can also use pre-made, acidic compost products specifically designed for acid-loving plants. These products often contain peat moss or other acidic ingredients that provide the necessary nutrients for these plants to thrive. By tailoring your composting approach to meet specific plant needs, you’ll be creating a customized fertilizer that ensures optimal growth and health in your garden.
Conclusion: Getting Started with Composting
Now that you’ve learned the basics of composting, let’s get started on creating your own nutrient-rich fertilizer at home. This final chapter will walk you through essential next steps.
Tips for Beginners and Advanced Gardeners Alike
As you embark on your composting journey, it’s essential to remember that every gardener, regardless of level, can benefit from this rewarding practice. Whether you’re a beginner or an advanced gardener, there are numerous ways to make the most out of composting.
For beginners, starting small is key. Begin with a simple compost bin and dedicate a corner of your garden to it. Add kitchen scraps, leaves, and other organic materials in moderation, and don’t be afraid to experiment. Research online or consult local nurseries for guidance on what can and cannot be composted. Some essentials to get you started include a compost aerator, gloves, and a pitchfork.
As you gain experience, consider expanding your composting efforts by adding worms (vermicomposting) or bokashi bins. These methods can provide additional nutrients and reduce waste output. If you’re feeling ambitious, explore the world of hot composting – a method that involves rapid decomposition through precise layering.
Regardless of your level, getting involved with local gardening communities is an excellent way to connect with fellow enthusiasts and gain valuable insights. Join online forums, attend workshops or conferences, or participate in neighborhood garden clubs. Not only will you find like-minded individuals, but you’ll also have access to knowledge, resources, and networking opportunities.
For those seeking further guidance, recommended reading includes ‘The Composting Book’ by Peter Rostad and ‘Compost: A Natural Guide to Fertilizer for Gardeners’ by Mary Louise Ehringer. Online resources like the US Composting Council and the Compost Council of Canada provide extensive information on composting techniques, workshops, and best practices.
By embracing this practice and staying connected with fellow gardeners, you’ll not only reduce your waste output but also enrich your soil, nourish your plants, and build a thriving community around shared interests.
Frequently Asked Questions
What’s the ideal carbon-to-nitrogen ratio for effective composting?
The optimal carbon-to-nitrogen (C:N) ratio is between 25:1 and 30:1. This balance ensures that microorganisms have enough nitrogen to decompose organic matter efficiently, while excess carbon helps regulate moisture levels.
How often should I turn or aerate my compost pile?
Turning your compost pile regularly (every 7-10 days) will help speed up decomposition by introducing oxygen, breaking down clumps, and promoting even moisture distribution. However, if you’re using a tumbling composter, less frequent turning is sufficient.
Can I compost meat, dairy, or oily foods?
No, it’s best to avoid adding these high-nitrogen, high-fat, or high-protein items as they can attract pests and create unpleasant odors. Stick to vegetable scraps, fruit peels, leaves, and other carbon-rich materials for optimal composting results.
How long does it take for finished compost to be ready for use?
Finished compost is typically ready after 2-3 months of regular maintenance. However, this timeframe can vary depending on factors like temperature, moisture, and the mix of materials used in your compost pile or bin.
Can I reuse kitchen scraps that have gone moldy or are heavily infested with pests?
No, if you notice moldy or pest-infested kitchen scraps, it’s best to discard them. These items can introduce pathogens into your compost and harm plant growth. Instead, focus on using fresh, clean materials for optimal decomposition and a healthy finished product.