Composting at home is one of those simple yet powerful secrets to transforming your garden into an oasis. With just a few basic materials, you can create nutrient-rich soil that will make your plants thrive. But let’s face it – getting started with composting can be intimidating, especially when things go wrong (and they probably will!). That’s why we’ve put together this comprehensive guide on how to compost at home step by step. In the following pages, we’ll walk you through setting up your very own compost bin, selecting the right materials, and troubleshooting common issues like pests, odors, and imbalances. By the end of it, you’ll be well on your way to creating a thriving garden that’s full of life – all from the comfort of your own backyard.
Setting Up Your Composting System
To get started, it’s essential to set up a solid foundation for your composting system, including choosing the right location and selecting the perfect bin. Let’s dive into the details of setting up your home composting system now.
Choosing the Right Location
When choosing the location for your compost pile, it’s essential to consider several factors to ensure optimal decomposition and minimum odors. First and foremost, select a spot that is close to a water source, but not directly under a downspout or in a low-lying area where water may collect. This will make it easier to maintain the right moisture levels for composting.
Next, think about wind direction. A location protected from strong winds is ideal, as these can spread odors and dust. If possible, position your compost pile near a natural windbreak like a fence or a group of trees. In addition to proximity to water sources and wind protection, also consider the amount of sunlight the area receives. Compost piles need some sunlight to dry out excess moisture, but direct sunlight can cause temperatures to soar, potentially harming microorganisms.
Look for an area with good drainage and aeration to promote healthy decomposition. Aim for a spot that is at least 10-15 feet away from any structures or living areas to minimize potential odors and pests.
Selecting the Right Bin or Container
When it comes to setting up your composting system, selecting the right bin or container is crucial. You have various options available, ranging from DIY solutions to commercial bins. Let’s explore some of these choices.
For a budget-friendly and eco-conscious approach, consider repurposing wooden pallets as a compost bin. This method not only saves you money but also reduces waste. To use this option, gather sturdy pallets, disassemble them if needed, and assemble the bin structure by stacking the pallets. However, keep in mind that pallets may not provide adequate ventilation or pest protection.
Commercial bins offer better insulation, moisture control, and pest resistance compared to DIY solutions like wooden pallets. Some popular types of commercial bins include tumblers, roll-off bins, and worm composting containers. Each has its own set of pros and cons: tumblers are easy to turn but can be expensive; roll-off bins provide ample space but may take up more yard space; worm composting containers require specific maintenance but offer high-quality output.
Before making a final decision, consider factors like size, durability, and ease of use. Your chosen bin should suit your household’s needs and preferences while also serving the purpose of effective waste management through composting.
Understanding Composting Types (Hot vs Cold)
When it comes to composting, you’ll come across two main methods: hot composting and cold composting. While both approaches can be effective, they have distinct differences that will influence the outcome of your composting process.
Hot composting involves actively managing the carbon-to-nitrogen ratio, moisture levels, and aeration within the compost pile to promote rapid decomposition. This method typically takes 1-3 months to complete, resulting in a rich, dark soil amendment. However, it requires regular turning and monitoring of temperature levels, which can be time-consuming.
On the other hand, cold composting is a more low-maintenance approach that allows materials to break down at their own pace without frequent turning or temperature checks. This method may take several months or even years to complete but produces a high-quality compost with minimal effort required.
Consider your lifestyle and preferences when deciding between these two methods. If you have time to regularly turn and monitor the compost pile, hot composting might be suitable for you. But if you prefer a hands-off approach, cold composting is an excellent option.
Gathering Materials for Your Compost Pile
Now that you know what composting is all about, it’s time to start preparing your materials – collecting a mix of “green” and “brown” scraps will be key. Let’s take a closer look at what to gather for your pile.
What to Add: Green Materials (Nitrogen-Rich)
When it comes to creating a balanced compost pile, green materials like nitrogen-rich substances play a crucial role. These materials are rich in carbon, but lacking in nutrients, making them perfect for balancing out the brown materials like dried leaves and shredded newspaper that provide high levels of carbon.
Some examples of green materials you can add to your compost pile include:
• Food scraps: Fruit and vegetable peels, cores, and rinds
• Grass clippings: Fresh cut grass adds a boost of nitrogen to your pile
• Manure from herbivores like horses, cows, or rabbits
When using these materials, it’s essential to add them in moderation. Aim for a mix that consists of 2/3 brown materials (high in carbon) and 1/3 green materials (rich in nitrogen). Overloading on the green side can lead to anaerobic conditions, causing unpleasant odors and slowing down the decomposition process.
For instance, if you’re adding one bucket of dried leaves, you can add a handful of food scraps or some grass clippings. This balance will ensure that your compost pile breaks down efficiently and effectively.
What to Add: Brown Materials (Carbon-Rich)
Brown materials are a crucial component of maintaining a healthy carbon-to-nitrogen ratio in your compost pile. These materials are high in carbon and low in nitrogen, making them an ideal counterbalance to the “green” materials like food scraps and grass clippings that are rich in nitrogen but lacking in carbon.
Examples of brown materials include dried leaves, straw, shredded newspaper, and cardboard. To incorporate these materials into your compost pile, simply add a layer of 2-3 inches on top of your green materials. This will help absorb excess moisture, provide structure, and regulate temperature.
When choosing brown materials, consider the carbon-to-nitrogen ratio (C:N) of each item. A general rule of thumb is to aim for a C:N ratio of 25:1 or higher. For example, shredded newspaper has a high C:N ratio of around 400:1, making it an excellent addition to your compost pile.
Remember, the key is balance. Don’t overload your compost pile with too much brown material, as this can create anaerobic conditions and lead to unpleasant odors. Aim for a mix that’s roughly 2/3 brown materials and 1/3 green materials for optimal decomposition.
Maintaining Your Compost Pile
Now that you have a thriving compost pile, it’s essential to keep it healthy and pest-free by regularly maintaining its moisture levels and structure. This involves monitoring temperature, mixing in new materials, and controlling pests.
Monitoring Moisture Levels
Maintaining optimal moisture levels is crucial for efficient decomposition and minimizing odors. A well-balanced compost pile should be moist like a damp sponge, but not waterlogged. To check the moisture level, insert your hand into the pile up to the wrist; if it feels dry or requires significant effort to insert, it’s too dry.
Signs of overwatering include an unpleasant odor, mold growth, and leachate (a liquid with high nutrient content) seeping from the bottom. On the other hand, underwatered compost may crumble easily when disturbed, indicating insufficient moisture. Monitor your pile regularly and maintain a consistent moisture level by adding water only as needed.
Aim to keep your compost pile at around 50-60% moisture, adjusting this ratio based on temperature fluctuations. During hot summer days, you might need to add more water; conversely, cooler months may require less watering. Balance is key – if you notice any deviations from the ideal moisture range, adjust accordingly and observe how your compost responds.
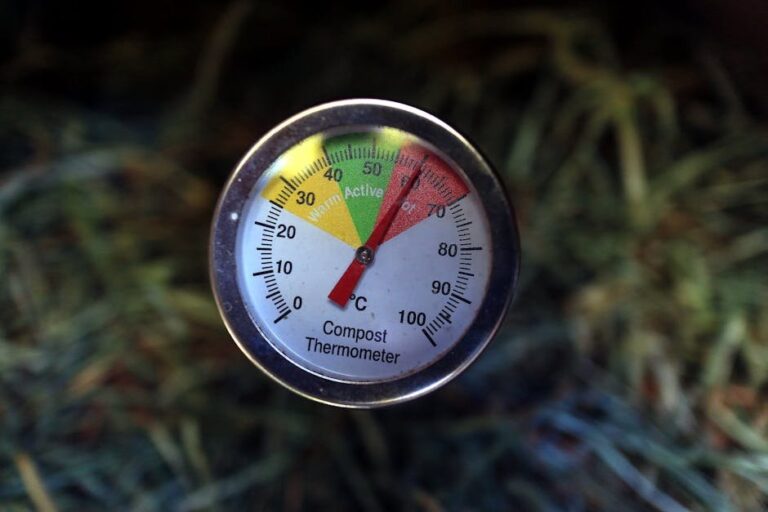
Turning Your Compost Pile (Aeration)
Regular turning or aeration of your compost pile is essential for speeding up decomposition, improving oxygen flow, and preventing odors. When you turn your compost, you’re essentially giving it a makeover, mixing the ingredients together to create a nutrient-rich blend.
By incorporating aeration into your composting routine, you’ll see significant benefits. For one, decomposition accelerates as microorganisms break down organic matter more efficiently. With increased oxygen flow, these tiny workers are able to multiply and thrive, leading to faster results. Furthermore, turning your compost helps prevent unpleasant odors from developing. A well-aerated pile encourages healthy microbial activity, which means less chance of stinky surprises in the garden.
To turn your compost pile effectively, aim for 2-3 inches of fresh material on top each week. Every 7-10 days, use a pitchfork or shovel to gently mix and aerate the contents. Don’t overdo it – excessive turning can damage delicate microorganisms and slow down decomposition.
Harvesting Your Compost
Now that your compost is mature and rich, it’s time to harvest and use its nutrient-dense goodness in your garden. Let’s learn how to extract the finished compost from your pile safely and effectively.
Identifying Mature Compost
When it comes to harvesting your compost, identifying mature compost is key. It’s time to put that finished product to good use! To determine if your compost is ready, let’s take a closer look at its texture, color, and aroma.
Texture-wise, mature compost should be crumbly or earthy in consistency. Think of it like topsoil – you can easily tear it apart with your fingers. If it still feels too dense or lumpy, give it a few more weeks to break down further.
As for color, expect it to range from dark brown to rich black, depending on the original materials you used. Avoid any signs of green or bright colors, as these indicate an imbalance in carbon-to-nitrogen ratios.
Now, let’s talk about that unmistakable aroma – earthy and rich, like forest floor. This is a good sign that your compost has matured. Avoid any pungent smells that might signal ammonia buildup or anaerobic conditions.
When you’re confident that your compost checks all these boxes, it’s ready to be used as fertilizer for your garden beds, houseplants, or even indoor containers.
Using Your Finished Compost in the Garden
Now that you’ve harvested your finished compost, it’s time to put it back into the garden where it will do the most good. This is often referred to as “returning” the compost to the soil.
When incorporating finished compost into your garden beds, consider mixing it with other soil amendments like peat moss or well-rotted manure to create a nutrient-rich blend. A general rule of thumb is to mix 10% compost into 90% existing topsoil. This will help aerate and improve drainage in the soil while adding essential nutrients.
Alternatively, you can use finished compost as a mulch around plants to retain moisture, suppress weeds, and regulate soil temperature. Simply spread a 2-3 inch layer of compost over the surface of the soil and keep it several inches away from plant stems to prevent rotting.
When applying either method, be sure to gently work the compost into the top 6-8 inches of soil or scatter it evenly across the garden bed. This will allow roots to access its nutrient-rich goodness while preventing any potential burning or scorching of nearby plants.
Troubleshooting Common Composting Issues
Don’t worry, we’ve all been there – unexpected problems can pop up when composting at home. In this next step, we’ll tackle common issues and show you how to resolve them quickly.
Odors, Pests, and Weeds: Solutions and Prevention
When you’re composting at home, it’s not uncommon to encounter some common issues like odors, pests, and weeds that can quickly ruin the composting process. These problems can be frustrating, but don’t worry – we’ve got solutions for you!
Odor Control
One of the biggest complaints about composting is the unpleasant smell that comes with it. The good news is that there are ways to minimize odors while still creating nutrient-rich soil. To start, ensure your compost pile has a balance of green and brown materials (food scraps and yard waste). Also, make sure your bin or container is well-ventilated – this allows for airflow which helps reduce the buildup of ammonia gas responsible for that pungent smell.
Another trick to keep in mind is adding a 4-6 inch layer of finished compost at the bottom of your pile. This acts as a buffer zone and prevents strong-smelling materials from rising up through the pile. You can also experiment with different carbon-rich materials like straw or coconut coir, which have natural odor-absorbing properties.
Pest Control
Unwanted critters in your compost bin are another common issue that needs addressing. Some pests like rodents, raccoons, and ants will seek out food sources (like food scraps) and can quickly contaminate the entire pile. To prevent these problems:
* Keep your bin clean by regularly cleaning up debris
* Don’t over-add meat, dairy products, or oils as these attract pests
* Consider using hardware cloth or chicken wire to cover your bin – this makes it more difficult for critters to climb inside
* Bury any scraps with high pest-attracting potential, like fruit and vegetable peels
Weed Prevention
Finally, weeds can be another nuisance in the composting process. These unwanted plants can sprout from seeds or spores that are inadvertently introduced into your pile. To minimize weed growth:
* Use matured compost as mulch around your garden beds – this will help suppress weed growth while also retaining moisture
* Don’t turn over the soil too often, as this can spread weed seeds and encourage unwanted plant life
* Regularly inspect your compost bin for any signs of weeds or unwanted sprouts
By following these tips and taking a few simple precautions, you can keep odors, pests, and weeds at bay while enjoying the many benefits of composting at home!
Advanced Composting Techniques and Tips
Now that you have a solid understanding of composting basics, let’s dive into some advanced techniques to take your composting game to the next level.
Worm Composting (Vermicomposting)
Worm composting, also known as vermicomposting, is an efficient and space-friendly method of turning food waste into nutrient-rich compost. One of the significant advantages of worm composting is its ability to break down organic matter at a much faster rate than traditional composting methods. This process can be completed in just a few weeks, making it ideal for gardeners who want to produce high-quality compost quickly.
To set up a worm bin, you’ll need a specialized container with a lid that allows air circulation and has drainage holes. A minimum of 10-20 red wiggler worms is recommended to start the process. These worms are specifically suited for vermicomposting due to their ability to thrive in low-oxygen environments.
To maintain your worm bin, it’s essential to add equal parts “green” (food waste) and “brown” (dried leaves or straw) materials, keeping the mix moist but not waterlogged. Regular monitoring of pH levels is also crucial to ensure optimal conditions for the worms. By following these steps and guidelines, you can successfully implement worm composting in your home and enjoy a steady supply of high-quality compost for your garden.
Bokashi Composting: A Fermentation Method
Bokashi composting is an advanced fermentation method that’s gaining popularity among home composters. This approach involves using microorganisms to break down organic matter into a nutrient-rich fertilizer. The process begins by adding water and a specific blend of microbes to a container filled with food scraps, including fruits, vegetables, grains, and even eggshells.
These microorganisms feed on the organic matter, breaking it down into carbon dioxide, ethanol, and a liquid fertilizer rich in beneficial bacteria and enzymes. This liquid is often referred to as “bokashi tea,” which can be used as a natural fertilizer for plants.
A key aspect of bokashi composting is that it allows you to process food waste more quickly than traditional composting methods. With the right conditions, bokashi can break down organic matter in just a few days, compared to weeks or even months required by traditional composting. This makes it ideal for small spaces and tight deadlines.
To get started with bokashi composting, you’ll need to purchase a bokashi bin or make one using a plastic container and a lid. The microbes will be available at most gardening stores or online. Simply follow the manufacturer’s instructions for adding water and microorganisms, and let the fermentation process begin.
Frequently Asked Questions
What if I don’t have a dedicated outdoor space for my compost pile?
If you’re living in an apartment or have limited outdoor space, consider indoor composting methods like vermicomposting (worm composting) or bokashi composting. These methods can be done on your countertop or even indoors with proper ventilation. You can also explore compact, odor-free bins that fit inside your home.
How often should I turn my compost pile for optimal decomposition?
Turning your compost pile is crucial for aeration and moisture distribution. Aim to turn it every 7-10 days during the hot composting phase (active decomposition). This will help speed up the process and prevent odors. For cold composting, you can turn it less frequently, about once a month.
Can I add meat, dairy, or oily foods to my compost pile?
No, it’s generally recommended not to add meat, dairy, or oily foods to your compost pile as they can attract pests and create unpleasant odors. Instead, focus on adding green materials like fruit and vegetable scraps, tea bags, and coffee grounds.
What if I notice mold growing in my compost pile? Should I be concerned?
Yes, mold growth in compost can be a sign of overwatering or inadequate aeration. To address this, turn the compost pile to improve airflow, and reduce moisture levels by adding more brown materials (dried leaves, straw). Monitor your compost’s temperature; if it’s consistently above 160°F (71°C), it may be too hot for decomposition.
Can I use my finished compost immediately in my garden?
While it’s tempting to use your freshly harvested compost right away, it’s essential to let it mature and cure for at least a few weeks. This allows the compost to break down fully and become stable. Using immature compost can potentially burn your plants’ roots or disrupt soil pH balance.