Are you tired of bland, unimpressive photos of your tomato plants? Do you want to capture breathtaking images that showcase the beauty of your harvest? If so, you’re in the right place. In this article, we’ll dive into the world of photography and share expert tips on how to take stunning pictures of your tomato plants.
But before you can start snapping away, let’s talk gardening. Growing a thriving tomato plant requires more than just sunlight and water – it needs care, patience, and attention to detail. We’ll cover some essential gardening tips to help you grow the most delicious, healthy tomatoes possible. From planting to harvesting, we’ve got you covered. So whether you’re a seasoned gardener or a beginner, keep reading to learn how to capture stunning images of your tomato plants and grow a bountiful harvest.
Understanding the Basics of Tomato Plant Photography
To take stunning photos of your tomato plant, let’s start by understanding its unique characteristics and how to work with them to create visually appealing images.
Types of Photos for Different Platforms
When it comes to showcasing your tomato plant on social media, having the right type of photo can make all the difference. Different platforms have unique characteristics and audience preferences, so let’s break down some popular types of photos that work well for Instagram, Facebook, Pinterest, and other online spaces.
For visually-driven platforms like Instagram, focus on high-quality images with good lighting, showcasing the vibrant colors and textures of your tomato plant. Consider capturing macro shots of individual leaves or flowers to highlight their intricate details. Use a mix of close-ups and wide-angle shots to create visually appealing galleries that capture the essence of your plant.
For Facebook, where users interact more with friends and family, opt for candid photos that show the personality of your garden. Think about including images of your hands holding freshly picked tomatoes or sharing moments of growth with loved ones. On Pinterest, focus on vertical images that highlight the aesthetic value of your tomato plant, using visually appealing compositions to create a sense of serenity.
By understanding the unique character of each platform and tailoring your photos accordingly, you can effectively showcase your tomato plant’s beauty and connect with like-minded gardeners around the world.
Essential Equipment for Tomato Plant Photography
To capture stunning images of a tomato plant, you’ll need the right equipment. When it comes to lenses, a macro lens (50-100mm) is ideal for showcasing intricate details like ripe tomatoes and delicate leaves. A prime lens (50-85mm) can also produce beautiful bokeh effects, especially when capturing the plant’s stem or branches.
For more versatile photography sessions, consider investing in a zoom lens (70-200mm). This will allow you to capture both close-up shots of individual flowers and wider views of the entire plant. A camera with image stabilization is also crucial for taking sharp photos without shaky hands or low light.
A sturdy tripod is another essential piece of equipment for tomato plant photography. It’ll enable you to set up your camera in optimal positions, even at awkward angles, ensuring minimal movement while shooting. Additionally, consider using a reflector or softbox for soft, natural-looking lighting. This can be especially useful when photographing indoor plants with limited natural light.
Composing Effective Images of Tomato Plants
When capturing images of your tomato plant, it’s not just about framing a nice view – you need to compose an image that tells a story and draws the viewer in. This involves paying attention to lighting, color, and negative space.
Visual Balance and Composition Tips
When it comes to capturing stunning images of tomato plants, visual balance and composition are crucial elements to consider. A well-balanced image can make all the difference between an ordinary photo and a captivating one.
To achieve balance in photographs, try using the rule of thirds. Imagine your image is divided into nine equal parts by two horizontal lines and two vertical lines. Place interesting features like the tomato plant’s leaves or fruit along these lines to create visually appealing compositions. For instance, position the main stem of the plant along a vertical line, and place the camera at an angle to capture the surrounding garden or supporting structure.
Leading lines can also be used to draw the viewer’s eye into the image. Look for elements like paths, trellises, or even the tomato plant’s own vines that can lead the viewer’s attention to the subject. Framing techniques can also enhance the composition of your image. Use garden structures, gates, or even branches to frame the tomato plant and add depth to your photo.
By incorporating these visual balance and composition tips into your photography skills, you’ll be able to capture images that showcase the beauty of your tomato plants in a captivating way.
Using Depth of Field and Focal Length
When it comes to capturing high-quality images of tomato plants, two key elements come into play: depth of field and focal length. Depth of field refers to the area within an image that appears to be in focus, while focal length is the distance between the lens and the subject.
To achieve a pleasing effect, you’ll want to control both depth of field and focal length. For example, if you’re photographing a tomato plant with a sprawling habit, you may want to use a wide-angle lens (between 10-24mm) to capture the entire plant in one shot. This will give you a good sense of its size and layout.
However, if you focus too much on the background, it can become distracting and take away from your subject. In this case, using a shallow depth of field by stopping down to f/8 or higher can help blur out the background and bring attention to the plant itself. Conversely, for more intimate shots, using a longer focal length (around 50-100mm) will compress the scene and emphasize textures and details.
Experimenting with both depth of field and focal length will allow you to find the perfect balance for your specific shot, making it easier to capture captivating images of your tomato plant.
Photography Techniques for Capturing Tomato Plant Details
To truly bring out the beauty of your tomato plant, you’ll want to master some key photography techniques that highlight its intricate details and textures. Let’s dive into a few essential tips for capturing stunning close-ups.
Macro Photography Tips
When it comes to capturing the intricate details of a tomato plant, macro photography is an excellent technique to employ. To get started, you’ll need a macro lens or extension tubes that can attach to your existing camera lens. This will allow you to capture images at extremely close range, revealing textures and patterns on the leaves, stems, and flowers.
To use macro photography effectively, focus on the smallest details of the plant. Experiment with different angles and compositions to highlight interesting features such as veins on a leaf or the delicate texture of a flower petal. Shooting in bright, indirect light will help prevent overexposure and reveal subtle colors and textures.
One essential tip for capturing sharp images is to use a tripod and set your camera to continuous autofocus mode. This allows you to take multiple shots of the same subject while adjusting focus on specific areas of interest. Reviewing your photos at different magnifications can also help you identify the best composition and refine your technique.
Using Shallow Depth of Field for Blurred Backgrounds
When it comes to capturing stunning images of your tomato plant, one technique that can elevate your photos is using shallow depth of field. This means intentionally blurring the background to emphasize your subject – in this case, the beautiful leaves and blossoms of your tomato plant.
To achieve a blurred background, you’ll want to use a large aperture (small f-stop number) on your camera lens. A good starting point is to set your f-stop to around f/2.8 or wider. This will create a shallow depth of field that separates your subject from the surrounding environment.
For example, imagine taking a photo of your tomato plant against a busy garden backdrop. With a large aperture, you can blur out the distracting elements and bring attention to the delicate leaves and vibrant colors of your plant. As you experiment with different apertures, pay attention to how it affects the overall look of your image.
Remember, practice makes perfect! Experiment with shallow depth of field on your next tomato plant photo shoot to see how it can take your images to the next level.
The Art of Gardening: Tips for Growing Luscious Tomato Plants
When it comes to growing luscious tomato plants, there are several key tips and tricks that can make all the difference in achieving a bountiful harvest every time you plant. Let’s dive into some expert advice on how to get started!
Choosing the Right Variety
When it comes to growing luscious tomato plants, one of the most crucial decisions you’ll make is choosing the right variety. With so many options available, from cherry tomatoes to beefsteak tomatoes and heirloom varieties, selecting the perfect type can be overwhelming.
Cherry tomatoes are a popular choice for home gardeners due to their compact size and high yield. They’re perfect for small spaces and can thrive in containers or hanging baskets. Beefsteak tomatoes, on the other hand, are ideal for those who want to grow large, meaty tomatoes with a rich flavor. These varieties tend to be more challenging to care for but offer a higher reward.
Heirloom varieties, such as Brandywine and Cherokee Purple, offer unique characteristics like stunning colors and complex flavors. They often require more maintenance than other types but can add visual interest and variety to your garden. When choosing a tomato plant variety, consider factors like climate, soil type, and desired harvest time. Research the specific needs of each variety to ensure you’re providing the best conditions for growth.
Some popular heirloom varieties include ‘Black Krim’, ‘Stupice’, and ‘Yellow Pear’. Each has its unique characteristics, such as flavor profile or color, making them perfect for adding visual interest to your garden and creating captivating images.
Soil Preparation and Fertilization Techniques
When it comes to growing luscious tomato plants, the foundation lies in preparing the soil. The pH level of the soil is crucial for optimal growth, and achieving a balanced pH between 6.0 and 7.0 will ensure that your tomatoes receive the necessary nutrients. To test the pH level, you can use a DIY kit or consult with a local nursery expert. If your soil is too acidic or alkaline, incorporate organic matter like compost or well-rotted manure to adjust the balance.
When it comes to fertilizing, tomato plants require a balanced diet of nitrogen (N), phosphorus (P), and potassium (K). You can use commercial fertilizers, but be cautious not to overdo it as this may lead to weaker stems and reduced yields. A more sustainable approach is to create your own compost tea by steeping compost in water for 24 hours. This liquid fertilizer provides essential nutrients without the risk of over-fertilization.
Keep in mind that regular feeding throughout the growing season will yield better results than a single, heavy dose of fertilizer at planting time.
Common Challenges in Growing and Photographing Tomato Plants
Growing and photographing tomato plants can be a challenging combination, especially when trying to capture their unique textures and colors. We’ll explore some of the most common obstacles you may face.
Overcoming Pests and Diseases
As you nurture your tomato plants, it’s inevitable that pests and diseases will try to sabotage your efforts. One of the most common issues is aphids, which can infest leaves and stems, causing curled or distorted growth. To combat this, use neem oil or insecticidal soap as a natural deterrent. For more severe cases, introduce beneficial insects like ladybugs or lacewings that prey on aphid populations.
Diseases such as fungal infections, caused by excess moisture, can be prevented by maintaining good air circulation and ensuring plants receive adequate sunlight. Fungal pathogens thrive in humid environments; therefore, ensure your tomato plant receives at least six hours of direct sunlight each day.
Nutrient deficiencies are another common problem that can manifest as yellowing leaves or stunted growth. To avoid this, regularly check soil pH levels and amend them if necessary. Most importantly, maintain a balanced fertilizer routine to provide your plants with the essential nutrients they need for optimal health. A general-purpose fertilizer during the growing season will suffice, but be mindful of over-fertilizing, which can harm the plant’s root system.
Troubleshooting Photography Issues
Troubleshooting photography issues can be frustrating, especially when you’re trying to capture the perfect shot of your thriving tomato plant. Poor lighting is a common culprit behind subpar images. When shooting indoors, ensure your subject receives natural light by placing it near a south-facing window or using grow lights specifically designed for indoor plants. If you’re photographing outdoors, consider the time of day and adjust your camera settings accordingly.
Equipment malfunctions can also throw off your photography plans. To avoid this, regularly inspect your camera equipment, lenses, and flashes to prevent any issues from arising during critical shooting moments. For instance, make sure your memory cards are not corrupted or full before heading out to shoot. Additionally, invest in a good quality external flash unit that’s designed for plant photography, as they often have adjustable diffusers for softer lighting.
If you encounter other problems like camera shake or blurred images, practice using the correct technique and take multiple shots of different areas of your tomato plant.
Conclusion: Capturing the Beauty of Tomato Plants through Photography
Now that you’ve captured the essence of your tomato plant, let’s explore ways to preserve these beautiful moments in photographs that will last a lifetime.
Final Tips and Recommendations
As we conclude our journey through capturing the beauty of tomato plants through photography, it’s essential to summarize key takeaways and provide you with a clear direction on how to improve your skills.
By now, you should have gained a solid understanding of the fundamentals of photographing tomato plants. This includes mastering composition, using the right lighting, and experimenting with different angles and perspectives. Remember, practice makes perfect, so keep experimenting with various techniques until you achieve the desired results.
To further enhance your photography skills, focus on developing a keen eye for detail. Study the structure and texture of tomato leaves, the vibrant colors of ripening fruits, and the intricate patterns on stems. Pay attention to subtle changes in lighting throughout the day, as this can greatly impact the mood and atmosphere of your photographs.
When it comes to post-processing, don’t be afraid to get creative with editing software. Learn basic techniques such as adjusting exposure, contrast, and saturation levels to enhance the overall appearance of your images. Consider experimenting with unique filters or presets to add a personal touch to your photographs.
Lastly, don’t forget the importance of gardening skills in complementing your photography abilities. Continuously learn about tomato plant varieties, pruning techniques, and optimal growing conditions to ensure you’re capturing the best possible shots. With patience, persistence, and practice, you’ll be well on your way to becoming a skilled photographer and gardener – capable of capturing breathtaking images of your prized tomato plants.
Frequently Asked Questions
Can I use a smartphone camera to take photos of my tomato plant, or do I need a dedicated camera?
You can definitely use a smartphone camera to capture stunning images of your tomato plant! In fact, many photographers swear by the quality of smartphone cameras. Just make sure you have good lighting and experiment with different angles and compositions to get the best results.
How often should I water my tomato plant for optimal photography?
The frequency of watering will depend on various factors such as climate, soil type, and stage of growth. As a general rule, water your tomato plant when the top 2-3 inches of soil feel dry to the touch. This will ensure that your plant stays healthy and vibrant for photography purposes.
What are some common mistakes to avoid when photographing my tomato plants?
Some common mistakes include over-exposure, under-exposure, and poor composition. To avoid these issues, make sure to adjust your camera settings according to the lighting conditions, pay attention to background clutter, and experiment with different angles and perspectives.
Can I take photos of my tomato plant at any stage of growth, or are some stages better than others?
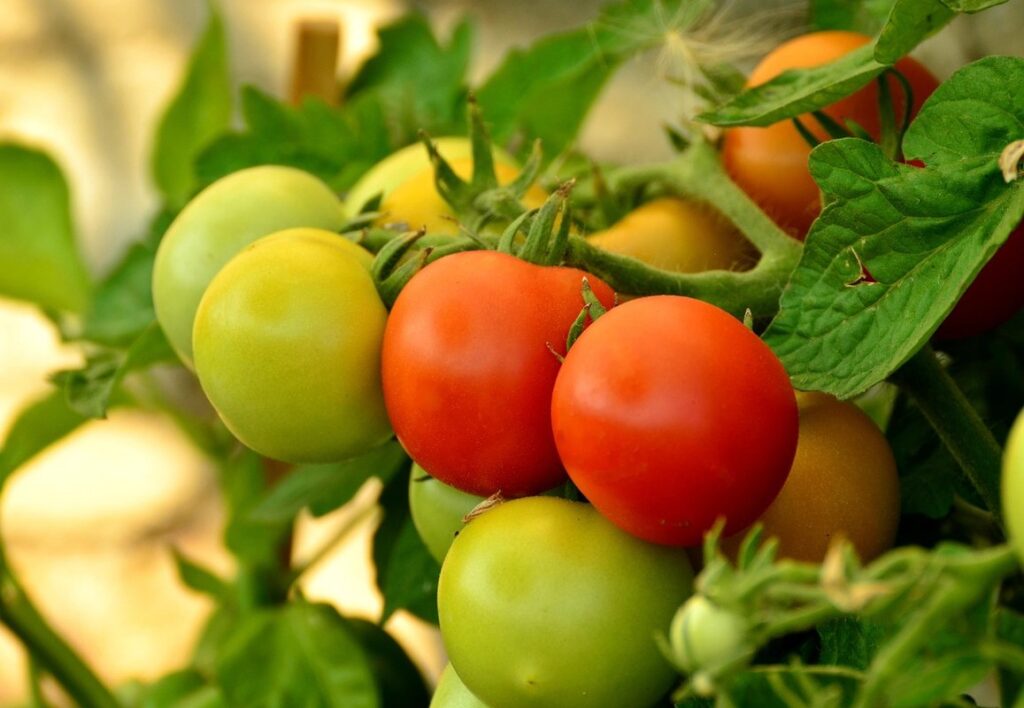
Yes, you can take photos of your tomato plant at various stages of growth. However, for visually appealing images, focus on capturing the fruiting stage when tomatoes are ripe but not yet overripe. This will add a pop of color and texture to your photos.
How do I prevent pests and diseases from affecting my tomato plant’s appearance in photos?
To minimize the impact of pests and diseases, ensure good air circulation around your plants, maintain proper hygiene practices when handling them, and use organic or integrated pest management methods whenever possible. Regularly inspecting your plants for signs of distress will also help you catch any issues early on.