Are you eager to coax your calendula seeds into growth? If so, you’re in luck! Calendula germination can be a finicky process, but with the right conditions, you’ll be on your way to nurturing these beautiful flowers. Did you know that temperature, light, and moisture play crucial roles in this delicate stage of plant development? Optimizing these factors is essential for successful germination. In our comprehensive guide, we’ll dive into the specifics of calendula germination time, exploring how to create an environment conducive to growth. From identifying the ideal temperatures for germination to understanding the impact of light and moisture on your seeds, we’ll cover it all. Whether you’re a seasoned gardener or just starting out, this article will equip you with the knowledge necessary to successfully cultivate calendula from seed.
Understanding Calendula Germination Basics
To successfully grow calendula, you need to understand the basics of germination, including optimal temperature and moisture levels for successful seed sprouting. This section breaks it down in detail.
What is Calendula and Why Is It Important?
Calendula is a versatile and widely used herb that has been cherished for its medicinal and cosmetic properties for centuries. Native to the Mediterranean region, calendula has been cultivated for its bright orange and yellow flowers, which are rich in antioxidants and possess anti-inflammatory properties. The plant’s uses extend far beyond its ornamental value; it is often employed in traditional medicine to soothe skin irritations, wounds, and minor burns.
Calendula’s importance lies not only in its therapeutic applications but also in its versatility as a natural ingredient in skincare products. Its extracts are commonly used in creams, ointments, and lotions to promote wound healing, reduce inflammation, and protect the skin from environmental stressors. Moreover, calendula is a popular ingredient in herbal remedies for digestive issues and menopausal symptoms.
To appreciate the significance of calendula germination time, it’s essential to understand the plant’s unique characteristics and requirements. Calendula’s sensitivity to temperature fluctuations and moisture levels makes its germination process a delicate balance that demands precise conditions. By grasping the intricacies of calendula growth and development, you can successfully cultivate this valuable herb in your garden or indoor space.
Calendula seeds are relatively easy to obtain and store, making it an ideal plant for hobbyists and professional growers alike. However, its germination rate can be influenced by factors such as soil quality, pH levels, and sowing depth. To increase the chances of successful germination, it’s crucial to create a conducive environment that mimics calendula’s natural habitat.
As you delve into the specifics of calendula germination time, keep in mind that this plant is not only a valuable addition to your garden but also a rich source of medicinal and cosmetic benefits. By understanding its unique characteristics and requirements, you can unlock the full potential of calendula and reap its rewards.
Factors Affecting Calendula Germination
When it comes to getting your calendula seeds to germinate, there are several key factors that can influence success. Let’s start with temperature, as this is one of the most critical elements for calendula germination. Calendulas prefer temperatures between 65-75°F (18-24°C) for optimal growth, but they can also tolerate cooler temperatures around 55-60°F (13-15°C). Avoid placing your seeds in direct sunlight or areas with extreme heat fluctuations.
Light exposure is another crucial factor to consider. While calendula seeds do require some light to germinate, they are sensitive to intense light and may develop ‘leggy’ growth if exposed to too much direct sunlight. Provide your seedlings with bright, indirect light for the first few weeks after sowing. Moisture levels also play a significant role in calendula germination.
Make sure the soil is consistently moist but not waterlogged during this period. Finally, the quality of your seeds can significantly impact germination rates. Look for high-quality seeds that are fresh and have a good viability rate to increase your chances of successful germination.
Preparing Seeds for Germination
To get your calendula seeds off to a strong start, you’ll need to prepare them for germination by following some simple steps. This includes cleaning and treating the seeds as needed.
Seed Selection and Storage
When it comes to calendula germination, selecting healthy seeds is crucial for optimal growth. Look for seeds that are plump, dark in color, and free of visible damage. Avoid old or moldy seeds, as they may not germinate well. You can also check the seed package for a “sowing date” or “shelf life,” which can indicate the freshness of the seeds.
Proper storage conditions are equally important to ensure healthy germination rates. Store your calendula seeds in an airtight container, such as a glass jar or envelope, and keep them in a cool, dry place like a cupboard or drawer. Avoid storing seeds near direct sunlight, heat sources, or moisture-prone areas like the kitchen or bathroom.
To handle your seeds gently, use a soft-bristled brush to remove any debris or dust from the seed surface. This helps prevent fungal growth and promotes even germination. If you’re not using your seeds immediately, make sure to store them in a spot with consistent temperatures between 40°F to 50°F (4°C to 10°C) to slow down the aging process. This will help preserve their viability for optimal germination rates.
Seed Stratification: A Crucial Step
Seed stratification is a crucial step in the calendula germination process. It involves exposing the seeds to a period of cold temperatures, usually between 35-45°F (2-7°C), to break dormancy and stimulate growth. This process mimics the natural winter cycle that would occur outdoors, allowing the seeds to awaken from their dormant state.
The benefits of stratification are numerous. By exposing seeds to cold temperatures, you can increase germination rates by up to 50%. Additionally, stratification helps to synchronize seed growth with the optimal temperature and moisture conditions for germination. This means that your calendula plants will be more robust and resilient when they finally emerge.
To perform seed stratification, simply place the seeds in a sealed container or plastic bag filled with moist peat moss or vermiculite. Store it in the refrigerator at 35-45°F (2-7°C) for 30-60 days. After this period, transfer the seeds to a warm location with temperatures between 65-75°F (18-24°C). This will help to trigger germination within 1-3 weeks. By incorporating stratification into your seed-starting routine, you can ensure optimal results and get a head start on your calendula harvest.
Optimal Conditions for Calendula Germination
To successfully germinate calendula seeds, it’s essential to provide optimal conditions that mimic their natural habitat and promote healthy growth from the start. Let’s explore what these ideal conditions are.
Temperature Requirements
When it comes to calendula germination, temperature plays a crucial role. The ideal temperature range for calendula germination is between 65°F (18°C) and 75°F (24°C). If the temperature drops below 55°F (13°C), the seeds may not germinate at all, while temperatures above 85°F (29°C) can cause the seeds to sprout unevenly.
For optimal results, it’s essential to maintain a consistent temperature during the germination period. Sudden changes in temperature can shock the seeds and slow down the germination process. If you’re planning to start calendula seeds indoors, make sure your seed starting mix is at room temperature (around 70°F or 21°C) before sowing.
In case you’re growing calendula outdoors, be mindful of the last frost date in your area. Calendula seeds can tolerate a light frost but prolonged exposure to freezing temperatures can cause damage to the young seedlings. Once the soil has warmed up and reached an optimal temperature, you can expect the calendula seeds to germinate within 7-14 days. Keep the soil consistently moist during this period to promote healthy growth.
Light and Watering Schedule
Light and water are two essential elements that play a crucial role in promoting healthy germination of calendula seeds. Adequate light exposure triggers the seed’s natural processes, while consistent watering helps to maintain an optimal moisture level.
When it comes to lighting, direct sunlight can be too intense for young seedlings. Instead, provide indirect light or use grow lights with a spectrum suitable for seed starting (around 18-24 inches from the seeds). Aim for 12-14 hours of light per day, and consider using a timer to maintain consistency.
Watering schedules are equally important. Keep the soil consistently moist during the germination period, but avoid overwatering, which can lead to rot and poor growth. Check the soil daily by sticking your finger into it; if it feels dry, it’s time for watering. A good rule of thumb is to water when the top inch of soil feels dry to the touch.
Monitor your seeds closely during this period, as excessive moisture or lack thereof can significantly impact germination rates. With proper light and watering schedules in place, you’ll be well on your way to successfully growing healthy calendula seedlings.
Monitoring and Maintaining Calendula Seedlings
Now that your calendula seeds have germinated, it’s time to ensure they thrive – here’s how to monitor and maintain them until they’re ready for transplanting. Proper care is key!
Recognizing Germination Signs
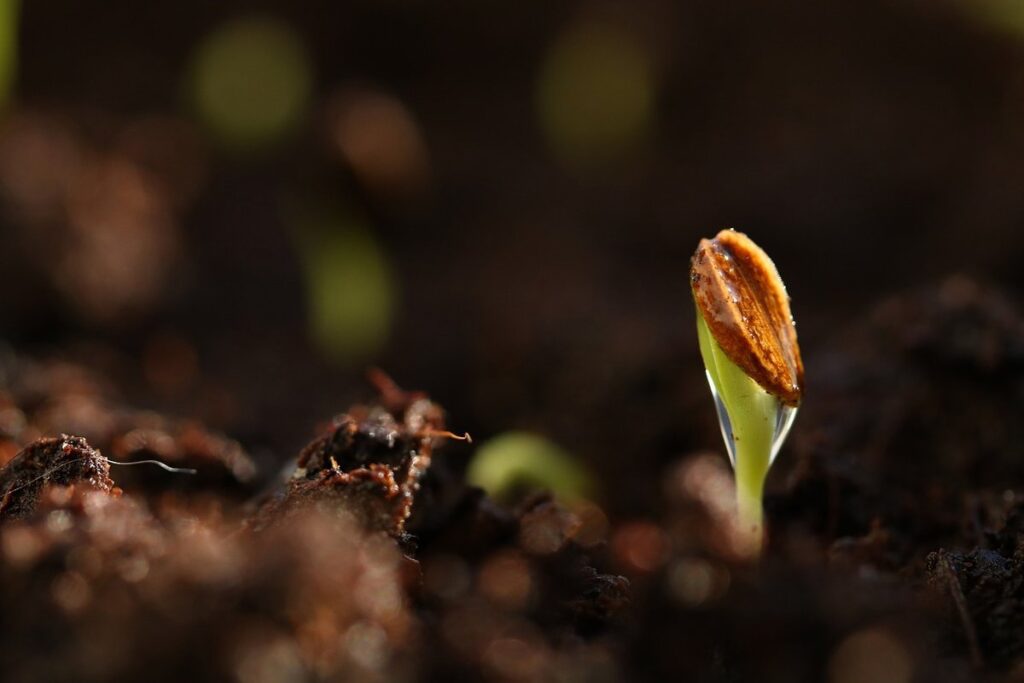
As you wait for your calendula seeds to sprout, it’s essential to recognize the signs of successful germination. This is crucial in determining if your seeds are thriving or if there are any issues that need attention. One of the most noticeable indicators of germination is seedling emergence.
This can be identified by a small green stem pushing its way out of the soil. The first leaves, or cotyledons, will also begin to unfurl and take their characteristic shape. Keep in mind that this process usually occurs 7-14 days after sowing, depending on factors like temperature, light, and seed quality.
Another significant sign is root development. As your seedling grows, its roots will start to extend downward into the soil, anchoring itself firmly. You can check for this by gently excavating around the seed without damaging the delicate roots. This process typically begins a few days after emergence, as the plant focuses on establishing a strong foundation.
It’s also worth noting that calendula seeds often germinate in a cluster due to their small size and tendency to sprout together. As they grow, separate them carefully to prevent overcrowding and promote healthy development.
Common Issues and Troubleshooting
As you nurture your calendula seedlings, you may encounter some common issues that can hinder their growth. One of the most frustrating problems is poor germination rates. This could be due to old or low-quality seeds, inadequate moisture, or insufficient warmth.
If your seeds are not germinating at all, check if they have been stored properly. Old seeds can lose their viability over time, so it’s essential to use fresh ones for optimal results. Ensure the soil is consistently moist but not waterlogged, as this can cause the seeds to rot.
Another issue you might encounter is fungal infections or root rot. This can be caused by overwatering or poor air circulation around the seedlings. To prevent this, make sure your growing medium has good drainage properties and provide sufficient light for the seedlings.
In case of fungal infections, remove affected seedlings immediately to prevent the spread of disease. Treat the remaining seedlings with a fungicide specifically designed for seedlings.
Advanced Techniques for Accelerating Calendula Germination
Now that you’ve mastered the basics, it’s time to take your calendula germination skills to the next level with expert techniques to speed up the process and get a head start on your growing season.
Hydroponics and Aeroponics
When it comes to accelerating calendula germination rates, exploring alternative methods can be a game-changer. Hydroponics and aeroponics are two innovative techniques that have gained popularity in recent years for their ability to enhance seed germination. By leveraging these methods, you can create an optimal environment for your calendula seeds to thrive.
Hydroponics involves growing plants in a nutrient-rich solution rather than soil. This method allows for precise control over the amount of water and nutrients delivered to the roots, resulting in faster and more efficient growth. For example, a study on hydroponically grown calendulas found that they germinated 20% faster and had a 15% higher seedling survival rate compared to traditional soil-grown plants.
Aeroponics, on the other hand, takes hydroponics a step further by delivering water and nutrients directly to the roots through a fine mist. This method reduces water usage by up to 90% while increasing oxygen availability to the roots, leading to healthier and more robust seedlings. By incorporating either of these methods into your calendula germination process, you can achieve faster and more reliable results.
It’s worth noting that both hydroponics and aeroponics require specific equipment and setup. However, with a little investment in time and resources, the rewards are well worth it.
Seed Coatings and Treatments
Seed coatings and treatments can significantly impact calendula germination time. Various options are available to enhance the process, each with its effects on the plant and potential drawbacks.
Some common seed coatings include clay-based products that improve water retention and provide essential nutrients. These coatings can help reduce soil compaction, allowing for better root development. However, they may also increase the risk of fungal diseases if not properly applied.
Treatments like gibberellic acid can stimulate germination by breaking dormancy. This process is particularly useful for seeds with low viability or those that require specific temperature conditions to germinate. Nevertheless, excessive application can lead to seedling weakening and reduced yields.
Another approach involves using bio-stimulants, which promote root growth and increase the plant’s ability to absorb water and nutrients. These products can be especially beneficial in challenging environments like drought-prone areas or poor soil quality. It is essential to research and carefully choose a treatment that aligns with your specific growing conditions to avoid any adverse effects on the calendula plant.
When selecting seed coatings or treatments, consider factors such as cost, environmental impact, and long-term benefits to the plant’s health. A well-informed decision can lead to improved germination rates and overall crop success.
Conclusion: Putting It All Together
Now that we’ve explored the intricacies of calendula germination time, let’s summarize key takeaways and create a plan to successfully grow your own calendula.
Recap of Key Takeaways
As we come to the end of our comprehensive guide on calendula germination time, let’s recap the essential points that’ll help you confidently grow these beautiful flowers. To recap, we established that calendula seeds typically take 7-14 days to germinate indoors and around 1-3 weeks to sprout outdoors, depending on weather conditions.
We also discussed the importance of providing optimal growing conditions, such as temperature (between 65°F to 75°F), light exposure, and soil quality. Make sure your soil is well-draining and has a pH between 6.0 and 7.0 for best results.
Additionally, we highlighted that direct sowing is not recommended, and it’s better to start seeds indoors in seed trays or small pots before transplanting them outside when they’re around 2-3 inches tall. By following these guidelines, you’ll be able to successfully grow calendula flowers with vibrant petals and a long blooming period.
Remember, patience is key when germinating calndula seeds. Keep the soil consistently moist but not waterlogged, and maintain a temperature between 65°F to 75°F for optimal growth.
Final Tips for Success
To ensure a successful germination process, keep in mind that patience is key. Calendula seeds can take anywhere from 7 to 21 days to sprout, depending on the conditions they’re exposed to. Don’t be discouraged if you don’t see immediate results – it’s normal for some seeds to take longer than others.
To optimize your chances of successful germination, maintain a consistent temperature between 65°F and 75°F (18°C and 24°C). Avoid placing your seedlings near drafts or air conditioning vents, as this can cause them to dry out too quickly. Keep the soil consistently moist but not waterlogged, as this can lead to root rot.
If you’re experiencing issues with germination, consider using a propagation tray or starting seeds in a greenhouse environment. This will provide controlled conditions that promote healthy growth and development. Regularly inspect your seedlings for signs of disease or pests, and take action promptly if you notice any issues. With the right care and attention, you should be able to successfully grow calendula from seed.
Frequently Asked Questions
Can I use a heated propagation mat for calendula germination?
Yes, you can definitely use a heated propagation mat to accelerate the germination process. In fact, many growers find that maintaining an optimal temperature between 70-80°F (21-27°C) using a heated mat helps promote healthy growth and development.
How do I know if my calendula seeds are not responding due to inadequate light or insufficient moisture?
Monitor your seedlings closely for signs of nutrient deficiency. If you suspect that your seeds are not germinating due to inadequate light, try moving them to a brighter location or using grow lights. For issues related to moisture, ensure that the soil is consistently moist but not waterlogged.
What if I notice mold growth on my calendula seedlings? How can I prevent it?
Mold growth on your seedlings is often a sign of overwatering. To prevent this issue in the future, ensure that you’re providing enough light and air circulation for your plants. Adjust your watering schedule to avoid waterlogged soil conditions.
Can I use store-bought potting mix or do I need to create my own blend?
You can definitely use a high-quality store-bought potting mix specifically designed for seed starting and germination. However, keep in mind that some potting mixes may contain ingredients that inhibit germination. Look for a well-balanced mix with optimal pH levels (around 6.0-7.0) to support healthy growth.
How long does it typically take for calendula seeds to sprout after stratification?
The exact time frame for sprouting can vary depending on factors like temperature, moisture, and seed quality. Generally, you can expect your calendula seeds to germinate within 1-2 weeks following stratification, with some varieties taking longer than others.