Are you ready to get your green thumb on? With the rising costs of gardening, building a mini greenhouse is not only an eco-friendly solution but also a budget-friendly one. By creating your very own DIY mini greenhouse, you can grow your favorite plants year-round, regardless of the season or weather conditions outside. But what exactly does it take to build and maintain a mini greenhouse? In this article, we’ll guide you through a step-by-step process of building a mini greenhouse using affordable materials like PVC pipes and plastic sheets. We’ll also cover how to plant and care for your mini greenhouse, so you can enjoy the benefits of fresh homegrown produce all year long.
Choosing the Right Materials
When it comes to building a mini greenhouse, selecting the right materials is crucial for durability and optimal growth. Choose wisely from materials like wood, plastic, and glass, considering your climate and budget.
Budget-Friendly Options
When it comes to building a mini greenhouse on a budget, considering affordable materials is crucial. You don’t have to break the bank to create a functional and thriving space for your plants.
One of the best ways to save money is by using recycled or repurposed materials. For example, you can use old pallets as a base for your greenhouse’s frame. Not only will this reduce waste, but it’ll also add character to your mini greenhouse. You can find pallets at local hardware stores, online marketplaces, or even ask friends and family if they have any spare ones.
Another affordable option is using plastic sheets instead of glass panels. These are often used for greenhouses and come in different thicknesses to suit your needs. Plus, they’re relatively easy to install and can be sourced from home improvement stores or online retailers.
Remember, the key to building a mini greenhouse on a budget is to think outside the box and get creative with materials you already have or can source inexpensively.
Durable and Long-Lasting Materials
When it comes to building a mini greenhouse, using durable and long-lasting materials is essential for ensuring its longevity. While it may be tempting to go for cheaper options, investing in high-quality materials will pay off in the long run. Consider using cedar wood for the frame of your mini greenhouse. Not only does cedar wood have natural resistance to rot and insects, but it also has a beautiful, rustic aesthetic that adds charm to any garden.
Another important material to consider is polycarbonate panels. These panels are incredibly durable and can withstand harsh weather conditions, making them perfect for withstanding temperature fluctuations and heavy rainfall. Plus, they allow for maximum light transmission, ensuring your plants receive the sunlight they need to thrive. When choosing polycarbonate panels, look for UV-stabilized options that will resist yellowing over time.
Remember, investing in high-quality materials may be more expensive upfront, but it will save you from costly repairs and replacements down the line. By selecting durable materials like cedar wood and polycarbonate panels, you’ll be able to enjoy your mini greenhouse for years to come.
Planning Your Mini Greenhouse Design
To bring your mini greenhouse design to life, you’ll need to start planning its layout and structure, considering factors such as size and materials. Consider carefully what will work best for your space and needs.
Considerations for Size and Shape
When planning your mini greenhouse design, choosing the right size and shape is crucial. This decision will not only determine how effectively you can utilize your space but also impact the functionality of your mini greenhouse. Before deciding on a specific size and shape, consider the available space where your mini greenhouse will be placed.
Think about the location’s accessibility for maintenance, as well as the surrounding environment. Ensure that the chosen dimensions fit comfortably within this area without overcrowding it.
Next, think about the features you want to include in your design. For example, do you need large windows for ample natural light or vents for proper ventilation? Are there any additional features like shelves for plant storage or a trellis system?
To give you a better idea of what size and shape works best, consider common mini greenhouse dimensions such as 4×4 feet, 6×8 feet, or even larger options. Remember to calculate the interior space carefully, leaving enough room for your plants’ growth.
Climate and Weather Factors
When designing your mini greenhouse, it’s essential to consider the climate and weather factors specific to your region. Temperature control is a critical aspect of mini greenhouse design, as it can make or break your plants’ success. In warmer climates, you’ll need to ensure that your greenhouse receives adequate shade to prevent overheating, which can be achieved with louvers, umbrellas, or even a trellis system.
In colder climates, insulation and heating options become crucial. You can use materials like polycarbonate panels, double-glazed glass, or even bubble wrap to keep the cold out. Additionally, consider installing a passive solar design that allows the sun’s rays to warm the greenhouse during the day while releasing heat at night.
Protection from extreme weather events is also vital. Make sure your mini greenhouse is securely anchored to prevent it from toppling over in strong winds. You can also use materials like metal or wooden frames with heavy bases for added stability. By taking these climate-specific considerations into account, you’ll be well on your way to creating a thriving mini greenhouse that withstands the elements and produces an abundance of fresh produce all year round.
Building Your Mini Greenhouse Base
To get started, you’ll need a sturdy base for your mini greenhouse, which will provide a foundation that’s both functional and visually appealing. Let’s build a solid base to support your project!
Foundation Options: Pavers, Gravel, or Concrete
When it comes to building the base of your mini greenhouse, you have several options to consider. Three popular choices are pavers, gravel, and concrete. Each has its own set of pros and cons that can impact the overall performance and longevity of your mini greenhouse.
Pavers offer a decorative look and easy maintenance. They allow for good air circulation around the roots of your plants and can be easily removed if needed. However, they can become dislodged over time, especially with heavy rainfall or foot traffic. Additionally, pavers require a solid base to prevent shifting, which can add extra cost.
Gravel provides excellent drainage and aeration for your mini greenhouse’s foundation. It allows excess water to flow freely through the ground, preventing waterlogged soil that can be detrimental to plants. However, gravel can shift over time, especially if not properly compacted, which may require periodic replenishment.
Concrete is a solid choice, offering stability and long-term durability. It provides a level surface for your mini greenhouse and prevents shifting or settling issues. However, it can be more expensive than other options, and improper installation can lead to cracks and damage over time.
Frame Construction: Lumber or PVC
When it comes to building a sturdy frame for your mini greenhouse, you have two main options: using lumber or PVC pipes. Both materials can provide excellent support and durability, but they offer distinct advantages and disadvantages.
Lumber is a traditional choice for framing, offering a natural look and feel that many gardeners appreciate. However, it requires regular maintenance to prevent rot and insect damage, which can be time-consuming and costly in the long run. You’ll need to consider factors like moisture resistance, as wood will eventually warp or crack if exposed to too much rain or sunlight.
PVC pipes, on the other hand, are a low-maintenance alternative that’s easy to install and requires minimal upkeep. They’re also resistant to rot, insects, and warping, making them an excellent choice for gardeners who want a hassle-free greenhouse experience. That being said, PVC pipes can be more expensive than lumber, especially if you need to cut them to size.
Consider the following when deciding between lumber and PVC pipes:
* Budget: If cost is a major concern, lumber might be the better option.
* Maintenance: If you’re short on time or prefer low-maintenance gardening, PVC pipes are the way to go.
* Aesthetics: If you want a natural look, lumber might be the best choice.
Assembling the Roof and Walls
Now that you’ve prepared your frame, it’s time to bring your mini greenhouse together by assembling the roof and walls, which will provide the structural integrity for your growing space. This section guides you through this process step-by-step.
Gable or Hip Roof Options
When it comes to assembling the roof and walls of your mini greenhouse, one crucial decision is choosing the right roof style. You have two primary options: gable or hip roofs. Both styles offer unique benefits that can enhance the structure’s durability, weather resistance, and overall aesthetic appeal.
A gable roof features a triangular shape with two sloping sides that meet at a ridge in the middle. This design is relatively easy to construct, as it requires fewer materials than a hip roof. However, it may not be as effective at shedding water during heavy rainfall or snowfall, which can lead to leaks and structural damage.
On the other hand, a hip roof has four sloping sides that meet at each corner, providing better water runoff and more even weight distribution. This design is more complex to build, but its added stability and weather resistance make it a great option for areas with high winds or heavy snowfall. When deciding between these two options, consider the climate, local building codes, and your personal preference for ease of construction versus long-term durability.
Wall Paneling and Ventilation Systems
When it comes to building your mini greenhouse’s walls, you’ll want to consider various wall paneling options that provide durability, light transmission, and protection from the elements. Polycarbonate panels are an excellent choice for their affordability and ease of installation. You can opt for either 4mm or 6mm thickness, depending on your specific needs and budget.
Alternatively, glass panels offer superior light transmission and better insulation properties. However, they require more support and care during handling to avoid breakage. If you’re looking for a more decorative option, consider using reclaimed wood or composite materials that mimic the look of wood but are more resistant to rot and insect damage.
When it comes to ventilation systems, proper airflow is crucial to prevent overheating and maintain healthy plant growth. Install vents at different levels on the walls to allow warm air to escape while keeping cool air inside. Consider adding automatic vent openers or manual latches for easy access.
Adding Lighting and Irrigation Systems
Now that you have a mini greenhouse up and running, let’s add the finishing touches: lighting and irrigation systems to promote healthy plant growth. This is where your DIY project gets truly special.
Types of Grow Lights: LED, Fluorescent, or HPS
When it comes to illuminating your mini greenhouse, you’ve got several options for grow lights. Let’s break down the main types: LED, Fluorescent, and HPS (High Pressure Sodium) lights.
LED grow lights are energy-efficient and durable, using up to 70% less power than traditional lighting methods. They’re also available in a range of spectra, allowing you to tailor their output to your plants’ specific needs. If you’re growing delicate seedlings or flowering plants, look for LEDs with a spectrum rich in blue and red light.
Fluorescent lights are another option, providing a broad spectrum that’s suitable for most plants. They’re relatively inexpensive but can be less energy-efficient than LEDs. HPS lights offer high intensity, making them ideal for larger spaces or for promoting rapid growth in specific crops like tomatoes.
Consider your mini greenhouse size and the types of plants you’ll be growing when choosing a grow light type. If space is limited, LED lights are a great choice due to their compact design and low energy consumption.
DIY Irrigation System Ideas
When it comes to creating a mini greenhouse, one of the most crucial components is ensuring that your plants receive adequate water supply. A well-designed irrigation system can save you time and effort while keeping your plants healthy. Fortunately, building a DIY irrigation system is easier than you think.
One simple yet effective idea is to use plastic tubing and drippers. You can purchase these materials at a relatively low cost from most gardening stores or online retailers. To get started, lay out the area where you’ll be placing the mini greenhouse, then run the tubing along the length of your plant bed. Use T-connectors to create a network of lines that distribute water evenly across each section.
For an even more efficient setup, consider using soaker hoses instead of individual drippers. These specialized hoses emit a gentle spray of water as plants need it most – at the roots. This approach is particularly useful for large planters or areas with dense foliage. By repurposing everyday materials and following these simple steps, you can create an irrigation system that not only conserves water but also minimizes waste.
Planting and Maintenance Tips
To ensure your mini greenhouse thrives, follow these essential planting and maintenance tips that will help you keep your plants happy and healthy all year round.
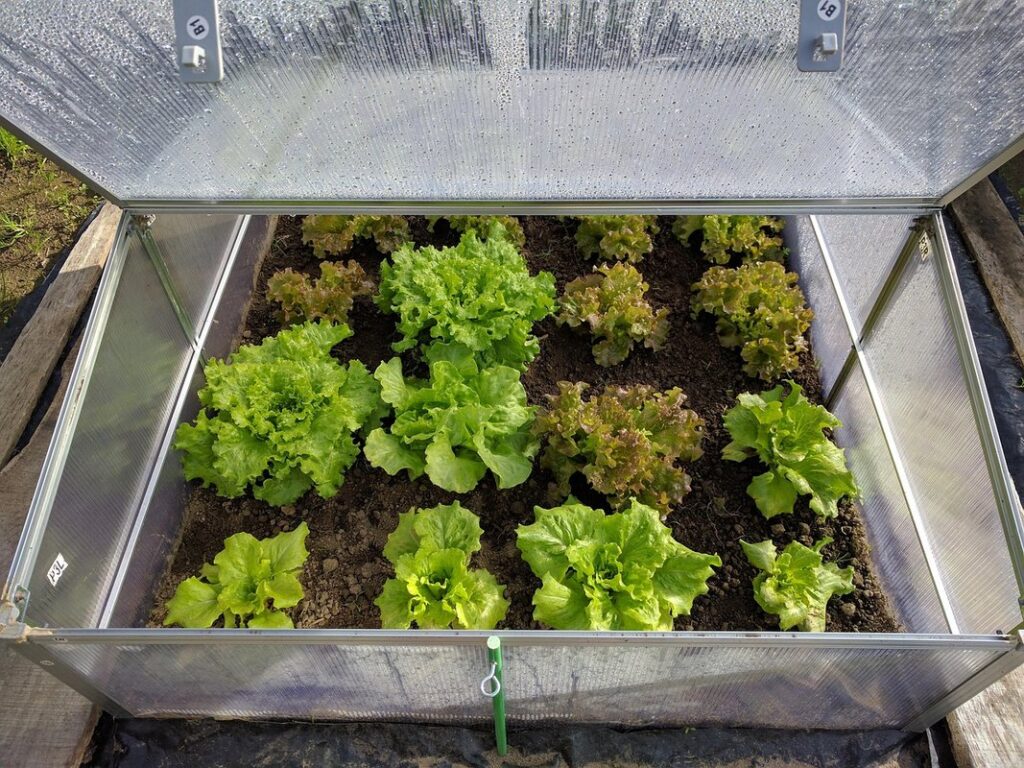
Choosing the Right Plants for Your Mini Greenhouse
When choosing plants for your mini greenhouse, it’s essential to consider their temperature tolerance and light requirements. Some plants thrive in temperatures between 65-75°F (18-24°C), while others can handle the warmer conditions inside a mini greenhouse.
For example, tomatoes and peppers are perfect for a mini greenhouse as they require warmth and sunlight to produce an abundance of fruit. On the other hand, delicate herbs like basil and mint prefer cooler temperatures and should be placed in areas with indirect light.
Make sure to research the specific needs of each plant before bringing them into your mini greenhouse. This will ensure they receive the right conditions for optimal growth. Here are some general guidelines for plants that do well in a mini greenhouse:
* Warm-season crops like tomatoes, peppers, and eggplants
* Herbs like basil, mint, and cilantro
* Leafy greens like lettuce and kale
When selecting plants, also consider their mature size to ensure they have enough space to grow inside the mini greenhouse.
Watering, Fertilization, and Pest Control Strategies
Maintaining a healthy mini greenhouse ecosystem requires regular watering schedules and pest management techniques. Watering is crucial to ensure the plants receive adequate moisture, but overwatering can be detrimental. Aim to water your mini greenhouse when the top 1-2 inches of soil feel dry to the touch. Check the moisture level daily during hot or dry weather.
To prevent pests from infesting your mini greenhouse, introduce beneficial insects like ladybugs and lacewings that feed on aphids and whiteflies. Use neem oil or insecticidal soap as a natural deterrent against spider mites and mealybugs. Inspect your plants regularly for signs of pest activity, such as tiny eggs, sticky substances, or actual pests.
Fertilize your mini greenhouse plants every 2-3 weeks with a balanced fertilizer (10-10-10 NPK). Dilute the fertilizer according to the manufacturer’s instructions to avoid burning your plants’ roots. Keep in mind that overfertilization can lead to more harm than good, so monitor your plants closely for any signs of nutrient overload.
In addition, maintain air circulation within your mini greenhouse by opening windows or using fans to prevent fungal diseases from taking hold. Regular pruning and grooming will also help keep your plants healthy and thriving.
Troubleshooting Common Issues
Don’t worry if things don’t go exactly as planned – we’ve got you covered with some helpful troubleshooting tips to get your mini greenhouse back on track. Common issues and their solutions are just ahead.
Leaks, Condensation, and Other Common Problems
Leaks, condensation, and other issues may arise when using a mini greenhouse. To ensure optimal performance, it’s essential to address these problems promptly. Leaks are often caused by improper sealing of joints, gaps between the frame and glazing, or damaged components.
To fix leaks, inspect the entire structure for any signs of damage or wear. Check for loose connections and re-tighten screws or clips. If the issue persists, consider replacing the affected part. Sealants like silicone or weatherstripping can also be applied to fill gaps between frames and glazing.
Condensation may occur due to temperature fluctuations, high humidity levels, or poor ventilation within the greenhouse. To minimize this issue, ensure good airflow by installing vents or screens on the sides or top of the mini greenhouse. You can also use a dehumidifier to reduce moisture inside the structure.
Other common problems include pests, uneven watering, and lack of sunlight penetration. Regularly inspect your mini greenhouse for signs of pest infestation and take action promptly. Proper watering techniques should be implemented, such as using a drip irrigation system or self-watering pots. To ensure sufficient light exposure, position your mini greenhouse facing southwards, ideally between 10-12 am for optimal direct sunlight.
Seasonal Maintenance and Upgrades
As you tend to your mini greenhouse throughout the seasons, it’s essential to perform some routine tasks to maintain optimal performance and extend its lifespan. During spring and summer, inspect your greenhouse regularly for debris accumulation on the glazing and roof. This is a perfect opportunity to clean out any leaves or branches that may have accumulated during winter.
In addition to cleaning, consider upgrading your mini greenhouse equipment during these seasons. For instance, you can replace old or worn-out irrigation systems with more efficient ones. Also, inspect the ventilation system and replace any faulty fans to ensure proper airflow and prevent overheating.
Another critical task is to check for pests and diseases that thrive in warmer temperatures. Regularly inspect your plants for signs of infestation or infection and take prompt action if necessary. This proactive approach will help you maintain a healthy and thriving ecosystem within your mini greenhouse. By performing these seasonal tasks, you’ll be able to enjoy optimal growth and yields from your plants.
Frequently Asked Questions
Can I use a mini greenhouse for plants that require different temperature conditions?
You can create separate sections within your mini greenhouse to accommodate plants with varying temperature needs. This will allow you to regulate the climate in each area, ensuring optimal growth and thriving plants.
How do I maintain my mini greenhouse during extreme weather conditions like heavy snow or intense heatwaves?
Regularly inspect your mini greenhouse for any damage caused by harsh weather conditions. Use weather-resistant materials and apply a waterproof coating to protect your structure from moisture-related issues. Consider installing a backup system, such as a dehumidifier or heating element, to maintain a stable environment.
Are there any eco-friendly alternatives to PVC pipes for the frame of my mini greenhouse?
Consider using recycled metal frames, sustainably sourced wood, or bamboo for an environmentally friendly option. These materials can provide durability and support while minimizing your carbon footprint.
Can I reuse or repurpose old windows for the walls of my mini greenhouse?
Yes, you can repurpose old windows by cleaning them thoroughly and installing them on a frame or attaching them directly to the structure. This not only adds character but also reduces waste and creates a unique feature for your mini greenhouse.
How do I prevent pests and diseases in my mini greenhouse without using harsh chemicals?
Implement integrated pest management techniques, such as introducing beneficial insects, practicing good hygiene, and rotating crops regularly. Use natural deterrents like neem oil or garlic sprays to maintain a healthy environment within your mini greenhouse.