Are you one of the lucky gardeners who has fallen in love with the bright, cheery blooms of Brown Eyed Susan? This drought-tolerant flower is a dream to care for, but it still needs some TLC to thrive. Whether you’re a seasoned pro or just starting out, learning how to properly care for your Brown Eyed Susans can make all the difference in their health and appearance.
In this comprehensive guide, we’ll walk you through everything you need to know about caring for Brown Eyed Susan. From planting and watering to fertilizing and pruning, we’ve got it covered. We’ll share expert tips on how to coax the most vibrant blooms out of these gorgeous flowers, even in challenging conditions. By the end of this article, you’ll be a pro at growing drought-tolerant Brown Eyed Susans that add warmth and personality to your garden.
Understanding Brown Eyed Susan
If you’re new to brown eyed susan care, understanding its unique needs is crucial for thriving plants. In this next part, we’ll delve into what makes brown eyed susan special.
What is Brown Eyed Susan?
Brown Eyed Susan is a daisy-like perennial flower that’s native to North America. Its botanical name is Rudbeckia hirta, and it’s a popular choice for gardeners due to its vibrant yellow petals with dark centers. This lovely plant thrives in dry to medium moisture conditions, making it an ideal option for areas with poor soil quality.
In the wild, Brown Eyed Susan grows abundantly in prairies, meadows, and along roadsides from Canada to Mexico. It’s a hardy perennial that can tolerate drought, heat, and cold temperatures, making it a low-maintenance addition to any garden. When choosing a spot for your Brown Eyed Susan, consider areas with full sun to partial shade, as this will help promote healthy growth and blooming.
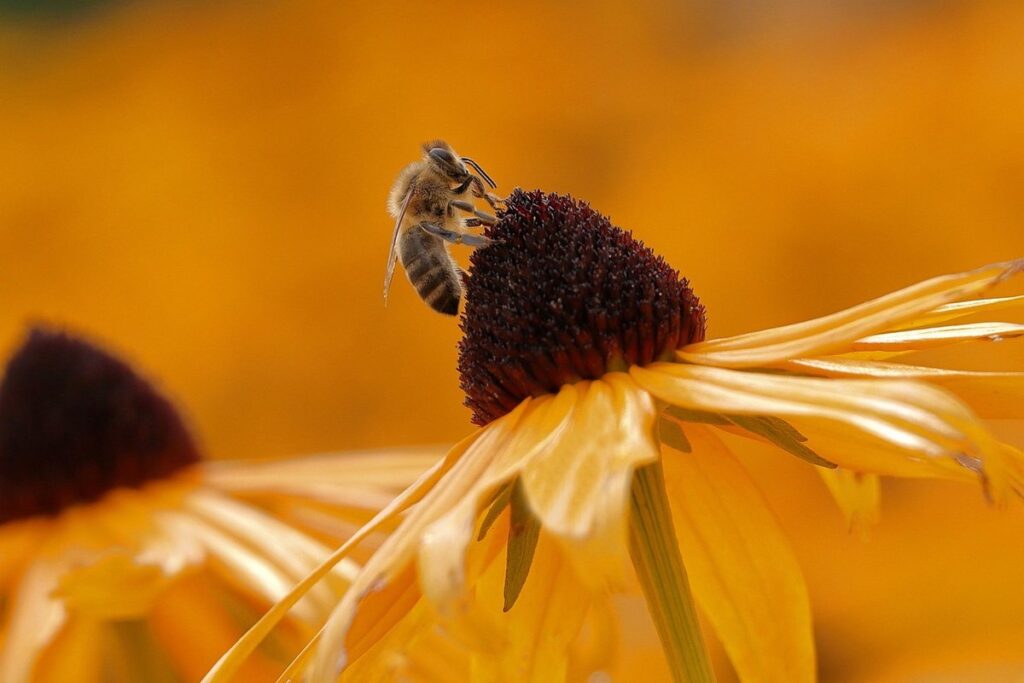
If you’re planting Brown Eyed Susan in a new garden bed, be sure to loosen the soil to a depth of about 12 inches to encourage root growth. This will also help prevent the plant from becoming waterlogged during periods of high rainfall. With proper care and conditions, your Brown Eyed Susan should bloom from mid-summer to fall, attracting pollinators like bees and butterflies to your garden.
Benefits of Growing Brown Eyed Susan
Brown Eyed Susan is an exceptional addition to any garden, offering numerous benefits that make it a popular choice among gardeners. One of its most significant advantages is its ability to attract pollinators like bees and butterflies. These beneficial insects are essential for the reproduction of many plants, making Brown Eyed Susan a vital component in maintaining a healthy ecosystem.
Its drought-tolerant nature also makes it an excellent option for areas with limited water resources or during times when water conservation is crucial. With proper care, this hardy flower can thrive in full sun and well-drained soil, requiring minimal maintenance. This low-maintenance aspect allows gardeners to enjoy its vibrant yellow petals and dark center without the need for frequent watering or pruning.
During summer months, Brown Eyed Susan adds a burst of color to gardens, providing a delightful contrast to other foliage. Its late-blooming habit also extends the blooming season, as it continues to produce flowers from mid-to-late summer until fall. By incorporating this versatile flower into your garden, you’ll not only enjoy its beauty but also contribute to the well-being of local pollinators and support a more sustainable gardening approach.
Planting Brown Eyed Susan
To get started with growing brown eyed susans, you’ll want to know when and how to plant them for optimal blooms. Let’s dive into the process of planting these beautiful flowers.
Choosing the Right Location
When it comes to planting Brown Eyed Susan, selecting the right location is crucial for optimal growth and overall health of the plant. First and foremost, consider the amount of sunlight the area receives. Brown Eyed Susans love basking in full sun exposure, so choose a spot that gets at least 6 hours of direct sunlight per day. This will not only promote vibrant blooms but also prevent any potential issues with powdery mildew, a common disease affecting plants grown in shady conditions.
In addition to sunlight, pay attention to the soil quality. Brown Eyed Susans thrive in well-drained soil that’s rich in organic matter. If your yard has heavy clay or sandy soils, consider amending it with compost or perlite to improve drainage and fertility. Avoid low-lying areas where water tends to collect, as this can lead to root rot and other problems.
When selecting a location for Brown Eyed Susan, keep an eye out for nearby plants that might compete with them for resources. Plant them in a spot where they’ll have enough space to spread out without being crowded by other vegetation. By considering these factors, you’ll set your Brown Eyed Susans up for success and enjoy their beautiful blooms all season long.
Preparing the Soil
Preparing the soil before planting Brown Eyed Susans is crucial for their healthy growth and development. To start, dig up the area to a depth of about 12 inches. This will loosen the soil, making it easier for the roots to spread out and absorb nutrients. You can use a shovel or a garden fork to break up any clumps and remove any debris.
Next, mix in some organic matter like compost or well-rotted manure. These add essential nutrients to the soil while improving its drainage and fertility. A general rule of thumb is to add about 2-3 inches of compost or manure, spreading it evenly across the prepared area. This will not only provide a nutrient-rich environment for your Brown Eyed Susans but also help them establish a strong root system.
When choosing an organic matter, consider what’s readily available in your garden or local nursery. Composted leaf mold and peat moss are good options for improving soil structure and fertility. Remember to mix the organic matter well into the loosened soil, making sure it’s evenly distributed throughout the area where you’ll be planting.
Planting Techniques
When it comes to planting Brown Eyed Susan, you want to make sure you’re setting yourself up for success from the get-go. Here’s a step-by-step guide on how to plant these beautiful flowers.
Start by choosing a location with well-draining soil and full sun to partial shade. This will ensure that your Brown Eyed Susans receive the right amount of light and water to thrive. Next, dig a hole that’s about 12-18 inches deep and wide enough to accommodate the root ball of the plant.
Space the plants about 18-24 inches apart, depending on how dense you want them to grow. If you’re planting in a large area, consider staggering the rows to create a more visually appealing pattern. Water the soil well after planting and keep it consistently moist during the first few weeks while the plants establish themselves.
As your Brown Eyed Susans begin to bloom, don’t forget to deadhead spent flowers regularly. This will encourage new blooms and prevent seed production. Simply snip off the faded flowers at the stem, leaving a small portion of the stem intact.
Watering and Irrigation
Now that you’ve got Brown Eyed Susans thriving, it’s time to teach them good habits by learning how to properly water and irrigate these lovely flowers. Let’s dive into the nitty-gritty of keeping them happy and healthy.
Importance of Proper Watering
When it comes to caring for Brown Eyed Susans, proper watering is crucial to maintaining their health and vibrancy. Watering your plants adequately but not excessively is key to preventing both overwatering and underwatering issues. Overwatering can lead to root rot, as the excess water creates an environment perfect for fungal growth, which can be fatal to these lovely wildflowers.
On the other hand, underwatering causes stress to the plant, weakening its immune system and making it more susceptible to pests and diseases. To avoid these problems, it’s essential to strike the right balance. Check the soil moisture by sticking your finger into the soil up to the first knuckle. If the soil feels dry at this point, it’s time to water.
Aim to provide about 1 inch of water per week, either through rainfall or irrigation. However, make sure not to overwater, as the excess can collect in the crown and cause rot. Water your Brown Eyed Susans deeply but infrequently to encourage deep root growth, making them more drought-resistant and less prone to disease. This simple habit will help keep your plants thriving all season long.
Efficient Irrigation Methods
When it comes to watering Brown Eyed Susans, efficient irrigation methods are crucial to prevent overwatering and reduce water waste. One effective technique is drip irrigation, which delivers water directly to the roots of the plant through a network of tubes and emitters. This method reduces evaporation and runoff, ensuring that the plant’s needs are met while minimizing excess moisture in the soil.
Another option is soaker hoses, which release water slowly along their length as they’re placed around the base of the plants. These flexible hoses are perfect for large areas or for plants like Brown Eyed Susans that have extensive root systems. Both drip irrigation and soaker hoses conserve water while promoting healthy growth by allowing the plant to absorb water precisely when it needs it.
To implement these methods, consider installing a timer or moisture sensor to regulate watering schedules based on weather conditions and soil moisture levels. By adopting efficient irrigation techniques like drip irrigation and soaker hoses, you can help Brown Eyed Susans thrive while saving precious resources for other areas of your garden.
Fertilizing Brown Eyed Susan
When it comes to keeping your brown eyed susans healthy and thriving, fertilizing is a crucial step that’s often overlooked. Let’s dive into how to give them the nutrients they need to bloom beautifully!
Nutrient Requirements
When it comes to fertilizing Brown Eyed Susan, understanding its nutrient requirements is crucial for optimal growth and development. These daisy-like flowers thrive in well-draining soil with a balanced mix of essential nutrients.
Nitrogen (N) is a vital component for leaf growth and green coloration. Brown Eyed Susan requires moderate levels of nitrogen throughout the growing season. A general rule of thumb is to apply 10-15% nitrogen fertilizer in the spring, followed by a balanced formula during peak bloom period.
Phosphorus (P) plays a significant role in root development and flower production. This nutrient should be applied at the start of the growing season to promote healthy roots and robust blooms. A recommended ratio for phosphorus is around 5-10% P2O5.
Potassium (K), also known as potash, helps with overall plant health, resistance to disease, and improves water retention in the soil. Aim for a potassium-rich fertilizer with 20-25% K2O content.
For optimal results, consider using a balanced, slow-release fertilizer that provides equal amounts of nitrogen, phosphorus, and potassium (e.g., 10-10-10 N-P-K). This approach ensures your Brown Eyed Susan receives the necessary nutrients for healthy growth throughout its life cycle.
Organic vs. Synthetic Fertilizers
When it comes to fertilizing Brown Eyed Susan, you’ve got two main options: organic and synthetic fertilizers. Both have their pros and cons, which we’ll explore below.
Organic fertilizers are made from natural ingredients like compost, manure, or bone meal. They work slowly, releasing nutrients as they break down in the soil. This approach is gentler on the environment, reducing the risk of water pollution and soil degradation. For example, using fish emulsion as a fertilizer will provide your Brown Eyed Susan with essential micronutrients without harming local aquatic life.
However, organic fertilizers can be less effective than synthetic options, requiring more frequent applications to see results. This may be a drawback for busy gardeners or those short on time. Moreover, some organic fertilizers can be costly and harder to find in local nurseries.
Synthetic fertilizers, on the other hand, provide quick fixes but come with their own set of issues. They’re made from chemical compounds that rapidly release nutrients, which can lead to over-fertilization and soil toxicity. This type of fertilizer also contributes to environmental degradation, contaminating water sources and harming local ecosystems.
Pruning and Maintenance
To keep your brown eyed susans thriving, it’s essential to prune them regularly and perform some basic maintenance tasks. This will ensure they continue to bloom beautifully year after year.
Why Prune Brown Eyed Susan?
Pruning is an essential part of maintaining your Brown Eyed Susan (Rudbeckia hirta) and ensuring it remains healthy and thriving. By pruning this beautiful perennial flower, you can control its plant height, promote bushy growth, and encourage more blooms.
One of the main reasons to prune Brown Eyed Susan is to control its height. If left unpruned, it can grow quite tall – up to 3-4 feet in some cases! Pruning helps keep it at a manageable size, making it perfect for smaller gardens or containers. To achieve this, simply cut back the stems by about one-third to one-half after blooming has finished.
Pruning also promotes bushy growth and encourages more blooms. By removing spent flowers (deadheading) and trimming back leggy stems, you’re directing the plant’s energy towards producing new growth and flowers. This will not only make your Brown Eyed Susan look fuller and more vibrant but also increase its overall blooming period.
Regular pruning is key to maintaining a healthy Brown Eyed Susan. By incorporating this simple practice into your garden routine, you’ll be rewarded with a lush, thriving plant that’s sure to add color and charm to your outdoor space!
Techniques for Deadheading
Deadheading spent flowers is an essential technique for encouraging Brown Eyed Susan to produce more blooms and maintain its appearance. To deadhead without damaging the plant’s foliage or stem, start by carefully removing the faded flower from the stem using a pair of clean scissors or pinchers. Cut or pinch off the entire flower head, leaving about 1-2 inches of stem intact.
When deadheading, it’s essential to make clean cuts just above a node (where a leaf meets the stem), as this will help prevent water from collecting on the plant and reduce the risk of disease. Be sure not to cut too much of the stem, as this can weaken the plant and lead to an increased risk of dieback.
To avoid damaging the plant’s foliage, gently remove any dead or dying leaves that are below the node, taking care not to pull or tear at the surrounding tissue. By regularly deadheading spent flowers, you’ll encourage Brown Eyed Susan to focus its energy on producing new blooms and maintain a tidy appearance throughout the growing season.
Common Pests and Diseases
As a brown-eyed susan enthusiast, you’re probably aware that even the most thriving plants can fall victim to pests and diseases, which is why it’s essential to know how to identify common problems. Keep reading for some expert advice on tackling these issues!
Identifying Issues Early On
Regular monitoring is essential to catch signs of pests and diseases early on, preventing them from taking over your Brown Eyed Susan. These issues can arise at any time, even if you’ve provided optimal growing conditions.
Aphids are a common pest that can infest Brown Eyed Susans, especially in warmer temperatures. They appear as small, soft-bodied insects that feed on the plant’s sap. To detect aphids, inspect your plants regularly, looking for curled or distorted leaves, and a sticky substance called honeydew.
On the other hand, powdery mildew is a fungal disease that causes a white, powdery coating to form on the leaves of infected plants. Root rot is another concern, caused by overwatering or poor drainage, which can lead to soft, mushy stems and yellowing leaves.
To prevent these issues, inspect your Brown Eyed Susans every week during peak growing seasons. Look for signs like holes in leaves, discoloration, or an unusual amount of debris around the base of the plants. If you notice any problems, address them promptly with organic pest control methods or fungicides as needed.
Effective Pest and Disease Management Strategies
When it comes to brown-eyed Susan care, effective pest and disease management is crucial for maintaining the health and beauty of these lovely flowers. One of the most common issues gardeners face with brown-eyed Susans is powdery mildew, a fungal disease that causes white, powdery patches on leaves.
To manage this issue, consider using neem oil as an organic solution. Neem oil can be applied to affected areas to help control fungal growth and prevent further spread. Mix 2-3 tablespoons of neem oil with water according to the product’s instructions and spray it on your brown-eyed Susans at the first sign of powdery mildew.
Cultural controls are also essential in preventing pest and disease issues. Make sure to plant brown-eyed Susans in well-draining soil, as this can help prevent root rot and other diseases. Also, avoid overwatering, which can lead to fungal growth and attract pests like aphids and whiteflies.
Tips for Winter Care
To keep your Brown Eyed Susans thriving through winter, it’s essential to provide them with proper care and protection from harsh weather conditions. Here are some valuable tips to help you do so.
Preparing Brown Eyed Susan for Dormancy
As autumn approaches and the days grow shorter, it’s time to start preparing Brown Eyed Susan for dormancy. This process will help the plant conserve energy and protect itself from harsh winter conditions.
First, cut back the stems of the plant to about 2-3 inches above the ground. This will encourage new growth in the spring and prevent the plant from rotting over winter. You can use a pair of pruning shears or loppers for this task, depending on the thickness of the stems. Be sure to remove any dead or damaged flowers or leaves as well, as these can harbor diseases that might harm the plant.
Next, apply a protective layer of mulch or straw around the base of the plant. This will help insulate the roots from cold temperatures and prevent moisture loss. You can use a thick layer (about 3-4 inches) to ensure the plant stays cozy throughout winter. Make sure to leave a small gap around the center of the plant so that water can still drain off. By taking these simple steps, you’ll be giving your Brown Eyed Susan a head start on next year’s growth and ensuring it remains healthy and vibrant for years to come.
Bringing Cuttings Indoors
To bring the vibrant beauty of Brown Eyed Susan indoors during winter, propagation using cuttings is an excellent option. This method allows you to create new plants from existing ones, ensuring a continuous supply of this lovely flower in your home.
Start by selecting healthy stem sections with at least two nodes (the joint where a leaf meets the stem) and a few sets of leaves. Cut just above a node using sharp, clean scissors or pruning shears. Remove lower leaves, leaving only two to three sets towards the top.
Next, prepare a propagation station by filling a container with a well-draining rooting mix. Dip the cut end into a rooting hormone powder or liquid, following the product’s instructions for application rates and timing. Gently plant the cutting into the mix, firming it in place to secure the stem. Water thoroughly and provide bright, indirect light until roots develop.
Within 2-3 weeks, you should notice new growth emerging from the node where you made the cut. Once established, transplant the young plants into individual pots or directly into your garden come springtime, when temperatures allow for outdoor planting.
Frequently Asked Questions
How do I ensure my Brown Eyed Susans receive the right amount of sunlight?
While Brown Eyed Susan can tolerate partial shade, it prefers full sun to produce the most vibrant blooms. To determine the ideal spot for your plants, observe the area where they will be planted and note how much direct sunlight they receive throughout the day. If possible, choose a location that receives at least 6 hours of direct sunlight.
Can I propagate Brown Eyed Susan through division or cuttings?
Yes, both division and cuttings can be effective methods for propagating Brown Eyed Susan. Division is best done in the spring when the plant is actively growing, while cuttings can be taken from stem sections during the growing season. Make sure to take 4-6 inch stem sections with at least two sets of leaves, and plant them in well-draining soil.
What are some common pests that target Brown Eyed Susan?
Aphids, Japanese beetles, and caterpillars are common pests that can affect Brown Eyed Susan. To manage these issues effectively, keep a watchful eye on your plants for signs of infestation and use organic methods whenever possible. For example, introducing beneficial insects like ladybugs or lacewings can help control aphid populations.
Can I grow Brown Eyed Susan in containers?
Yes, Brown Eyed Susan can thrive in containers, provided they are at least 6-8 inches deep to accommodate the plant’s taproot. Choose a well-draining potting mix and avoid overwatering, as this can lead to root rot. Place the container in a location with full sun to partial shade, depending on your local climate.
How do I winterize my Brown Eyed Susan for optimal spring growth?
To prepare your Brown Eyed Susan for dormancy, cut back the stems after the first frost and remove any dead or damaged foliage. Apply a layer of mulch around the base of the plant to protect it from extreme temperatures and moisture fluctuations. This will help promote healthy growth when the weather warms up in spring.