As a gardener, you know how essential pollinators are to your plant’s success. But did you know that a strong and healthy queen bee is the key to maximizing your garden’s pollination power? Breeding queen bees for specific traits can make all the difference in keeping your colonies thriving and increasing yields. By learning the techniques of selecting the right breeds, integrating new queens into your existing colonies, and optimizing conditions for successful breeding, you’ll be able to boost your gardens’ pollination potential like never before. In this article, we’ll explore how breeding queen bees can take your garden’s pollination power to the next level, covering everything from choosing the right breed to successfully integrating a new queen into your colony.
Understanding the Importance of Queen Bees in Pollination
You might wonder why queen bees are crucial for effective pollination, but it’s essential to understand their unique role in fertilizing plants and crops. Let’s dive into this vital process!
The Role of Queen Bees in Colony Success
When it comes to maintaining a healthy colony and ensuring successful pollination, queen bees play a crucial role. As the largest bee in the colony, the queen is responsible for laying eggs that will hatch into new worker bees, drones, or even future queens. Her pheromones also regulate the behavior of the other bees, helping to maintain social order within the colony.
A healthy queen bee can mean the difference between a thriving colony and one on the brink of collapse. Without her, the colony would eventually die out due to lack of new workers. In fact, studies have shown that colonies with high-quality queens are more resilient to pests and diseases, and have higher honey yields.
To ensure the success of your garden’s pollination efforts, it’s essential to prioritize queen bee health. This means providing a nutritious diet, ensuring access to clean water, and maintaining a healthy environment within the colony. By doing so, you’ll not only be promoting the well-being of your bees but also supporting their critical role in pollinating your garden’s plants.
Factors Affecting Queen Bee Performance
A queen bee’s performance and productivity are influenced by several factors that you can control to ensure healthy and thriving colonies. Genetics play a significant role, as the quality of the queen affects the overall health and performance of her colony. A good brood stock or parent colony is essential for producing high-quality queens.
Nutrition also impacts a queen’s performance. A well-fed queen will live longer and be more productive than one that is malnourished. Provide your bees with high-quality pollen and nectar-rich diets to ensure optimal nutrition. Environmental conditions, such as temperature, humidity, and disease pressure, can also affect a queen’s performance.
For example, a queen exposed to high temperatures or prolonged periods of cold will not live as long or be as productive as one in ideal conditions. Similarly, a colony with high disease pressure may experience reduced productivity due to the queen’s weakened immune system. By controlling these factors and providing optimal conditions, you can maximize your queen bee’s performance and ensure healthy colonies for garden pollination.
Choosing the Right Breeds for Your Garden
When selecting bee breeds for your garden, it’s essential to consider factors such as their suitability for pollination and resistance to local pests. Let’s explore popular options together.
Selecting Breeds Based on Climate and Region
When selecting breeds for your garden pollination needs, it’s essential to consider the climate and region you’re working with. Different breeds excel in various conditions, so choosing the right ones will ensure optimal performance.
For warm climates, such as those found in Mediterranean or tropical regions, Italian honey bees (Apis mellifera ligustica) are an excellent choice. These hardy bees thrive in temperatures above 50°F and are well-suited for areas with limited water resources.
In cooler climates, like those in the Pacific Northwest, Carniolan bees (Apis mellifera carnica) are a popular option. They’re more resistant to cold temperatures and can tolerate light frosts.
For regions with intense heatwaves or droughts, consider breeds with heat tolerance. For example, the European dark bee (Apis mellifera mellifera) is known for its ability to conserve water and withstand high temperatures.
Ultimately, research local regulations and consult with experienced beekeepers to determine which breeds are best suited for your specific region and climate. Consider factors like disease resistance, nectar flow, and pest management when making your selection.
Considerations for Small-Scale Beekeepers
If you’re a small-scale beekeeper with limited space or resources, choosing the right breed can make all the difference. When selecting a breed for pollination purposes, consider those that are naturally smaller in size and require less storage space.
For example, the Italian bee is a popular choice among small-scale beekeepers due to its high honey production rate and docile nature. They’re also known to be good weather forecasters, often returning to the hive before storms hit.
Another option for small-scale beekeepers is the Carniolan bee, which is highly adaptable and requires minimal space. They’re also prolific pollinators, making them an excellent choice for gardeners with limited resources.
When choosing a breed, also consider their temperament and ability to thrive in smaller environments. Some breeds, such as the Buckfast, are known to be more aggressive and require more space, so it’s essential to do your research before selecting a breed that suits your needs.
Preparing Your Queens for Breeding
Before breeding your queen bees, it’s essential to ensure she’s healthy and ready for the task at hand. This section will walk you through the steps to prepare her successfully.
Queen Rearing Techniques and Methods
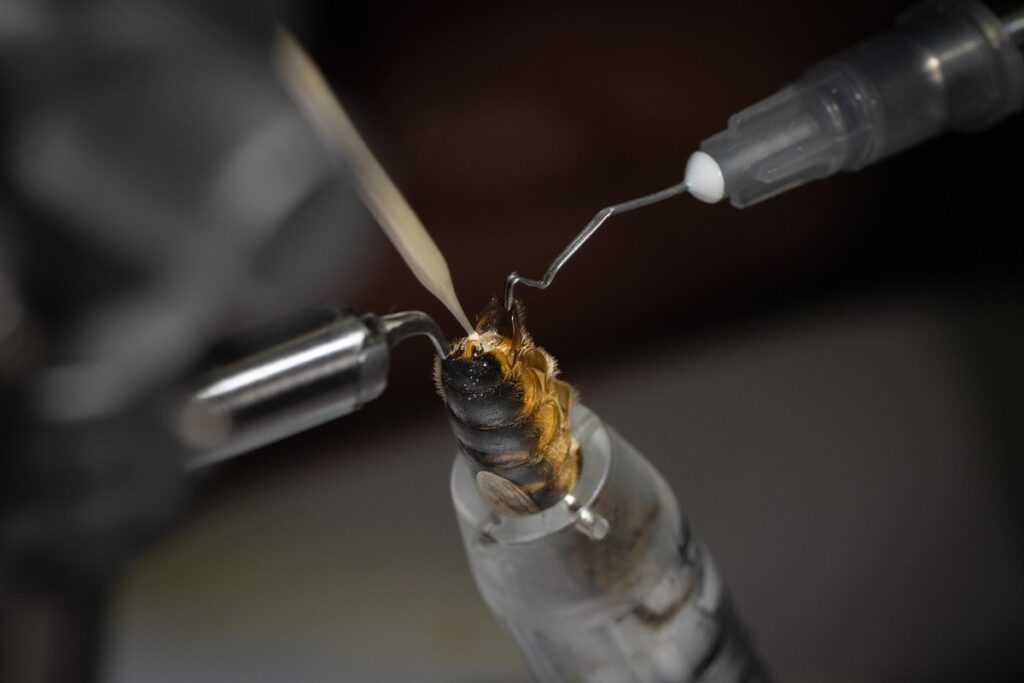
As you prepare your queens for breeding, it’s essential to understand the different techniques and methods used by beekeepers. One of the most common methods is grafting, where a queen larva is carefully removed from its cell and placed into a new one within the colony or on a queen cup.
Grafting requires precision and patience, but can be highly successful with proper technique. Another method gaining popularity is cell culture, which uses specialized equipment to grow queen larvae in a controlled environment. This approach allows for higher yields and greater control over the queen’s development.
When choosing a method, consider your goals and resources. Grafting is often more labor-intensive, but can be a cost-effective option for small-scale beekeepers. Cell culture, on the other hand, requires significant investment in equipment and training, but offers higher success rates and greater flexibility.
Regardless of the method, proper technique and attention to detail are crucial to successful queen rearing. Regularly inspect your grafts or cell cultures to ensure the queen larvae are developing as expected, and take corrective action if necessary. With practice and patience, you’ll be well on your way to raising high-quality queens for garden pollination.
Essential Tools and Equipment Needed
When it comes to breeding queens for garden pollination, having the right tools and equipment is crucial for success. As a beekeeper preparing your queens for breeding, you’ll need a variety of specialized equipment and supplies to ensure healthy development and successful mating.
To start, you’ll need a sturdy queen rearing stand or a dedicated area within your apiary where you can perform the necessary operations. This will provide a safe and controlled environment for handling delicate tasks like grafting and incubation. You’ll also require a high-quality queen cage with a food trough and a secure mesh to prevent escape.
Additional essential tools include a precision grafting knife, a pair of forceps or pipettes for handling larvae, and a well-ventilated incubator set at the optimal temperature (around 90°F) for brood development. Don’t forget specialized equipment like frame grippers, hive scales, and a reliable thermometer to monitor conditions.
Remember, investing in quality tools and supplies will save you time and effort in the long run. It’s also essential to maintain your equipment regularly to prevent damage and ensure optimal performance during breeding operations.
Breeding Queens: A Step-by-Step Guide
If you’re ready to breed your own queen bees, this step-by-step guide will walk you through the process of selecting and raising healthy queens for garden pollination. Let’s get started!
Cell Preparation and Grafting Basics
Preparing cells for grafting is an essential step in breeding queens. To start, you’ll need to select suitable larvae that are approximately 2-3 days old and have no signs of disease or pests. This stage is crucial as it determines the success of your grafts.
To prepare the cells, begin by cleaning and sanitizing them with a soft brush and soap solution. Rinse thoroughly and dry with a clean towel. Next, insert a small amount of royal jelly into each cell to create a food source for the larvae. You can use a spoon or pipette to distribute it evenly.
When selecting larvae, look for those with well-formed heads and no visible signs of damage. It’s also essential to choose larvae from healthy parents to increase the chances of successful grafts. With your cells prepared and suitable larvae selected, you’re now ready to proceed with the grafting process. Remember to handle the larvae gently to avoid causing them any stress. By following these basic steps, you’ll be well on your way to successful cell preparation and grafting.
Caring for Grafted Queens During Emergence
When caring for grafted queens during emergence, it’s essential to provide them with optimal temperature and humidity conditions. During this critical stage, temperatures should be maintained between 75°F to 85°F (24°C to 30°C), as temperatures above or below this range can cause stress and even death.
To manage humidity levels effectively, you’ll want to maintain a relative humidity of 50% to 70%. You can use a humidifier or mist the queens with water daily to achieve this level. Be cautious not to over-mist, as this can lead to fungal growth and other issues.
Maintain a stable environment by placing the grafts in a shaded area, protected from direct sunlight and drafts. It’s also crucial to keep the grafts away from any potential pests or diseases that may be present in your apiary.
Keep an eye on your queens’ behavior during emergence – they should begin to extrude from the graft within 7-10 days. If you notice any issues, such as slowed growth or unusual behavior, take corrective action promptly to ensure their survival and success.
Integrating Breeding Queens into Your Garden
Now that you have your breeding queens, it’s time to integrate them safely and effectively into your garden, learning how to balance their needs with the health of your plants.
Creating a Suitable Environment for Queen Introduction
When introducing new breeding queens into your garden, it’s essential to create a welcoming environment that encourages them to thrive. This involves selecting suitable nectar sources and providing shelter from predators and harsh weather conditions.
Start by identifying areas of the garden with an abundance of flowers rich in nectar, such as sunflowers, zinnias, or lavender. These plants not only provide a vital source of food for the queens but also help to establish a diverse pollinator community. Place these plants near the area where you’ve set up your queen hives to create a feeding station that’s easily accessible.
In addition to nectar sources, make sure to provide sheltered areas for the queens to rest and hide from predators or bad weather. This can be achieved by setting up a bee hotel or creating a windbreak using natural materials like branches or leaves. Ensure the shelter is well-ventilated and provides adequate protection from rain and strong winds.
Consider also incorporating plants with a low water requirement, as queen bees require less moisture than worker bees. By selecting the right nectar sources and providing suitable shelter, you’ll be creating an environment that encourages your breeding queens to thrive and multiply, ultimately boosting pollination in your garden.
Managing Integration with Existing Colonies
When introducing new breeding queens into an existing colony, it’s essential to consider the potential for conflict and take steps to ensure a harmonious coexistence. This can be achieved by implementing a gradual introduction process.
Start by separating the new queen from her workers and introducing them to the existing colony at a different location, such as a separate hive or even in a nearby area. Allow the bees to become familiar with each other’s scents before uniting them. This will reduce aggression and stress on both colonies.
Another strategy is to introduce the new queen when the existing colony is weak, such as during the winter months. The stronger colony can then support the weaker one, reducing competition for resources.
When introducing queens into a thriving colony, it’s best to do so in late summer or early fall. This allows the bees to focus on preparing for winter rather than competing with a new queen for dominance.
Monitoring and Evaluating Your Breeding Program
Now that you’ve established a thriving breeding program, it’s essential to keep track of its progress. This involves monitoring your queen’s health, fertility, and pollination efficiency over time.
Tracking Queen Performance and Productivity
As you monitor and evaluate your breeding program, tracking queen performance and productivity is crucial to ensuring the success of your garden pollinators. One key metric to track is egg production – a strong indicator of a queen’s fertility and overall health. You can estimate this by regularly checking for eggs on brood frames or by using specialized equipment like egg counters.
Brood health is another essential aspect to monitor, as it directly affects the colony’s productivity. Keep an eye out for signs of disease, pests, or other issues that might be impacting your brood’s development. Regular inspections can also help you identify potential problems early on, allowing you to take corrective action before they become major issues.
To streamline this process, consider implementing a regular monitoring schedule, checking frames at least once a week during peak breeding seasons. You can use digital tools or apps to record and track your findings, making it easier to identify trends and patterns in your queen’s performance over time.
Analyzing Results and Making Adjustments
As you continue to monitor and evaluate your breeding program for garden pollination queens, it’s essential to analyze results and make adjustments accordingly. This step is crucial in refining your approach and achieving optimal outcomes.
Start by identifying key performance indicators (KPIs) such as colony strength, queen lifespan, egg production, and nectar quality. Track these metrics over time to gauge the effectiveness of your breeding program. For instance, if you notice a decline in queen lifespan or egg production, it may be necessary to reassess your selection criteria or adjust environmental conditions.
Look for areas where improvements can be made by analyzing data and conducting experiments. Consider factors such as nutrition, disease resistance, and genetic diversity when making decisions about your breeding stock. By optimizing these parameters, you’ll increase the chances of producing high-quality queens that excel in pollination tasks.
When evaluating results, ask yourself questions like: Are my queens consistently strong and healthy? Do they produce an adequate number of offspring to meet demand? What factors contribute to their success or failure? By addressing these queries and making informed adjustments, you’ll be able to refine your breeding program and achieve greater efficiency in producing pollination-optimized queens.
Frequently Asked Questions
How can I ensure the health of my queen bee before breeding her?
Before breeding your queen, it’s essential to check for signs of good health, such as a shiny exoskeleton, clean eyes, and a robust build. A healthy queen will also have a strong pheromone scent and be more energetic during inspections. Yes, if you notice any signs of weakness or disease, consult with a local beekeeper or apiarist to determine the best course of action.
What’s the ideal environment for integrating breeding queens into my existing colonies?
When introducing new queens to your colonies, it’s crucial to maintain a temperature between 60°F and 80°F (15°C and 27°C) during the first few days. Provide an adequate food supply and ensure there are no aggressive bees in the colony. Yes, this will help reduce stress on both the queen and the existing worker bees.
Can I use just any queen breed for my garden’s pollination needs?
While some breeds are more suitable than others, you should choose a breed that matches your local climate and region. For example, Italian bees thrive in warmer climates, while Carniolan bees perform better in cooler temperatures. Consider consulting with a local beekeeper to determine the best breed for your specific environment.
How often should I inspect my queen’s cell preparation and grafting?
Inspect your grafted queens every 24-48 hours during emergence to ensure proper growth and development. Monitor for signs of disease, pests, or poor nutrition, which can impact the overall success of your breeding program. Regular inspections will also help you identify potential issues before they become major problems.
What are some common mistakes small-scale beekeepers make when breeding queens?
Common mistakes include inadequate queen selection, insufficient colony resources, and improper cell preparation. Be sure to research specific techniques for your region and climate, and consult with local experts if you’re unsure about any aspect of the process. Additionally, maintain accurate records to track performance and identify areas for improvement.