Are you tired of dealing with soggy, compacted soil that’s suffocating your plants? Aerating your soil is a simple yet powerful technique that can make all the difference in improving drainage, reducing compaction, and boosting microbial activity. By doing so, you’ll be giving your plants the breathing room they need to thrive. But how do you aerate your soil effectively? From manual methods like forking and spiking to power tools like rotary hoes and fork rakes, we’ll cover it all. We’ll also dive into essential safety precautions and best practices to ensure a safe and successful experience. Whether you’re a seasoned gardener or just starting out, this article will provide you with the knowledge you need to improve your soil’s health and grow healthier, happier plants.
Understanding the Importance of Soil Aeration
Soil aeration is often overlooked, but it plays a vital role in your garden’s overall health and productivity. In this section, we’ll explore why aerating soil matters.
What is Soil Compaction?
Soil compaction is a critical issue that affects soil structure and plant growth. In simple terms, soil compaction occurs when the weight of heavy machinery, foot traffic, or even water causes the soil particles to become compressed, reducing the pore space between them. This compression prevents air, water, and nutrients from reaching the roots of plants, ultimately hindering their growth.
The causes of soil compaction can be varied, ranging from intensive farming practices to construction activities that compact the soil beneath buildings and roads. Compacted soil becomes harder and less permeable, making it challenging for plants to absorb essential resources like oxygen, water, and nutrients. This can lead to a decline in crop yields, reduced soil fertility, and increased susceptibility to pests and diseases.
The effects of soil compaction are far-reaching, impacting not only plant growth but also the overall ecosystem. Compacted soil can contribute to soil erosion, reduce biodiversity, and increase greenhouse gas emissions. Moreover, compacted soil can be costly to repair, requiring expensive treatments like aeration and soil amendments to restore its fertility and structure.
How Does it Impact Plant Growth?
Soil compaction can have far-reaching consequences for plant growth. When soil is compacted, it becomes harder for roots to grow and expand. This reduced root development limits the plant’s ability to absorb essential nutrients and water from the soil. Compacted soil also hinders air circulation, leading to poor oxygen levels that can cause plants to suffocate.
Water infiltration is another critical aspect of plant growth affected by compacted soil. When soil is too dense, it prevents water from penetrating to its full depth, causing runoff or shallow root development. This in turn limits the plant’s ability to absorb vital nutrients like nitrogen and phosphorus.
Aeration helps improve these conditions by breaking up soil compaction. Proper aeration allows for better water absorption, oxygen exchange, and nutrient uptake. By aerating your soil regularly, you can stimulate healthy growth in your plants. This is especially true for plants that require deep root development, such as trees and vegetables.
Benefits of Aerating Your Soil
Aerating your soil can bring about numerous benefits that enhance its overall health and fertility. One of the most significant advantages is improved drainage. When soil is aerated, it allows for better water penetration and movement, reducing the risk of waterlogging and root rot. This is especially crucial for plants that require well-draining conditions to thrive.
Reducing soil density is another key benefit of aeration. Compacted soil can impede root growth and make it challenging for plants to absorb essential nutrients. Aerating your soil breaks up these dense pockets, making it easier for roots to expand and for water and air to reach the plant’s roots.
Aerated soil also experiences enhanced microbial activity. Microorganisms in the soil play a crucial role in decomposing organic matter, fixing nitrogen, and fighting pests and diseases. By promoting a healthy balance of beneficial microbes, you’re creating an environment that supports optimal nutrient cycling and plant growth. Regular aeration can lead to increased crop yields, improved soil structure, and overall better plant health.
Methods of Aerating Soil
So, now that we’ve covered the benefits of aerating your soil, let’s dive into the different methods you can use to get the job done effectively. This includes manual, mechanical, and even some DIY approaches.
Manual Aeration Techniques
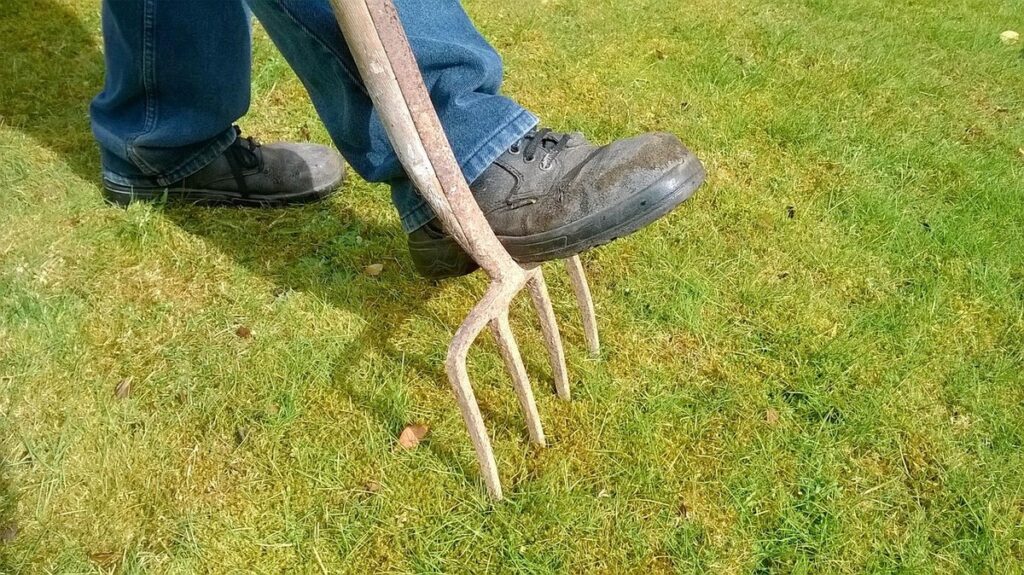
Aerating compacted soil manually can be an effective way to improve soil health and structure. One of the most straightforward methods is using a fork or spade to loosen dense soil. To do this safely, start by removing any debris from the area, such as rocks or twigs. Begin loosening the soil about 6-8 inches deep, working in small sections. Use long, gentle strokes with the tines of the fork to break up compacted clods.
When using a spade, insert it at an angle and rock back and forth to create a shallow trench. This helps prevent the spade from slipping or causing damage to surrounding plants. Be cautious not to over-aerate, as this can cause more harm than good by damaging roots or disrupting soil microorganisms. To avoid this, work in thin layers and check your progress periodically.
Some key tips for safe manual aeration include working during cooler parts of the day to prevent moisture loss from the soil, wearing gloves to protect hands from thorns or rough soil, and avoiding areas with fragile plants that may be damaged by aerating.
Power Tool-Based Aeration
When it comes to aerating soil, power tool-based methods like rototillers and aerators are highly effective. These tools can be used for small to medium-sized areas, making them ideal for home gardeners and landscapers. One of the main benefits of using a power tool is their efficiency – they can cover a significant amount of ground in a short period. For example, a gas-powered rototiller can aerate up to 2,000 square feet in about an hour.
However, there are also potential drawbacks to consider. Power tools require regular maintenance and fueling, which can be time-consuming and costly. They also produce noise pollution, which may not be suitable for residential areas with noise restrictions. Moreover, overuse of power tools can damage the soil’s structure and destroy any existing ecosystem.
Before using a power tool, it’s essential to choose the right type for your specific needs and follow safety guidelines. For instance, if you have compacted clay soil, a rototiller is likely a better option than an aerator. Conversely, if you’re dealing with heavy thatch buildup, an aerator may be more effective.
DIY vs. Hiring a Professional
When it comes to aerating soil, you have two primary options: doing it yourself (DIY) or hiring a professional service. While both methods can be effective, the best approach depends on the size and complexity of your project.
For small to medium-sized lawns or gardens, DIY aeration is often a cost-effective and straightforward solution. You can purchase an aerator attachment for your lawn mower or rent a manual aerator for about $20-50 per day. This approach allows you to save money and get some exercise at the same time. However, if your soil has deep compacted layers or if you’re dealing with large areas, DIY aeration may not be enough.
On the other hand, hiring a professional service can provide more extensive and thorough results, especially for larger properties or lawns with complex issues like hardpan or poor drainage. A professional aerator can access deeper levels of soil and remove more compacted material, leading to improved air circulation and water penetration. Additionally, a pro will also ensure that the area is properly leveled and even after aeration.
Ultimately, it’s essential to weigh your options carefully before making a decision. Consider factors like budget, time commitment, and the extent of your project. If you’re unsure about which approach is best for your specific needs, consult with a local gardening expert or landscaper for personalized advice.
Choosing the Right Tools for Soil Aeration
To get the most out of soil aeration, you’ll need the right tools for the job. Let’s take a closer look at what equipment is available and how to choose the best fit for your needs.
Types of Aerating Tools
When it comes to aerating soil, having the right tools for the job is crucial. There are several types of aerating tools available, each with its own unique features and applications. Spike aerators, for example, use long spikes or tines to penetrate deep into the soil, making them ideal for heavily compacted areas or lawns with thick thatch.
Plug aerators, on the other hand, remove small plugs of soil as they aerate, which can help improve drainage and reduce soil density. These tools are great for smaller areas or for breaking up compacted soil in tight spaces. Other types of aerating tools include hollow-tine aerators, which use a rotating cutting head to remove soil plugs, and slitter aerators, which use a series of horizontal blades to cut through the soil.
When choosing an aerating tool, consider the size of your lawn, the type of soil you have, and the level of compaction. For smaller areas or for general maintenance, plug aerators may be sufficient. However, for larger lawns with severe compaction issues, spike aerators may be a better option. By selecting the right tool for the job, you’ll be able to effectively improve drainage, reduce soil density, and promote healthy root growth in your lawn.
Factors Influencing Tool Selection
When it comes to choosing the right tool for soil aeration, several factors come into play. The type of soil you’re working with is one of the most critical considerations. For example, if you have heavy clay soil, you’ll need a tool that can effectively break up these dense particles without causing further compaction. On the other hand, sandy or loose soils may require less aggressive tools to avoid damaging the structure.
Another crucial factor is the size of your garden or lawn. Larger areas will require more powerful and efficient tools, such as aerators with rotating tines or tow-behind aeration machines. Smaller spaces can be tackled with handheld aerators or manual fork tools.
The condition of your soil also plays a significant role in tool selection. For instance, if you’re dealing with compacted or hardpan soils, a more aggressive tool like a spiking aerator may be necessary to penetrate these stubborn areas. Ultimately, personal preference and the level of effort you’re willing to invest will also influence your choice of tool.
Safety Precautions When Using Aerating Tools
When using aerating tools, it’s essential to prioritize safety precautions to avoid accidents and injuries. Before starting the aeration process, make sure you’re wearing protective gear such as gloves, safety glasses, and a face mask to shield yourself from flying debris and dust.
Familiarize yourself with the tool’s manual and understand its operation, including any specific safety features or warnings. Always keep loose clothing and long hair tied back to prevent entanglement with the tool.
When operating power tools, maintain a stable footing and avoid overreaching. Keep children and pets away from the area being aerated, as they can easily be injured by flying debris.
Regularly inspect your equipment for damage or wear and tear, replacing any worn-out parts promptly. Finally, consider enlisting help when using heavy equipment to ensure someone is available to provide assistance in case of an emergency.
Remember, safety should always be the top priority when aerating soil to avoid accidents and ensure a successful aeration process.
Best Practices for Soil Aeration
To achieve optimal results from aerating your soil, it’s essential to follow a set of best practices that ensure safe and effective operation. This includes choosing the right equipment and following manufacturer guidelines.
Timing Your Aeration Project
Timing your aeration project is crucial to get the most out of this beneficial process. You should aerate your lawn or garden at specific times, taking into account weather conditions and plant growth stages.
During the growing season (spring-fall), it’s best to aerate when plants are actively growing but before they enter their peak growth phase. This typically occurs in late spring to early summer when temperatures are mild and rainfall is consistent. Aeration during this period helps loosen compacted soil, promotes healthy root development, and enhances nutrient uptake.
Avoid aeration during extreme weather conditions such as intense heat, drought, or heavy rainfall. These conditions can exacerbate soil compaction and make it difficult for plants to recover from the aeration process.
Consider aerating your lawn in early spring (late March to early May) or late summer/early fall (August to September). This allows plants to recover before entering their most critical growth periods. Remember, proper timing is key to achieving optimal results from soil aeration.
Preparing Your Soil Before Aeration
Before you can aerate your soil effectively, it’s essential to prepare it by removing debris, weeds, and excess thatch. This step is crucial as it allows the aeration process to reach deeper into the soil, promoting healthy root growth and reducing the risk of compacted soil.
Start by clearing the area of any visible debris such as rocks, twigs, or branches. Use a rake or a spade to loosen and remove any loose material on the surface. Next, focus on weeds by using an herbicide or manually removing them from the soil. Be sure to get rid of the entire root system to prevent regrowth.
Excess thatch can also be a problem, as it can harbor pests and diseases. Use a dethatching rake or a power rake to remove excess thatch, taking care not to damage the underlying grass. By removing these obstacles, you’ll create a smooth path for your aerator to penetrate deeper into the soil, allowing for better airflow and improved root growth.
Keep in mind that over-manipulating the soil can be counterproductive, so only remove what’s necessary to ensure a successful aeration process.
Post-Aeration Care
After aerating your soil, it’s essential to maintain its benefits over time. This involves implementing fertilization schedules that take into account your soil type and the needs of your plants. For example, if you live in an area with poor soil quality, consider using organic fertilizers rich in nutrients like compost or manure tea.
When it comes to watering habits, make sure not to overwater, as this can lead to re-compaction and undo all the benefits of aeration. Check the moisture levels in your soil regularly by sticking your finger into the ground up to the knuckle. If the soil feels dry, it’s time for water; if it’s already moist, wait another day.
Regularly monitoring your soil for signs of re-compaction is also crucial. Watch out for changes in drainage or increased soil compaction around plants’ roots. You can use a fork to gently probe the soil and check its texture. If you notice any issues, make adjustments to your fertilization schedule or watering habits as needed.
Frequently Asked Questions
How Often Should I Aerate My Soil?
Aeration frequency depends on the type of soil, climate, and plant growth stage. As a general rule, aerate your soil annually for optimal results. However, if you have heavy clay or compacted soils, you may need to aerate every 6-8 weeks during periods of intense growth. Keep in mind that over-aeration can be detrimental, so it’s crucial to monitor your soil’s response and adjust accordingly.
Can I Aerate My Soil During the Growing Season?
Yes, but exercise caution when aeration during peak growing seasons (spring-fall). While some plants may benefit from aerated soils, others might experience stress. If you must aerate during this time, ensure it’s done carefully to minimize damage and prevent root disturbance.
What Happens if I Don’t Aerate My Soil Regularly?
Soil compaction and reduced drainage will likely occur if your soil isn’t regularly aerated. This can lead to stunted plant growth, poor nutrient uptake, and increased susceptibility to pests and diseases. Failing to aerate your soil may also result in the buildup of toxic gases, further hindering plant health.
How Do I Maintain My Aerator Tools?
After each use, clean your aerator tools with a soft brush or cloth to remove any debris. Regularly sharpen blades and check for worn-out parts to ensure optimal performance. Proper maintenance will extend the tool’s lifespan, save you money in replacement costs, and guarantee effective soil aeration.
Can I Aerate My Lawn Without Removing Grass?
Yes, there are methods that allow for aerating lawns without completely removing grass. Techniques like slit-tine aeration or hollow-tine aeration minimize damage while still improving soil structure. Be cautious not to over-aerate, as this can still cause significant stress to your lawn.