Growing carrots from top can be a game-changer for any gardener, whether you’re a seasoned pro or just starting out. Not only is this method a space-saving technique that can fit even the smallest of gardens, but it also allows for a higher yield and reduced waste. However, growing carrots from top requires some finesse and attention to detail.
In this step-by-step guide, we’ll walk you through the preparation and methods involved in successfully growing carrots from top. From understanding the optimal conditions for growth to troubleshooting common issues, we’ve got you covered. By the end of this article, you’ll be equipped with the knowledge and confidence to grow a bountiful harvest of delicious carrots from the comfort of your own home.
Understanding the Concept of Growing Carrots from Top
Now that you’ve successfully grown a carrot and harvested it, let’s explore an innovative technique to regrow carrots from the top, also known as “cut-and-come-again” cultivation. This method requires minimal effort and space.
What is Growing Carrots from Top?
Growing carrots from top is an unconventional yet intriguing method that’s gaining traction among gardeners. Essentially, it involves taking the crown of a mature carrot plant and using it to grow new roots. This technique has sparked interest due to its potential benefits: reduced waste, increased yields, and novel ways to propagate favorite varieties.
The main advantage of growing carrots from top is minimizing crop loss. When harvesting traditional carrots, the tops are often discarded, which can be up to 50% of the plant’s biomass. By utilizing these crowns, gardeners can salvage a significant portion of their harvest and reduce waste. This method also allows for the propagation of rare or heirloom varieties that might not produce viable seeds.
However, this technique has its challenges. Growing carrots from top requires specific conditions: consistent moisture, optimal temperature ranges, and precise timing. Gardeners must be meticulous about crown separation, as improper division can hinder root development. Despite these requirements, many gardeners are finding success with this method, leading to increased adoption in experimental gardens and beyond.
History and Background of Growing Carrots from Top
Growing carrots from top is a technique that has been around for decades, but its popularity has grown exponentially over the years. The concept of growing vegetables from their tops dates back to the early 20th century when pioneers like Alan Chadwick and Rudolf Steiner began experimenting with biodynamic farming methods.
These innovators realized that by planting seeds upside down and letting them grow roots in the air, they could create a more efficient and sustainable way of producing vegetables. They observed that carrots grown from their tops produced higher yields, were less prone to disease, and had better flavor profiles compared to conventionally grown ones.
One notable contributor to this method is John Jeavons, who popularized it through his book “How to Grow More Vegetables” in the 1970s. He demonstrated that by using this technique, gardeners could grow up to four times more produce on a given area of land. This sparked a new wave of interest in growing carrots from top, with many gardeners and farmers adapting the method to suit their needs.
As we move forward, it’s essential to recognize the pioneers who paved the way for this innovative technique, which continues to inspire and educate gardeners around the world.
Preparing for Successful Growth
Before you start growing carrots from top, let’s cover some crucial steps to ensure your plants thrive and produce a bountiful harvest. Next, we’ll walk through each of these essential preparation tasks.
Choosing the Right Variety of Carrot
When it comes to growing carrots from top, selecting the right variety is crucial for success. Not all carrot varieties are created equal, and some are better suited for certain climates, soil types, and growth conditions than others.
Look for a variety that’s resistant to common diseases such as root maggots, leaf blight, and powdery mildew. Some popular disease-resistant varieties include ‘Little Finger’, ‘Thumbelina’, and ‘Danver’. Consider the maturity days of the variety as well – some carrots take only 50-60 days to mature, while others may require up to 70 or more.
In addition to disease resistance and maturity days, think about the growth habits of the variety. Do you want a compact, bush-type carrot that won’t require staking? Or do you prefer a longer, thinner variety that will need support as it grows? Examples of bush-type varieties include ‘Parisienne’ and ‘Baby Ball’. Understanding these characteristics will help you choose the right carrot variety for your specific needs and growing conditions.
Soil Requirements and Preparation
When growing carrots from top, it’s essential to create an ideal environment for them to thrive. The soil requirements for carrot growth are quite specific, and preparing the soil correctly will make a significant difference in their quality and quantity.
Firstly, the pH level of the soil is crucial. Carrots prefer a slightly acidic to neutral soil pH, ranging from 6.0 to 7.0. If your soil’s pH is too high or too low, it can lead to stunted growth or poor flavor. To check your soil’s pH, you can purchase a DIY kit or send a sample to a laboratory for analysis.
In terms of nutrient content, carrots need well-draining soil rich in organic matter. A mix of compost and aged manure will provide the necessary nutrients for healthy growth. Aim to maintain a moisture level that keeps the soil consistently moist but not waterlogged, as this can lead to root rot.
To prepare your soil, start by loosening it to a depth of about 12-15 inches using a fork or spade. Then, mix in 2-3 inches of compost and aged manure to improve its structure and fertility. This will provide the ideal environment for your carrots to grow from top with minimal fuss and maximum flavor.
Methods of Growing Carrots from Top
To grow carrots from tops, you’ll need to know how to successfully propagate them using leafy greens, which we’ll explore in more detail below. Let’s get started!
Direct Sowing from Seeds
Direct sowing from seeds is a straightforward method that eliminates the need for intermediate steps. To begin with direct sowing, you’ll need to prepare the soil by loosening it to a depth of about 12-15 inches. This will allow for the seeds to germinate and grow without any obstruction.
One major advantage of this approach is that it saves time, as you won’t have to go through the process of thinning seedlings or pruning them to prevent overcrowding. Additionally, direct sowing allows for more control over the growing conditions, as you can select a spot with optimal sunlight and soil quality.
However, there are potential challenges associated with direct sowing from seeds. For instance, it may be difficult to achieve consistent germination rates, especially if the soil is of poor quality or lacks sufficient moisture. Moreover, the seeds may be more susceptible to pests and diseases when planted directly into the soil without any intermediate protection.
When attempting direct sowing, make sure to plant the seeds at a depth about 2-3 times their width. Sow them in rows spaced about 1-2 inches apart. Keep the soil consistently moist during the first few weeks after planting.
Using Seedlings or Cuttings
Growing carrots from top using seedlings or cuttings is an alternative method to direct sowing that can be more efficient and space-saving. This approach involves propagating carrot tops to create new plants, which can then be transplanted into larger containers or directly into the garden.
One benefit of using seedlings or cuttings is that it allows you to start growing carrots from top indoors, even during cooler months when outdoor conditions are not suitable. You can propagate carrot tops in a controlled environment, such as a greenhouse or a sunny windowsill, and then transfer them outside once the weather warms up.
However, keep in mind that using seedlings or cuttings may reduce the vigor of the new plants, potentially affecting their growth rate and yield. It’s essential to monitor the health and development of the propagated plants closely, ensuring they receive enough light, water, and nutrients.
To propagate carrot tops successfully, make clean cuts just above a node (where a leaf meets the stem), and root the cuttings in a well-draining potting mix. Provide sufficient light, keep the soil consistently moist, and fertilize regularly to encourage healthy growth.
Troubleshooting Common Issues
We all hit bumps along the way, and growing carrots from tops is no exception. This section will help you tackle common problems and get back on track to a successful harvest.
Dealing with Poor Germination Rates
When tackling a low germination rate, it’s essential to revisit the basics of growing carrots from seed. One crucial aspect is soil preparation. Ensure you’re using a well-draining potting mix specifically designed for root vegetables like carrots. Avoid compacted or waterlogged soils, as these can hinder seedling development.
Another key factor influencing germination rates is temperature control. Carrot seeds typically require a consistent temperature between 60-75°F (15-24°C) to germinate. If your environment is too cold, you may need to use a heating mat or a warm location like a sunroom. On the other hand, if it’s too hot, the seeds might dry out before sprouting.
Proper seed handling also plays a significant role in achieving high germination rates. Store seeds in an airtight container in the refrigerator to maintain their viability. Sow seeds at the correct depth – about ¼ inch (6-8 mm) below the soil surface. This will help prevent overwatering, which can lead to poor germination.
To further boost your chances of successful germination, consider sowing carrot seeds in a propagation tray or seed starting mix, which provide improved moisture retention and reduced transplant shock.
Managing Pests and Diseases
As you grow carrots from top, you might encounter common pests and diseases that can damage your crop. Regularly monitoring your plants is crucial to catch these issues early on.
Some common pests affecting carrots grown from the top include carrot rust flies, carrot weevils, and root maggots. These pests lay eggs on the carrot’s leafy greens or soil surface, which then hatch into larvae that feed on the roots. To manage these infestations, try introducing beneficial nematodes to your garden. These microscopic worms attack and kill insect larvae, thus controlling pest populations.
As for diseases, powdery mildew and root rot are common issues affecting carrots grown from top. Powdery mildew appears as a white or grayish powder on the leaves’ surface, while root rot causes soft spots or discoloration on the roots. To prevent these infections, maintain good air circulation by thinning out your crop, and avoid overwatering.
Keep an eye out for signs of pests and diseases in your carrot plants. Regularly inspect your crops, and take action promptly if you notice any issues.
Tips for Maximizing Yields
Now that you know how to grow carrots from tops, let’s dive into some valuable tips on maximizing your harvest and getting the most out of these delicious roots.
Providing Optimal Light Conditions
When it comes to growing carrots from top, providing optimal light conditions is crucial for healthy growth and maximum yields. Adequate light exposure not only promotes photosynthesis but also helps to prevent diseases that can be triggered by inadequate lighting.
To maximize natural light, choose a location with direct sunlight for at least 6 hours a day. If this isn’t possible, consider using supplemental lighting options like LED grow lights or HPS (High Pressure Sodium) lamps. These options are energy-efficient and can provide the necessary spectrum for carrot growth.
When selecting a supplemental lighting option, look for products that emit a balanced spectrum with a high blue light component, which promotes healthy leaf growth and root development in carrots. Some popular options include LED grow lights with a 12-14 hour day cycle and HPS lamps with a 6500K color temperature.
Remember to place the lighting at least 18 inches above the soil surface to prevent overheating and promote even growth. By providing optimal light conditions, you can create an environment that supports healthy carrot growth and maximizes yields.
Maintaining Consistent Watering and Fertilization Schedules
When it comes to growing carrots from top, maintaining consistent watering and fertilization schedules is crucial for achieving high yields. Water and nutrients are essential for carrot growth, and inconsistent schedules can lead to stunted or deformed roots.
A typical carrot crop requires about 1-2 inches of water per week, either from rainfall or irrigation. To maintain optimal water levels, create a schedule that includes watering every 3-4 days during hot weather and once a week during cooler months. Make sure the soil is moist but not waterlogged, as this can lead to root rot.
In terms of fertilization, carrots require a balanced diet of nitrogen, phosphorus, and potassium (NPK) throughout their growth cycle. A sample fertilizer schedule might look like this: apply a starter solution with high phosphorus content at sowing time, followed by a balanced NPK formula every 2-3 weeks during the first month after emergence. This will promote healthy root development and prevent nutrient deficiencies. Remember to adjust your schedule based on soil type, climate, and specific crop needs for optimal results.
Harvesting and Storage
Now that you’ve successfully grown carrots from the top, it’s time to learn how to harvest them at their peak freshness and store them for a longer shelf life. This crucial step will ensure your hard work doesn’t go to waste.
Identifying Maturity Indicators
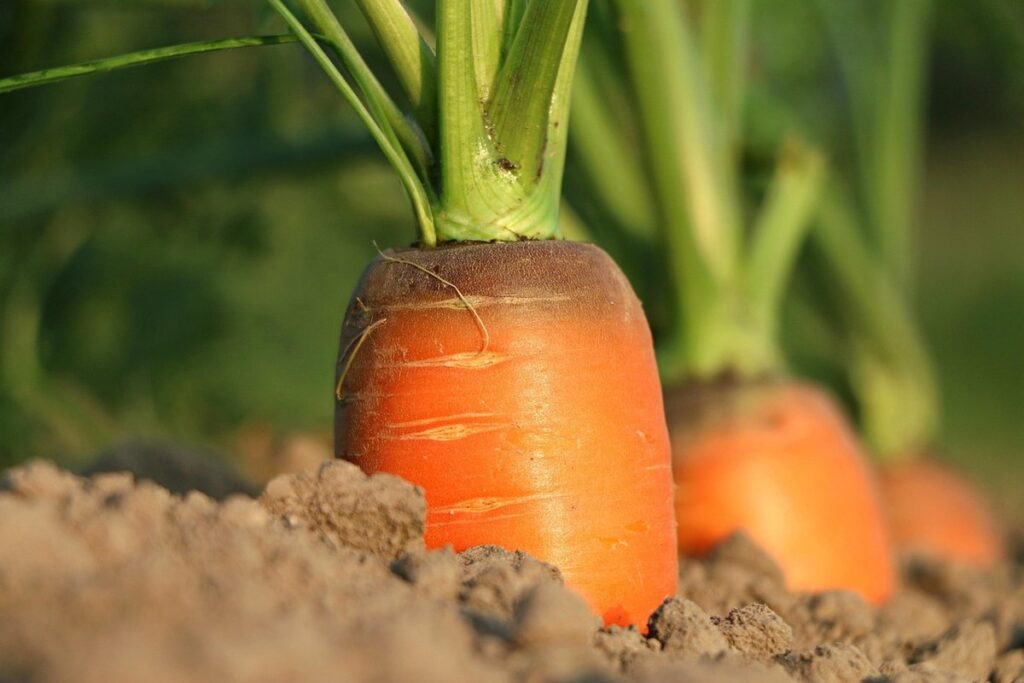
When harvesting carrots from top, it’s essential to identify when they’ve reached full maturity. One of the most noticeable signs is an increase in size. As carrots mature, their diameter will expand, and their shape will become more uniform. A well-grown carrot should be around 1/2 inch in diameter, although some varieties can grow larger.
Another indicator of maturity is a change in color. Most carrots start out with a green top and a white or light-colored root. As they mature, the root will deepen in color to orange, yellow, red, or purple, depending on the variety. Some carrots may retain a slight green tint at the crown, but this should be minimal.
Texture also plays a significant role in determining maturity. A mature carrot will be firm and crunchy when gently twisted. Avoid pulling up immature carrots that are still soft or brittle.
Proper Handling and Storage Techniques
When it’s time to harvest mature carrots from top growth, handle them with care to preserve their quality and freshness. To prevent damage, gently dig around the carrot using a fork to loosen the soil, working carefully not to bruise or break the roots.
Once harvested, immediately trim the tops, leaving about 1 inch of stem attached to the root. This helps prevent moisture loss and encourages the carrots to dry out further, making them easier to store. Next, pack the carrots loosely in a container or bag filled with damp paper towels or sawdust, ensuring good airflow around each individual carrot.
For optimal storage conditions, maintain a consistent refrigerator temperature between 32°F (0°C) and 40°F (4°C), relative humidity of 80-90%, and darkness. Avoid storing carrots near strong-smelling produce as they can absorb odors easily. Regularly check the stored carrots for signs of spoilage, such as mold or discoloration, to prevent contamination of other stored vegetables.
Conclusion and Future Developments
Now that you’ve successfully grown carrots from the top of another carrot, it’s time to reflect on what you’ve learned and consider future developments. By experimenting with this unique method, you’ve likely encountered some exciting results and discovered new techniques for promoting root growth. One key takeaway is the importance of maintaining optimal growing conditions, including adequate light, water, and nutrients.
As you continue to explore the possibilities of top-grown carrots, keep in mind that there’s still much to be learned about this innovative approach. Consider experimenting with different varieties or even using hydroponics to further optimize results. By sharing your experiences and tips with fellow gardeners, you can help advance the field of top-grown vegetables and inspire others to try this creative method.
Frequently Asked Questions
Can I grow carrots from top using any type of carrot variety?
While this method is adaptable to various types, it’s essential to choose varieties that are bred for regrowth or have a high crown-to-root ratio. These will typically be more productive and easier to manage.
What if my cut-and-come-again carrot doesn’t produce new roots at all?
Poor growth might be due to insufficient light, inadequate watering, or an unfavorable temperature range. Ensure your plant is receiving 12 hours of direct sunlight daily and maintain consistent moisture levels. You can also try adjusting the temperature to between 60°F (15°C) and 70°F (21°C).
How often should I water my carrot plants after regrowing from top?
It’s crucial to strike a balance between providing enough moisture for growth and avoiding root rot. Water your plants when the top inch of soil feels dry, typically every other day or as needed depending on weather conditions.
Can I grow carrots from top indoors using LED grow lights?
Yes! This method is ideal for indoor growing with LED lights. Simply ensure the plant receives sufficient light (at least 12 hours a day) and maintain optimal temperature ranges (60°F – 70°F). Keep in mind that indoor conditions might require more precise watering schedules.
What’s the best way to store regrown carrots to prolong their shelf life?
To maximize storage time, keep your newly grown carrots cool, dry, and away from direct sunlight. Store them in a breathable container or bag at temperatures below 40°F (4°C).