Elderberry pie is a delicious and nutritious treat that can be made using fresh garden elderberries. If you’re looking for a unique way to use your homegrown berries, look no further! Using garden elderberries in your pie offers numerous benefits, from added flavor and texture to potential health advantages. But where do you start? Harvesting and preparing the berries requires some care, so we’ll cover that first.
In this article, we’ll take you through the process of using fresh garden elderberries in your pie, including traditional recipes and serving suggestions. We’ll discuss how to harvest and prepare the berries, as well as provide tips for incorporating them into your favorite pie recipe. Whether you’re a seasoned baker or just starting out, our guide will show you the benefits of using garden-grown elderberries in your homemade pie.
What is an Elderberry and Why Choose Garden-Grown?
Elderberries are a nutrient-rich, versatile fruit that’s perfect for baking, and choosing garden-grown allows you to have full control over their quality and origin. Let’s dive into what makes elderberries so special.
Benefits of Using Fresh Garden Elderberries
When it comes to baking with elderberries, there’s no substitute for fresh, homegrown berries. One of the most significant advantages of using garden-grown elderberries is that you can avoid exposure to pesticides and other chemicals commonly used in commercial farming practices.
By growing your own elderberries, you have complete control over the soil quality, watering habits, and pest management methods used on your land. This not only ensures a healthier product for consumption but also reduces your exposure to potential toxins. According to a study by the USDA, pesticide residues were found on 95% of conventionally grown produce samples tested in 2019.
Growing elderberries also supports local sustainability efforts by reducing reliance on industrial agriculture and promoting urban gardening practices. By cultivating your own fruit, you’re contributing to a more resilient food system and encouraging biodiversity within your community. As you harvest your fresh elderberries for baking, remember that every berry picked is an opportunity to create something nourishing and delicious – like our signature elderberry pie recipe!
Growing Conditions for Healthy Elderberry Bushes
To cultivate healthy elderberry bushes in your garden, you’ll want to create an environment that mimics their natural habitat. Elderberries thrive in well-draining soil with a pH between 4.5 and 6.5. To test the pH level of your soil, you can purchase a DIY kit or consult with a local nursery for assistance.
Elderberry bushes require full sun to partial shade, meaning they need at least six hours of direct sunlight per day. If you live in an area with harsh winters, it’s essential to provide some protection from extreme cold snaps and drying winds. Plant your elderberry bush in a spot that receives consistent moisture, but ensure the soil isn’t waterlogged.
When choosing a location for your elderberry bushes, consider their mature size (typically around 10-15 feet tall) and prune them regularly to maintain a manageable shape. By providing the right conditions, you’ll be well on your way to growing vibrant, disease-resistant elderberries that will produce an abundance of berries perfect for baking into pies, jams, or other delicious treats.
Harvesting and Preparing Garden Elderberries
Now that you’ve harvested your elderberries, it’s time to prepare them for baking into a delicious pie. This next step is crucial in bringing out their full flavor potential.
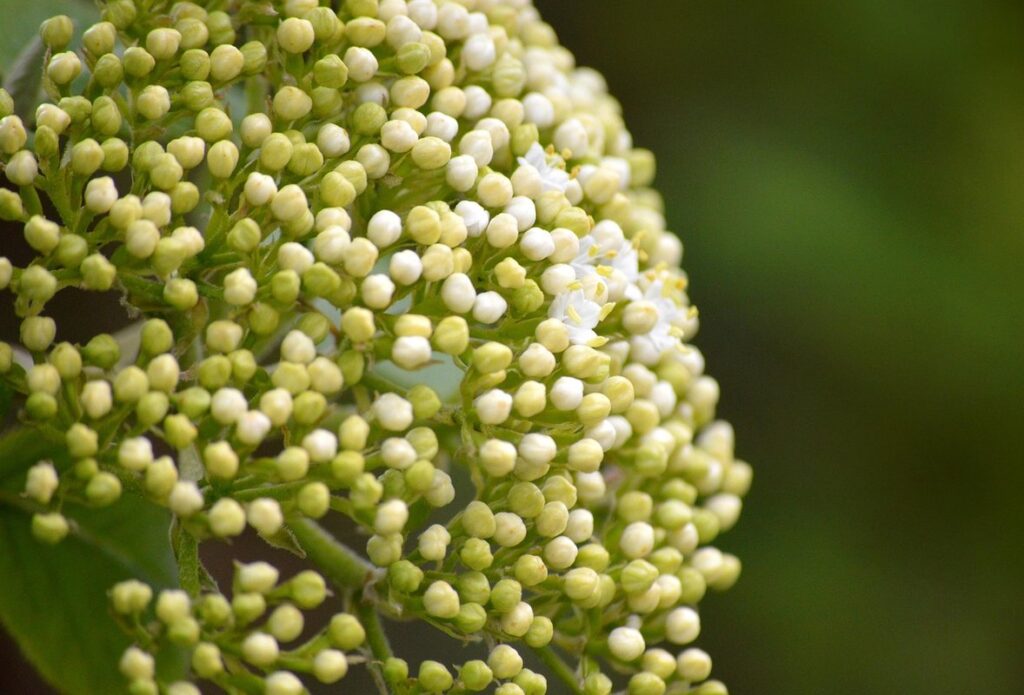
Choosing Ripe Elderberries
When selecting ripe elderberries from your garden, it’s essential to choose berries that are free of spoilage and ready for use. One of the primary ways to identify ripe elderberries is by their color. Ripe elderberries typically have a deep purple or almost black hue, while unripe berries will appear green or blue-green.
To ensure you’re picking only the ripest berries, inspect them carefully before harvesting. Avoid any berries that are soft, mushy, or show signs of mold or mildew. Instead, opt for berries that are firm and plump, with a slight give when pressed gently between your fingers.
When selecting elderberries, it’s also crucial to check their stems. Ripe berries will come off the stem easily, while unripe berries may cling tightly. Harvesting at the right time is vital to prevent spoilage and ensure the best flavor in your final product, such as a delicious homemade elderberry pie.
Washing and Storing Fresh Elderberries
Properly cleaning and storing fresh elderberries is crucial to maintain their flavor and nutritional value. When handling elderberries, make sure to wear gloves as the berries can cause skin irritation in some individuals.
First, gently rinse the elderberries under cool running water to remove any dirt or debris. Next, soak them in a large bowl of cold water for about 30 minutes to loosen any remaining dirt. After soaking, drain the water and gently agitate the berries by squashing them between your fingers to release any remaining impurities.
For longer storage, elderberries can be frozen or dried. To freeze, spread the cleaned and rinsed berries on a baking sheet in a single layer and place it in the freezer until they are frozen solid. Transfer the frozen berries to an airtight container or freezer bag for long-term storage. Alternatively, you can dry the berries using a food dehydrator or by spreading them out on a paper towel-lined plate and placing them in a low oven (150°F – 200°F) for several hours. Properly stored elderberries will retain their flavor and nutritional value for up to six months.
Traditional Elderberry Pie Recipe
For those eager to try their hand at traditional pie-making, here’s a step-by-step recipe for crafting an authentic elderberry pie using your own garden-grown berries. This time-tested formula yields a richly flavored dessert that’s sure to impress!
A Brief History of Elderberry Pie
Elderberry pie has been a beloved tradition for centuries, with its roots (pun intended) deeply embedded in European folklore. The earliest recorded recipe dates back to 16th-century England, where elderberries were considered a staple ingredient in many pies and tarts. The berries’ sweet-tart flavor and high vitamin C content made them an ideal choice for preserving during the harsh winter months.
As the centuries passed, elderberry pie recipes spread throughout Europe, with each region adding its own unique twist to the traditional recipe. In medieval France, elderberries were used in a rich and flavorful tart known as “tarte aux airelles,” while in Germany, they were incorporated into a sweet and tangy filling called “Zimtsterne.” These variations not only reflected local tastes but also showcased the resourcefulness of cooks in adapting to limited ingredients.
Family traditions played a significant role in passing down elderberry pie recipes through generations. In many rural communities, elderberries were harvested together as a family, with each member contributing their unique skills and knowledge to create a delicious and nourishing dessert.
Essential Ingredients and Tools for a Classic Pie
To make a classic homemade elderberry pie using garden elderberries, you’ll need some essential ingredients and tools. Start by gathering 2 cups of fresh or frozen elderberries, depending on what’s available to you. Don’t forget to use the ripe berries, as they will give your pie a deeper flavor.
For the pastry dough, you’ll need all-purpose flour (3-4 cups), cold unsalted butter (1 cup), and ice-cold water (about 1/2 cup). You can also add some salt (a pinch) and sugar (1 tablespoon) to balance out the flavors. As for spices, you’ll want to use ground cinnamon (1/2 teaspoon), nutmeg (1/4 teaspoon), and ginger (1/4 teaspoon).
In terms of equipment, make sure you have a large mixing bowl, a pastry blender or a fork to work with the butter and flour, a measuring cup, and a rolling pin for flattening out your dough. Don’t forget a pie dish (9-inch) to hold all that goodness! You’ll also need a hand mixer or a whisk for combining wet ingredients and beating eggs. To avoid over-mixing your dough, use cold ingredients and work them gently until you get the right consistency.
When working with pastry dough, be gentle to avoid developing gluten, which can make it tough. If you’re new to making pie crusts, consider using a food processor or a pastry blender to speed up the process. With these basic tools and ingredients, you’ll be well on your way to crafting a mouthwatering elderberry pie that will impress anyone!
Tips for Making the Perfect Elderberry Filling
To make the most of your fresh garden elderberries, you’ll want to learn some essential tips for creating a perfectly balanced and flavorful filling. Let’s dive into these expert techniques.
Cooking Down Fresh Elderberries
Cooking down fresh elderberries is an art that requires patience and attention to detail. To extract the deep flavor and color from these delicate berries, you’ll need to cook them slowly over low heat, allowing the natural sugars to break down into a rich, syrupy filling.
Begin by measuring out 2-3 cups of fresh or frozen elderberries for every cup of sugar called for in your recipe. Rinse the berries and discard any stems or debris. In a large pot, combine the elderberries with 1/4 cup of water and bring to a boil over medium heat. Reduce the heat to low and simmer, covered, for about 20-25 minutes.
As the mixture cooks down, you’ll notice it thickening and darkening in color. Stir occasionally to prevent scorching and adjust the heat as needed to maintain a gentle simmer. After 30-40 minutes of cooking time, your elderberry filling should have reached the perfect consistency – thick enough to hold its shape, yet still pourable.
Remember, the longer you cook the berries, the deeper the flavor will be. But be cautious not to overcook, as this can result in a bitter taste. With practice and patience, you’ll master the art of cooking down fresh elderberries and create a filling that’s truly fit for your pie.
Sweetening Options for Your Pie Filling
When it comes to balancing the tartness of your elderberry filling, choosing the right sweetening option can make all the difference. Traditional white sugar is a classic choice, but you may find that it adds a flavor that overpowers the delicate taste of the elderberries. If you’re looking for an alternative, consider using honey or maple syrup instead.
Both of these natural sweeteners have a distinct flavor profile that pairs well with elderberries. Honey adds a rich, floral note that complements the fruit’s sweetness, while maple syrup brings a deep, velvety smoothness. When substituting these sweeteners, keep in mind that they’re both sweeter than white sugar, so use them sparingly to avoid over-sweetening your filling.
To get started, try using 1/4 cup of honey or 2 tablespoons of maple syrup per cup of elderberries. Taste as you go and adjust the sweetness level to your liking. You can also experiment with blending different sweeteners to find the perfect balance for your taste buds. Remember, the key is to enhance the natural flavor of the elderberries without overpowering it – with a little experimentation, you’ll find the sweet spot for your pie filling.
Putting it All Together: Assembling Your Pie
Now that you’ve harvested and prepared your garden elderberries, let’s move on to assembling them into a delicious pie. This is where all your hard work comes together!
Tips for Making Flaky Pastry Dough
Creating a light and flaky pastry crust is an art that requires patience, practice, and attention to detail. To complement the rich flavors of our elderberry filling, it’s essential to get this crucial component just right. Here are some expert tips to help you achieve the perfect pastry dough for your homemade elderberry pie.
Firstly, remember that cold ingredients are key to a flaky crust. Make sure to keep all your butter and water chilled in the refrigerator before starting to mix the dough. This will help create those delicate layers of butter and dough that give our pastry its signature texture.
When mixing the dough, be gentle but thorough – you want to avoid overworking it, which can lead to a tough crust. Think of it like kneading bread: stop as soon as the ingredients come together in a cohesive ball. Now, let’s talk about resting time. Give your dough at least 30 minutes to an hour to relax and allow those butter layers to reorganize themselves. This will result in a pastry that’s both tender and flaky.
When it comes to rolling out the dough, try to maintain even pressure, avoiding stretching or pulling it too much. This can lead to shrinkage during baking and compromise the texture of your crust. To achieve an optimal thickness, aim for about 1/8 inch – not too thin, but still allowing the filling to shine through.
When it comes time to place the pastry into your pie dish, don’t stretch or pull it to fit. Instead, gently drape it over the sides and trim any excess with a sharp knife. This will ensure that your crust remains flaky and even as it bakes.
Remember, practice makes perfect, so don’t be discouraged if your first attempts at making pastry dough don’t yield the results you’re looking for. With time and patience, you’ll develop the skills to create a truly exceptional pastry crust – one that perfectly complements our delicious elderberry filling.
Final Assembly and Baking Instructions
It’s time to put all the hard work together and create that stunning elderberry pie! As you’ve gathered your fresh garden elderberries, made the filling, and rolled out the dough, it’s now time for the final assembly. Take a deep breath, follow these last-minute steps, and get ready to be amazed by your very own creation.
To prevent the crust from shrinking during baking, apply an egg wash around its edges using a pastry brush. This will create a golden seal that not only adds texture but also keeps your filling intact. Brush the entire surface of the top crust with another layer for that perfect glaze – it’s like giving your pie a spa day!
Bake your masterpiece in a preheated oven at 375°F (190°C) for about 45-50 minutes or until the crust reaches a golden brown, and the filling bubbles slightly. Keep an eye on your timer; you don’t want to overbake that beautiful pastry.
Once baked, allow the pie to rest for 10-15 minutes before serving. This will enable the flavors to meld together harmoniously – like a symphony of elderberry goodness!
Serving Suggestions and Variations
Now that you’ve perfected your homemade elderberry pie, let’s explore ways to mix things up – from creative toppings to new flavors to try.
Classic Accompaniments for Elderberry Pie
When it comes to serving your homemade elderberry pie, you’ll want to complement its rich, fruity flavor with a few classic accompaniments. Whipped cream is a timeless choice that pairs perfectly with the deep purple hue of elderberries. Simply whip heavy cream until stiff peaks form and top your pie with a dollop. You can also infuse your whipped cream with a hint of vanilla or lemon zest to add an extra layer of flavor.
For a colder treat, consider serving your elderberry pie à la mode with a scoop of creamy vanilla ice cream. The contrast between the warm filling and the cold ice cream is a match made in heaven. If you want to get creative, try making a homemade vanilla bean ice cream using fresh vanilla beans and heavy cream. Your taste buds will thank you for this indulgent treat.
If you’re looking for something a bit lighter, consider serving your pie with a dollop of clotted cream or mascarpone cheese. These rich, creamy toppings add a luxurious touch to your dessert without overpowering the delicate flavor of the elderberries.
Seasonal Variations on the Classic Recipe
One of the joys of baking with garden elderberries is that you can adapt your recipe to suit different times of year. Whether it’s a springtime burst of citrus or a cozy winter warmth of spice, there are plenty of ways to put your own seasonal twist on the classic elderberry pie.
In the spring, consider adding a squeeze of fresh lemon juice and some grated lemon zest to your filling for a bright and tangy flavor. This is especially lovely with the first ripe berries of the season, when their sweetness is still unadulterated by the long summer months.
As summer wears on, you might want to emphasize the warm spices that complement elderberries so beautifully. Add a pinch of ground cinnamon or nutmeg to your filling for a cozy, autumnal flavor that’s perfect for a harvest dinner party.
In the winter, when the days are short and dark, a hint of citrus can be just what you need to lift your spirits. Try adding some grated orange zest or a splash of citrus-infused liqueur to your filling for a burst of sunshine in the midst of winter’s chill.
Frequently Asked Questions
How do I ensure the freshness of my garden-grown elderberries throughout the baking process?
The key to maintaining freshness is proper storage and handling. Store fresh elderberries in an airtight container in the refrigerator, keeping them away from direct sunlight. You can also freeze them for later use by rinsing and patting dry, then placing them in a single layer on a baking sheet before transferring to a freezer-safe bag.
Can I substitute other types of berries or fruit with garden-grown elderberries?
While elderberries add a unique flavor and texture, you can experiment with combining them with other berries like blueberries or raspberries. However, keep in mind that the resulting pie might be sweeter due to the natural sweetness of the mixed fruits. Balance the sweetness by adjusting sugar levels accordingly.
What are some potential allergens I should consider when serving elderberry pie to guests?
As with any fruit-based dessert, common allergens like gluten, nuts, and soy need consideration. Additionally, since elderberries can be high in histamine, individuals with histamine intolerance or sensitivity may react poorly. Be sure to inform your guests about the ingredients used.
How long does it take for garden-grown elderberry bushes to produce fruit after planting?
The time frame varies depending on factors like climate and soil quality. Generally, elderberry bushes can take 2-5 years to mature and start producing flowers and berries. Regular maintenance and proper care will help promote healthy growth and timely harvesting.
Can I make an elderberry pie with frozen or dried elderberries instead of fresh?
Yes, you can use frozen or dried elderberries as a substitute in your pie recipe. However, keep in mind that the flavor and texture might be slightly different due to the dehydration process. Adjust cooking times and sugar levels accordingly when using frozen or dried berries.