Onions are a fundamental ingredient in many of our favorite recipes, but their short shelf life can be frustrating. They’re prone to spoiling quickly, which means we often end up tossing them before they even get used. But what if you could preserve onions at home and enjoy their flavor and texture for months to come? Curing onions is a natural method that not only extends their shelf life but also intensifies their flavor. In this article, we’ll show you how to cure onions using simple, effective methods. You’ll learn about the best techniques for drying onions naturally, as well as essential storage tips to keep them fresh and flavorful throughout the year. By following these steps, you can enjoy your favorite onion-based dishes without worrying about expired or spoiled ingredients.
Understanding Onion Curing
To successfully cure onions, it’s essential to grasp the fundamental principles behind the process and understand how different factors affect the outcome of your cured onions. Let’s break down what makes onion curing work effectively.
Benefits of Curing Onions
Curing onions offers numerous benefits that can elevate your cooking experience and preservation techniques. One of the primary advantages is the enhancement of flavor. When you cure onions, the natural sugars are concentrated, resulting in a sweeter and more complex taste profile. This process helps to break down the cell walls, releasing enzymes that intensify the onion’s characteristic pungency.
In addition to improved flavor, curing also enhances the texture of onions. Dehydrated or cured onions become crispy and caramelized, adding a satisfying crunch to various dishes. Moreover, this method allows you to store onions for extended periods without worrying about spoilage or degradation. Cured onions can be stored in airtight containers, retaining their quality and usability for up to six months.
To maximize the benefits of curing, it’s essential to follow proper techniques. Begin by selecting high-quality onions with minimal damage. Next, dry them using a food dehydrator or by air-drying in a warm, well-ventilated area. Monitor the onions’ moisture levels regularly, ensuring they reach the optimal 10-15% humidity mark for long-term storage.
By embracing onion curing, you’ll be able to enjoy your favorite onions year-round while appreciating their enhanced flavor and texture. This preservation method is an excellent way to save space in your pantry and experiment with various recipes.
Choosing the Right Onions for Curing
When it comes to choosing the right onions for curing, you’ll want to focus on varieties that are naturally high in sugar content and have a robust flavor. Sweet onions like Vidalia, Maui, and Texas Grano are perfect candidates, as they have a naturally sweet taste and will caramelize beautifully during the curing process.
Yellow onions, such as Yellow Granex or Ebenezer, are also great options for curing. They may not be as sweet as their sweet onion counterparts, but they’ll add a depth of flavor to your cured onions that’s hard to beat. Shallots, too, can be cured and make a fantastic addition to any dish.
When selecting onions for curing, look for firm, dry bulbs with no signs of sprouting or mold. Avoid onions that are past their prime, as they won’t cure properly and may spoil quickly. By choosing the right type of onion for your curing needs, you’ll be well on your way to creating delicious, store-bought-style cured onions in the comfort of your own home.
It’s also worth noting that some onion varieties will yield better results than others when it comes to curing. For example, red onions tend not to cure as well as their yellow or sweet counterparts, so they’re best avoided if you want to achieve professional-grade results.
Preparing Onions for Curing
Before you start curing onions, it’s crucial to prepare them properly by cleaning and drying each bulb thoroughly. This step ensures optimal results and prevents spoilage during the curing process.
Harvesting and Cleaning Onions
When it’s time to harvest your onions, make sure you’re doing so at the right stage of maturity. If they’re left too long, they’ll begin to deteriorate and lose their flavor. Check for a few signs that indicate they’re ready: the tops will start to yellow and fall over, and the bulbs will be firm and heavy.
To harvest, carefully loosen the soil around each onion using a fork, being careful not to damage the bulb. Then, gently lift it out of the ground, taking care not to bruise or break the skin. Once you’ve collected all your onions, move them to a dry, well-ventilated area where they can cure.
Cleaning your onions is an essential step before curing. Start by brushing off any loose dirt and debris from the surface using a soft-bristled brush or a clean cloth. Next, submerge the onions in a large container of cold water, swishing them around to remove any remaining dirt or sediment. Let them soak for about 10-15 minutes before lifting them out and gently patting dry with paper towels to remove excess moisture. This will help prevent mold and bacterial growth during the curing process.
Trimming and Shaping Onions
When it comes to preparing onions for curing, trimming and shaping them is an essential step that can make a big difference in the quality of your final product. To start, remove the green tops from each onion as close to the bulb as possible. This will help prevent moisture loss during the curing process and reduce the risk of mold growth.
Next, trim the roots of the onions using a sharp knife or garden shears. Remove any damaged or soft areas on the root end, making sure to cut about 1-2 inches above this area. This will help promote healthy drying and minimize the risk of rot.
Trimming and shaping your onions is also an opportunity to inspect them for any imperfections or damage that may affect their curing quality. Check each onion for any signs of decay, mold, or pests, and remove any affected areas to ensure a successful cure. By taking the time to properly trim and shape your onions, you’ll be setting yourself up for a successful curing process and high-quality final product.
The Curing Process
Now that you’ve harvested and prepared your onions, it’s time to learn how to cure them properly to ensure they last throughout the year. In this crucial step, we’ll walk you through the curing process.
Natural Drying Method
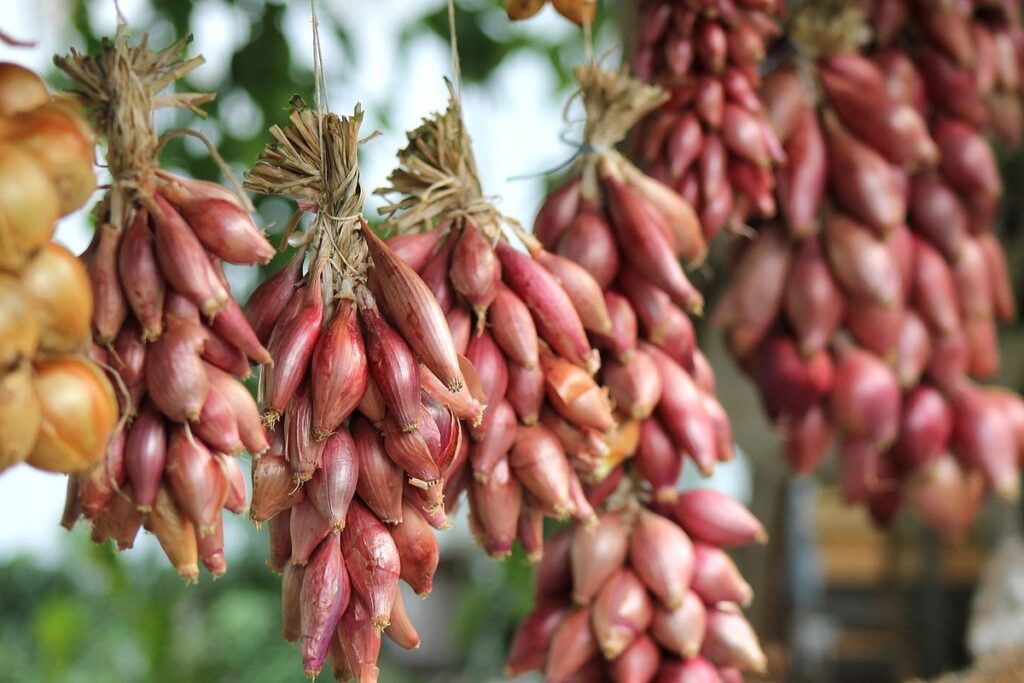
Curing onions using natural drying methods is a simple and effective way to preserve their flavor and texture. To start, select healthy onions with no signs of mold or damage. Then, tie them together in small bunches, leaving enough space between each bulb for air to circulate.
Next, hang the onion bunches upside down from a hook or a beam, making sure they are not touching each other. This will allow for even drying and prevent moisture from accumulating between the bulbs. It’s essential to keep the onions in a warm, dry, and well-ventilated area with temperatures ranging from 60°F to 70°F (15°C to 21°C).
It may take several weeks for the onions to fully cure using this method. You’ll know they’re ready when their papery skin is completely dry and brittle. To check on them, gently shake each bulb; if it makes a rattling sound, it’s likely cured.
Keep in mind that natural drying can be a slower process than other methods, but the end result is well worth the wait.
Using a Dehydrator or Oven for Faster Curing
If you’re eager to speed up the curing process, you can consider alternative methods using equipment like dehydrators or ovens. These approaches work by gently drying out the onions, which can take anywhere from 2-12 hours depending on the temperature and airflow.
When using a dehydrator, set it to its lowest temperature setting (usually around 135°F) and follow the manufacturer’s guidelines for time. As a general rule, thinly sliced onions will dry faster than thicker ones. To get the best results, try to spread them out evenly in a single layer to ensure proper air circulation.
Alternatively, you can use your oven with its lowest temperature setting (usually around 150°F) to speed up the curing process. However, be cautious not to overheat the onions, as this can cause browning or caramelize them. Keep an eye on the onions and check on them every hour or so to prevent any damage.
Keep in mind that when using either method, it’s essential to maintain good air circulation around the onions. This will help prevent the growth of mold or yeast.
Monitoring and Maintaining Onions During Curing
Now that you’ve got your onions curing, it’s time to keep an eye on them to ensure they develop that perfect sweet flavor and chewy texture. This is where monitoring and maintenance come into play.
Checking Moisture Levels and Color
Checking moisture levels and color is crucial to ensure that onions cure properly. A moisture level of 8-10% is ideal for curing onions. You can check the moisture level by inserting a hygrometer probe into the container or bag holding the onions. Alternatively, you can cut an onion open and place it in a dry paper bag. Leave the bag sealed overnight, then weigh it the next morning to determine if it has dried out.
As onions cure, their color will change from greenish-yellow to a more uniform brown. Keep an eye on them, as this process usually takes 2-4 weeks depending on the variety and storage conditions. If you notice any signs of mold or discoloration, remove the affected onions immediately.
It’s also essential to monitor the onions’ texture. A cured onion should feel dry and papery when peeled. Avoid storing onions in airtight containers, as this can cause moisture buildup and lead to spoilage. Keep them in paper bags or breathable containers with loose-fitting lids to maintain airflow. Regularly inspecting your onions will help you identify any issues early on and prevent damage during the curing process.
Storing Cured Onions Properly
Once you’ve successfully cured your onions, it’s essential to store them properly to maintain their quality and flavor. Storing cured onions in a cool, dry place is crucial to prevent moisture from entering the onion cells, which can cause spoilage.
To begin with, select an area that remains between 50°F to 60°F (10°C to 15°C), as this temperature range slows down the onion’s respiration rate. Avoid storing them near direct sunlight or heat sources, as these conditions can accelerate decay.
Store cured onions in a breathable container, such as paper bags, mesh bags, or ventilated containers with lids. These allow for airflow and help maintain a consistent moisture level within the storage area. It’s also vital to keep onions away from strong-smelling foods, as they can absorb odors easily.
When storing, ensure each onion is layered separately to prevent them from coming into contact with each other. This simple step will help prevent the spread of any existing decay and keep your cured onions fresh for several months. Regularly check on your stored onions to identify any signs of spoilage early on.
Tips for Long-Term Storage
Now that you’ve cured and dried your onions, it’s time to consider long-term storage options to keep them fresh for months to come. Learn how to properly store your cured onions for maximum flavor retention.
Using Airtight Containers or Pouches
When storing cured onions, it’s essential to use airtight containers or pouches to prevent moisture buildup and maintain their flavor. Cured onions are more prone to absorbing moisture than fresh ones, which can lead to spoilage and affect their taste.
To keep the onions fresh for an extended period, transfer them to airtight containers or pouches made of materials like glass, plastic, or silicone. These containers should be able to seal tightly, preventing any air from entering or escaping. You can also use ziplock bags, but make sure they are specifically designed for food storage.
When selecting containers, consider the size and shape of the onions. For example, if you have larger onions, a glass jar with a wide mouth might be more suitable than a smaller container. Store the containers in a cool, dry place, such as a pantry or cupboard, away from direct sunlight.
By using airtight containers or pouches, you can extend the shelf life of your cured onions and maintain their flavor for several months.
Labeling and Dating Cured Onions
When it comes to long-term storage of cured onions, labeling and dating them is crucial to ensure they are used before spoilage. Start by using a permanent marker to label each container with the date you stored the onions. This will help you keep track of how long they’ve been in storage.
It’s also essential to store the onions in a clear container or bag, so you can easily see what’s inside without having to dig through the contents. Consider labeling the containers by type of onion (e.g., yellow, red, shallots) and date stored. For example, you might label one container “Yellow Onions – 02/10” and another “Red Onions – 02/15”.
To take it a step further, consider color-coding your labels. Use different colored markers or stickers to indicate the type of onion, so you can quickly identify what’s inside each container. This is especially helpful if you have a lot of onions stored at once.
Remember to regularly check your stored onions for signs of spoilage, and use the oldest ones first. By labeling and dating your cured onions, you’ll be able to keep track of how long they’ve been in storage and ensure that you’re using them before they go bad.
Conclusion and Variations
Now that you’ve successfully cured your onions, let’s explore some conclusion ideas and variations on these techniques to suit your specific needs.
Different Ways to Use Cured Onions
Now that you have a batch of cured onions on hand, it’s time to think outside the box and explore various ways to incorporate them into your cooking. Caramelizing is one popular method where you can use these onions as a topping for burgers, steaks, or as a side dish on its own. Simply heat some oil in a pan, add the cured onions, and let them cook until they’re dark golden brown.
You can also roast cured onions to bring out their natural sweetness. Toss them with olive oil, salt, and your choice of herbs, then spread them on a baking sheet and roast at 400°F (200°C) for about 20-25 minutes or until tender and caramelized.
If you prefer a tangy flavor, try pickling cured onions by soaking them in a brine solution made with vinegar, sugar, salt, and spices. This makes for a great addition to sandwiches, salads, or as a topping for tacos or grilled meats. Experiment with different seasonings and ingredients to create your own unique flavor profiles.
Troubleshooting Common Issues with Onion Curing
As you embark on curing onions, it’s not uncommon to encounter some hiccups along the way. Don’t worry – we’ve got you covered! Here are some common issues that may arise during the curing process and how to troubleshoot them.
Mold or mildew is a major concern when curing onions. This usually happens due to high humidity levels, poor air circulation, or contaminated tools. To prevent mold from taking over, ensure your storage area has good airflow and maintain a relative humidity level of 50-60%. Regularly inspect your onions for signs of mold or mildew, and remove any affected bulbs immediately.
Another common issue is uneven curing – sometimes, one onion might cure faster than the others. This can be due to differences in moisture content or storage conditions. To prevent this, try storing your onions in a single layer, rather than stacking them. You can also gently rotate the onions every few days to ensure even exposure to air.
Finally, some people experience issues with onions developing an off-flavor or becoming too dry during curing. This might be due to over-curing or using tools that have come into contact with strong-smelling foods. To avoid this, cure your onions for a shorter period – around 2-3 weeks is usually sufficient – and handle them gently to prevent damage.
Frequently Asked Questions
How Long Does the Curing Process Take?
The curing process can take anywhere from a few days to several weeks, depending on the method you choose and the desired level of dryness. Natural drying methods can be slower, but they allow for more control over the final product’s flavor and texture.
Can I Cure Onions in Hot Weather or High Humidity?
While it’s technically possible to cure onions in hot weather or high humidity, it’s not recommended. These conditions can promote mold growth and affect the quality of your cured onions. Instead, choose a cooler, drier environment for optimal results.
How Do I Know If My Cured Onions Are Ready to Store?
Cured onions are ready to store when they’re completely dry, brittle, and have a uniform color. Check moisture levels by cutting into an onion; if it’s still damp or spongy, continue curing until desired dryness is achieved.
Can I Use a Dehydrator or Oven for Curing Onions?
Yes, using a dehydrator or oven can speed up the curing process, but be cautious not to overcook your onions. Monitor temperature and time carefully to prevent damage to the onion’s texture and flavor. A lower temperature (135°F – 150°F) is usually recommended.
How Do I Store Cured Onions for Long-Term Use?
Store cured onions in airtight containers or pouches, labeling them with the date and contents. Keep them away from direct sunlight and heat sources to maintain their quality. Regularly check on stored onions for signs of moisture, mold, or pests.