As you gaze out into your garden, have you ever wondered about the busy little creatures flitting from flower to flower? Bumblebees are some of our most vital pollinators, but their populations are facing threats. That’s where a bumblebee nesting box comes in – by installing one in your garden, you can provide these amazing insects with a safe haven and support local conservation efforts. But what makes a good nesting box, and how do you choose the right one for your garden? In this article, we’ll walk you through the essential steps to creating a welcoming environment for bumblebees, from selecting the perfect nesting box to attracting pollinators and troubleshooting common issues along the way. By following these simple tips, you can make a real difference in supporting these incredible creatures.
Introduction to Bumblebee Nesting Boxes
Welcome to our guide on creating a welcoming space for bumblebees! In this next part, we’ll delve into designing and placing nesting boxes specifically tailored to these busy pollinators.
Importance of Bumblebee Conservation
Bumblebees play a vital role in our ecosystem, and their importance cannot be overstated. As primary pollinators of many crops, including tomatoes, blueberries, and cucumbers, bumblebees are responsible for transferring pollen between flowers, facilitating the reproduction of plants. Without them, many of our favorite fruits and vegetables would disappear from our plates.
Unfortunately, bumblebee populations have been declining at an alarming rate due to habitat loss, pesticide use, and climate change. The consequences of this decline are far-reaching, affecting not only plant diversity but also the entire food chain. In fact, it’s estimated that one-third of all crops worldwide rely on bumblebees for pollination.
This is why conservation efforts are crucial to protect these vital pollinators. By installing bumblebee nesting boxes in your garden or community green space, you can provide a safe haven for these magnificent creatures and help reverse the decline of their populations.
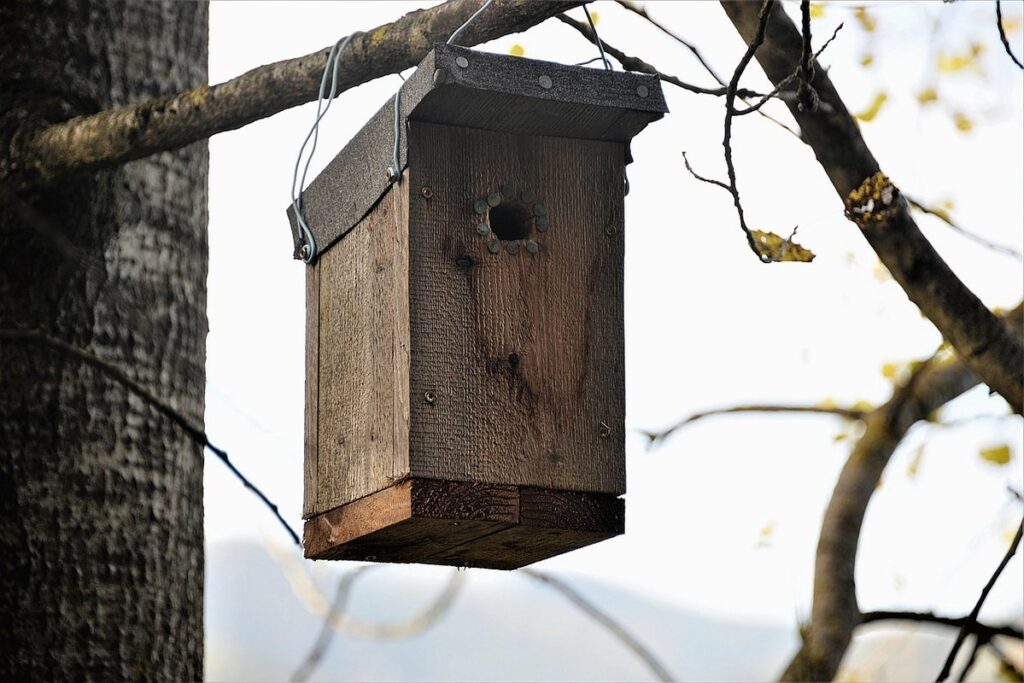
Types of Bumblebee Nesting Boxes
When it comes to providing a safe haven for bumblebees, choosing the right nesting box is crucial. There are various types of nesting boxes available, each with its own set of advantages and disadvantages.
Wooden nesting boxes are a popular choice among bee enthusiasts. Made from sustainable wood sources like pine or fir, these boxes provide a natural and rustic environment for the bumblebees to nest in. Wooden boxes tend to be more expensive than plastic options but offer better insulation and a longer lifespan. They also blend seamlessly into gardens and landscapes.
On the other hand, plastic nesting boxes are often more affordable and lightweight, making them easier to transport and install. However, they may not provide the same level of insulation as wooden boxes and can become brittle with age. Some plastic options come with added features like waterproof coatings or built-in ventilation systems, which can enhance their durability.
When selecting a nesting box, consider factors such as the climate in your region, the type of bumblebees you’re trying to attract, and the level of maintenance you’re willing to perform.
Choosing the Right Location for Your Bumblebee Nesting Box
When it comes to setting up a bumblebee nesting box, choosing the right location is crucial to attracting these beneficial pollinators. Consider factors like sunlight and wind protection in your selection.
Factors to Consider When Selecting a Location
When selecting a location for your bumblebee nesting box, there are several essential factors to consider. First and foremost, think about sunlight. Bumblebees need warmth to survive, so choose a spot that receives at least six hours of direct sunlight per day. A south-facing wall or a spot near a sunny patch of flowers is ideal.
Wind protection is also crucial. Bumblebees can get disoriented in strong winds, which can make it difficult for them to navigate and find the nesting box. Look for a location that provides some shelter from the wind, such as a fence, a hedge, or a group of trees.
In addition to sunlight and wind protection, proximity to flowers and water sources is also important. Bumblebees need nectar-rich flowers to feed on, so choose a spot near a garden or meadow with an abundance of blooms. Also, ensure that the nesting box is close enough to a water source, such as a birdbath or a shallow dish filled with fresh water, to allow the bees to collect water and stay hydrated.
Remember, by choosing the right location for your bumblebee nesting box, you’ll be creating a welcoming haven for these incredible pollinators.
Tips for Installing the Nesting Box in a Suitable Environment
Now that you’ve chosen the perfect location for your bumblebee nesting box, it’s time to install it. This is a crucial step, as the box needs to be placed in an area that provides the right conditions for the bees to thrive.
When installing the nesting box, consider the elevation of the surrounding area. A spot with some sunlight but also shade, especially during the hottest part of the day, will provide optimal temperatures for the bees. Avoid areas that are prone to flooding or waterlogging, as this can be detrimental to the health of the colony.
It’s also essential to install the nesting box in a location where it won’t be disturbed by nearby human activity. A spot near a busy path or area with high foot traffic is not suitable, as this can cause stress and potentially harm the bees. Instead, consider placing the box in a quiet corner of your garden, surrounded by vegetation that will provide shelter and protection for the colony.
Make sure to install the nesting box at least 1-2 meters off the ground to prevent rodents and other small animals from accessing it.
Building or Purchasing a Bumblebee Nesting Box
When it comes to attracting bumblebees to your garden, building or purchasing a nesting box is a crucial step. This section will guide you through the process of creating a welcoming habitat for these beneficial pollinators.
DIY vs. Pre-Made Options
When it comes to building or purchasing a bumblebee nesting box, one of the most significant decisions you’ll face is whether to DIY or opt for a pre-made option. Both approaches have their pros and cons, which we’ll explore below.
Building your own nesting box can be a cost-effective solution, as you can source materials at a lower price point than buying pre-made boxes. Additionally, you have complete control over the design and materials used, allowing you to tailor the box to specific bumblebee species or your local climate. However, building from scratch requires some technical expertise and time commitment, which may not be feasible for everyone.
On the other hand, purchasing a pre-made nesting box offers convenience and a hassle-free experience. Pre-made boxes are often designed with optimal bumblebee habitats in mind, ensuring that they provide the necessary space, insulation, and protection for the bees. However, pre-made options can be more expensive than building your own, and you may not have as much control over the materials used.
Ultimately, whether to DIY or purchase a pre-made nesting box depends on your individual circumstances, skill level, and priorities. If you’re short on time but willing to invest in a high-quality product, purchasing a pre-made option might be the way to go.
Step-by-Step Instructions for Building a Basic Bumblebee Nesting Box
To build a basic bumblebee nesting box using readily available materials, you’ll need to gather the following components:
* 1″ x 6″ x 6′ cedar or pine wood for the back and shelves (you can use scraps from a hardware store)
* 1″ x 4″ x 6′ cedar or pine wood for the sides and floor
* Wood glue
* 2″ nails
* Waterproof roofing felt
* Waterproof glue
* A drill with a 1/16″ drill bit
Cut the 1″ x 6″ wood into four pieces, each measuring 12″ long. These will be the back and shelves of your nesting box. Cut the 1″ x 4″ wood into two pieces, each measuring 12″ long for the sides, and one piece measuring 16″ long for the floor.
Assemble the box by attaching the sides to the floor using 2″ nails. Attach the shelves to the inside of the back panel. Cover the roof with waterproof roofing felt, ensuring it’s securely attached with waterproof glue.
Place the nesting box in a sunny spot, ideally 3-5 feet off the ground and near a source of water. This will provide your bumblebees with a safe haven for nesting and breeding.
Maintenance and Monitoring of Your Bumblebee Nesting Box
Now that your bumblebee nesting box is up and running, it’s essential to regularly check on its inhabitants and perform some simple maintenance tasks to ensure their health and safety. This section will guide you through these crucial steps.
Cleaning and Maintenance Tasks
Regular cleaning and maintenance tasks are essential for the health and well-being of the bumblebees living in your nesting box. Over time, debris such as dead bees, pollen, and wax can accumulate inside the box, creating an unhealthy environment for the colony.
To ensure the longevity and productivity of your nesting box, set aside some time each season to clean it out thoroughly. Start by removing any obvious debris or waste from the entrance tunnel and hive area. Use a soft-bristled brush or a small vacuum cleaner with a gentle suction setting to gently sweep away dirt and debris without damaging the internal components.
Also, inspect the nesting box’s internal parts, such as the hanger system, ventilation holes, and roof tiles. If any of these components show signs of wear or damage, consider replacing them to maintain proper airflow, prevent moisture buildup, and ensure safe bee passage.
Regular maintenance tasks like these can help prevent infestations, reduce disease transmission, and promote a strong colony. By committing to regular cleaning and upkeep, you’ll be rewarded with happy, healthy bumblebees that thrive in their home – your nesting box!
Monitoring the Occupancy and Health of the Nesting Box
Monitoring the occupancy and health of your bumblebee nesting box is crucial to ensure the well-being of these incredible pollinators. To do this effectively, start by observing the box regularly, at least once a week during peak activity seasons. Look for signs of successful colonies, such as:
* A steady stream of bees entering and exiting the box
* The sound of buzzing and gentle humming within the box
* Patches of pollen or debris accumulating around the entrance
Conversely, watch out for potential issues like:
* Excessive dead bees at the entrance
* An unusual amount of moisture or water accumulation inside the box
* Visible signs of pests, like spiders or wasps
If you notice any of these problems, it’s essential to take action promptly. You can do this by gently cleaning the box with a soft brush and inspecting for any damage or issues with the nesting material. If the problem persists, consider relocating the box to a different area or seeking guidance from local bumblebee experts.
Keep in mind that some degree of mortality is normal, especially during peak colony growth periods. By regularly monitoring your nesting box, you’ll be better equipped to address any challenges and provide a safe haven for these vital pollinators.
Attracting Bumblebees to Your Garden
To attract bumblebees to your garden, you’ll want to create a welcoming environment that provides them with the resources they need to thrive. This section will guide you through essential tips for attracting these beneficial pollinators.
Plant Selection and Preparation
When it comes to attracting bumblebees to your garden, selecting the right plants is crucial. Bumblebees are attracted to flowers that are rich in nectar and pollen, so choose plants with a high nectar content. Some excellent options for pollinator-friendly plants include lavender, coneflower, black-eyed Susan, and sunflowers. These flowers come in a range of colors and bloom times, ensuring your garden remains attractive to bumblebees throughout the growing season.
In addition to selecting the right plants, consider creating a welcoming environment by incorporating native plants, which are adapted to your local climate and soil conditions. This will not only attract more bumblebees but also reduce the need for pesticides and fertilizers. When planting, be mindful of the location and arrangement of flowers, as bumblebees prefer a mix of open spaces and sheltered areas.
When preparing your garden for bumblebees, avoid using invasive species that can outcompete native plants and harm local ecosystems. By making informed plant choices and creating a diverse, pollinator-friendly environment, you’ll be well on your way to attracting these vital insects to your garden.
Tips for Creating a Pollinator-Friendly Garden
Creating a pollinator-friendly garden is an essential step in supporting local bumblebees and other beneficial insects. When designing your garden, consider incorporating plants that are rich in nectar and pollen, as these provide the necessary food sources for pollinators. Incorporate a mix of annuals and perennials to ensure year-round nectar availability.
Maintain good soil quality by using compost or manure tea, which will help retain moisture and reduce the need for pesticides. Mulch around plants to regulate temperature and conserve water. A shallow dish filled with fresh water can also be beneficial for pollinators during hot summer months.
Incorporate sheltered areas in your garden design by planting native shrubs or trees that provide a canopy for insects to hide from harsh weather conditions. These sheltered spots will encourage bumblebees to stay and nest within the area. Consider planting bee-friendly herbs like mint, rosemary, and thyme near these sheltered spots.
By implementing these strategies, you can create a haven for local pollinators, providing them with the necessary resources to thrive in your garden. This supportive environment will also encourage bumblebees to nest nearby, increasing their chances of survival and population growth.
Common Issues with Bumblebee Nesting Boxes
As you set up your bumblebee nesting box, it’s essential to be aware of some common issues that can arise, and knowing what to look out for will help ensure a successful nesting season.
Identifying Potential Problems and Solutions
When it comes to bumblebee nesting boxes, there are several potential problems that can arise. One common issue is the presence of predators, such as mice, rats, and wasps, which can invade the nest and harm the bees. To address this challenge, consider using a predator-proof design for your nesting box, such as a metal mesh or hardware cloth enclosure.
Another problem you may encounter is parasites, like mites and small wasp species, that can infest the nest and weaken the bee colony. Regular cleaning and maintenance of the nesting box can help prevent parasite infestations. For example, remove any debris or dead bees from the box after each season to reduce the risk of parasites.
A poorly designed nesting box can also be a problem. Make sure your box has adequate ventilation to prevent moisture buildup, which can lead to mold growth and harm the bees. Additionally, consider using a nesting box with a built-in roof or overhang to provide protection from extreme weather conditions.
Best Practices for Resolving Conflicts between Humans and Bumblebees
When conflicts arise between humans and bumblebees, it’s essential to approach the situation with care and understanding. Bumblebee nesting boxes can sometimes be located in areas where they may be perceived as a nuisance, such as near outdoor seating or play areas.
In cases like property disputes, try to communicate with your neighbors or local community members about the importance of bumblebees and their role in pollination. You might even consider hosting an educational event or workshop to raise awareness about these vital insects.
If concerns are raised about noise or mess, offer solutions that balance human needs with those of the bumblebees. For example, you can install a nesting box with a sound-dampening material or place it in a location where it’s less likely to be disturbed.
Some key considerations when resolving conflicts include:
* Being proactive and addressing concerns early on
* Educating others about the benefits of bumblebee conservation
* Finding creative solutions that balance human needs with those of the bees
* Being patient and understanding, as conflicts may require time and effort to resolve
Conclusion and Next Steps
Now that you’ve learned how to create a bumblebee-friendly habitat, let’s summarize what we’ve covered so far and discuss next steps for your bee conservation journey.
Recap of Key Takeaways
As we conclude our journey into the world of bumblebee nesting boxes, it’s essential to recap the key takeaways from this article. We’ve discussed the importance of providing a suitable environment for these incredible pollinators.
First and foremost, we emphasized the significance of choosing the right location for your nesting box. Bumblebees prefer areas with partial shade, protection from strong winds, and proximity to their food sources. Think about placing it near your garden or a flower bed that attracts bumblebees.
Another crucial aspect is the design and size of the nesting box. A minimum of 12 inches tall and 8-10 inches wide is recommended, with a hollow compartment for the queen to lay her eggs. Consider adding features like ventilation and a roof to protect the bees from predators and harsh weather conditions.
By following these guidelines and creating a welcoming environment, you can play a vital role in supporting bumblebee conservation. Remember, every small step counts, and providing a suitable nesting box is an excellent starting point. So, get creative and build or purchase your own bumblebee nesting box today!
Encouragement to Get Involved with Bumblebee Conservation Efforts
As you’ve learned about the importance of bumblebee nesting boxes and the role they play in supporting local pollinators, it’s time to take action. You can make a real difference by installing your own nesting box and participating in ongoing conservation initiatives.
Consider reaching out to local beekeepers or entomologists to learn more about existing efforts in your area. Many organizations, such as the Xerces Society, are working tirelessly to protect pollinators through habitat restoration, research, and education. You can also join online communities or forums dedicated to bumblebee conservation to connect with like-minded individuals and stay updated on local initiatives.
By installing a nesting box in your own backyard, you’ll not only be supporting local bumblebees but also contributing to the larger effort to protect these vital pollinators. Take the first step today by investing in a high-quality nesting box and following proper installation guidelines to ensure its success. Together, we can make a significant impact on the health of our ecosystems and the well-being of these incredible creatures.
Frequently Asked Questions
What are some common mistakes to avoid when installing a bumblebee nesting box?
When installing your bumblebee nesting box, be cautious not to place it too close to human dwellings or areas with high foot traffic. Bumblebees can become defensive if they feel threatened, and placing the box in a safe location is crucial for their well-being. Additionally, avoid orienting the box towards direct sunlight, which can cause the internal temperature to rise.
Can I use an existing birdhouse as a bumblebee nesting box?
While some birdhouses may be suitable for bumblebees, they are not ideal. Bumblebees require specific dimensions and entrance sizes, as well as features like ventilation and insulation to maintain optimal temperatures. Using an existing birdhouse without modifications can be detrimental to the health of your bumblebees.
How do I clean and maintain my bumblebee nesting box?
Regular cleaning is essential for maintaining a healthy environment for your bumblebees. Remove any debris, dead bees, or parasites from the nest during the winter months when the colony is dormant. Wear gloves and use a soft-bristled brush to gently sweep away any dirt or dust.
What if I notice pests or diseases in my bumblebee nesting box?
If you suspect an infestation of mites, wasps, or other pests, monitor the situation carefully before taking action. For small colonies (less than 50 bees), consider moving the nest to a nearby location with fewer inhabitants. If the infestation persists or spreads, it may be necessary to replace the nesting box entirely.
Can I install multiple bumblebee nesting boxes in my garden?
Installing multiple nesting boxes can support larger populations of bumblebees and enhance pollination efficiency within your garden. However, consider the proximity between boxes (at least 10 feet apart) and ensure each box is placed according to its specific orientation and sunlight exposure requirements.
How long do I need to leave a new bumblebee nesting box undisturbed?
Bumblebee colonies typically emerge in late spring or early summer after their winter hibernation. To allow the colony time to establish itself, refrain from checking or handling the nesting box for at least 2-3 months after installation. This period will give your bees ample time to settle and begin reproducing.