If you’re like many gardeners, you’ve likely encountered those pesky carpenter bees drilling holes into your precious fences, decks, and planters. While they may look destructive, carpenter bees are actually beneficial insects that play a crucial role in pollination. However, their nesting habits can cause damage to your outdoor structures if left unchecked. As a responsible gardener, you want to repair those carpenter bee holes without harming these helpful insects. But where do you start? In this article, we’ll explore DIY and professional methods for repairing carpenter bee holes, as well as preventative measures to keep future infestations at bay. By the end of it, you’ll be equipped with the knowledge to safely repair damage and protect your garden structures while still welcoming these beneficial bees.
Understanding Carpenter Bees and Their Habitats
Carpenter bees are important pollinators, but their nesting habits can sometimes damage your garden structures – let’s take a closer look at what makes them tick.
What Are Carpenter Bees?
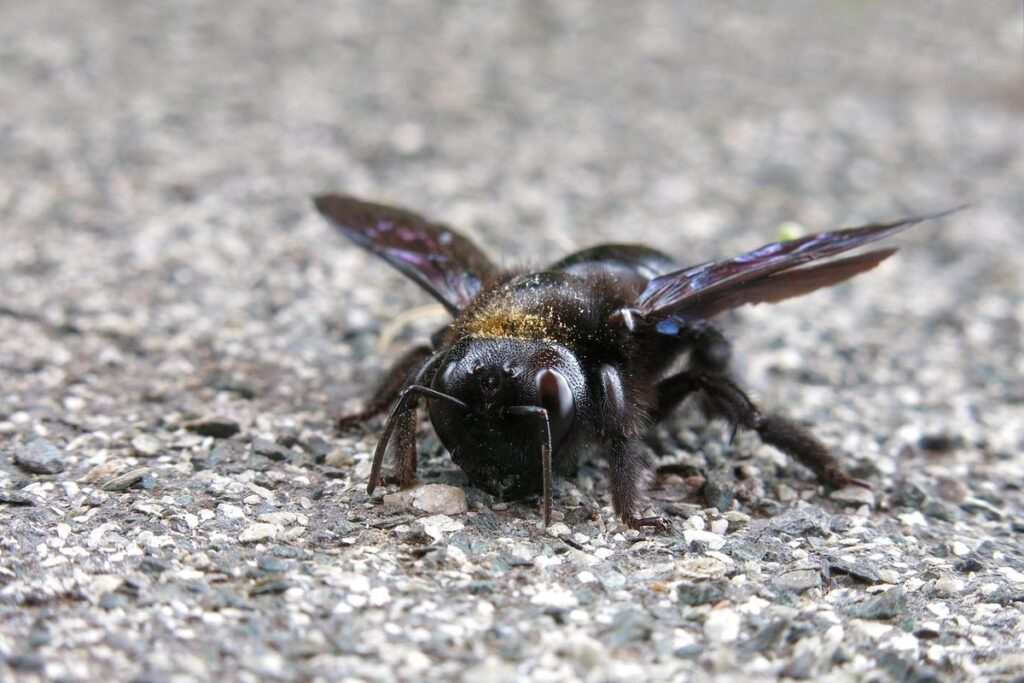
Carpenter bees are one of the most common and misunderstood insects that inhabit our gardens. These large, metallic-colored bees can be intimidating to some gardeners, but they play a vital role in pollination and ecosystem health.
To identify carpenter bees, look for their distinctive size – typically between 1-2 inches long – and shiny black or blue-black body with a bright green thorax. Female carpenter bees are slightly larger than males and have a yellow or white spot on the forehead, which is often absent in males. These bees are also known for their loud humming noise, created by vibrating their wings at an incredible 200 times per second.
One of the most striking features of carpenter bees is their ability to bore holes into wood to create nests. Female carpenter bees use these holes as protection and shelter for their young, often reusing existing holes or excavating new ones each season. These holes can range from small, perfectly round entrances to larger, more irregular shapes depending on the bee’s needs.
If you suspect that a carpenter bee has taken up residence in your garden structure, observe the hole carefully before taking any action. If it appears clean and tidy with no visible debris or sawdust, it may be an old nest from a previous season.
Identifying Common Locations for Carpenter Bee Holes
Carpenter bees can be found nesting in a variety of garden structures, including fences, decks, and planters. When searching for carpenter bee holes, it’s essential to inspect these areas carefully, as they are common locations for nests.
Fences, particularly those made from pressure-treated wood or cedar, are attractive to carpenter bees due to the softwood composition. These types of wood are more prone to nesting, and you may find holes ranging in size from 1/4 inch to 1/2 inch. Decks, especially those with wooden boards, can also be targeted by carpenter bees. Inspect any wooden deck boards for signs of nesting, such as sawdust or frass.
Planters, often made from plastic or wood, are another common location for carpenter bee nests. If you have planters on a balcony or patio, take note of any small holes or grooves in the surface. Carpenter bees can also be found nesting in other wooden structures like garden benches and trellises. Keep an eye out for these potential nesting sites to effectively identify and repair carpenter bee holes in your garden structures.
Importance of Not Killing Carpenter Bees
Carpenter bees may seem like pests at first glance, but they play a crucial role in our ecosystem. These beneficial insects are responsible for pollinating plants and flowers, just like honeybees. In fact, research suggests that carpenter bees visit over 100 different plant species, contributing to the reproduction of many fruits and vegetables we enjoy.
When you see a carpenter bee hovering around your garden, it’s not necessarily a sign that they’re damaging your structures. They’re often attracted to flowers in search of nectar, which is essential for their survival. In reality, only female carpenter bees dig holes into wood to lay their eggs and store pollen, not to harm your garden.
To coexist peacefully with these beneficial insects, it’s essential not to kill them. Instead, focus on repairing the damage they cause by filling in their holes with a mixture of sawdust and sealant. This will prevent future damage while also giving you an opportunity to inspect for any other potential issues with your garden structures.
Assessing Damage and Choosing Repair Methods
Now that you’ve identified carpenter bee damage, it’s time to assess its severity and decide on the best repair methods to restore your garden structures. This decision will depend on several factors, including the extent of the damage and the materials used in construction.
Inspecting for Damage
When inspecting your garden structures for carpenter bee holes, it’s essential to look out for signs of infestation and damage. Start by examining the wood surfaces, particularly areas around doors, windows, and other entry points. Check for small, round holes about 1/4 inch in diameter, often surrounded by a “frass” or sawdust-like material.
Carpenter bees typically create their holes vertically, but can also be found horizontally or even diagonally. Look for multiple holes in the same area, as this is a common sign of infestation. Inspect the surrounding wood for any signs of damage, such as cracks, splits, or warping.
Pay close attention to areas with heavy wood use or high moisture levels, like planters and outdoor furniture. Carpenter bees are attracted to softwoods, especially pine and fir, so inspect these areas thoroughly. Use a flashlight to peer into the holes, if necessary, to assess the extent of the damage. If you find any signs of infestation, it’s best to address them promptly to prevent further damage.
Evaluating Repair Options: DIY vs. Professional Help
When evaluating repair options for carpenter bee holes in garden structures, you’re likely faced with two primary choices: DIY repair methods versus hiring a professional. While some homeowners may be tempted to tackle the repair themselves, others might prefer to leave it to the experts.
DIY repair methods can be cost-effective and allow you to take control of the project. However, they often require specialized knowledge and tools, which can be daunting for those without experience. For instance, using a drill bit with a hollow center can help remove damaged wood without causing further damage, but this requires precision and patience.
On the other hand, hiring a professional carpenter or arborist can provide peace of mind knowing that the job is done correctly and safely. They’ll assess the extent of the damage, recommend the best repair method, and execute it with expertise. While more expensive upfront, professional help can save you from costly mistakes and potential injuries.
Consider your time, skills, and the scope of the project before making a decision. If you’re short on time or unsure about the repair process, hiring a professional might be the better option.
Preparing for Repair
Before you start repairing damaged carpenter bee holes, it’s essential to clean and inspect each site thoroughly to ensure a successful fix. This step can help prevent further damage down the line.
Safety Precautions When Working with Power Tools
When working with power tools to repair carpenter bee holes in garden structures, safety should be your top priority. Before starting the job, take a few minutes to familiarize yourself with the equipment and ensure you’re using it correctly.
Wearing protective gear is essential when operating power tools. This includes gloves to prevent hand injuries, safety glasses or goggles to protect your eyes from debris, and a dust mask to minimize exposure to airborne particles. Choose protective gear that fits comfortably and allows for freedom of movement.
Maintaining equipment regularly is also crucial for safe operation. Check the tool’s condition before use, looking for signs of wear, damage, or loose parts. Replace worn-out cords or damaged handles to prevent accidents. Keep your workspace clean and well-ventilated, ensuring clear access to the area you’re working on.
Regular maintenance can help prevent equipment failure and reduce the risk of injury. Always follow the manufacturer’s instructions for operation and maintenance, and take regular breaks to avoid fatigue.
Cleaning Out the Hole: Removing Debris and Old Nesting Material
When cleaning out carpenter bee holes, it’s essential to prioritize caution and safety. Start by removing any visible debris or old nesting material from the hole using a small brush or a specialized tool like a dental pick. Be gentle to avoid damaging the surrounding wood or causing further harm to the bees.
If the hole is particularly deep or narrow, consider using a long-handled brush or a flexible cable with a hooked end to reach and remove debris without having to stick your hand into the hole. This will also help prevent accidental stings from any remaining carpenter bee occupants.
Once you’ve removed as much debris as possible, inspect the hole for any remaining old nesting material or honeycomb fragments. Use a soft-bristled brush to gently sweep away these particles and create a smooth surface for your repair work. Remember to work slowly and carefully to avoid pushing more debris further into the hole or causing damage to the surrounding area.
Repair Techniques for Different Garden Structures
We’ll dive into specific repair techniques tailored to different types of garden structures, helping you fix those pesky carpenter bee holes efficiently. From wooden fences to trellises and more!
Wood Repair for Fences and Decking
Repairing carpenter bee holes in wooden fences and decking can be a bit tricky, but with the right materials and techniques, you can get the job done. First, let’s talk about the materials needed. You’ll need some basic carpentry tools like a drill, sandpaper, and a hammer. For filling the holes, you can use either caulk or wood filler, depending on the size of the hole.
When it comes to larger holes, it’s best to use a combination of both. Apply a layer of wood filler to fill in most of the hole, then top it off with caulk for a smooth finish. To ensure a strong bond between the old and new wood, it’s essential to clean out any debris from the hole before filling.
To repair a large number of holes, you can also use a carpenter bee hole repair kit. These kits usually contain a specialized adhesive that is designed specifically for this type of repair. They’re easy to apply and dry quickly, making them a great option for busy homeowners who want to get the job done fast.
Planters and Wooden Trellises: Specialized Repair Considerations
Repairing carpenter bee holes in planters and wooden trellises can be particularly challenging due to their delicate design and sensitive materials. One of the primary concerns when repairing these structures is preserving their aesthetic appeal while ensuring stability and functionality.
When dealing with planters, it’s essential to assess the extent of the damage caused by the carpenter bees. If the holes are shallow and limited to a small area, you may be able to repair them using wood filler or putty. However, if the damage is more extensive or the planter has significant structural issues, it might be necessary to replace it altogether.
In contrast, wooden trellises often require more intricate repairs due to their latticework design. To fix carpenter bee holes in these structures, you can use a combination of wood glue and filler or even replace individual slats if the damage is severe. When working with trellises, be cautious not to compromise the integrity of the structure during the repair process.
When repairing either planters or wooden trellises, it’s crucial to prioritize the structural soundness of the surrounding area to prevent further damage from water or pests. Regular maintenance and prompt attention to carpenter bee holes can help you avoid costly repairs down the line.
Preventative Measures for Future Infestations
Now that you’ve learned how to repair carpenter bee holes, let’s talk about preventing future infestations by taking proactive steps in your garden. We’ll explore some effective measures to protect your structures and plants.
Sealant Options for Garden Structures
When it comes to protecting your garden structures from carpenter bee infestations, using the right sealant is crucial. There are several options available on the market, each with its own effectiveness against these pests.
One popular choice is silicone-based sealants. These flexible and waterproof sealers can be used on a variety of surfaces, including wood, metal, and plastic. They’re also easy to apply and dry quickly, making them a convenient option for garden owners. However, it’s worth noting that some carpenter bees may still manage to drill through these sealants, so it’s essential to use multiple coats for optimal protection.
Another effective option is polyurethane-based sealants, which offer improved durability and water resistance compared to silicone-based products. These sealers are also resistant to UV light, ensuring they won’t degrade over time due to exposure to sunlight. When choosing a sealant, consider the type of surface you’re working with and the level of protection you need.
Some garden owners swear by using natural sealants like beeswax or plant-based oils to repel carpenter bees. While these products can be effective in some cases, they may not provide the same level of protection as synthetic sealants and may require frequent reapplication.
In any case, it’s essential to follow the manufacturer’s instructions when applying a new sealant, and to test a small area first to ensure the product doesn’t damage your garden structure. Regular inspections will also help you identify potential issues before they become major problems.
Implementing Habitats That Deter Carpenter Bees
When creating gardens or outdoor structures, it’s essential to think ahead and incorporate elements that discourage carpenter bee infestations from occurring in the first place. Carpenter bees often target untreated wood for their nesting sites, so using materials that are less appealing to them is a great starting point.
Consider using woods like cedar or redwood, which contain oils that repel carpenter bees. Alternatively, you can opt for composite materials or recycled plastic lumber, which they tend to avoid altogether. In addition to the type of wood used, the size and shape of your structures also play a role in deterring infestations.
For instance, installing narrow wooden dowels or strips instead of thick planks can make it more difficult for carpenter bees to access and nest within the material. You can also try incorporating metal or plastic inserts into your structures, which provide an impenetrable barrier against these pesky insects. By incorporating these strategies into your design, you’ll be well on your way to creating a carpenter bee-free zone in your garden.
Frequently Asked Questions
Can I repair carpenter bee holes myself without any prior experience?
Yes, with the right guidance and precautions, you can successfully repair carpenter bee holes yourself. Before starting, assess the damage and consider the type of structure affected to determine if a DIY approach is feasible. For most garden structures, a simple repair method can be implemented using basic tools.
What are some common challenges when repairing large or deep holes?
When dealing with larger or deeper holes, it’s essential to exercise caution not only for your safety but also to prevent further damage to the surrounding area. To overcome this challenge, consider using specialized tools like drill bits or a rotary hammer to avoid over-drilling and causing more harm.
How do I ensure I’m not harming any existing carpenter bees when repairing their holes?
Yes, it’s crucial to identify and respect the presence of active nests. Before cleaning out debris, inspect for signs of fresh mud or sawdust around the hole’s entrance, indicating recent activity. Gently remove any debris and old nesting material without causing further damage to the surrounding structure.
Can I use any type of sealant to fill carpenter bee holes?
No, not all sealants are suitable for garden structures. When choosing a sealant, consider factors such as durability, weather resistance, and compatibility with your specific structure’s materials (e.g., wood, plastic). Opting for eco-friendly or water-based sealants can also help prevent chemical harm to beneficial insects.
How do I know which repair method is best suited for my garden structures?
Evaluating the size, material, and age of your garden structures will help determine the most effective repair approach. Consider factors such as structural integrity, surrounding plant life, and future maintenance needs when deciding between DIY or professional assistance to ensure long-term protection against carpenter bee damage.