If you’re a gardener who loves spending time outdoors, but is also concerned about protecting your wooden structures from damage, then this DIY project is perfect for you. Carpenter bees can be a real nuisance in gardens, causing harm to decks, fences, and even homes. But don’t worry, with a simple carpenter bee trap, you can prevent these pests from causing damage and enhance your gardening experience. In this article, we’ll show you how to make a carpenter bee trap using everyday DIY materials and clever designs. You’ll learn about the benefits of trapping carpenter bees, how to choose the right materials, and step-by-step instructions on building your very own trap. By following our guide, you can enjoy your garden without worrying about these pesky insects causing damage.
Understanding Carpenter Bees and Their Impact
Before we dive into building a carpenter bee trap, let’s take a closer look at these beneficial insects and how they impact your garden.
What are Carpenter Bees?
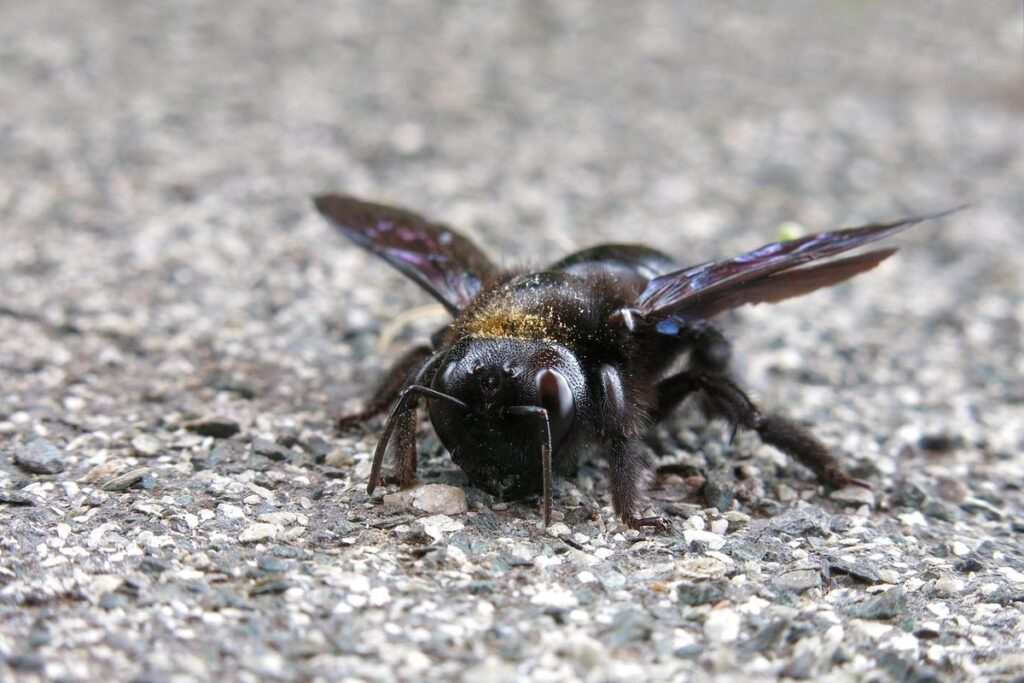
Carpenter bees are one of the most recognizable and often misunderstood types of bees. These large, solitary insects are part of the Xylocopa spp. family, which includes over 500 species worldwide. One of the key characteristics of carpenter bees is their ability to bore holes into wood to create their nests.
You might be wondering why they choose to nest in wood instead of in soil or other materials like mud tubes. The reason is that wood provides a more stable and protected environment for their eggs, allowing them to lay and incubate their young without fear of predators or harsh weather conditions. However, this nesting habit can also cause significant damage to wooden structures such as fences, decks, and even houses.
It’s worth noting that carpenter bees are generally harmless and do not defend their nests aggressively like some other bee species. In fact, they can be beneficial to gardens, as they are pollinators and help to transfer pollen between plants. By understanding the behavior and habits of these unique bees, you can learn how to peacefully coexist with them in your garden and even attract them to your yard for their pollination benefits.
Why Are Carpenter Bee Traps Necessary?
Carpenter bees can cause significant damage to wooden features in your garden if left unchecked. They dig holes into wood to create nests for their young, often targeting untreated or weathered wood. If not managed properly, these holes can weaken the structure and compromise its integrity.
One of the primary reasons carpenter bee traps are necessary is that they help regulate the population of these bees in your garden. By using a trap to capture and remove individual bees, you reduce the likelihood of them laying eggs in nearby wood. This approach prevents new generations from developing and eventually dying out, which can be a slow process if done manually.
Effective management also reduces the risk of significant damage. Carpenter bee traps work by luring the bees into a container where they are unable to escape, either due to their physical design or baiting strategies. This method helps you monitor and control the population without harming them, promoting a balanced ecosystem in your garden.
Materials Needed for a DIY Carpenter Bee Trap
To build your carpenter bee trap, you’ll need some basic materials and tools that are likely already sitting in your garage or workshop. Check out our list of essential supplies below.
Choosing the Right Wood
When it comes to selecting the right type of wood for your DIY carpenter bee trap, you’ll want to choose a material that’s not only durable but also naturally resistant to these unwanted visitors. While there are many types of wood to consider, some options stand out from the rest due to their unique properties.
Cedar, cypress, and redwood are three popular choices for carpenter bee traps because they contain natural oils that repel bees. These oils, which are released as the wood weathers over time, create a barrier that deters carpenter bees from attempting to nest in your trap. Cedar, in particular, is known for its potent aroma, which is often used in traditional woodworking and garden projects.
When selecting one of these woods, look for heartwood – the inner, older growth rings that are typically free of knots and other imperfections. This will not only provide a stronger, more durable material but also ensure that your trap is less likely to be compromised by carpenter bees. By choosing the right wood and following proper construction techniques, you’ll be well on your way to creating an effective carpenter bee trap for your garden.
Essential Components
When it comes to building an effective carpenter bee trap, having the right materials is crucial. You’ll need a few essential components to get started. First and foremost, you’ll require a wooden board that’s untreated and free from chemicals. This will provide a safe and natural surface for the bees to land on.
In addition to the wooden board, you’ll also need some nails or screws to assemble the trap. Make sure to choose materials that are specifically designed for outdoor use and can withstand the elements. Waterproof glue is another crucial component that will help keep the trap’s structure intact and prevent water from seeping in.
Finally, consider applying a waterproof coating or paint to protect the wooden board from moisture and extend its lifespan. This will not only ensure the durability of your carpenter bee trap but also give you peace of mind knowing that it can withstand various weather conditions. With these essential components on hand, you’ll be well-prepared to create an effective carpenter bee trap for your garden.
Designing Your Carpenter Bee Trap
Now that you’ve gathered materials and have a basic understanding of carpenter bee behavior, it’s time to focus on designing your trap. This crucial step will help ensure your bee trap is effective in attracting these beneficial insects.
Basic Trap Design
When designing your carpenter bee trap, it’s essential to consider a basic design that effectively captures these beneficial insects without harming them. A simple yet effective design can be achieved by incorporating a few key features.
Firstly, you’ll need to create entrance holes that are specifically designed for carpenter bees. These holes should be larger than those used for other types of bees or wasps, typically around 1/4 inch in diameter. This is because carpenter bees have a more substantial body size compared to other bees.
Next, consider adding compartments or tubes within the trap where captured carpenter bees can lay eggs and store pollen without escaping. These compartments should be long enough for the female bee to fly inside but not so large that she can fly out again. You can use plastic tubes or even empty bamboo sticks as makeshift compartments.
Remember, a basic design is just the starting point. Feel free to experiment and adjust the dimensions of your trap based on local carpenter bee populations and personal preferences.
Variations of Carpenter Bee Traps
While traditional carpenter bee traps made from wooden logs and hollow tubes are effective, you can also experiment with alternative designs that incorporate different materials or techniques. For instance, using plastic containers can be a great option for those who want to try something new.
You can transform an old plastic bottle or container into a trap by drilling a hole of the right size in one end, allowing carpenter bees to enter but not escape. This design is perfect for areas where space is limited, as it doesn’t take up much room. Additionally, you can use metal containers like tin cans or buckets with holes drilled into them.
Another creative approach is to repurpose an old cardboard box by cutting a hole in one end and coating the interior with a sticky substance like honey or tree resin. This trap design works best when placed near areas where carpenter bees are most active, such as sunny spots with blooming flowers. When choosing materials for your trap, ensure they’re durable enough to withstand outdoor conditions and can be easily cleaned.
Step-by-Step Instructions for Building a Carpenter Bee Trap
Now that you have your materials, let’s move on to building your carpenter bee trap. This step-by-step guide will walk you through each component.
Assembling the Wooden Frame
To assemble the wooden frame, you’ll need to follow these steps carefully. First, place the four rectangular pieces on a flat surface, ensuring they are aligned properly. Use wood glue to secure them together at each corner, forming a square shape. Then, clamp the pieces together to hold them in place while the glue dries.
Next, attach the top and bottom panels to the sides using hinges. This will allow you to easily open and close the trap. Make sure the hinges are securely fastened with screws or nails.
It’s essential to ensure your wooden frame is sturdy enough to support the weight of the bees. To do this, use 1-inch thick wood for the sides and top, and 3/4-inch thick wood for the bottom panel. You can also add additional supports if needed.
Once you’ve assembled the frame, inspect it carefully to make sure all the parts are securely attached. If you’re unsure about any aspect of the assembly process, consult with a professional or seek guidance from online resources.
Creating Compartments and Entrances
To create an effective carpenter bee trap, you’ll need to design compartments that mimic the bees’ natural nesting habits. These compartments should be made of a smooth material like wood or bamboo, as carpenter bees prefer to excavate their nests from solid materials. Divide the trap into individual cells using a sharp utility knife or a saw, taking care not to create any rough edges.
Next, drill precise entrance holes at the top of each compartment. Carpenter bees are attracted to traps with small, rounded entrances that resemble their natural nesting sites. Use a drill bit with a diameter of about 1/4 inch (6-7 mm) and make sure the holes are centered above each compartment. You can also use a combination of drilling and sanding to create smooth, rounded entrances.
When placing the entrance holes, consider the carpenter bee’s preference for vertical access. Position the holes slightly off-center, allowing the bees to climb up into the trap with ease. This will increase your chances of attracting these beneficial pollinators and monitoring their behavior in a controlled environment.
Placement and Maintenance Tips for Your Carpenter Bee Trap
Now that you’ve built your carpenter bee trap, it’s time to learn how to place it effectively and maintain its performance throughout the season. Proper placement will ensure optimal results.
Where to Place the Trap
When placing your carpenter bee trap, it’s essential to consider two crucial factors: sunlight exposure and proximity to nesting sites. Carpenter bees are attracted to warmth, so a spot that receives direct sunlight for at least six hours a day is ideal. Avoid areas with dense foliage or overhanging branches, as these can create shade and make it difficult for the bees to reach the trap.
Ideally, place your trap near an existing carpenter bee nesting site, such as a wooden fence post or a tree trunk. This will increase the chances of attracting the target species and reduce the risk of other beneficial insects getting trapped. When selecting a location, keep in mind that carpenter bees tend to nest in areas with good ventilation, so avoid placing the trap in a low-lying spot where water may collect.
In terms of specific placement, aim for a height of around 3-5 feet above ground level. This will allow you to easily access and maintain the trap while also keeping it out of reach of pets and children.
Regular Maintenance
Regular maintenance is crucial to ensure the effectiveness and longevity of your carpenter bee trap. Set aside some time each week to inspect the trap and perform basic cleaning tasks. Start by gently removing any debris, leaves, or other obstructions that may be clogging the entrance or exit points.
As you clean the trap, also take a moment to check for trapped bees. If you’ve been successful in attracting carpenter bees, there’s a good chance some will have gotten stuck inside. Gently release them outside, making sure they’re able to fly away safely. It’s essential to do this carefully to avoid harming the bees.
To prevent pest buildup and keep your trap clean, ensure that it’s properly ventilated. If you notice any signs of rot or mold, replace the trap immediately. Regular maintenance not only helps maintain the health of the trap but also ensures that carpenter bees continue to be attracted to it. By performing these simple tasks, you’ll be able to monitor their activity and make adjustments as needed to maximize your trap’s effectiveness.
Benefits of Using a Carpenter Bee Trap
By using a carpenter bee trap, you’ll not only protect your garden from these pesky insects but also enjoy numerous benefits for your plants and overall gardening experience.
Reduced Damage to Wooden Structures
Carpenter bees can be a major nuisance for garden owners, not just because of their painful stings but also due to the extensive damage they cause to wooden structures. These wasp-like bees are notorious for boring holes into wood to create nests, which can weaken the structural integrity of fences, decks, and other outdoor features.
By using a carpenter bee trap in your garden, you can significantly reduce the damage caused by these pests. The trap’s design allows carpenter bees to enter but not exit, preventing them from infesting nearby structures. This means that even if carpenter bees are present in your area, they won’t be able to cause significant damage.
To maximize the effectiveness of the trap, make sure it’s placed near areas with high carpenter bee activity and baited with a sweet substance like honey or fruit juice. Regularly inspecting the trap will also help you identify any infestations early on, allowing you to take corrective action before the damage becomes extensive.
Enhanced Gardening Experience
When you reduce the number of carpenter bees in your garden using a carpenter bee trap, you’ll be able to enjoy gardening without worrying about their activity. This is because fewer pests mean less stress and anxiety when tending to your plants. You can spend more time cultivating your garden, experimenting with new techniques, or simply appreciating its beauty.
With fewer carpenter bees around, you’ll also be able to protect your crops from damage. Carpenter bees are known to bore into wood, which can weaken plant structures and create entry points for other pests. By reducing their population, you’ll minimize the risk of plant damage and ensure a healthier harvest. Additionally, with less pest activity, you may even notice an increase in beneficial insects like pollinators and ladybugs, which are crucial for maintaining a balanced ecosystem.
To make the most of your carpenter bee trap, place it near areas where you’ve seen carpenter bees frequenting. You can also experiment with different trap designs or baits to see what works best in your garden. By creating a more peaceful environment, you’ll be able to enjoy the therapeutic benefits of gardening and appreciate the fruits of your labor without worrying about unwanted visitors.
FAQs and Troubleshooting Tips for Carpenter Bee Traps
Got stuck setting up your carpenter bee trap? This section is here to help, covering common questions and solutions to get you back on track.
Common Issues with Trap Design or Placement
When designing and placing carpenter bee traps, it’s not uncommon to encounter issues that can affect their effectiveness. One common problem is creating escape routes for the bees themselves. If the trap design allows for easy exit points, the bees may simply fly out without being trapped at all.
To avoid this issue, consider the following: ensure that the entrance of your carpenter bee trap is slightly smaller than the body of a carpenter bee to prevent them from flying back out. You can also use a mesh or netting material to cover the escape routes, but make sure it’s not so fine that it traps other beneficial insects.
Another potential issue with trap placement is positioning it too close to an existing beehive or nest site. This can lead to conflicts between carpenter bees and other bees in the area. To minimize this risk, place your trap at least 10-15 feet away from any known bee activity.
It’s also worth noting that improper placement of the trap can attract other pests, such as wasps or flies, which may compete with your target species for resources.
Solutions for Low Catch Rates
If you’re finding that your carpenter bee trap isn’t catching as many bees as you’d like, don’t worry – it’s a common issue! To boost the effectiveness of your trap and attract more carpenter bees, consider these solutions. First, ensure your trap is well-positioned in an area with plenty of sunlight and warmth, as carpenter bees are attracted to heat.
Another key factor is bait: try using different types of flowers or herbs, such as lavender or geraniums, which carpenter bees love. You can also experiment with sugar water or nectar-rich substances like honey or maple syrup. Make sure the bait is fresh and not too concentrated – you want to entice the bees, not overwhelm them.
Lastly, inspect your trap regularly for any debris or blockages that might be hindering entry points. Clean out any stuck bees gently, using a soft brush or cloth, and make repairs if necessary. With these tweaks, your carpenter bee trap should start luring in more visitors – and help you monitor their populations with greater ease!
Frequently Asked Questions
What are the key characteristics of a carpenter bee trap that ensure effective catching?
A well-designed carpenter bee trap should have compartments and entrances that mimic the natural nesting sites of carpenter bees. This includes creating holes or cavities in wood that are similar in size and shape to those made by carpenter bees. Additionally, the trap should be placed in an area where carpenter bees are likely to be present, such as near wooden structures.
Can I use a single type of wood for both the frame and compartments of my carpenter bee trap?
While you can use the same type of wood for both the frame and compartments, it’s recommended to use different types of wood to ensure effective catching. Carpenter bees are attracted to certain types of wood over others, so using a combination of woods may increase their chances of being caught.
What is the ideal location for placing my carpenter bee trap in my garden?
Place your carpenter bee trap near wooden structures such as decks, fences, or outdoor furniture. Avoid areas with direct sunlight and ensure good airflow to prevent moisture buildup inside the trap.
How often should I inspect and clean my carpenter bee trap?
Regular maintenance is crucial for the effectiveness of your carpenter bee trap. Inspect and clean the trap every 1-2 weeks during peak carpenter bee season (spring-fall). Remove any caught bees, debris, or rotting wood to prevent the spread of diseases.
Can I use a pre-made wooden box as the frame for my carpenter bee trap?
While using a pre-made wooden box can save time and effort, it’s recommended to build your own frame from scratch. This ensures that you can customize the design and size of your carpenter bee trap according to your specific needs and preferences.