Are you tired of watching your beautiful garden be destroyed by carpenter bees? These pesky insects may look harmless, but they can cause significant damage to your plants and wood structures. But don’t worry, we’ve got a solution for you! In this article, we’ll show you how to create simple and effective DIY traps to keep your garden safe from these unwanted visitors.
We’ll start by covering the basics of carpenter bee behavior and why they’re attracted to gardens in the first place. Then, we’ll dive into the world of DIY trap-making, sharing expert tips on choosing the right location and setting up a long-term protection system for your garden. Whether you’re a seasoned gardener or just starting out, our step-by-step guide will have you on your way to carpenter bee-free bliss in no time!
Understanding Carpenter Bees and Their Impact on Gardens
Carpenter bees can be a nuisance in gardens, damaging flowers and trees as they burrow into wood for nesting sites. In this next part, we’ll explore their behavior and impact on your outdoor space.
What are Carpenter Bees?
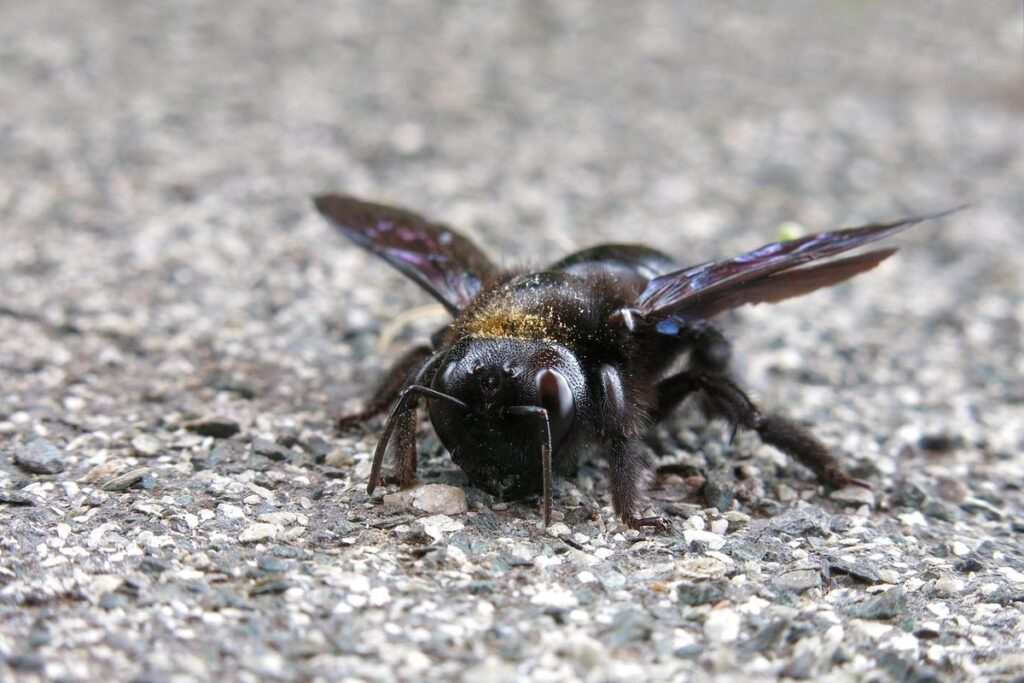
Carpenter bees are large, solitary bees that are often mistaken for bumblebees due to their similar appearance. However, they have a distinctive habit of boring holes into wood to create nests, which is how they got their name.
A female carpenter bee typically emerges from her winter slumber in late spring or early summer and sets out to find suitable nesting sites. She will often choose untreated wood, such as cedar, cypress, or pine, for her nest. Once she has selected a site, she uses her powerful mandibles to excavate a hole and create a tunnel system within the wood.
The female carpenter bee collects pollen and nectar from flowers to feed herself and her offspring, and will often visit gardens in search of these resources. In fact, carpenter bees are important pollinators, and their presence can be beneficial for gardeners who want to attract pollinators.
As they are solitary bees, each female carpenter bee is responsible for laying eggs in her own nest and caring for her young on her own. This means that a single female carpenter bee can produce multiple generations of offspring throughout the summer months.
Distinguishing Carpenter Bees from Other Insects
If you’re looking to set up carpenter bee traps in your garden, it’s essential to first identify whether you have an actual problem with these bees. Carpenter bees can be easily mistaken for other insects, so let’s break down the key characteristics that distinguish them from wasps and other bees.
Carpenter bees are large, solitary bees that resemble bumblebees but lack the fuzzy appearance. They’re typically between 1-2 inches in length, with a black or metallic sheen to their body. One of the most distinctive features of carpenter bees is their habit of drilling perfectly round holes into wood, often for nesting purposes.
When trying to identify a carpenter bee, look for these characteristics: shiny, smooth bodies, and large size compared to other insects in your garden. Also, pay attention to the patterns on their body – carpenter bees usually have a black or metallic sheen with white or yellow markings. It’s worth noting that while wasps are often mistaken for carpenter bees, they’re generally smaller, more slender, and have a narrow waist.
If you still can’t be sure whether the insects in your garden are carpenter bees or not, observe their behavior – carpenter bees tend to be less aggressive than wasps.
Types of Carpenter Bee Traps: Commercial and DIY Options
There are two main types of carpenter bee traps you can consider for your garden, each with its own set of advantages and disadvantages. Let’s explore them in more detail.
Commercial Trap Designs
Commercial trap designs have evolved to cater to various garden needs and preferences. One popular option is the baited trap, which uses a sweet liquid or gel to lure carpenter bees into a container. These traps are often made from durable plastics or wood, making them easy to clean and maintain.
Another design is the UV trap, which utilizes ultraviolet light to attract carpenter bees. This mechanism is effective because carpenter bees are naturally drawn to UV light, increasing the chances of capture. However, some gardeners find these traps less appealing due to their appearance and potential impact on surrounding vegetation.
The snap trap is another commercial design that quickly captures carpenter bees upon entry. These traps usually consist of a spring-loaded mechanism that snaps shut when triggered by an approaching bee. While effective, they can sometimes harm the trapped bee if not handled correctly.
When choosing a commercial trap, consider factors such as ease of use, effectiveness, and durability. Some gardeners prefer more humane designs, like the baited trap or UV trap, which minimize harm to captured bees.
Homemade Trap Ideas for a Budget-Friendly Solution
When it comes to creating a carpenter bee trap on a budget, you don’t need to break the bank. With a little creativity and some household items, you can make an effective trap without spending too much money. One idea is to use a plastic bottle with a funnel-like entrance made from a piece of cardboard or paper. Cut a small hole at the top of the bottle and insert the funnel, making sure it’s secure.
Another option is to create a “scent trap” using a jar filled with water, dish soap, and a few drops of essential oil (like peppermint or lemongrass). The carpenter bees will be attracted to the scent and fall into the jar. Make sure to place the jar near the affected area, but not so close that it’s easily accessible.
For those who prefer a more elaborate design, you can use wooden blocks or boards to create a “box trap”. Drill some holes at the bottom for the bees to exit through and add a piece of string or twine to hang it from a tree.
Choosing the Right Location for Your Carpenter Bee Trap
When setting up your carpenter bee trap, placement is crucial. Selecting a location that mimics natural bee nesting sites will help attract and capture these beneficial insects effectively.
Assessing Garden Conditions
When assessing garden conditions for your carpenter bee trap, it’s essential to consider several key factors that will impact its effectiveness and overall health of the bees. First and foremost, evaluate the sunlight exposure in your garden. Carpenter bees require warmth to fly and pollinate, so a spot that receives at least 6 hours of direct sunlight is ideal.
Next, check for nearby nesting sites such as tree trunks, rocks, or other surfaces where carpenter bees might already be living. If these potential competitors are too close, it may affect the performance of your trap.
Consider existing vegetation in your garden, especially tall plants that can provide shelter and a food source for carpenter bees. However, if vegetation is too dense, it may obstruct access to the trap.
Assessing these factors will give you a clear understanding of how to position your carpenter bee trap effectively. A location with optimal sunlight, minimal nearby nesting sites, and moderate vegetation will increase the chances of attracting and capturing these beneficial insects.
Identifying High-Risk Areas in Your Garden
When it comes to choosing the right location for your carpenter bee trap, understanding which areas of your garden are most susceptible to infestations is crucial. Carpenter bees are attracted to gardens with an abundance of flowers, particularly those with high nectar content. Plants like lavender, coneflower, and black-eyed Susan are common attractants due to their rich nectar flow.
It’s also essential to consider the presence of standing water sources, as these can become breeding grounds for carpenter bees. Areas with poor drainage or where water tends to collect should be prioritized for trap placement. Regularly inspect your garden for signs of carpenter bee activity, such as sawdust-like debris around holes in wood or the presence of large, solitary bees.
When placing your trap near plants or standing water sources, consider positioning it slightly upwind of these areas to maximize the chances of capturing infesting carpenter bees. By understanding and addressing high-risk areas in your garden, you’ll be better equipped to effectively monitor and control carpenter bee populations using your trap.
Setting Up and Maintaining Carpenter Bee Traps
To effectively manage your carpenter bee trap, you’ll want to know how to set it up properly and maintain it over time to ensure its continued effectiveness. This section covers those crucial steps.
Placement and Installation Tips
When it comes to setting up and maintaining carpenter bee traps in your garden, proper placement and installation are crucial for their effectiveness. To maximize the chances of capturing these beneficial insects, consider the following factors: visibility, accessibility, and proximity to nesting sites.
Place your trap in a spot where it’s easily visible to you but also out of direct sunlight, which can cause the bait or attractant to degrade quickly. A location near your garden’s entrance or near areas with high carpenter bee activity will also increase your chances of catching these bees.
Position your trap at least 5-6 feet off the ground and avoid placing it in a spot where water may collect, as this can compromise the trap’s integrity. If you’re concerned about the trap being too prominent in your garden, consider disguising it with some foliage or placing it behind a screen to maintain a natural appearance.
Remember, carpenter bees often nest in trees, so having your trap near tree branches will increase its effectiveness.
Monitoring and Replenishing Bait: Best Practices
Monitoring the effectiveness of your carpenter bee trap is crucial to its success. You’ll want to check on it regularly to see if it’s attracting the desired amount of bees and if the bait is still effective. A good rule of thumb is to inspect your trap every 7-10 days during peak carpenter bee season, which usually falls in late spring or early summer.
When checking the trap, look for signs that it’s working as intended. If you’re using a baited trap, check the amount of bait remaining and replenish it as needed. A full tray of water should also be available to ensure the bees can drink safely. Make sure to clean any debris from the trap itself to maintain its effectiveness.
It’s also essential to regularly inspect the condition of your trap. Over time, the UV-resistant materials may begin to degrade, reducing the trap’s attractiveness to carpenter bees. If you notice any signs of wear and tear, consider replacing it with a new one to ensure continued success.
Safety Precautions When Handling Carpenter Bee Traps
When working with carpenter bee traps, it’s essential to take certain precautions to ensure your safety and the well-being of these beneficial bees. Let’s review the key steps to follow for safe handling.
Protective Gear Recommendations
When handling carpenter bee traps, it’s essential to prioritize your safety and well-being. Carpenter bees can be aggressive when threatened or scared, and their stings can cause severe reactions in some individuals.
To minimize the risk of being stung, we recommend wearing protective gear while handling carpenter bee traps. A good pair of gloves is a must-have for this task. Look for gloves made from thick, durable material that covers your hands up to the wrist. This will prevent any potential stings from penetrating through to your skin.
Safety glasses are also crucial when working with carpenter bee traps. Bees can fly unexpectedly and accidentally sting your eyes, causing serious injury. Choose safety glasses with a wraparound frame for maximum protection.
Wearing long sleeves is another vital precaution to take. Carpenter bees often target exposed skin areas like the arms and neck, so covering these regions will significantly reduce the risk of being stung.
Avoiding Injury from Stingers or Other Defensive Measures
When handling trapped carpenter bees, it’s essential to be aware of their potential defensive measures. These bees are known for their painful stingers, which they use as a last resort when threatened. When feeling cornered or in danger, carpenter bees can become aggressive and sting repeatedly, causing significant pain and swelling.
To avoid injury from stings, always wear protective clothing, including long sleeves, gloves, and safety glasses, when handling trapped carpenter bees. It’s also crucial to move slowly and deliberately around the trap, giving the bee time to calm down and assess the situation.
If you need to handle a trapped carpenter bee, use a pair of tweezers or a small scoop to carefully pick it up by its thorax, rather than grasping it directly with your hands. This will minimize the risk of being stung. It’s also vital to release the bee away from your face and body, allowing it to fly freely once released.
Remember, carpenter bees are generally non-aggressive unless provoked or threatened. By handling them with care and caution, you can safely capture and relocate these beneficial pollinators without putting yourself at risk of injury.
Frequently Asked Questions
What if I have a large garden with many high-risk areas? Can I set up multiple traps?
You can set up multiple carpenter bee traps around your garden, but make sure to space them out evenly and cover all high-risk areas. This will ensure that you’re effectively protecting all parts of your garden from these pests. Consider using a map or layout plan to identify the best locations for each trap.
Can I use store-bought bait instead of making my own?
Yes, you can use store-bought bait as an alternative to making your own. However, keep in mind that homemade baits are often more cost-effective and allow for customization based on your garden’s specific needs. Choose a reputable brand and follow the manufacturer’s instructions for proper use.
How do I know if my carpenter bee trap is working effectively?
Effective monitoring of your carpenter bee trap is key to its success. Check the trap regularly, usually after 1-2 weeks of setting it up, to see how many bees have been caught. Adjust your bait and trap placement as needed based on these results.
Can I use a single type of bait for all types of carpenter bees?
No, different species of carpenter bees are attracted to different types of baits. Research the specific species found in your area and choose baits that match their preferences. Using the wrong bait can reduce the effectiveness of your trap.
How long do I need to maintain my carpenter bee trap before it becomes less effective?
Carpenter bee traps typically require regular maintenance for 2-3 months during peak nesting season. After this period, you may start to see a decrease in catches as the bees begin to seek out new nesting sites. Consider rotating or replacing your trap to keep it effective throughout the growing season.