If you’re like many gardeners, you’re probably wondering how to create a haven for your local pollinators. With bee populations in decline and other beneficial insects facing similar threats, it’s essential to have a plan in place to support these vital creatures. One simple yet effective solution is to grow clover in your garden. Not only is white clover (Trifolium repens) an attractive groundcover that can thrive in poor soil conditions, but it also provides a rich source of nectar and pollen for pollinators like bees, butterflies, and ladybugs. In this article, we’ll show you how to grow clover and create a pollinator-friendly garden with minimal effort and maximum impact.
Why Clover is Essential for Pollinator Health
As a pollinator-friendly gardener, you want to know why clover is a game-changer for your garden’s beneficial bugs and bees. This section breaks down its vital role in supporting their health and well-being.
Benefits of Clover for Bees and Butterflies
Clover is a pollinator’s paradise, providing a rich source of nectar and pollen that’s crucial for their survival. Bees and butterflies rely heavily on these resources to fuel their flight, feed their young, and build their colonies.
Did you know that one-third of all the food we eat is directly or indirectly dependent on bee pollination? According to a study by the University of California, Davis, bees contribute to around $20 billion worth of crops in the United States alone. Butterflies, although smaller in number, are equally important, with some species playing a crucial role in pollinating plants like passionflower and tobacco.
Clover’s unique structure allows it to produce an abundance of nectar-rich flowers that attract a variety of pollinators. Its leaves are also rich in protein, making it an excellent food source for larvae and adult bees alike. To create a bee-friendly clover patch, simply plant a mix of white or red clover seeds in a sunny area with well-draining soil. With minimal maintenance, you’ll be supporting the health and happiness of these vital pollinators all season long!
Choosing the Right Clover Species
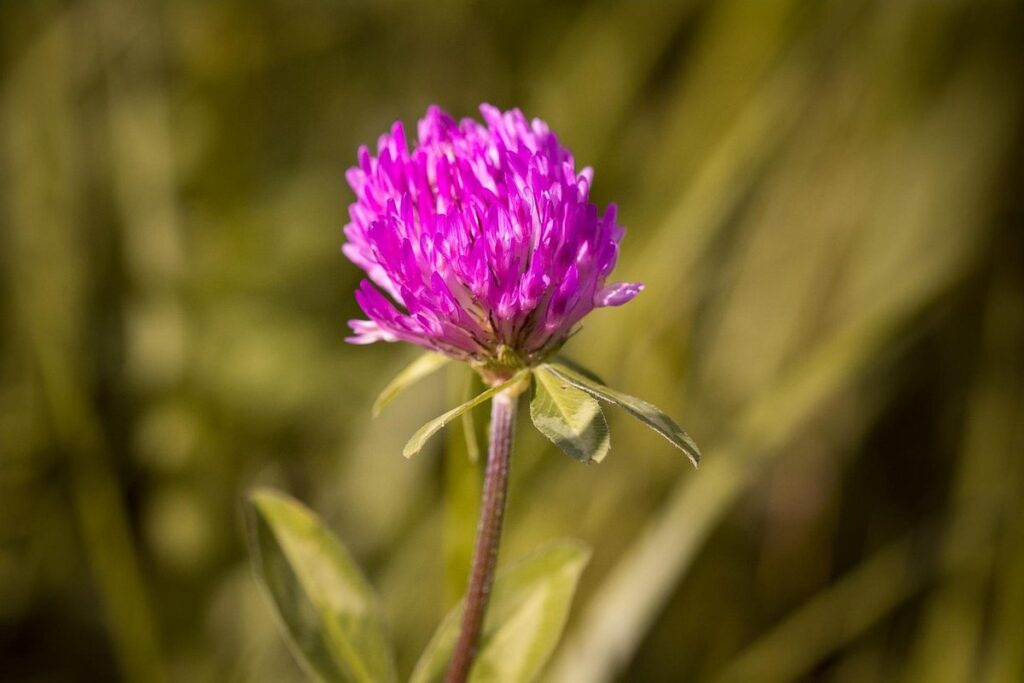
When it comes to choosing the right clover species for your garden, you’ll find that there are several options to consider. White clover (Trifolium repens) and red clover (Trifolium pratense) are two of the most popular varieties, each with its own unique benefits for pollinators.
White clover is a low-growing, spreading species that’s ideal for lawns and meadows. It’s a favorite among bees, as it produces an abundance of nectar-rich flowers throughout the growing season. Red clover, on the other hand, grows taller (up to 3 feet) and has larger flowers, making it a great choice for borders and cut-flower gardens.
Consider factors like soil type, sunlight, and moisture levels when selecting a clover species. White clover prefers well-drained soils, while red clover can tolerate some shade and heavier clay soils. Think about the types of pollinators you want to attract – if it’s bees, white clover might be the better choice; for butterflies, red clover is often preferred.
Ultimately, the best clover species for your garden will depend on your specific needs and conditions. Research different varieties and consult with local nurseries or gardening experts to determine which one will thrive in your climate and provide the most benefits for pollinators.
Creating a Pollinator-Friendly Environment with Clover
When it comes to creating a pollinator-friendly garden, clover is one of the simplest and most effective additions you can make. By incorporating white clover into your landscape, you’ll be supporting local bees and butterflies in no time.
Preparing Your Soil for Clover Growth
Before planting clover, it’s essential to prepare your soil for optimal growth. This involves testing the pH levels, removing weeds, and tilling the soil.
Firstly, test your soil pH using a DIY kit or by sending a sample to a lab for analysis. Clover prefers slightly acidic to neutral soil with a pH between 6.0 and 7.0. If your soil is too alkaline (above 8.0) or too acidic (below 5.5), amend it with lime or sulfur accordingly.
Next, remove any weeds that might compete with the clover for water and nutrients. Use a combination of hand-weeding, mulching, and herbicides as necessary to create a weed-free zone around your planting area.
Finally, till the soil to a depth of about 8-10 inches to loosen and aerate it. Break up any clods or compacted layers that might hinder clover root growth. You can use a rototiller or garden fork for this task. By preparing your soil properly, you’ll give your clover plants the best chance to thrive and support pollinators in your garden.
Planting and Maintaining Clover in Your Garden
When it comes to planting and maintaining a healthy clover patch, there are several key considerations to keep in mind. To begin with, choose a location that receives full sun to partial shade and has well-draining soil. Clover is relatively low maintenance, but it will still require regular watering, especially during its first year of growth.
As you plant your clover seeds, be sure to sow them about 1/4 inch deep and 6-8 inches apart. You can also mix in a starter fertilizer to give the plants an extra boost. When companion planting with clover, consider pairing it with native flowers, herbs, or vegetables that will attract pollinators and add biodiversity to your garden.
To maintain a healthy clover patch, water it regularly during its first year of growth, but avoid overwatering, which can lead to disease and pests. Mulching around the plants will also help retain moisture and suppress weeds, making it easier to care for your clover patch. By following these simple tips, you’ll be well on your way to creating a thriving clover patch that attracts pollinators all season long.
As an added benefit, clover is relatively pest- and disease-resistant, reducing the need for pesticides and other chemicals in your garden. By embracing the natural benefits of clover, you’ll not only create a haven for pollinators but also maintain a healthier, more sustainable garden ecosystem.
Tips for Integrating Clover into Your Garden Design
When incorporating clover into your garden design, consider these practical tips to maximize its benefits and beauty. This is where you’ll find expert advice on blending clover seamlessly into your existing landscape.
Using Clover as a Ground Cover or Lawn Alternative
If you’re looking for an eco-friendly alternative to traditional lawns, consider using clover as a ground cover. One of its most significant benefits is its ability to reduce water consumption. Unlike grass, clover is drought-tolerant and requires minimal watering, making it perfect for areas with low rainfall or water restrictions.
Using clover as a lawn alternative also means less mowing and maintenance requirements. Clovers are low-growing plants that typically reach about 2-3 inches in height, eliminating the need for frequent mowing. This reduced maintenance translates to more free time for you to enjoy your garden!
To incorporate clover into your yard, start by choosing a suitable variety like microclover or white clover. These varieties spread quickly and can thrive in partial shade to full sun conditions. Simply broadcast the seeds evenly across the area, rake them in gently, and keep the soil moist until they germinate. With minimal care, clovers will form a lush, weed-suppressing mat that’s perfect for pollinators like bees and butterflies.
Incorporating Clover into Permaculture Designs
When it comes to creating a diverse and resilient ecosystem, incorporating clover into permaculture designs is a great way to start. Clover is a versatile plant that can thrive in a variety of conditions, making it an ideal choice for permaculture gardens.
One key benefit of using clover in permaculture designs is its ability to fix nitrogen in the soil. This makes it an excellent companion plant for other plants that require high levels of nitrogen, such as fruit trees and vegetables. By incorporating clover into your design, you can create a more balanced ecosystem where plants are able to thrive.
To incorporate clover into your permaculture design, start by identifying areas in your garden where it can provide the most benefit. This might include under trees or in areas with poor soil quality. Plant the clover seeds densely to create a mat-like effect, which will help to retain moisture and suppress weeds. As the clover grows, it will begin to fix nitrogen in the soil, creating a nutrient-rich environment for other plants to grow.
By incorporating clover into your permaculture design, you’ll be creating a more diverse and resilient ecosystem that’s better equipped to handle pests, diseases, and other challenges. With its ability to fix nitrogen, suppress weeds, and attract beneficial pollinators, clover is an essential component of any permaculture garden.
Encouraging Native Pollinators with Clover
Growing clover is a simple yet effective way to attract native pollinators, but did you know that certain types of clover are better suited for this purpose than others? In this section, we’ll explore which varieties excel at supporting local bees and butterflies.
Attracting Local Bees and Butterflies with Native Clover Species
When it comes to attracting local bees and butterflies to our gardens, using native clover species is a crucial step. Native plants have evolved alongside local pollinators, providing them with the exact nutrients they need to thrive. By planting native clover, you’re essentially speaking their language.
Native clover species are specifically adapted to the local climate, soil conditions, and pest dynamics of your area. This means they’ll require less maintenance, watering, or fertilization than non-native plants. Plus, they’ll provide a rich source of nectar and pollen for pollinators, supporting biodiversity in your garden.
To attract local bees and butterflies with native clover species:
* Research the native clover species suitable for your region.
* Choose a mix of annuals and perennials to ensure a constant food supply throughout the growing season.
* Plant them in clusters or blocks to mimic their natural growth patterns, allowing pollinators to navigate easily.
* Incorporate other native flowers that bloom at different times to provide a prolonged nectar source.
By using native clover species, you’re contributing to ecosystem health and biodiversity. Your garden will become a haven for local bees and butterflies, supporting the entire food chain.
Creating a Bee Hotel or Butterfly Garden with Clover
Creating a bee hotel or butterfly garden that incorporates clover is an excellent way to encourage native pollinators in your garden. To start, choose a location with full sun to partial shade and well-draining soil, as both bees and butterflies prefer these conditions.
For a bee hotel, you’ll need to create a structure using materials like bamboo tubes, hollow reeds, or wooden blocks of different diameters and depths. Fill the hotel with a mixture of clover flowers (red or white) and other native wildflowers that provide nectar for pollinators. Plant clover seeds around the base of the hotel, allowing it to spread and create a lush mat.
For a butterfly garden, focus on planting a variety of host plants that attract specific species, along with nectar-rich flowers like clover. Incorporate rocks or logs as perches for butterflies to warm up on chilly mornings. Plant red clover, in particular, which is a rich source of nectar and provides shelter from the elements.
Regular maintenance involves ensuring the bee hotel stays dry by adding a roof or using a waterproof coating. Remove any debris that may accumulate within the hotel and replenish the clover flowers seasonally to keep them blooming throughout the growing season.
Managing Pests and Diseases in Your Clover Patch
As a clover grower, it’s inevitable that pests and diseases will eventually threaten your patch – but don’t worry, we’ve got you covered. This section offers practical tips for keeping your clover thriving despite these common challenges.
Identifying Common Pests and Diseases Affecting Clover
When growing clover for garden pollinators, it’s essential to be aware of common pests and diseases that can affect this valuable crop. Aphids and whiteflies are two frequent visitors to clover patches, feeding on sap and secreting sticky honeydew that attracts ants and other beneficial insects. These pests can weaken the plant and make it more susceptible to disease.
Another issue you may encounter is powdery mildew, a fungal disease that covers leaves in a white, powdery coating. This can be identified by its distinctive appearance on the upper leaf surface, especially during periods of high humidity or warm temperatures. Leaf spot diseases, such as bacterial blight and anthracnose, are also common clover afflictions.
To manage these issues effectively, monitor your patch regularly for signs of pests and disease. Use neem oil or insecticidal soap to control aphids and whiteflies, and remove any infected leaves or stems to prevent the spread of fungal diseases. For more severe infestations, consider applying fungicides specifically designed for clover crops. Regular watering and good air circulation can also help prevent disease development. By staying vigilant and taking prompt action, you can minimize damage and keep your clover patch thriving.
Using Natural Methods to Control Pests and Diseases
When it comes to managing pests and diseases in your clover patch, it’s essential to explore natural methods that not only reduce chemical usage but also promote a balanced ecosystem. Companion planting is an effective way to achieve this goal. By pairing clover with plants like marigold, nasturtium, or calendula, you can deter pests like aphids and whiteflies while also attracting beneficial insects.
Crop rotation is another natural method that can help control pests and diseases. By rotating your crops seasonally, you break the life cycle of pests and reduce the risk of disease buildup. For example, if you planted a clover patch in a location where tomatoes were previously grown, consider rotating to a different location or planting a cover crop like radish to disrupt pest populations.
Physical barriers can also be used to prevent pests from reaching your clover. Row covers, fine mesh screens, and individual plant wraps can all be effective deterrents for pests like slugs and snails. By combining these methods, you can create a pest-friendly environment that promotes healthy growth and minimizes chemical usage.
Conclusion: Creating a Pollinator-Friendly Garden with Clover
Now that you’ve learned how to grow clover for pollinators, let’s tie everything together with some practical advice on creating a thriving pollinator-friendly garden.
Recap of Key Takeaways
As we wrap up our exploration of creating a pollinator-friendly garden with clover, let’s take a moment to recap the key takeaways from this journey. By now, you should have a solid understanding of why growing clover is essential for supporting these vital creatures.
First and foremost, remember that clover is more than just a humble lawn alternative – it’s a powerhouse of pollinator support. With its ability to attract an impressive array of species, including bees, butterflies, moths, and even hummingbirds, clover provides a much-needed source of food for these busy friends. By incorporating clover into your garden design, you’re essentially creating a haven for pollinators.
Some of the key points we’ve covered include the importance of choosing the right type of clover (white or red) for your region and climate. We also discussed how to plant and maintain a healthy clover lawn, including tips on mowing height, watering, and fertilizing. Remember that clover is a low-maintenance option, requiring less water and fewer chemicals than traditional lawns.
Another crucial aspect of creating a pollinator-friendly garden with clover is providing a diverse range of flowers to complement the plant’s blooms. We highlighted some of our favorite companion plants for clover, including coneflowers, black-eyed Susans, and lavender. By incorporating these into your design, you’ll create a rich tapestry of nectar sources that will attract pollinators from far and wide.
As you begin to implement these strategies in your own garden, remember that every little bit counts. Even small patches of clover can make a significant difference in supporting local pollinator populations. So go ahead, take the plunge, and join the ranks of dedicated gardeners who are working tirelessly to protect our precious pollinators. By doing so, you’ll not only be contributing to their survival but also creating a haven for beauty, biodiversity, and wonder in your own backyard.
Frequently Asked Questions
How can I determine if my soil is suitable for growing clover?
If you’re unsure whether your soil is ready for clover, try conducting a simple pH test or consulting with a local nursery expert. Clover prefers slightly acidic to neutral soil (pH 6.0-7.0), but it’s surprisingly adaptable and can thrive in poor soil conditions.
Can I grow clover alongside other plants that attract pollinators?
Yes! Clover is an excellent companion plant for other pollinator-friendly species like lavender, coneflowers, or black-eyed Susans. By creating a diverse and layered garden, you’ll attract a wider range of beneficial insects and support the local ecosystem.
How do I prevent pests from damaging my clover patch?
Common issues like aphids, whiteflies, or slugs can be managed using natural methods. Implement integrated pest management (IPM) techniques by introducing beneficial insects (e.g., ladybugs), practicing good garden hygiene, and using neem oil or insecticidal soap as a last resort.
Can I use clover as a ground cover for areas with heavy foot traffic?
Yes, but consider using a mix of white and red clover to create a more durable and resilient ground cover. This blend can tolerate moderate foot traffic while still providing essential resources for pollinators.
What’s the best way to harvest seeds from my clover patch?
To ensure high-quality seeds, allow your clover patch to flower and produce seedheads. Simply cut off the seed heads when they’re dry, remove the seeds by hand or with a brush, and store them in an airtight container for future use.