If you’re considering adding some beauty to your home with an oleander houseplant, you’ll want to make sure you’re doing it right. With over 600 species to choose from, selecting the perfect variety can be overwhelming, especially if you’re new to plant parenthood. But don’t worry, we’ve got you covered. Our comprehensive guide to caring for oleander houseplants will walk you through everything you need to know, from choosing the right type of oleander to fertilization and pruning techniques that’ll keep your plants healthy and thriving.
In this article, we’ll share our expertise on how to properly care for oleander houseplants, so you can enjoy their stunning blooms all year round. Whether you’re a seasoned plant enthusiast or just starting out, you’ll find valuable tips and advice on how to create the perfect conditions for your oleanders to flourish.
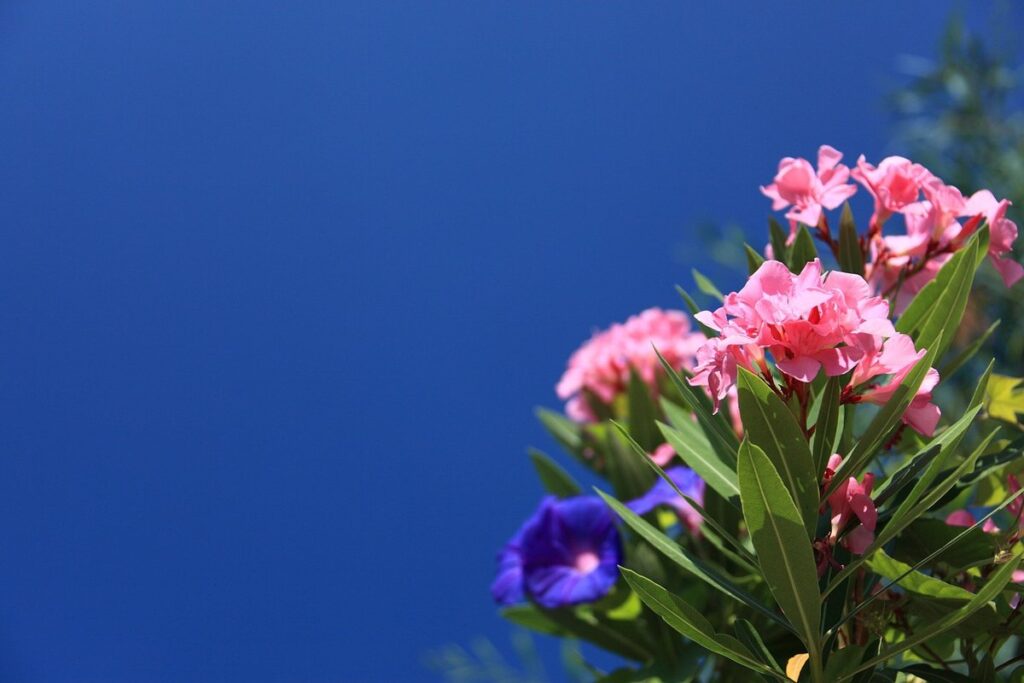
Choosing the Right Oleander Variety
When selecting an oleander variety for your home, it’s essential to consider factors such as growth habits and flower color to ensure a perfect fit.
Understanding Oleander Types
When it comes to choosing the right oleander variety for your home, understanding the different types is crucial. There are several unique and beautiful varieties to choose from, each with its own set of characteristics that might make one more suitable for your space than others.
For example, variegated oleanders have leaves with attractive white or yellow markings, adding a pop of color to any room. They require minimal pruning and can thrive in full sun to partial shade. Dwarf oleanders, on the other hand, are perfect for small spaces and produce smaller flowers but still pack a punch when it comes to fragrance.
Some popular varieties include ‘Talavera’, known for its stunning white blooms with yellow centers, and ‘Major’, which boasts bright pink flowers that are almost as large as dinner plates. If you’re looking for something more compact, consider ‘Hainault’ or ‘Hardy Roseus’, both of which have a more contained growth habit.
Remember to choose a variety that fits your climate, care level, and desired aesthetic. With so many options available, it’s easy to find the perfect oleander variety to complement your home decor.
Selecting Healthy Plants for Your Collection
When selecting healthy oleander plants for your collection, it’s essential to look beyond aesthetics. While vibrant colors and well-shaped leaves can be enticing, they’re not the only indicators of a plant’s overall health.
Begin by inspecting the leaves for signs of pests or diseases. Check for yellowing or browning spots, holes, or blackened areas, which could indicate infestations like aphids, whiteflies, or spider mites. Healthy oleander plants typically have dark green, glossy leaves with no visible damage.
Next, examine the plant’s roots. Avoid plants with circling or tangled roots, as these can be a sign of root bound conditions. Instead, opt for plants with healthy, fibrous roots that are evenly spaced within the pot.
When choosing plants with vibrant colors, consider the natural color palette of oleander. While some varieties may exhibit more intense reds and pinks, others may have softer pastel hues. Select plants that complement your desired aesthetic and growing conditions.
Remember, even if a plant appears healthy initially, poor care or growing conditions can quickly compromise its well-being. By selecting plants with robust roots and healthy leaves, you’ll set yourself up for success in caring for your oleander collection.
Preparing Your Home Environment for Oleanders
When bringing an oleander houseplant into your home, it’s essential to consider the environment you’re providing for it. These plants are native to warm and dry climates, so they have specific needs that must be met.
First and foremost, lighting is crucial for oleanders. They prefer bright, direct sunlight but can tolerate partial shade. If possible, place your oleander in a south-facing window with a sheer curtain to filter the intense sun. Avoid low-light areas, as this can cause the plant to become leggy or even die.
Temperature-wise, oleanders thrive in temperatures between 65°F and 75°F (18°C and 24°C). Avoid placing them near heating vents, fireplaces, or air conditioning units, as sudden changes in temperature can shock the plant. Humidity is also a consideration; oleanders prefer a relatively dry environment, but be cautious not to let the soil dry out completely.
To create an optimal environment for your oleander, ensure good air circulation by keeping it at least 6-8 inches away from any walls or other plants. This will help prevent fungal diseases and pests that thrive in stagnant air. By providing the right conditions, you’ll be well on your way to a happy and thriving oleander houseplant.
Watering and Humidity Needs of Oleanders
When it comes to keeping your oleander happy and thriving, getting its watering and humidity needs just right is crucial. In this next part, we’ll explore these essential care requirements in more detail.
The Importance of Proper Watering Habits
When it comes to oleander care, proper watering habits are crucial to prevent potential risks associated with overwatering or underwatering. Overwatering is one of the most common mistakes that can lead to root rot and kill an oleander plant quickly. Waterlogged soil creates an ideal environment for fungal diseases like root rot, which can be difficult to treat.
On the other hand, underwatering can cause stress to the plant, resulting in yellowing leaves and reduced growth rate. Oleanders need consistent moisture, especially during their first year after transplanting. However, allowing the top 1-2 inches of soil to dry out between waterings is essential to prevent overwatering.
To avoid these risks, it’s best to check the soil moisture by inserting your finger into the soil up to the second knuckle. Water when you notice the soil feels dry, but not before. Aim for about 1 gallon of water per plant during hot summer months and reduce watering in fall and winter when temperatures are cooler.
Keep an eye on your oleander’s response to watering schedules and adjust as needed.
Maintaining Optimal Humidity Levels
Maintaining optimal humidity levels is crucial for your oleander houseplants to thrive. Since oleanders are native to Mediterranean regions with dry climates, they’re adapted to relatively low humidity levels. However, indoor environments tend to be more humid due to human activity and moisture from plants themselves. To maintain a healthy balance, you can use two main strategies: misting and humidifiers.
Misting involves spraying water directly on the leaves or soil to increase local humidity around your oleander plant. This method is ideal for small spaces or areas with low humidity levels. You can use a spray bottle filled with distilled water to mist your plant 2-3 times a week, especially during dry winter months. Another approach is using humidifiers, which release moisture into the air, helping to maintain a consistent humidity level.
When choosing a humidifier, select one that’s designed for small spaces or indoor plants. These usually have a built-in hygrometer to monitor and control humidity levels between 40-60%. Some examples include ultrasonic humidifiers or cool-mist models that release moisture without overheating the air. By combining misting with humidifiers or using either method alone, you can create an optimal environment for your oleander houseplants to flourish.
Lighting and Temperature Requirements
When it comes to oleander care, providing your plant with the right lighting and temperature conditions is crucial for its overall health. In this section, we’ll cover what you need to know about light and heat requirements.
Oleanders’ Lighting Needs: Direct vs. Indirect
When it comes to providing the right amount of light for your oleander houseplant, understanding its lighting needs is crucial. Oleanders are Mediterranean plants that thrive in full sun to partial shade conditions. However, they can also tolerate low-light environments, making them a versatile choice for indoor spaces.
To determine whether your oleander prefers direct or indirect sunlight, observe its color and overall health. If the leaves are a vibrant green and growing well, it’s likely getting enough light. On the other hand, if the leaves appear pale or wilted, consider moving it to a brighter location.
Direct sunlight is ideal for oleanders, but be cautious not to expose them to intense rays during peak hours (usually between 11am and 3pm). This can cause scorching or leaf discoloration. If you don’t have a south-facing window, consider using grow lights to supplement the natural light.
Keep in mind that indirect sunlight is still beneficial for oleanders, especially during the winter months when natural light is scarce. Place your plant near an east- or west-facing window to receive soft, diffused light. Regardless of the lighting conditions, ensure your oleander receives at least 4-6 hours of direct or indirect sunlight daily.
Maintaining Optimal Temperatures
When it comes to maintaining optimal temperatures for your oleander plant, it’s essential to consider its environment and adapt accordingly. Oleanders prefer warmer temperatures but can be sensitive to extreme heat. If you’re keeping your oleander indoors, aim for a temperature range of 65-75°F (18-24°C) during the day and no lower than 55°F (13°C) at night.
In outdoor environments, oleanders thrive in temperatures between 70-85°F (21-29°C). However, they can tolerate some frost but may require protection from prolonged exposure to freezing temperatures. If you live in a tropical climate, be mindful that high temperatures above 90°F (32°C) can cause stress and lead to leaf scorch.
To maintain optimal temperatures for your oleander, consider the following tips: avoid placing plants near heating or cooling vents, use a thermometer to monitor temperature fluctuations, and adjust your plant’s position accordingly. Additionally, if you live in an area prone to frost, bring your outdoor oleanders under cover or move them to a protected location during winter months. By providing a stable and suitable environment, you’ll be able to enjoy your oleander’s vibrant blooms year-round.
Fertilization and Pruning Techniques
To keep your oleander houseplant thriving, it’s essential to understand how to properly fertilize and prune its delicate blooms. We’ll dive into the specifics of these techniques in this next section.
Understanding Oleander’s Nutritional Needs
Choosing the right fertilizer for your oleander houseplant is crucial to promote healthy growth and vibrant blooms. Since oleanders are native to tropical regions, they require a balanced diet of nutrients to thrive indoors.
When selecting a fertilizer, look for a water-soluble or slow-release formula that contains essential macronutrients like nitrogen (N), phosphorus (P), and potassium (K). Oleanders prefer a slightly acidic to neutral soil pH between 6.0-7.0, so choose a fertilizer with a balanced N-P-K ratio of around 20:10:10.
A good rule of thumb is to fertilize your oleander during the growing season (spring-fall) with a balanced fertilizer once a month. During the dormant winter months, reduce fertilization to once every two months to avoid overfertilizing.
Some popular fertilizer options for indoor plants like oleanders include miracle-gro all-purpose plant food and Schultz bloom! plant food. Be sure to follow the instructions on the label carefully and start with a small dose to prevent burning your plant’s roots. Regular soil testing can also help you determine if your oleander requires additional nutrients or pH adjustments.
Mastering Pruning Techniques for a Healthy Plant
When it comes to maintaining healthy growth patterns in oleanders, pruning is an essential technique that requires some finesse. Pruning not only helps control the plant’s size but also encourages new growth and promotes overall health.
To prune your oleander effectively, start by removing any dead or damaged branches, as these can harbor pests and diseases that might harm the rest of the plant. Next, identify the oldest stems, which will typically be the thickest and woodiest. These are usually the ones to focus on when reducing the plant’s size.
To do this, cut them back to about one-third to one-half their original height, making clean cuts just above a node (where a leaf meets the stem). This will encourage new growth from those nodes. When shaping your oleander, work from the bottom up and use sharp pruning shears or loppers to make precise cuts.
Remember, regular pruning is key to maintaining your oleander’s health and encouraging new growth – aim for at least two to three pruning sessions per year, depending on your plant’s specific needs.
Common Pests, Diseases, and Repotting
Oleander houseplants can be susceptible to pests, diseases, and nutrient deficiencies, which is why it’s essential to monitor your plant regularly. In this section, we’ll cover common issues and provide tips for maintaining a healthy oleander.
Identifying and Preventing Common Pests
Oleander plants can be susceptible to various pests that can cause damage and even lead to plant death. Some common pests to watch out for are mealybugs, spider mites, and scale insects. Mealybugs appear as small, white, cottony patches on the leaves or stems of your oleander, while spider mites are usually visible as fine webbing between the veins of the leaves.
To identify these pests, inspect your plant regularly, especially during hot summer months when they tend to thrive. Look for signs of infestation such as yellowing or droopy leaves, and small white eggs on the underside of the leaves.
Prevention is key in avoiding pest problems. Make sure to water your oleander from below to prevent moisture from accumulating on the leaves where pests can easily feed. You should also keep an eye out for weeds that may be growing near your plant as they can harbor pests.
Additionally, maintain good air circulation around your plant by keeping it at least 6 inches away from any surrounding plants or walls. Regularly dusting your oleander’s leaves with a soft brush can help remove any dirt or debris where pests might hide.
Recognizing and Treating Oleander Diseases
As an oleander plant owner, it’s essential to recognize and treat diseases that can affect these beautiful plants. One of the most common issues is root rot, which occurs when the roots are exposed to too much water. This leads to a fungal growth that can quickly spread throughout the plant. To prevent this, make sure your pot has proper drainage holes and avoid overwatering.
Leaf spot disease is another common problem, caused by various fungi and bacteria. It appears as small, circular spots on the leaves that may turn yellow or drop off. To treat leaf spot, remove any infected leaves to prevent further spread. Next, apply a fungicide specifically designed for houseplants, following the manufacturer’s instructions.
Monitor your plant regularly for signs of disease, such as yellowing leaves or soft stems. If you notice any issues, take action promptly to prevent the problem from spreading. Regular pruning and disinfecting tools can also help prevent diseases from occurring in the first place.
By keeping a close eye on your oleander and taking preventative measures, you can enjoy these stunning plants for years to come.
Repotting and Propagation Methods
When it comes time to repot your oleander, you’ll want to know the best methods for getting your plant settled into a new pot. Let’s dive into how to repot and propagate oleanders successfully.
When to Repot Your Oleander Plant
If you’re wondering whether it’s time to repot your oleander plant, there are several signs to look out for. One of the most obvious indicators is when the plant has outgrown its container and needs more room to spread its roots. Check if the plant is top-heavy or if the leaves are starting to wilt due to root bound conditions.
Another sign that your oleander plant needs repotting is when you notice a decrease in its flowering performance. Oleanders produce beautiful flowers, but if the plant is not getting enough nutrients or is waterlogged, it may stop blooming altogether. If you’ve noticed a decline in the number of flowers or their color has become less vibrant, it’s likely time to repot.
If you’re not sure whether your oleander plant needs repotting, check its roots by gently removing the plant from its container. If the roots have filled the pot and are circling around the inside, it’s definitely time for a larger container. In this case, spring or summer is the best time to repot, when the plant is actively growing.
Remember, oleander plants prefer well-draining soil, so make sure to choose a pot with good drainage holes if you decide to repot your plant.
Propagating Oleanders through Stem Cuttings
To propagate new oleander plants from stem cuttings, you’ll need to follow these simple steps. First, choose a healthy stem with plenty of growth nodes, and snip off a section that’s around 3-4 inches long. Remove lower leaves from the cutting, leaving only a few sets of leaves at the top. This will help prevent moisture loss and promote rooting.
Next, dip the cut end into a rooting hormone powder or liquid to stimulate root growth. You can also use a sharp knife to make a small notch in the stem just below a node, as this will increase the chances of successful propagation.
Plant the cutting about 1-2 inches deep in a well-draining potting mix, and water thoroughly. Place the pot in a warm location with bright indirect light, but avoid direct sunlight, which can cause scorching. Keep the soil consistently moist but not waterlogged, as this can lead to root rot.
Within 6-8 weeks, you should start to see roots developing on the cutting. Once they’ve reached around an inch long, transfer the new plant into a larger pot with a balanced fertilizer. With proper care and attention, your propagated oleander will thrive in no time.
Frequently Asked Questions
How do I ensure my oleander plant receives the right amount of light, considering its lighting needs may vary depending on the variety?
To determine your oleander’s specific lighting requirements, research the specific variety you’ve chosen and observe its natural growth habits. If possible, place the plant in a spot with bright, indirect light for several hours a day to mimic outdoor conditions.
What are some common pests I should look out for when caring for my oleander houseplant?
Pests like mealybugs, spider mites, and aphids can infest oleander plants. Regularly inspect your plant’s leaves and stems for signs of these pests, such as white powdery residue or tiny eggs. If you notice any issues, treat the plant with insecticidal soap or neem oil.
Can I propagate my oleander through leaf cuttings, or is stem cutting the only viable method?
While stem cuttings are a popular and reliable method for propagating oleanders, some species can also be propagated using leaf cuttings. Research your specific variety to see if this option is available, but generally, stem cuttings yield more consistent results.
How often should I fertilize my oleander houseplant, considering its high nutritional needs?
Fertilize your oleander plant regularly during the growing season (spring and summer) with a balanced, water-soluble fertilizer. Dilute the fertilizer to half the recommended strength to avoid burning your plant’s roots. Fertilize every 1-2 weeks for optimal growth.
What are some common mistakes new oleander owners make when it comes to watering their plants?
One common mistake is overwatering, which can lead to root rot and other issues. Be sure to check the soil moisture by sticking your finger into the soil up to the first knuckle; if the soil feels dry, it’s time to water your oleander plant.