Spring is finally here, and with it comes the perfect opportunity to plant one of the easiest and most rewarding vegetables: peas! Not only are they a delicious addition to any meal, but they’re also a great way to get your garden off to a flying start. Whether you’re a seasoned gardener or just starting out, learning how to plant peas in spring is an essential skill that will set you up for success.
In this article, we’ll take you through everything you need to know to grow a bountiful crop of peas, from selecting the right variety for your climate and soil type, to preparing the perfect growing conditions and providing the necessary support. We’ll cover topics such as sowing at the right time, caring for your pea plants, and harvesting those tasty little pods. By following our expert guide, you’ll be enjoying fresh, homegrown peas in no time!
Choosing the Right Variety
When it comes to growing peas, selecting the right variety is crucial for success. This can be a daunting task, especially with so many options available in the market today.
Selecting Sugar Snap or English Peas
When it comes to selecting sugar snap or English peas for your spring garden, there are some key differences to consider. Sugar snap peas, also known as flat pod peas, have a flat, tender pod that can be eaten whole along with the pea inside. They’re sweet and crunchy, making them perfect for snacking or adding to stir-fries.
English peas, on the other hand, have a more traditional round pod that’s typically shelled before eating. The peas themselves are sweeter and more tender than sugar snap peas, but the pods can be fibrous and bitter. English peas are often used in classic dishes like mashed peas with ham or as a side dish.
In terms of growth habits, sugar snap peas tend to grow longer vines that require support, while English peas produce shorter, bushier plants. If you have limited space or prefer a more compact garden, English peas might be the better choice. However, if you’re looking for a versatile and easy-to-grow variety that can be harvested in succession, sugar snap peas are an excellent option.
Ultimately, the decision comes down to personal preference and your cooking needs. Consider what types of dishes you like to make and which pea variety will best fit into your recipes.
Considering Shelling Peas
When it comes to growing peas in your home garden, shelling peas are an excellent choice. These varieties offer a range of benefits that make them ideal for families and cooks who value convenience and versatility.
One of the main advantages of shelling peas is their high yield. A single plant can produce up to 2 pounds of pods per season, providing you with a steady supply of fresh produce throughout the growing period. This makes shelling peas an excellent choice for gardeners who want to enjoy a bountiful harvest without having to spend hours in the kitchen.
Another benefit of shelling peas is their ease of preparation. Unlike snow peas or snap peas, which require more effort to prepare and eat, shelling peas are simple to shell from their pods and can be added directly to salads, stir-fries, and other dishes. This makes them a great choice for families with young children who may not enjoy the extra work required for other types of peas.
In terms of variety selection, look for plants that mature quickly (around 50-60 days) and have compact growth habits to ensure they don’t spread too far in your garden. Some popular shelling pea varieties include ‘Green Arrow’, ‘Telephone’, and ‘Dwarf Green’. When choosing a variety, be sure to check the seed packet or consult with a local nursery for advice on which types perform best in your specific climate and region.
Preparing the Soil
Before you start planting, let’s get your garden bed ready for success by preparing the soil to give those peas a healthy head start. This involves loosening and enriching it just right.
Testing pH Levels
Testing soil pH levels is crucial before planting peas. These legumes thrive in slightly acidic to neutral conditions, with an ideal pH range of 6-7. If the pH level is too high (above 7) or too low (below 5), it can lead to stunted growth, reduced yields, and even death.
A common issue related to high pH levels is nutrient deficiencies. At a pH above 7, essential nutrients like iron, zinc, and manganese become less available to the plant. For instance, if your soil pH is too high, you may notice yellowing leaves or a lack of vigor in your pea plants. Conversely, low pH levels can lead to an overabundance of certain nutrients, causing imbalances that harm the plant.
To adjust soil pH levels, you’ll need to add either lime (to raise pH) or sulfur or peat moss (to lower pH). A simple soil test will provide you with a clear picture of your soil’s pH status. Once you have this information, you can take corrective measures to create an optimal growing environment for your pea plants. Remember, it’s essential to test and adjust your soil pH regularly to ensure healthy plant growth throughout the season.
Adding Organic Matter
When it comes to preparing the soil for pea plants, adding organic matter is an essential step. This involves incorporating compost, manure, or well-rotted leaf mold into the soil to improve its structure and fertility. The benefits of doing so are numerous. For one, these amendments help to improve drainage, reducing the risk of waterlogged soil that can lead to root rot and other problems.
Incorporating organic matter also increases the soil’s nutrient content, providing pea plants with a steady supply of essential micronutrients like nitrogen, phosphorus, and potassium. This is particularly important for peas, which are heavy feeders and require a lot of nutrients to produce a bountiful harvest. Well-rotted leaf mold, in particular, can help to break up compacted soil and improve its overall structure.
To incorporate organic matter into your soil, start by mixing in 2-4 inches of compost or manure into the top 6-8 inches of soil. If using well-rotted leaf mold, mix it in at a rate of about 1/3 to 1/2 the volume of the existing soil. This will give your pea plants the best possible start and set them up for success throughout the growing season.
Sowing Peas at the Right Time
When planting peas in spring, timing is crucial for optimal growth. This section will cover how to identify the ideal sowing window for your specific climate and region.
Determining Frost Dates
When planting peas in spring, timing is crucial to ensure optimal growth and prevent potential damage from frost. The key to successful pea sowing lies in determining the last frost date for your specific region.
To calculate this date, you can use online resources such as the National Weather Service’s (NWS) database or consult with local nurseries or gardening experts. These tools provide a wealth of information on average frost dates for your area, taking into account various climate factors like temperature, humidity, and wind direction.
Here’s a step-by-step guide to determining frost dates based on your location:
* Enter your zip code or city name in the NWS database.
* Select the type of data you’re looking for (e.g., last spring frost date).
* Choose the specific time frame you need (e.g., 10-year average).
By using these tools, you can determine the safest sowing dates for peas and avoid potential risks associated with early sowing. For instance, if your area typically experiences a late-season frost in mid-April, it’s essential to wait until at least two weeks after this date before planting pea seeds directly into the ground.
Keep in mind that even a light frost can be detrimental to young pea plants. Planting too soon can lead to poor germination rates or damaged seedlings. By waiting for the optimal sowing time, you’ll give your peas the best chance of thriving and producing an abundance of tender shoots and delicious pods.
Understanding Plant Spacing and Depth
When planting pea seeds, it’s essential to understand the importance of spacing and depth. Planting too close together can lead to overcrowding, which can cause disease to spread quickly through the plants. On the other hand, leaving enough space between each plant ensures proper air circulation and allows for healthy growth.
To achieve optimal results, plant your pea seeds 2-3 inches deep in the soil, making sure they are covered with a thin layer of soil. Space them 1-2 inches apart within rows that are spaced 18-24 inches apart. This spacing will provide enough room for each plant to develop its own root system and produce its best yield.
For example, if you’re planting ‘Sugar Snap’ peas, which grow quite tall, you’ll want to make sure they have plenty of space between them to prevent damage from wind or disease. By following these guidelines, you can enjoy a bountiful harvest of delicious and healthy peas in the spring. Proper spacing will also help prevent diseases like powdery mildew from taking hold.
Supporting Pea Plants
Once you’ve got your pea plants in the ground, it’s essential to provide them with some extra care to ensure they thrive. In this section, we’ll cover the key ways to support your pea plants as they grow.
Installing Trellises or Supports
When installing trellises or supports for your pea plants, you have several options to choose from. One of the simplest and most cost-effective methods is using wooden stakes or twine supports. These can be placed near the base of the plant, providing a sturdy structure for the peas to climb.
Another popular option is using obelisks, which can add an aesthetic touch to your garden while serving a functional purpose. When selecting an obelisk, consider its height and width, as well as any other features that may benefit your pea plants, such as a built-in watering system.
For smaller spaces or individual peas, you can use tomato cages or plant markers with attached twine. These compact options are perfect for containers or tight spaces where traditional trellises won’t fit.
Regardless of the type of support you choose, make sure it’s securely anchored to prevent damage from wind or other external factors. Regularly check and adjust your supports as the plants grow, ensuring they remain upright and secure throughout their growth cycle. This will help prevent common issues like plant collapse and promote healthy growth.
Pruning and Training
Pruning and training pea vines is crucial for maintaining optimal growth, promoting air circulation, and preventing disease. When seedlings reach about 6-8 inches tall, gently pinch off the top set of leaves to encourage bushy growth. This technique helps prevent the plant from putting too much energy into producing a single stem.
As the plants mature, prune them regularly to maintain a balanced shape and promote healthy air circulation. Remove any weak or spindly stems, and trim back overgrown tips to about 6 inches from the top node. This will also help control the overall size of the plant and prevent it from becoming leggy.
To train your pea plants, provide a trellis or support system for them to climb on. You can also use twine or clips to gently guide the stems towards the desired direction. By pruning and training your pea vines regularly, you’ll be rewarded with healthier, more productive plants that are less susceptible to disease and pests.
Managing Pests and Diseases
To ensure a healthy crop, it’s crucial to monitor for common pests and diseases that can affect peas, such as aphids and powdery mildew.
Recognizing Common Issues
As you nurture your spring pea garden, it’s essential to be aware of common pests and diseases that can affect these delicate plants. Aphids, for instance, are small, soft-bodied insects that feed on the sap of young shoots, causing curled or distorted leaves. They multiply quickly, releasing a sticky substance called honeydew that attracts ants and promotes fungal growth.
Slugs and snails are another nuisance, leaving behind silvery trails on your pea plants as they devour leaves and tender stems at night. Regularly inspect your garden for these pests, setting up traps or using copper tape to deter them.
Powdery mildew is a common disease affecting pea plants in spring gardens, characterized by a white, powdery coating on leaves that can lead to defoliation if left unchecked. Root rot, caused by overwatering and poor drainage, can be devastating, causing the plant’s roots to decay and making it vulnerable to other infections.
To prevent these issues, ensure good air circulation around your pea plants and maintain a consistent watering schedule. Remove any infected leaves or stems promptly, and consider using organic pest control methods like neem oil or Bt (Bacillus thuringiensis) to manage infestations.
Organic Pest Control Methods
When it comes to managing pests on your pea plants, there are several eco-friendly methods you can employ. One effective approach is Integrated Pest Management (IPM), which involves combining multiple techniques to maintain a balanced ecosystem.
Introducing beneficial insects is a great way to control pest populations without using chemical pesticides. For example, ladybugs and lacewings prey on aphids and other pests that target peas. You can attract these beneficial insects by planting flowers that provide nectar, such as marigolds or nasturtiums, near your pea plants.
Another useful method is using neem oil to repel pests. Neem oil contains compounds that disrupt the life cycle of pests, making it difficult for them to reproduce and spread. Mix a few drops of neem oil with water according to the label instructions and spray it on your plants.
Physical barriers are also an effective way to prevent pest infestations. For instance, fine mesh or row covers can keep aphids and other small insects from reaching your peas. By using these methods in combination, you’ll create a healthier environment for your pea plants to thrive.
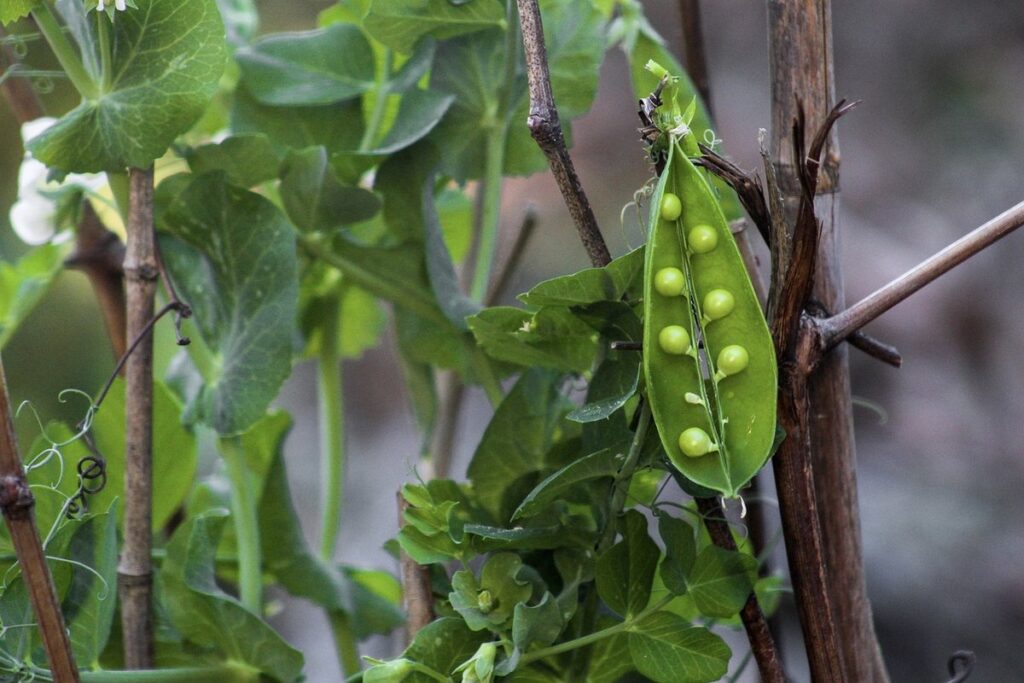
Harvesting Peas
Now that your peas have germinated and are growing, it’s time to think about harvesting them before they become too fibrous and lose their sweet flavor. In this next step, we’ll cover how to pick peas at just the right moment.
Timing the Perfect Pick
When it comes to harvesting peas, timing is everything. You’ll want to pick them at just the right moment to ensure maximum flavor and texture. One way to determine if your peas are ready is to check their pod color. For sugar snap and snow peas, look for a vibrant green color with no signs of yellowing or browning. As for shelling peas, you’ll know they’re ready when the pods turn from green to purple.
Another important factor is texture. Peas should be plump and firm to the touch. If they feel soft or limp, it’s best to wait a few more days. Finally, consider the flavor profile. If your peas have a sweet, earthy aroma, they’re likely ready to harvest.
To pick sugar snap and snow peas, simply snip off the stem with scissors or pinch off the pod. For shelling peas, you can either pull the entire plant out of the ground or use scissors to cut the stems just above the soil line. Whatever method you choose, be sure to harvest your peas regularly to encourage continued production and prevent over-maturity. Aim to pick them in the morning after the dew has dried but before the heat of the day sets in.
Storing Fresh Peas
Proper storage and handling of freshly harvested peas are crucial to maintain their flavor, texture, and nutritional value. After a long day of harvesting, it’s essential to cool the peas as soon as possible to slow down the spoilage process.
To start cooling your peas, spread them out in a single layer on a tray or container to prevent moisture buildup and promote air circulation. This will help reduce the temperature and prevent the growth of bacteria and mold. You can also use fans or ventilation systems to speed up the cooling process.
Once cooled, store the peas in paper bags or breathable containers to maintain airflow and prevent moisture from accumulating. Avoid plastic bags or airtight containers, as they can trap moisture and cause the peas to spoil quickly. If you don’t plan to use your harvest immediately, consider refrigerating them at 32°F (0°C) or below to prolong their freshness.
Remember, it’s essential to store your peas as soon as possible after harvesting to prevent damage and maintain quality. Proper storage will not only help extend the shelf life but also preserve the delicate flavor and texture of your freshly picked peas.
Frequently Asked Questions
Can I plant peas directly in the garden without prior preparation?
Yes, peas can be planted directly in the garden if you have well-draining soil with a pH level between 6.0 and 7.0. However, adding organic matter like compost or manure can improve soil structure and fertility.
What’s the ideal temperature for planting peas in spring?
Peas prefer cooler temperatures, typically between 40°F (4°C) and 70°F (21°C). Wait until the soil has warmed up to at least 55°F (13°C), but avoid planting when the temperature is consistently above 75°F (24°C).
How do I prevent common pests like aphids and powdery mildew from affecting my pea plants?
To manage these issues, practice good garden hygiene by removing weeds and debris. Use natural pest control methods such as introducing beneficial insects or spraying neem oil solution to repel aphids. Regularly inspect your plants for signs of disease and remove infected areas.
Can I use a single trellis for multiple pea plants, or do I need one per plant?
While it’s technically possible to train multiple pea plants on a single trellis, this can lead to overcrowding and reduced yields. For optimal growth, install separate supports or trellises for each plant, spaced about 3-4 inches apart.
What are some common issues that arise when growing peas in containers?
When growing peas in containers, ensure the pot has good drainage holes and is at least 6-8 inches deep to accommodate the taproot. Also, keep an eye on temperature fluctuations, as container-grown pea plants can be more susceptible to extreme temperatures.