Growing your own conker tree from a chestnut can be an exciting and rewarding experience, especially if you’re looking to create a unique feature in your garden. Conker trees are not only striking with their majestic branches but also steeped in history, dating back to medieval times when they were used as projectiles in battles.
If you’ve collected conkers from the ground or have some chestnuts lying around, you may be wondering how to coax them into growing into a thriving tree. The process involves more than just throwing the seeds into your garden and waiting for them to sprout – it requires careful selection, stratification, and aftercare. In this article, we’ll guide you through each step, covering seed selection, stratification, and aftercare for healthy growth, so you can successfully grow a conker tree from a chestnut and reap the rewards of your labor.
Choosing the Right Chestnut
When growing a conker tree from a chestnut, selecting the right type is crucial for its health and success. Choose from sweet, Spanish, and other varieties to find the best fit for your climate and space.
Understanding Conker Trees and Their Requirements
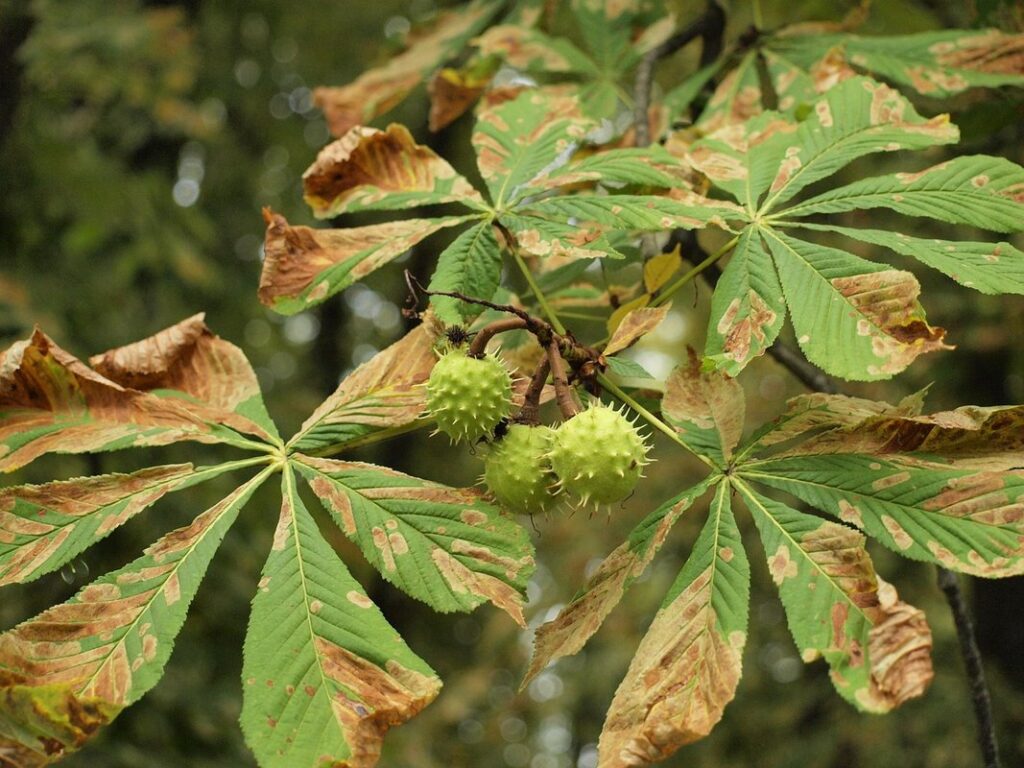
Conker trees are a type of chestnut tree that produces conkers, also known as horse chestnuts. To grow these magnificent trees, it’s essential to understand their growth habits, preferred climate, and soil conditions.
Conker trees can grow up to 40 meters tall and have a broad, rounded crown. They prefer well-drained soils, rich in organic matter, with a pH between 6.0 and 7.0. In terms of climate, conker trees thrive in temperate regions with mild winters and warm summers. They are also tolerant of drought but will perform best with regular watering.
When selecting a site for your conker tree, consider the amount of sunlight it will receive. While they can tolerate partial shade, conker trees prefer full sun to produce an abundance of conkers. It’s also crucial to choose a location with good air circulation to prevent disease. By understanding these basic requirements, you’ll be well on your way to growing a healthy and thriving conker tree. With proper care, your conker tree will provide shade, beauty, and even a bounty of conkers for years to come.
Selecting the Best Chestnuts for Planting
When selecting chestnuts for planting, it’s essential to choose high-quality specimens with viable seeds. This may seem obvious, but many gardeners make the mistake of using low-quality or rotten chestnuts, which can lead to poor germination rates or even no germination at all.
To identify suitable chestnuts, look for ones that are plump and have a hard, glossy shell. Avoid chestnuts with soft spots, cracks, or signs of mold. It’s also crucial to select chestnuts from a reputable source, such as a local nursery or a trusted online supplier. This will ensure that the chestnuts are fresh and free from disease.
When handling chestnuts, be gentle to avoid damaging the delicate seed inside. You can test the viability of the seed by placing it in a bowl of water. If it sinks to the bottom, it’s likely viable. Avoid using chestnuts that have been stored for too long or exposed to extreme temperatures, as this can affect their viability.
Remember, investing time and effort into selecting high-quality chestnuts will pay off in the end with healthier and more resilient seedlings.
Preparing the Seeds
To successfully grow a conker tree from a chestnut, you’ll need to carefully prepare the seeds for sowing, which involves several key steps. Let’s start by exploring these important procedures.
Extracting and Cleaning the Seeds
When extracting and cleaning the seeds from chestnut shells, precision is key to achieving optimal germination rates. Start by selecting a healthy conker with no visible cracks or blemishes. Gently tap the chestnut on a hard surface to dislodge it from its shell, then carefully pry open the two halves.
Using your fingers or a blunt instrument, carefully remove the fleshy coat surrounding each seed. This is a delicate process, but essential for promoting healthy growth. Take note that some seeds may have an added membrane – gently scrape this away with a blunt knife to ensure even moisture distribution.
Place the extracted seeds in a bowl of lukewarm water (around 30-40°C) for about an hour. This will help soften any remaining pulp or debris, making cleaning easier and more efficient. After soaking, rinse each seed under cold running water, then gently scrub them with a soft-bristled brush to remove any remaining impurities.
Dry the cleaned seeds thoroughly on paper towels before storing them in an airtight container for germination. By following these steps, you’ll set your conker seeds up for success and significantly improve their chances of thriving when planted.
Stratification: A Crucial Step for Germination
Stratification is a crucial step that helps chestnut seeds break dormancy and prepares them for germination. This process mimics the natural conditions that the seeds would experience if they were to fall from the tree during autumn. When we plant chestnut seeds, they are often in an immature state, with underdeveloped roots and shoots. Stratification allows these seeds to simulate this winter period, where temperatures drop and moisture levels increase.
To stratify chestnut seeds effectively, you can use a simple DIY approach or purchase specialized equipment. One method is to bury the seeds 2-3 inches deep in a container filled with moistened peat moss or vermiculite. Store the container in a cool place (around 40°F/4°C) for 90-120 days. Check on the seeds every few weeks, adding more water as needed.
Keep in mind that some chestnut varieties require longer stratification periods. Research your specific tree variety to determine the optimal duration. With proper stratification, you can increase the chances of successful germination and grow a healthy conker tree from seed.
Sowing the Seeds
To grow a conker tree from a chestnut, you’ll need to sow the seeds with care and attention to detail. In this next step, we’ll walk through the process together.
Preparing the Growing Medium and Containers
When it comes to growing conker trees from chestnuts, selecting the right containers and preparing a suitable growing medium is crucial for their development. You’ll want to choose containers that are at least 10-12 inches deep to accommodate the tree’s taproot.
Select pots or planters with good drainage holes in the bottom to prevent waterlogged soil. This is particularly important when growing conker trees, as they don’t like wet feet and can be prone to root rot if the soil is too moist.
To prepare a well-draining mix specifically designed for conker tree cultivation, you’ll want to combine peat-free potting compost with perlite or vermiculite. A good ratio is 2/3 potting compost to 1/3 perlite or vermiculite. Avoid using regular garden soil as it can be too dense and may cause problems for your conker tree.
Remember to sterilize the containers and growing medium before use to prevent any potential diseases or pests from affecting your seedlings.
Planting the Chestnuts: Depth, Spacing, and Orientation
When planting chestnut seeds, it’s essential to consider the depth, spacing, and orientation of the seed in the container. This will help ensure that your conker tree gets off to a strong start.
First, choose a container with good drainage holes to prevent waterlogged soil. Next, fill the container with a well-draining potting mix, leaving about an inch at the top for watering. The chestnut seed should be planted about 1-2 inches deep, depending on its size. If the seed is particularly large or has a long sprout, plant it slightly deeper to allow more room for growth.
For optimal spacing, plant multiple seeds about 6-8 inches apart. This will give them enough space to grow without overcrowding each other. As for orientation, make sure the pointed end of the seed (the cotyledon) is facing upwards towards the light source. Avoid planting the seed on its side or upside down, as this can lead to poor germination or stunted growth.
Caring for Young Conker Trees
When your young conker tree reaches 2-3 feet tall, it’s essential to provide regular care and attention to help it establish a strong root system. This section will guide you through the key tasks involved in caring for your young tree.
Providing Optimal Conditions for Growth
When it comes to providing optimal conditions for growth, young conker trees require attention to several essential factors. Temperature plays a crucial role, as they thrive best in temperatures between 64°F (18°C) and 75°F (24°C). Young trees are sensitive to extreme temperatures, so ensure they’re not exposed to frost or scorching heatwaves.
Humidity also affects their growth, preferring a moderate level of around 50-60%. A humid microclimate can be achieved by grouping plants together or using a cloche. However, be cautious not to overwater, which can lead to fungal diseases.
Light exposure is vital for photosynthesis and healthy development. Conker trees require full sun to partial shade, so choose a spot that receives at least 4-6 hours of direct sunlight daily. Be mindful of seasonal changes in sunlight patterns and adjust the tree’s position accordingly.
A consistent watering schedule is also essential, with young trees needing around 1-2 inches of water per week during their first year. Use a moisture meter to monitor soil conditions, avoiding overwatering or underwatering that can hinder growth.
Fertilizing and Pruning: Timing and Techniques
As your young conker tree grows, it will require regular fertilization and pruning to promote healthy development. When to fertilize is just as important as what to use. For the first year after planting, you won’t need to fertilize at all – the soil should still contain enough nutrients from the nursery potting mix.
Once your tree has reached its second growing season, start feeding it with a balanced fertilizer in early spring (around March) and again in mid-summer (June or July). Avoid over-fertilizing, as this can damage young roots. Instead, opt for a slow-release formula that will provide a steady supply of nutrients.
Pruning is essential to maintain shape, promote healthy growth, and encourage fruiting. Prune your conker tree annually in late winter or early spring (February to March), removing any dead, diseased, or damaged branches. Cut back about one-third of the tree’s new growth each year to control its size and promote a balanced structure. This will also help direct the tree’s energy towards producing healthy leaves and developing strong roots.
Transplanting and Establishing Mature Trees
When transplanting a mature conker tree, it’s essential to choose the right time of year and prepare the soil thoroughly. This will give your tree the best chance at establishing itself in its new home.
Preparing the Soil and Planting Location
When selecting a suitable planting location for your mature conker tree, it’s essential to consider factors such as sunlight, soil type, and space. Choose an area that receives full sun to partial shade, with at least 20-25 feet of clearance from nearby structures and power lines. The ideal soil should be well-drained, fertile, and slightly acidic, with a pH between 6.0 and 7.0.
To prepare the soil for planting, remove any debris, rocks, or weeds to create a smooth surface. Test the soil pH and adjust it if necessary by adding organic matter like compost or peat moss. If your soil is heavy clay or sandy, mix in some well-rotted manure or organic fertilizers to improve its structure.
Aim for a planting location with good air circulation to prevent disease and promote healthy growth. Also, ensure that the surrounding area is free from any obstacles or hazards that could damage the tree’s roots or branches. With careful planning and preparation, you’ll create an ideal environment for your mature conker tree to thrive.
Aftercare: Mulching, Watering, and Monitoring
After transplanting a conker tree, it’s essential to provide proper aftercare to ensure its successful establishment. Mulching is an excellent way to retain moisture, suppress weeds, and regulate soil temperature. Apply a 2-3 inch layer of organic mulch around the tree’s root zone, keeping it at least 6 inches away from the trunk.
Watering schedules will depend on weather conditions. During the first few weeks after transplanting, water your conker tree regularly to prevent drought stress. Aim for about 1 inch of water per week, either through rainfall or irrigation. As the tree becomes more established, you can gradually reduce watering frequency. Monitor soil moisture by inserting a finger into the soil up to the knuckle; if it feels dry, it’s time to water.
Regular monitoring is crucial to detect any signs of stress or disease. Check for wilting leaves, yellowing foliage, or visible pests. If you notice any unusual symptoms, inspect the tree thoroughly and consult with an arborist if necessary. Keep in mind that conker trees are relatively low-maintenance, but consistent aftercare will ensure a healthy and thriving tree.
Troubleshooting Common Issues
If you’re encountering problems growing your conker tree from a chestnut, don’t worry – we’ve got some practical advice to help you overcome common issues and get back on track. This section tackles the most frequent setbacks and provides solutions to get your tree thriving again.
Recognizing and Addressing Pests and Diseases
As you tend to your conker tree, it’s essential to be vigilant for pests and diseases that can harm its growth. Some common issues that affect conker trees include aphids, scale insects, and spider mites. These tiny pests feed on the sap of the tree, weakening its defenses and making it more susceptible to disease.
To identify these pests, inspect your tree regularly during the growing season for yellowing or distorted leaves, sticky honeydew droplets, and actual pests on the stems or under the leaves. For minor infestations, you can try washing the affected areas with a strong jet of water to dislodge the pests. If the issue persists, use insecticidal soap or neem oil to control the population.
Fungal diseases such as powdery mildew and leaf spot are also common threats to conker trees. These usually manifest as white or yellowish patches on the leaves, which can spread rapidly if not treated promptly. To prevent fungal diseases, ensure good air circulation around your tree and water it carefully to avoid overhydration.
In case of an infestation or disease outbreak, use fungicides or insecticides specifically labeled for conker trees according to their instructions. It’s also crucial to maintain a balanced ecosystem by planting beneficial flowers that attract pollinators and other natural predators that prey on pests.
Overcoming Climate-Related Challenges
Growing conker trees from chestnuts can be a rewarding experience, but it’s not without its challenges. Climate-related issues such as extreme weather conditions can impact the growth of your young tree. One common issue is frost damage, which can occur when sudden drops in temperature cause the leaves and twigs to freeze.
To combat this, make sure to plant your conker tree in a location that provides some protection from wind and frost pockets. If you live in an area prone to late frosts, consider using row covers or sheeting to keep the plant warm until it’s established.
Heat stress is another concern, especially during prolonged periods of hot weather. Keep your soil consistently moist but not waterlogged, as this can cause more harm than good. Also, avoid exposing young trees to direct sunlight for extended periods, instead providing shade with a mesh or trellis if necessary.
Regular monitoring of your tree’s condition will help you identify potential issues early on, allowing you to take corrective action and ensure the continued health and growth of your conker tree. By being aware of these climate-related challenges and taking proactive steps, you can overcome them and enjoy the beauty and bounty of a thriving conker tree.
Frequently Asked Questions
Can I use any chestnut variety to grow a conker tree, or are there specific requirements?
While many chestnut varieties can be used to grow a conker tree, some are better suited for cultivation than others. For optimal results, choose sweet or Spanish chestnuts, as they tend to produce larger and more consistent conkers. Other varieties may produce smaller or fewer conkers, affecting the overall health and vigor of your tree.
How often should I water young conker trees during their first year after planting?
Yes, watering is crucial for young conker trees during their first year after planting. Keep the soil consistently moist but not waterlogged, as this can lead to root rot. Water every 2-3 days during hot weather and once a week during cooler periods, adjusting frequency based on local climate conditions.
Can I grow conker trees in containers or do they require large spaces?
No, you can definitely grow conker trees in containers if space is limited. Choose large pots (at least 12-18 inches deep) with well-draining soil and a sturdy container to support the tree’s weight. Container-grown conkers still require proper care, including regular watering, fertilizing, and pruning.
What are some common pests or diseases that affect conker trees, and how can I prevent them?
Conker trees can be susceptible to pests like aphids, scale, and caterpillars, as well as diseases such as powdery mildew and chestnut blight. To prevent these issues, maintain good hygiene by removing weeds and debris around the tree’s base, inspecting for signs of infestation or disease regularly, and using organic pest control methods when necessary.
How long does it take for conker trees to produce their first set of conkers after planting?
The time it takes for a conker tree to produce its first set of conkers can vary depending on factors like climate, soil quality, and tree health. Generally, you can expect your conker tree to start producing conkers within 5-7 years after planting, with peak production occurring around 10-15 years later.