Raising your own peanuts can be a rewarding experience, especially if you’re looking for a low-maintenance crop that’s easy to grow. Not only are peanuts packed with protein and nutritious value, but they also require minimal care compared to other crops. However, successfully growing peanuts does involve some planning and preparation.
In this article, we’ll guide you through the process of raising peanuts from planning to harvest, covering essential topics such as choosing varieties, preparing the land, managing pests and diseases, and more. By following our step-by-step instructions, you can grow high-yielding peanut crops that will save you money on grocery bills and provide a sense of accomplishment in your garden. Whether you’re a seasoned farmer or a backyard gardener, we’ll walk you through everything you need to know about growing peanuts successfully.
Choosing the Right Variety
When it comes to growing peanuts, selecting the right variety is crucial for success. Let’s explore how to choose a peanut variety that thrives in your specific climate and conditions.
Understanding Peanut Growth Habits
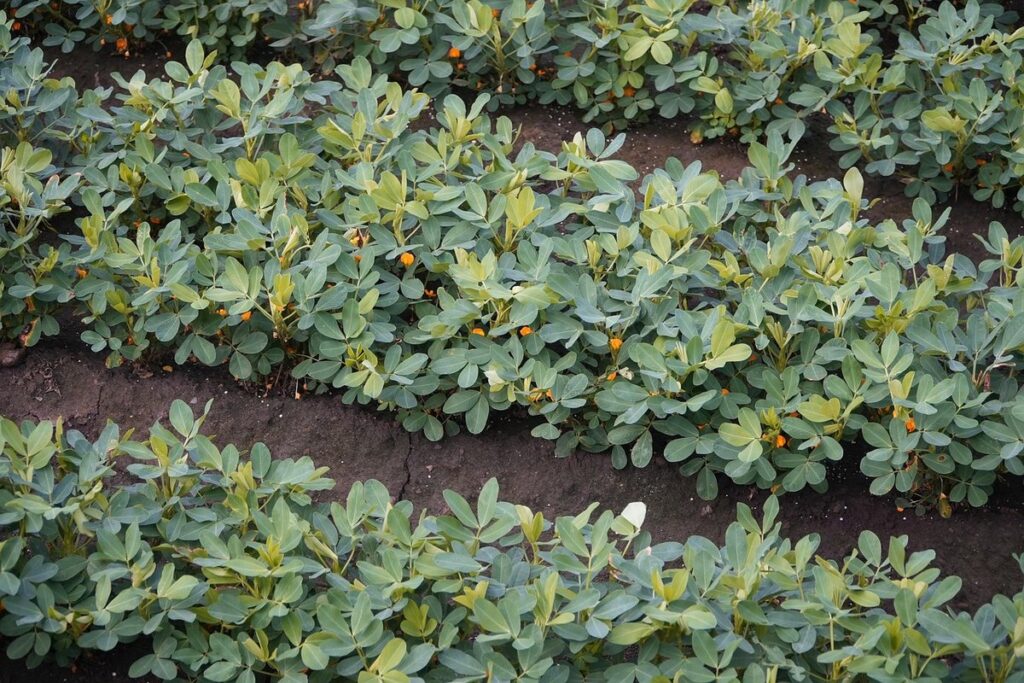
When it comes to growing peanuts, understanding their growth habits is crucial for optimal yields and disease resistance. The two main types of peanuts are runner, Virginia, and Spanish varieties. Each has its own unique characteristics that impact growth rates, maturity dates, and adaptability.
Runner peanuts are the most common type, accounting for over 90% of global production. They mature quickly (around 100-110 days), have a shorter stature (about 2 feet), and require minimal support as they grow. Virginia peanuts, on the other hand, take about 120-130 days to mature and reach heights of up to 3 feet. Their growth habit is more upright, making them more susceptible to lodging.
Spanish peanuts are smaller in size but have a faster maturation period (around 90-100 days) and require even less support than runner varieties. If you’re planning to grow peanuts in areas with high winds or extreme weather conditions, Spanish may be the better choice. Consider your climate, soil type, and available space when deciding on the best variety for your needs. This will help ensure a successful peanut harvest.
Considering Soil Requirements
When considering growing peanuts, it’s essential to take into account the ideal soil conditions for optimal growth. Peanuts prefer well-draining, loose soils with a pH between 6.0 and 7.0. A pH outside this range can lead to nutrient deficiencies or toxicity issues.
To ensure your peanut crop receives the necessary nutrients, test your soil before planting. Peanut crops require adequate nitrogen, phosphorus, and potassium levels. Aim for a balanced fertilizer application that includes these essential nutrients.
Soil-borne diseases like root rot, powdery mildew, and leaf spot can also impact peanut growth. To mitigate this risk, choose a location with good air circulation and ensure proper soil drainage. Consider using disease-resistant peanut varieties or organic amendments to enhance soil health.
When selecting a planting site, keep an eye out for areas where water tends to collect. This can lead to poor drainage and increased susceptibility to root rot. If your soil tests reveal nutrient deficiencies, apply the necessary fertilizers according to package instructions. By understanding and addressing these factors, you’ll be well on your way to growing healthy, productive peanut crops.
Preparing the Land
Before you start planting, it’s essential to prepare the land for your peanut crop. This involves clearing and tilling the soil to create a suitable environment.
Planning and Layout
When planning and designing your peanut farm or garden, it’s essential to consider several key factors. Crop rotation is a crucial aspect of maintaining soil fertility and preventing pests and diseases from building up over time. A good rule of thumb is to rotate peanuts with other legumes like beans or peas, which will fix nitrogen in the soil and benefit the following crop.
Companion planting can also play a significant role in enhancing peanut yields. Planting peanuts alongside marigolds, for example, can help deter nematodes, microscopic worms that can damage peanut roots. Other beneficial companions include sunflowers, which provide shade and improve soil structure, as well as radishes, which repel cucumber beetles.
In addition to crop rotation and companion planting, it’s vital to consider your irrigation system. Peanuts require a steady supply of moisture, especially during the germination phase. A drip irrigation system can be an effective way to deliver water directly to the roots, reducing evaporation and runoff. Be sure to plan for adequate storage for your irrigation equipment, as well as any necessary electrical connections or pumps.
When planning your layout, consider the mature size of the peanut plants and leave enough space between rows for easy access with a tractor or other equipment. A general rule of thumb is to plant peanuts 3-4 feet apart in rows that are 6-8 feet apart.
Soil Preparation Techniques
Proper soil preparation is the foundation upon which a successful peanut crop is built. It’s essential to create a conducive environment for healthy plant growth, and this begins with tilling the soil. Tilling breaks up compacted soil, allowing water, air, and nutrients to penetrate deeper, promoting root development and overall health.
Before tilling, it’s crucial to test your soil pH levels. Most peanut varieties thrive in slightly acidic soils (pH 6.0-7.0). Based on the test results, you may need to add lime or sulfur to adjust the pH. Fertilize your peanut crop according to the recommended guidelines for your specific region and variety.
Pest control measures should also be considered during soil preparation. For example, nematode-resistant varieties can help minimize root damage from these microscopic pests. Additionally, applying a pre-emergent herbicide can prevent weeds from competing with your peanuts for water and nutrients. By implementing these techniques, you’ll give your peanut plants the best possible start, setting them up for optimal growth throughout the season.
Planting Peanuts
When planting peanuts, it’s essential to follow a few key steps to ensure your crop gets off to a strong start. Let’s dive into the specifics of how and when to plant peanut seeds.
Sowing Seeds at the Right Time
When it comes to sowing seeds at the right time, peanuts have unique requirements that vary depending on your region. In general, peanuts are a warm-season crop and thrive in temperatures between 65°F to 85°F (18°C to 30°C). They can’t tolerate frost, so it’s essential to wait until the soil has warmed up sufficiently.
In temperate climates with mild winters, you can start planting peanuts as soon as the soil temperature reaches around 60°F (15°C) in late spring or early summer. For example, in regions like Texas or Georgia in the United States, ideal planting times range from late March to early May. However, if you live in an area prone to late frosts or cool springs, it’s best to wait until the soil temperature has consistently reached 70°F (21°C) before sowing.
In tropical and subtropical regions, peanuts can be planted year-round due to a relatively stable warm climate. Nonetheless, choose a time that aligns with your region’s specific growing season to ensure optimal growth. To determine the best planting time for your area, consider consulting with local nurseries or extension offices for guidance on soil temperature, moisture levels, and weather patterns.
Peanuts prefer well-draining soil with adequate moisture during germination and seedling stages. Thus, it’s crucial to plan around precipitation patterns in your region and avoid planting during periods of drought or excessive rainfall.
Correct Spacing and Depth
When sowing peanut seeds, it’s essential to get the spacing and depth just right. Overcrowding can lead to disease and pest issues, while too much space between plants may result in poor soil competition for nutrients. For optimal growth, sow seeds 2-3 inches apart in rows that are 30-36 inches apart. This allows for adequate air circulation and sunlight penetration.
To determine the correct depth for your peanut seeds, follow these general guidelines: small-seeded varieties should be sown 1-2 inches deep, while large-seeded varieties can be planted up to 3 inches deep. Planting too shallowly may expose the seeds to drying winds and wildlife foraging. On the other hand, planting too deeply can hinder germination or lead to poor seedling establishment.
Consider the specific climate and growing conditions in your region when determining the ideal depth for your peanut seeds. In general, aim for a 1-inch layer of soil covering the seeds, ensuring they remain moist during germination.
Caring for Peanut Plants
To keep your peanut plants thriving, you’ll need to provide them with regular watering and fertilization throughout their growing cycle. This is especially crucial during hot summer months when peanuts require extra moisture.
Watering and Irrigation Strategies
When it comes to watering and irrigation for peanut plants, there are several strategies you can employ depending on your specific situation. Drip irrigation is a popular choice among peanut farmers as it delivers water directly to the roots of the plant, reducing evaporation and runoff. This method also allows you to target specific areas that may require more or less water.
Flood irrigation, on the other hand, involves inundating the soil with water over a period of time. While this method can be effective for large fields, it requires careful planning to prevent erosion and ensure even distribution of water. Flood irrigation is generally more suitable for well-draining soils and may require additional labor to manage.
Regardless of the method you choose, make sure to monitor your plants’ moisture levels regularly using a soil probe or other tools. Aim to provide about 1-2 inches of water per week, either from rain or irrigation, during the growing season. By implementing an effective watering strategy and keeping your plants well-hydrated, you’ll be well on your way to a healthy and productive peanut crop.
Fertilization Schedules
Fertilizing your peanut plants is crucial for their growth and productivity. Regular fertilization helps to replace nutrients that are depleted from the soil as the plants grow, but over-fertilization can cause harm.
You’ll want to create a schedule that ensures your peanut plants receive the necessary nutrients at the right times. Generally, it’s recommended to apply fertilizer about 2-3 weeks after planting and then again when the plants reach 6-8 inches tall. During this stage, they need nitrogen to promote leaf growth. After the first harvest, you’ll want to add phosphorus-rich fertilizers to encourage tuber formation.
When choosing a fertilizer, consider a balanced formula that contains N-P-K (nitrogen-phosphorus-potassium). You can also opt for organic options like compost or manure tea. However, be aware of potential nutrient deficiencies. For example, an overabundance of nitrogen can lead to weak roots and reduced tuber production.
To avoid these issues, test your soil regularly and adjust your fertilization schedule accordingly.
Managing Pests and Diseases
When growing peanuts, dealing with pests and diseases can be a major challenge. We’ll walk you through the steps to identify and manage common issues that affect your peanut crop.
Identifying Common Peanut Pests
When it comes to growing peanuts, one of the biggest challenges you’ll face is dealing with pests. These tiny critters can quickly spread and cause significant damage to your crop if left unchecked. So, what are some of the most common peanut pests you should be on the lookout for?
Aphids and whiteflies are two of the most prevalent pests that target peanuts. Aphids are small, soft-bodied insects that feed on plant sap, causing curled or distorted leaves. Whiteflies, on the other hand, are tiny flying insects that suck sap from plants, leaving behind a sticky residue that attracts other pests.
Nematodes are another type of pest that can wreak havoc on peanut crops. These microscopic worms live in the soil and feed on plant roots, stunting growth and reducing yields. To control these pests, use row covers to prevent them from reaching your plants, or apply insecticidal soap to kill them off.
It’s also essential to monitor your crop regularly for signs of pest infestation. Check for sticky honeydew droplets, curled leaves, or holes in the leaves. Catching pest problems early on will make it easier to control them before they cause significant damage.
Recognizing and Preventing Diseases
Peanuts are susceptible to various diseases that can significantly impact yields and quality. One of the most common diseases is powdery mildew, which appears as a white powder on leaves. This fungal disease thrives in humid conditions and warm temperatures between 65°F to 75°F (18°C to 24°C). To prevent powdery mildew, ensure good air circulation around your peanut plants by pruning nearby vegetation.
Another prevalent disease is leaf spot, caused by fungi that infect the plant’s leaves. Symptoms include yellow or brown spots on leaves, which may eventually lead to defoliation and reduced yields. Leaf spot often occurs in areas with heavy rainfall or irrigation. To prevent it, maintain a dry environment around your peanut plants and ensure proper drainage.
To control these diseases, practice crop rotation, remove infected plants, and treat affected areas with fungicides. Regularly inspect your crops for signs of disease, taking action at the first sign of symptoms can help minimize damage.
Harvesting and Storage
Now that your peanut crop is ripe, let’s dive into the essential steps for harvesting and storing them to ensure a bountiful yield next season. Proper handling at this stage can make all the difference in quality and quantity.
Knowing When to Harvest
As you approach the harvesting stage, it’s essential to determine when your peanut crop is mature and ready for collection. This can be a bit tricky, but look out for these key signs: color changes, pod dryness, and seed hardness.
Start by observing the leaves on your peanut plants. As they mature, the leaves will begin to turn yellow or brown, signaling that the plant’s energy is being redirected towards ripening the pods. Next, inspect the pods themselves. Mature peanuts are dry and hard, feeling like small rocks in their skin. If you gently squeeze a pod, it should yield slightly to pressure but still feel quite firm.
If you’re unsure whether your peanuts are ripe or not, try this simple test: dig up a few plants and gently tug on one of the pods. If it comes off easily, leaving some stem attached, it’s likely mature. On the other hand, if it resists being pulled away from the plant, give it more time. Experience will help you develop a sense for when your peanuts are ready to be harvested.
Proper Handling and Storage Techniques
Proper handling and storage techniques are crucial to maintaining the quality and shelf life of harvested peanuts. When harvesting, it’s essential to avoid damaging the pods, as this can lead to mold, rot, and loss of nutrients.
After harvesting, dry the peanuts thoroughly to a moisture level between 10-12%. This helps prevent spoilage and pest infestation. You can use machines or sun-dry them under shade. Once dry, clean the peanuts by removing dirt, debris, and any broken pods.
Store peanuts in a cool, well-ventilated area, away from direct sunlight and heat sources. Use bins or containers made of durable materials to prevent moisture and pests from entering. Label each container with the date and contents. Store them upright to prevent moisture accumulation at the bottom.
Monitor your storage conditions regularly for signs of spoilage or infestation. Consider storing peanuts in airtight containers or vacuum-sealed bags for longer shelf life. By following these proper handling and storage techniques, you can enjoy high-quality peanuts for an extended period.
Note: It’s essential to follow local regulations and guidelines when harvesting and storing peanuts, especially if you plan to sell them.
Frequently Asked Questions
What if I’m new to gardening? Can I still grow peanuts successfully?
Growing peanuts requires minimal care, making it an ideal crop for beginners. With proper planning and preparation, you can achieve high yields even with limited gardening experience. Start by selecting a peanut variety that suits your climate and soil conditions.
How do I handle common pests like aphids and whiteflies on my peanut plants?
Aphids and whiteflies can be managed through integrated pest management (IPM) techniques. Regularly inspect your plants, use physical barriers to prevent infestation, and introduce beneficial insects or organic pesticides when necessary. Keep in mind that prevention is key – maintain healthy plants with proper watering, fertilization, and pruning.
Can I grow peanuts in containers or must I have a large garden bed?
Peanuts can be grown in containers as long as they are at least 6-8 inches deep to accommodate the taproot. Use well-draining potting mix and a container that’s at least 12 inches wide to allow for proper growth.
How do I store harvested peanuts to maintain their quality?
Proper storage is crucial to maintaining peanut quality. Store peanuts in an airtight container, such as a plastic bin or paper bag, in a cool, dry place like a pantry or cupboard. Keep them away from direct sunlight and heat sources to preserve freshness.
Can I replant peanut seeds from last year’s crop?
Reusing peanut seeds from previous harvests is not recommended due to potential disease transmission. Instead, purchase fresh seeds each season to ensure optimal germination rates and healthy growth. This also helps maintain genetic diversity within your peanut crop.